stop start KIA CERATO 2007 Owners Manual
[x] Cancel search | Manufacturer: KIA, Model Year: 2007, Model line: CERATO, Model: KIA CERATO 2007Pages: 329, PDF Size: 34.09 MB
Page 6 of 329
13
1 23456789
Introduction
VEHICLE BREAK-IN
PROCESS
No special break-in period is need-
ed. By following a few simple precau-
tions for the first 1,000 km (600
miles) you may add to the perform-
ance, economy and life of your vehi-
cle.
Do not race the engine.
Do not maintain a single speed forlong periods of time, either fast or
slow. Varying engine speed is
needed to properly break-in the
engine.
Avoid hard stops, except in emer- gencies, to allow the brakes to seat
properly.
Avoid full-throttle starts.
Page 16 of 329

Knowing your vehicle
6
3
1 23456789
To deactivate the immobilizer sys- tem:
Insert the ignition key into the key
cylinder and turn it to the ON posi-tion.
To activate the immobilizer sys- tem:
Turn the ignition key to the OFF posi-
tion. The immobilizer system acti-
vates automatically. Without a valid
ignition key for your vehicle, the
engine will not start.✽✽
NOTICE
When starting the engine, do not use
the key with other immobilizer keys
around.Otherwise the engine may not start
or may stop soon after it starts. Keepeach key separately not to have any
malfunction after you receive yournew vehicle.CAUTION
The transponder in your ignition key is an important part of theimmobilizer system. It isdesigned to give years of trou- blefree service, however youshould avoid exposure to mois-ture, static electricity and roughhandling. Immobilizer system malfunction could occur.
CAUTION
Do not change, alter or adjustthe immobilizer system becauseit could cause the immobilizersystem to malfunction and should only be serviced by anauthorized Kia dealer.Malfunctions caused by improp-er alterations, adjustments or modifications to the immobilizersystem are not covered by yourvehicle manufacturer warranty.
Page 141 of 329
Driving your vehicle
6
4
1 23456789
Starting and stopping the
engine for turbo charger
intercooler
1. Do not race or accelerate the
engine immediately after starting.
If the engine is cold, allow the
engine to idle for several seconds
before it is driven to ensure suffi-
cient lubrication of the turbocharger unit.
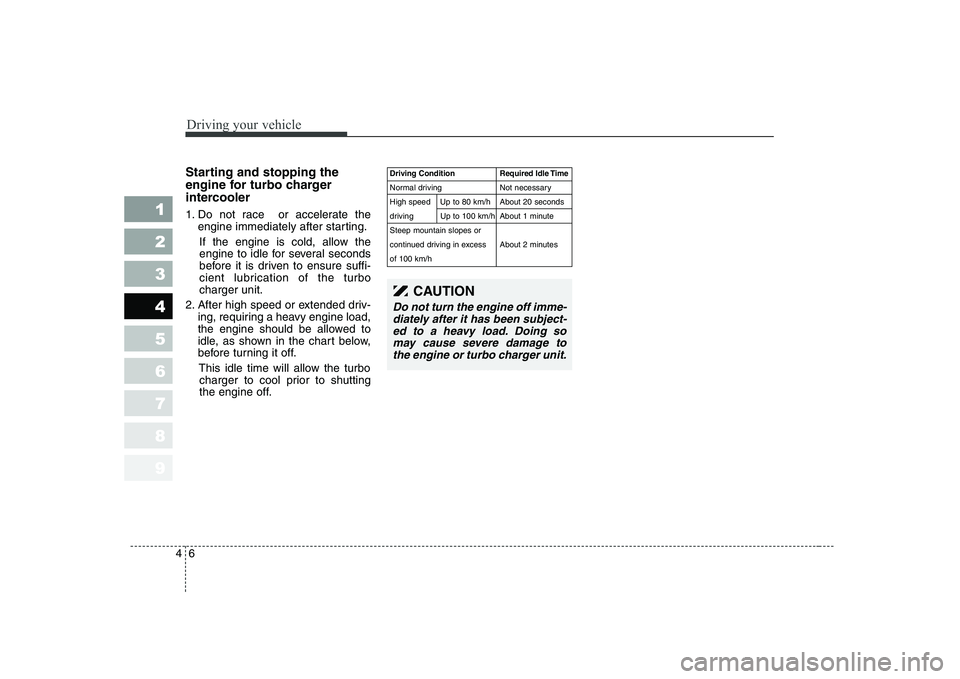
2. After high speed or extended driv- ing, requiring a heavy engine load,
the engine should be allowed to
idle, as shown in the chart below,
before turning it off.
This idle time will allow the turbocharger to cool prior to shutting
the engine off.Driving Condition Required Idle Time
Normal driving Not necessary
High speed Up to 80 km/h About 20 seconds
driving Up to 100 km/h About 1 minuteSteep mountain slopes or
continued driving in excess About 2 minutesof 100 km/h
CAUTION
Do not turn the engine off imme-
diately after it has been subject-ed to a heavy load. Doing somay cause severe damage to the engine or turbo charger unit.
Page 142 of 329
47
1 23456789
Driving your vehicle
Manual transaxle operation
The manual transaxle has five for-
ward gears.
Press the clutch pedal down fully
while shifting, then release it slowly.A special safety feature prevents
inadvertent shifting from 5 (Fifth) to
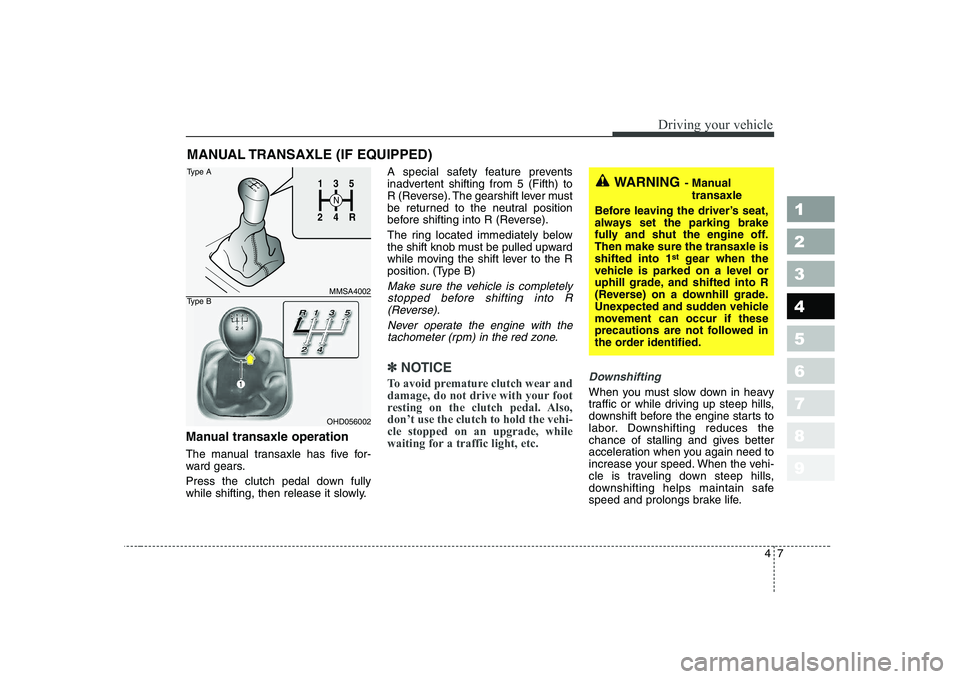
R (Reverse). The gearshift lever must
be returned to the neutral position
before shifting into R (Reverse).
The ring located immediately below
the shift knob must be pulled upward
while moving the shift lever to the R
position. (Type B)
Make sure the vehicle is completely
stopped before shifting into R (Reverse).
Never operate the engine with thetachometer (rpm) in the red zone.
✽✽ NOTICE
To avoid premature clutch wear and
damage, do not drive with your foot
resting on the clutch pedal. Also,don’t use the clutch to hold the vehi-cle stopped on an upgrade, while
waiting for a traffic light, etc.Downshifting
When you must slow down in heavy
traffic or while driving up steep hills,
downshift before the engine starts to
labor. Downshifting reduces the
chance of stalling and gives better
acceleration when you again need to
increase your speed. When the vehi-
cle is traveling down steep hills,
downshifting helps maintain safe
speed and prolongs brake life.
MANUAL TRANSAXLE (IF EQUIPPED)
WARNING
- Manual
transaxle
Before leaving the driver’s seat,
always set the parking brake
fully and shut the engine off.Then make sure the transaxle isshifted into 1 st
gear when the
vehicle is parked on a level or
uphill grade, and shifted into R
(Reverse) on a downhill grade.
Unexpected and sudden vehicle
movement can occur if these
precautions are not followed in
the order identified.1
2 4
R
3
S
N
135
R
4
2
MMSA4002
OHD056002
Type A
Type B
Page 148 of 329
413
1 23456789
Driving your vehicle
Shift lock system (if equipped)
For your safety, the automatic
transaxle has a shift lock system
which prevents shifting the transaxle
from P (Park) into R (Reverse)
unless the brake pedal is depressed.
To shift the transaxle from P (Park)
into R (Reverse):
1. Depress and hold the brake pedal.
2. Start the engine or turn the ignitionswitch to the ON position.
3. Move the shift lever.
If the brake pedal is repeatedly depressed and released with the
shift lever in the P (Park) position, a
chattering noise near the shift lever
may be heard. This is a normal con-dition. Ignition key interlock system (if equipped)
The ignition key cannot be removed
unless the shift lever is in the P
(Park) position. If the ignition switch
is in any other position, the key can-
not be removed.
Moving up a steep grade from
a standing start
To move up a steep grade from a
standing start, depress the brake
pedal, shift the shift lever to D
(Drive). Select the appropriate gear
depending on load weight and steep-
ness of the grade, and release the
parking brake. Depress the accelera-
tor gradually while releasing the
service brakes.
When accelerating from a stop on
a steep hill, the vehicle may have a
tendency to roll backwards.
Shifting the shift lever into 2
(Second Gear) will help prevent
the vehicle from rolling back-
wards.WARNING
Always fully depress the brake
pedal before and while shifting
out of the P (Park) position into
another position to avoid inad-
vertent motion of the vehicle
which could injure persons in or
around the car.
Page 175 of 329

Driving your vehicle
40
4
1 23456789
Parking brake & brake fluid warning
Parking brake warning
This light is illuminated when the
parking brake is applied with the igni-
tion switch in the START or ON posi-
tion. The warning light should go off
when the parking brake is released.
Low brake fluid level warning
If the warning light remains on, it may
indicate that the brake fluid level in
the reservoir is low.
If the warning light remains on:
1. Drive carefully to the nearest safe
location and stop your vehicle.
2. With the engine stopped, check the brake fluid level immediately
and add fluid as required. Then
check all brake components for
fluid leaks.
3. Do not drive the vehicle if leaks are found, the warning light
remains on or the brakes do not
operate properly. Have it towed to
any Authorized Kia Dealer for a
brake system inspection and nec-
essary repairs.
To check bulb operation, check
whether the parking brake and brake
fluid warning light illuminates when
the ignition switch is in the ON posi-tion.
Low brake vacuum pressure warn- ing (for diesel, if equipped)
If the brake warning light remains on
after adding brake fluid and the brake
pedal becomes heavier or harder, it
may indicate that the brake vacuum
pump has any problem. Therefore
you should avoid high speed driving
or sudden stop, and you should
depress the brake pedal deeper and
harder than usual in braking. Make
sure to have the brake system
checked and repaired by an author-
ized Kia dealer.
WARNING
Driving the vehicle with a warn-
ing light on is dangerous. If thebrake warning light remains on,
have the brakes checked and
repaired immediately by an
authorized Kia Dealer.
Page 221 of 329
Driving tips
4
5
Do not operate the engine in con-
fined or closed areas (such as
garages) any more than what is
necessary to move the vehicle in orout of the area.
When the vehicle is stopped in an open area for more than a short
time with the engine running,
adjust the ventilation system (as
needed) to draw outside air into the
vehicle.
Never sit in a parked or stopped vehicle for any extended time with
the engine running.
Inspect the emission control sys- tem whenever engine stalls.
If the engine stalls or fails to start, do not re-engaging the starter over
3 times. If the engine stalls or re-
engaged excessively, it may causedamage to the emission controlsystem. Operating precautions for cat-
alytic converters
Your vehicle is equipped with a cat-
alytic converter emission control
device.
Therefore, the following precautions
must be observed:
Use only UNLEADED FUEL for
gasoline engine (unleaded).
Do not operate the vehicle when there are signs of engine malfunc-
tion, such as misfire or a noticeable
loss of performance.
Do not misuse or abuse the engine. Examples of misuse arecoasting with the ignition off and
descending steep grades in gear
with the ignition off. Do not operate the engine at high
idle speed for extended periods (5
minutes or more).
Do not modify or tamper with any part of the engine or emission con-
trol system. All inspections and
adjustments must be made by an
authorized Kia dealer.
Failure to observe these precautionscould result in damage to the catalyt-
ic converter and to your vehicle.
Additionally, such actions could void
your warranties.
1 23456789WARNING - Fire
A hot exhaust system can ignite
flammable items under your
vehicle. Do not park the vehicle
over or near flammable objects,
such as dry grass, paper,
leaves, etc.
Page 237 of 329
Driving tips
20
5
1 23456789
Parking on hills
Generally, you should not park your
vehicle, with a trailer attached, on a
hill. People can be seriously or fatal-
ly injured, and both your vehicle and
the trailer can be damaged if they
begin a downhill trajectory. However, if you ever have to park
your trailer on a hill, here’s how to doit:
1. Apply your brakes, but don’t shift
into gear.
2. Have someone place chocks under the trailer wheels.
3. When the wheel chocks are in place, release the brakes until the
chocks absorb the load.
4. Reapply the brakes. Apply your parking brake, and then shift to R
(Reverse) for a manual transaxle
or P (Park) for an automatic
transaxle.
5. Release the brakes.
When you are ready to leave after parking on a hill
1. With the manual transaxle in Neutral or automatic transaxle in P
(Park), apply your brakes and hold
the brake pedal down while you:
Start your engine;
Shift into gear; and
Release the parking brake.
2. Slowly remove your foot from the brake pedal.
3. Drive slowly until the trailer is clear of the chocks.
4. Stop and have someone pick up and store the chocks.
WARNING - Parking brake
It can be dangerous to get out of
your vehicle if the parking brake
is not firmly set.
If you have left the engine run-
ning, the vehicle can move sud-
denly. You or others could be
seriously or fatally injured.
WARNING - Parking on a
hill
Parking your vehicle on a hill
with a trailer attached could
cause serious injury or death,
should the trailer break lose.
Page 251 of 329

611
In case of an emergency
1 23456789
Description Fuse rating Protected component
ECU1 10A Engine control unit
STOP 15A Stop light
F/WIPER 20A Front wiper
R/FOG 10A Rear fog light
F/FOG 15A Front fog light
LO HDLP 15A Headlight (low)
HI HDLP 15A Headlight (high)
A/CON 10A Air conditioner
F/PUMP 15A Fuel pump
T/OPEN 10A Trunk lid opener
SAFTY P/WINDOW 20A Safety power window module
HORN 10A Horn
INJ 15A Injector
SNSR 10A O2 sensor
ECU2 30A Engine control unit
SPARE 10A spare fuse
SPARE 15A spare fuse
SPARE 20A spare fuse
SPARE 30A spare fuse
ABS2 30A Anti-lock brake system
ABS1 30A Anti-lock brake system
IP B+ 50A In panel B+
BLOWER 30A Blower
IGN2 30A Ignition switch
IGN1 30A Ignition switchDescription Fuse rating Protected component
RAD
30A (Gasoline)Radiator fan
40A (Diesel)
COND 20A Condenser fan
ALT
120A (Gasoline)Alternator
140A (Diesel)
ATM - Automatic transaxle control relay
WIPER - Wiper relay
F/FOG - Front fog light relay
LO HDLP - Headlight relay (low)
HI HDLP - Headlight relay (high)
A/CON - Air conditioner relay
F/PUMP - Fuel pump relay
DRL - Daytime running light relay
COND2 - Condenser fan relay
HORN - Horn relay
MAIN - Main relay
START - Start motor relay
RAD - Radiator fan relay
COND - Condenser fan relay
Engine compartment