stop start KIA Forte 2011 1.G Owner's Guide
[x] Cancel search | Manufacturer: KIA, Model Year: 2011, Model line: Forte, Model: KIA Forte 2011 1.GPages: 342, PDF Size: 7.23 MB
Page 219 of 342
513
Driving your vehicle
During cold weather, shifting may bedifficult until the transaxle lubricant is
warmed up. This is normal and not
harmful to the transaxle.
If you've come to a complete stop and it's hard to shift into 1st or R (Reverse),
leave the shift lever at neutral position
and release the clutch. Depress the
clutch pedal back down, and then shift
into 1st or R (Reverse) gear position.E050101APB
Using the clutch
The clutch should be depressed all the
way to the floor before shifting, then
released slowly. The clutch pedal should
always be fully released while driving. Do
not rest your foot on the clutch pedal
while driving. This can cause unneces-
sary wear. Do not partially engage the
clutch to hold the vehicle on an incline.
This causes unnecessary wear. Use the
foot brake or parking brake to hold the
vehicle on an incline. Do not operate the
clutch pedal rapidly and repeatedly.
E050102APB
Downshifting
When you must slow down in heavy traf-
fic or while driving up steep hills, down-
shift before the engine starts to labor.
Downshifting reduces the chance of
stalling and gives better acceleration
when you need to increase your speed
again. When the vehicle is traveling down
steep hills, downshifting helps maintain
safe speed and prolongs brake life.
CAUTION
To avoid premature clutch wear and damage, do not drive withyour foot resting on the clutchpedal. Also, don’t use the clutchto hold the vehicle on an uphillgrade, while waiting for a trafficlight, etc.
Do not use the shift lever as a handrest during driving, as thiscan result in premature wear ofthe transaxle shift forks.
WARNING
Before leaving the driver’s seat, always set the parking brake fully
and shut the engine off. Then
make sure the transaxle is shifted
into 1st gear when the vehicle is
parked on a level or uphill grade,
and shifted into R (Reverse) on a
downhill grade. Unexpected and
sudden vehicle movement can
occur if these precautions are not
followed in the order identified.
Page 231 of 342
525
Driving your vehicle
E070202APB
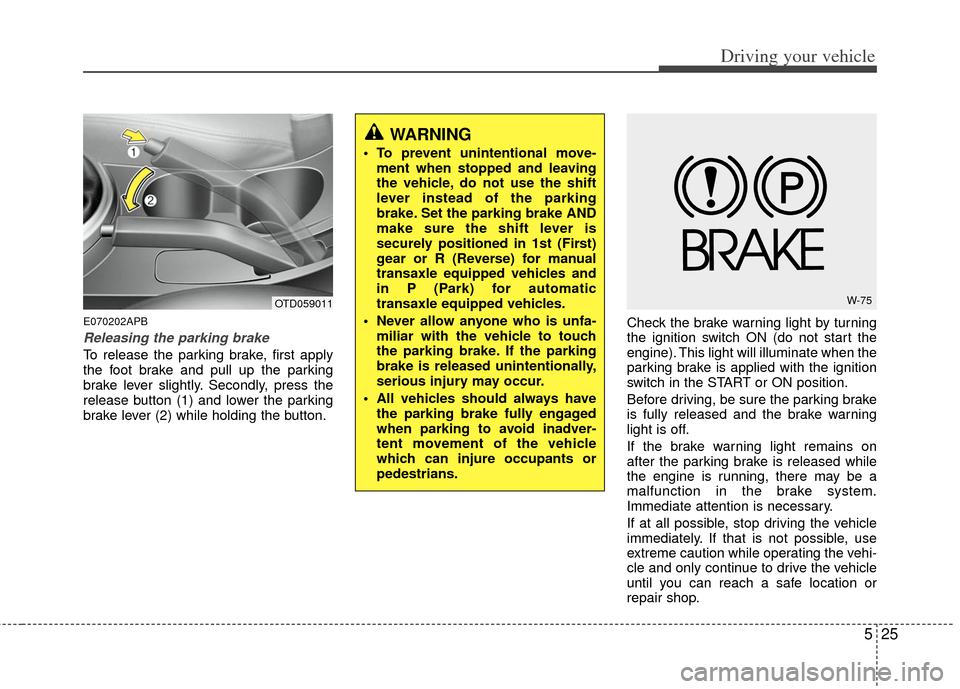
Releasing the parking brake
To release the parking brake, first apply
the foot brake and pull up the parking
brake lever slightly. Secondly, press the
release button (1) and lower the parking
brake lever (2) while holding the button.Check the brake warning light by turning
the ignition switch ON (do not start the
engine). This light will illuminate when the
parking brake is applied with the ignition
switch in the START or ON position.
Before driving, be sure the parking brake
is fully released and the brake warning
light is off.
If the brake warning light remains on
after the parking brake is released while
the engine is running, there may be a
malfunction in the brake system.
Immediate attention is necessary.
If at all possible, stop driving the vehicle
immediately. If that is not possible, use
extreme caution while operating the vehi-
cle and only continue to drive the vehicle
until you can reach a safe location or
repair shop.
WARNING
To prevent unintentional move-
ment when stopped and leaving
the vehicle, do not use the shift
lever instead of the parking
brake. Set the parking brake AND
make sure the shift lever is
securely positioned in 1st (First)
gear or R (Reverse) for manual
transaxle equipped vehicles and
in P (Park) for automatic
transaxle equipped vehicles.
Never allow anyone who is unfa- miliar with the vehicle to touch
the parking brake. If the parking
brake is released unintentionally,
serious injury may occur.
All vehicles should always have the parking brake fully engaged
when parking to avoid inadver-
tent movement of the vehicle
which can injure occupants or
pedestrians.
OTD059011W-75
Page 233 of 342
527
Driving your vehicle
✽
✽NOTICE
A click sound may be heard in the
engine compartment when the vehicle
begins to move after the engine is start-
ed. These conditions are normal and
indicate that the anti-lock brake system
is functioning properly.
Even with the anti-lock brake system,
your vehicle still requires sufficient
stopping distance. Always maintain a
safe distance from the vehicle in front
of you.
Always slow down when cornering. The anti-lock brake system cannot pre-
vent accidents resulting from exces-
sive speeds.
On loose or uneven road surfaces, operation of the anti-lock brake system
may result in a longer stopping dis-
tance than for vehicles equipped with a
conventional brake system.
✽ ✽ NOTICE
When you jump start your vehicle
because of a drained battery, the engine
may not run as smoothly and the ABS
warning light may turn on at the same
time. This happens because of the low
battery voltage. It does not mean your
ABS has malfunctioned.
• Do not pump your brakes!
• Have the battery recharged before
driving the vehicle.
W-78
CAUTION
If the ABS warning light is on and
stays on, you may have a problemwith the ABS. In this case, howev-er, your regular brakes will worknormally.
The ABS warning light will stay on for approximately 3 seconds afterthe ignition switch is ON. Duringthat time, the ABS will go throughself-diagnosis and the light will gooff if everything is normal. If thelight stays on, you may have aproblem with your ABS. Contactan authorized KIA dealer as soonas possible.
CAUTION
When you drive on a road with poor traction, such as an icy road,and have operated your brakes continuously, the ABS will beactive continuously and the ABSwarning light may illuminate. Pull your vehicle over to a safe placeand stop the engine.
Restart the engine. If the ABS warning light is off, then your ABSsystem is normal. Otherwise, you may have a problem with the ABS.Contact an authoriz ed KIA dealer
as soon as possible.
Page 243 of 342
537
Driving your vehicle
E100000AHM-EC
Your vehicle's fuel economy depends
mainly on your style of driving, where you
drive and when you drive.
Each of these factors affects how many
kilometers (miles) you can get from a
liter (gallon) of fuel. To operate your vehi-
cle as economically as possible, use the
following driving suggestions to help
save money in both fuel and repairs:
Drive smoothly. Accelerate at a moder-ate rate. Don't make "jack-rabbit" starts
or full-throttle shifts and maintain a
steady cruising speed. Don't race
between stoplights. Try to adjust your
speed to the traffic so you don't have to
change speeds unnecessarily. Avoid
heavy traffic whenever possible.
Always maintain a safe distance from
other vehicles so you can avoid unnec-
essary braking. This also reduces
brake wear.
Drive at a moderate speed. The faster you drive, the more fuel your vehicle
uses. Driving at a moderate speed,
especially on the highway, is one of the
most effective ways to reduce fuel con-
sumption. Don't "ride" the brake pedal. This can
increase fuel consumption and also
increase wear on these components.
In addition, driving with your foot rest-
ing on the brake pedal may cause the
brakes to overheat, which reduces
their effectiveness and may lead to
more serious consequences.
Take care of your tires. Keep them inflated to the recommended pressure.
Incorrect inflation, either too much or
too little, results in unnecessary tire
wear. Check the tire pressures at least
once a month.
Be sure that the wheels are aligned correctly. Improper alignment can
result from hitting curbs or driving too
fast over irregular surfaces. Poor align-
ment causes faster tire wear and may
also result in other problems as well as
greater fuel consumption. Keep your vehicle in good condition.
For better fuel economy and reduced
maintenance costs, maintain your vehi-
cle in accordance with the mainte-
nance schedule in section 7. If you
drive your vehicle in severe conditions,
more frequent maintenance is required
(see section 7 for details).
Keep your vehicle clean. For maximum service, your vehicle should be kept
clean and free of corrosive materials. It
is especially important that mud, dirt,
ice, etc. not be allowed to accumulate
on the underside of the vehicle. This
extra weight can result in increased
fuel consumption and also contribute
to corrosion.
Travel lightly. Don't carry unnecessary weight in your vehicle. Weight reduces
fuel economy.
Don't let the engine idle longer than necessary. If you are waiting (and not
in traffic), turn off your engine and
restart only when you're ready to go.
ECONOMICAL OPERATION
Page 319 of 342
Maintenance
44
7
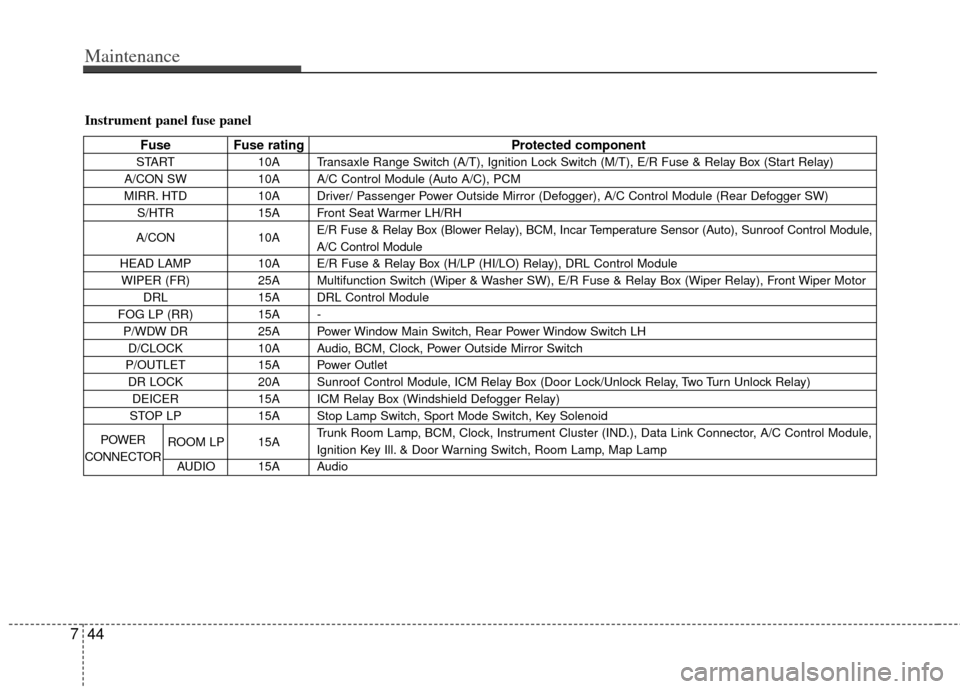
Instrument panel fuse panel
Fuse Fuse rating Protected component
START10A Transaxle Range Switch (A/T), Ignition Lock Switch (M/T), E/R Fuse & Relay Box (Start Relay)
A/CON SW 10A A/C Control Module (Auto A/C), PCM
MIRR. HTD 10A Driver/ Passenger Power Outside Mirror (Defogger), A/C Control Module (Rear Defogger SW)
S/HTR 15A Front Seat Warmer LH/RH
A/CON 10AE/R Fuse & Relay Box (Blower Relay), BCM, Incar Temperature Sensor (Auto), Sunroof Control Module,
A/C Control Module
HEAD LAMP 10A E/R Fuse & Relay Box (H/LP (HI/LO) Relay), DRL Control Module
WIPER (FR) 25A Multifunction Switch (Wiper & Washer SW), E/R Fuse & Relay Box (Wiper Relay), Front Wiper Motor
DRL 15A DRL Control Module
FOG LP (RR) 15A -
P/WDW DR 25A Power Window Main Switch, Rear Power Window Switch LH
D/CLOCK 10A Audio, BCM, Clock, Power Outside Mirror Switch
P/OUTLET 15A Power Outlet
DR LOCK 20A Sunroof Control Module, ICM Relay Box (Door Lock/Unlock Relay, Two Turn Unlock Relay)
DEICER 15A ICM Relay Box (Windshield Defogger Relay)
STOP LP 15A Stop Lamp Switch, Sport Mode Switch, Key Solenoid
ROOM LP 15A Trunk Room Lamp, BCM, Clock, Instrument Cluster (IND.), Data Link Connector, A/C Control Module,
Ignition Key Ill. & Door Warning Switch, Room Lamp, Map Lamp
AUDIO 15A Audio
POWER
CONNECTOR
Page 321 of 342
Maintenance
46
7
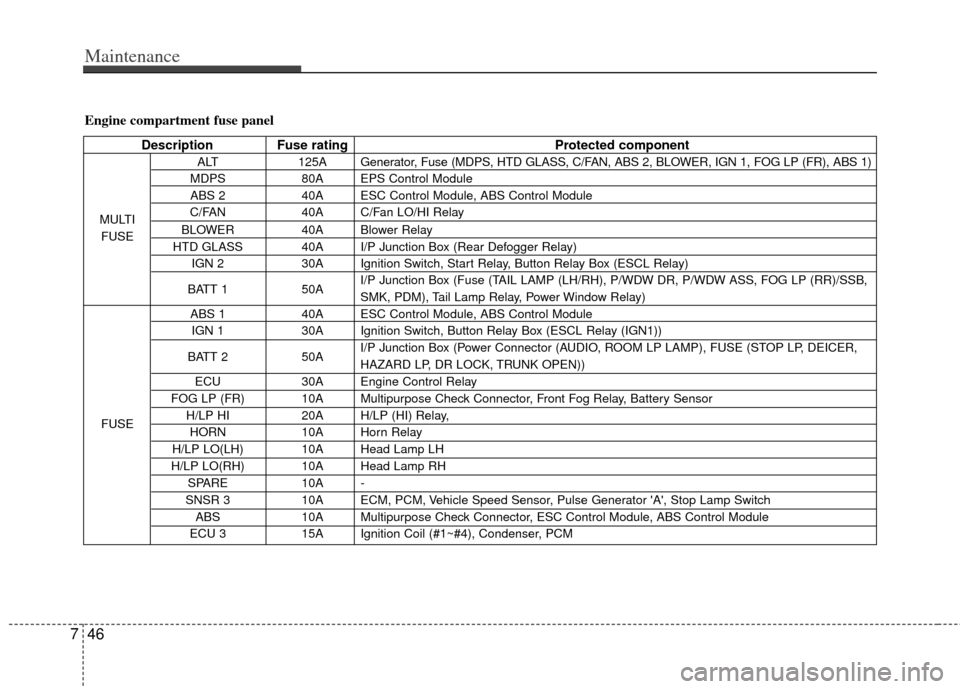
Engine compartment fuse panel
Description Fuse rating Protected component
ALT125AGenerator, Fuse (MDPS, HTD GLASS, C/FAN, ABS 2, BLOWER, IGN 1, FOG LP (FR), ABS 1)
MDPS 80A EPS Control Module
ABS 2 40A ESC Control Module, ABS Control Module
C/FAN 40A C/Fan LO/HI Relay
BLOWER 40A Blower Relay
HTD GLASS 40A I/P Junction Box (Rear Defogger Relay) IGN 2 30A Ignition Switch, Start Relay, Button Relay Box (ESCL Relay)
BATT 1 50AI/P Junction Box (Fuse (TAIL LAMP (LH/RH), P/WDW DR, P/WDW ASS, FOG LP (RR)/SSB,
SMK, PDM), Tail Lamp Relay, Power Window Relay)
ABS 1 40A ESC Control Module, ABS Control Module
IGN 1 30A Ignition Switch, Button Relay Box (ESCL Relay (IGN1))
BATT 2 50AI/P Junction Box (Power Connector (AUDIO, ROOM LP LAMP), FUSE (STOP LP, DEICER,
HAZARD LP, DR LOCK, TRUNK OPEN))
ECU 30A Engine Control Relay
FOG LP (FR) 10A Multipurpose Check Connector, Front Fog Relay, Battery Sensor H/LP HI 20A H/LP (HI) Relay,
HORN 10A Horn Relay
H/LP LO(LH) 10A Head Lamp LH
H/LP LO(RH) 10A Head Lamp RH SPARE 10A -
SNSR 3 10A ECM, PCM, Vehicle Speed Sensor, Pulse Generator 'A', Stop Lamp Switch
ABS 10A Multipurpose Check Connector, ESC Control Module, ABS Control Module
ECU 3 15A Ignition Coil (#1~#4), Condenser, PCM
MULTI
FUSE
FUSE
Page 331 of 342
Maintenance
56
7
Do not operate the engine in confined
or closed areas (such as garages) any
more than what is necessary to move
the vehicle in or out of the area.
When the vehicle is stopped in an open area for more than a short time
with the engine running, adjust the
ventilation system (as needed) to draw
outside air into the vehicle.
Never sit in a parked or stopped vehi- cle for any extended time with the
engine running.
When the engine stalls or fails to start, excessive attempts to restart the
engine may cause damage to the
emission control system.G270303AAM
Operating precautions for catalyticconverters (if equipped)
Your vehicle is equipped with a catalytic
converter emission control device.
Therefore, the following precautions
must be observed:
Use only UNLEADED FUEL for gaso- line engines.
Do not operate the vehicle when there are signs of engine malfunction, such
as misfire or a noticeable loss of per-
formance. Do not misuse or abuse the engine.
Examples of misuse are coasting with
the ignition off and descending steep
grades in gear with the ignition off.
Do not operate the engine at high idle speed for extended periods (5 minutes
or more).
Do not modify or tamper with any part of the engine or emission control sys-
tem. All inspections and adjustments
must be made by an authorized KIA
dealer.
Avoid driving with a extremely low fuel level. Running out of fuel could cause
the engine to misfire, damaging the
catalytic converter.
Failure to observe these precautions
could result in damage to the catalytic
converter and to your vehicle.
Additionally, such actions could void your
warranties.
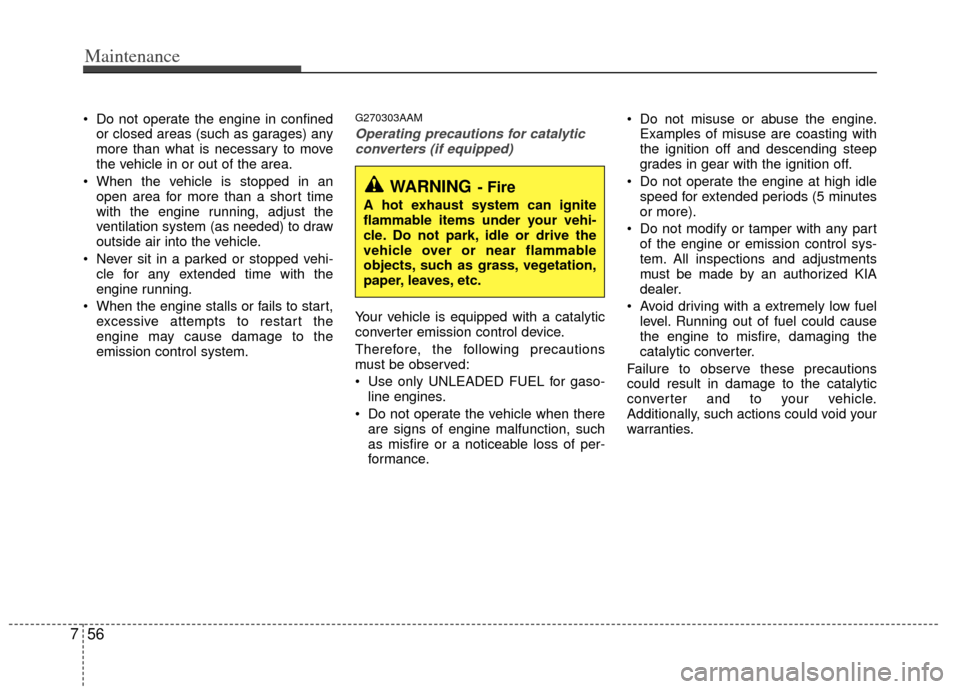
WARNING- Fire
A hot exhaust system can ignite
flammable items under your vehi-
cle. Do not park, idle or drive the
vehicle over or near flammable
objects, such as grass, vegetation,
paper, leaves, etc.
Page 340 of 342
Index
2I
Air cleaner ··················\
··················\
··················\
···············7-20
Airbag-supplemental restraint system ··················\
·········3-35
Appearance care··················\
··················\
··················\
·······7-48
Audio system ··················\
··················\
··················\
···········4-94
Automatic climate control system ··················\
···············4-78
Automatic transaxle ··················\
··················\
··················\
·5-15
Automatic transaxle fluid ··················\
··················\
··········7-19
Battery··················\
··················\
··················\
··················\
····7-23
Before driving ··················\
··················\
··················\
············5-3
Brake system··················\
··················\
··················\
············5-23
Brake/clutch fluid ··················\
··················\
··················\
····7-17
Bulb wattage ··················\
··················\
··················\
··············8-2
Child restraint system ··················\
··················\
················3-27
Climate control air filter ··················\
··················\
············7-21
Cruise control system ··················\
··················\
················5-33
Defroster ··················\
··················\
··················\
··················\
4-67
Dimensions ··················\
··················\
··················\
················8-2
Door locks··················\
··················\
··················\
················4-12Economical operation ··················\
··················\
················5-37
Emergency starting ··················\
··················\
··················\
····6-4
Emission control system ··················\
··················\
············7-54
Engine compartment ··················\
··················\
·············2-4/7-2
Engine coolant ··················\
··················\
··················\
·········7-14
Engine number ··················\
··················\
··················\
···········8-7
Engine oil ··················\
··················\
··················\
·················7-13\
ENGINE START/STOP button ··················\
··················\
···5-6
Explanation of scheduled maintenance items ···············7-10
Fuel filler lid ··················\
··················\
··················\
············4-25
Fuel requirements ··················\
··················\
··················\
······1-3
Fuses ··················\
··················\
··················\
··················\
······7-39
Hazard warning flasher ··················\
··················\
··············4-58
Hood··················\
··················\
··················\
··················\
·······4-23
How to use this manual ··················\
··················\
···············1-2
If the engine overheats··················\
··················\
·················6-6
If the engine will not start ··················\
··················\
···········6-3
If you have a flat tire ··················\
··················\
··················\
·6-7
AE
F
H
I
B
C
D