KIA Forte 2016 2.G User Guide
Manufacturer: KIA, Model Year: 2016, Model line: Forte, Model: KIA Forte 2016 2.GPages: 501, PDF Size: 14.8 MB
Page 11 of 501
Your vehicle at a glance
22
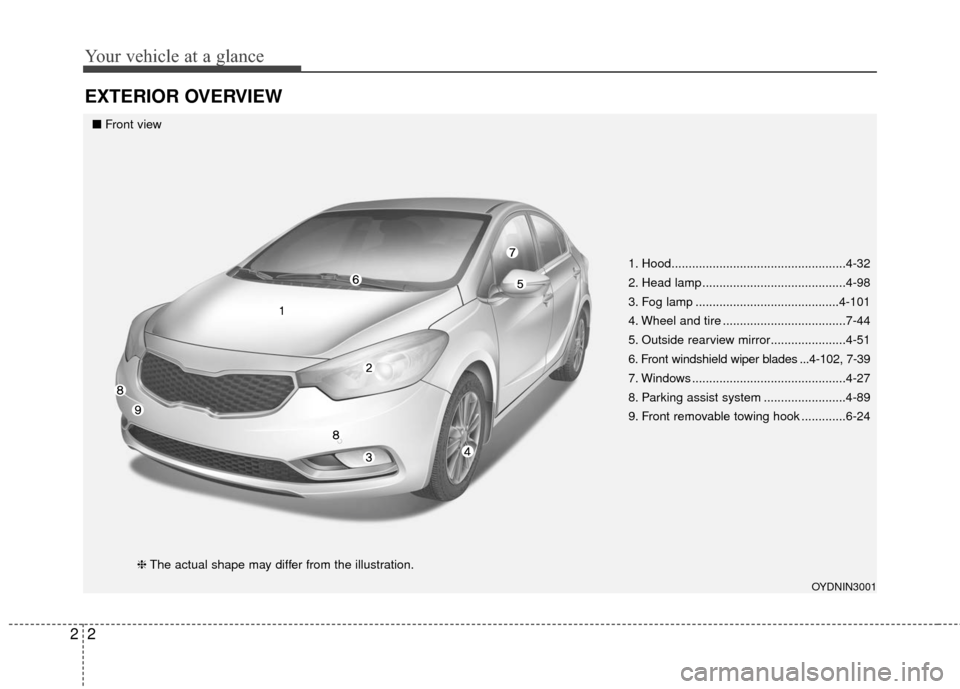
EXTERIOR OVERVIEW
1. Hood...................................................4-32
2. Head lamp ..........................................4-98
3. Fog lamp ..........................................4-101
4. Wheel and tire ....................................7-44
5. Outside rearview mirror......................4-51
6. Front windshield wiper blades ...4-102, 7-39
7. Windows .............................................4-27
8. Parking assist system ........................4-89
9. Front removable towing hook .............6-24
OYDNIN3001
■Front view
❈The actual shape may differ from the illustration.
Page 12 of 501
23
Your vehicle at a glance
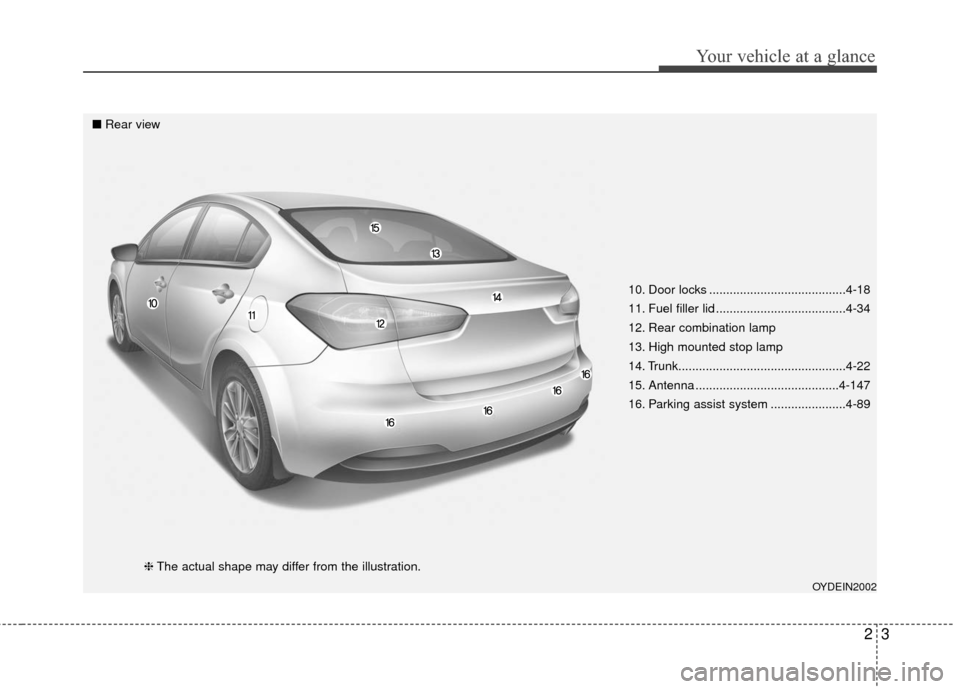
10. Door locks ........................................4-18
11. Fuel filler lid ......................................4-34
12. Rear combination lamp
13. High mounted stop lamp
14. Trunk.................................................4-22
15. Antenna ..........................................4-147
16. Parking assist system ......................4-89
OYDEIN2002
■Rear view
❈The actual shape may differ from the illustration.
Page 13 of 501
Your vehicle at a glance
42
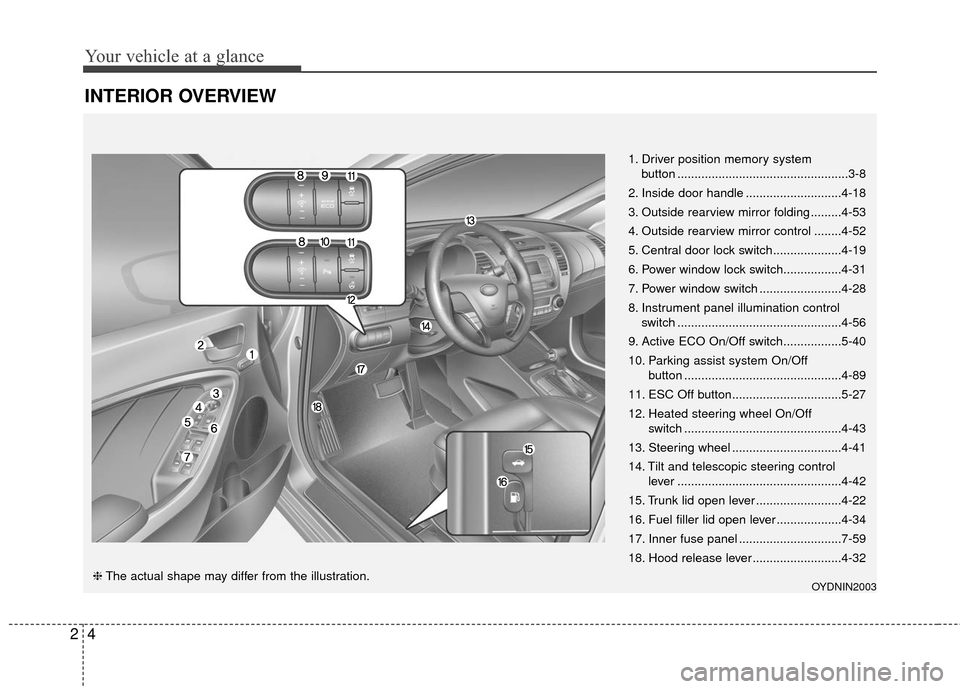
INTERIOR OVERVIEW
1. Driver position memory systembutton ..................................................3-8
2. Inside door handle ............................4-18
3. Outside rearview mirror folding .........4-53
4. Outside rearview mirror control ........4-52
5. Central door lock switch....................4-19
6. Power window lock switch.................4-31
7. Power window switch ........................4-28
8. Instrument panel illumination control switch ................................................4-56
9. Active ECO On/Off switch.................5-40
10. Parking assist system On/Off button ..............................................4-89
11. ESC Off button................................5-27
12. Heated steering wheel On/Off switch ..............................................4-43
13. Steering wheel ................................4-41
14. Tilt and telescopic steering control lever ................................................4-42
15. Trunk lid open lever .........................4-22
16. Fuel filler lid open lever ...................4-34
17. Inner fuse panel ..............................7-59
18. Hood release lever ..........................4-32
OYDNIN2003❈ The actual shape may differ from the illustration.
Page 14 of 501
25
Your vehicle at a glance
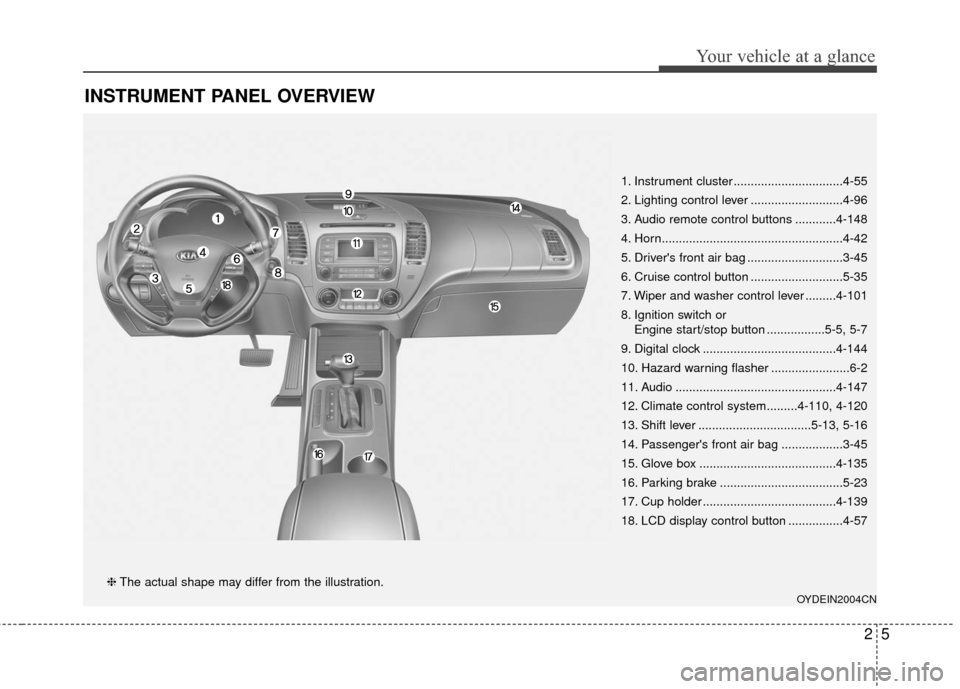
INSTRUMENT PANEL OVERVIEW
1. Instrument cluster ................................4-55
2. Lighting control lever ...........................4-96
3. Audio remote control buttons ............4-148
4. Horn.....................................................4-42
5. Driver's front air bag ............................3-45
6. Cruise control button ...........................5-35
7. Wiper and washer control lever .........4-101
8. Ignition switch orEngine start/stop button .................5-5, 5-7
9. Digital clock .......................................4-144
10. Hazard warning flasher .......................6-2
11. Audio ...............................................4-147
12. Climate control system.........4-110, 4-120
13. Shift lever .................................5-13, 5-16
14. Passenger's front air bag ..................3-45
15. Glove box ........................................4-135
16. Parking brake ....................................5-23
17. Cup holder .......................................4-139
18. LCD display control button ................4-57
OYDEIN2004CN
❈ The actual shape may differ from the illustration.
Page 15 of 501
Your vehicle at a glance
62
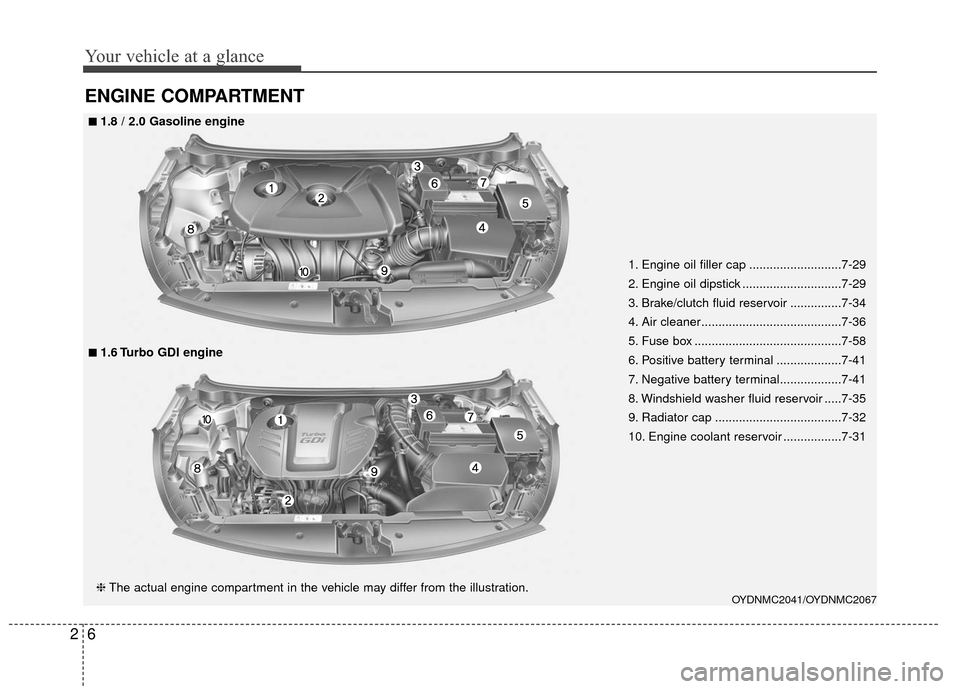
ENGINE COMPARTMENT
OYDNMC2041/OYDNMC2067
■
■1.8 / 2.0 Gasoline engine
❈The actual engine compartment in the vehicle may differ from the illustration.
■
■1.6 Turbo GDI engine
1. Engine oil filler cap ...........................7-29
2. Engine oil dipstick .............................7-29
3. Brake/clutch fluid reservoir ...............7-34
4. Air cleaner.........................................7-36
5. Fuse box ...........................................7-58
6. Positive battery terminal ...................7-41
7. Negative battery terminal..................7-41
8. Windshield washer fluid reservoir .....7-35
9. Radiator cap .....................................7-32
10. Engine coolant reservoir .................7-31
Page 16 of 501
Safety features of your vehicle
Seat. . . . . . . . . . . . . . . . . . . . . . . . . . . . . . . . . . . . \
. . . 3-2
• Front seat adjustment - Manual . . . . . . . . . . . . . . . . . 3-4
. . . . . . . . . . . . . . . . . . . 3-6
. . . . . . . . . . . . . . . . . . 3-8
. . . . . . . . . . . . . . . . . . . . . . . . . . 3-9
. . . . . . . . . . . . . . . . . . . . . . . . . . . . . . 3-12
. . . . . . . . . . . . . . . . . . . . . . . . . 3-13
. . . . . . . . . . . . . . . . . . . . . . . . . . 3-13
. . . . . . . . . . . . . . . . . . . . . . . . . . 3-14
Seat belt . . . . . . . . . . . . . . . . . . . . . . . . . . . . . . . . . . 3-17\
. . . . . . . . . . . . . . . . . . . . . . . . . . . . . 3-18
. . . . . . . . . . . . . . . . . . . . . . 3-18
. . . . . . . . . . . . . . . . . . . . . . . . . . 3-24
. . . . . . . . . . . . . . . . . . . . . . . . . . . . . 3-26
Child restraint system . . . . . . . . . . . . . . . . . . . . . . 3-27
. . . . . . . . . . . . . . . . . . 3-28
. . . . . . . . . . . . . . . . . . . . . . . . . 3-31
. . . . . . . . . . . . . . . . . . . . . . . . . 3-32
Air bag-supplemental restraint system . . . . . . . . 3-34
. . . . . . . . . . . . . . . . . . . . . . 3-35
passenger’s seat . . . . . . . . . . . . . . . . . . . . . . . . . . . . . 3-36
. . . . . . . . . . . . . . . . . . . . . . . . . 3-37
. . . . . . . . . . . . . . . . . 3-38 . . . . . . . . . . . . . . . . . . . . . 3-40
. . . . . . . . . . . 3-45
. . . . . . . . . . . . . . . . . . . . . . . . . . . . . . . . . 3-48
. . . . . . . . . . . . . . . . . . . . . . . . . . . . . . 3-49
. . . . . . 3-50
. . . . . . . . . . . . . . . . . . . . . . . . . . . . . . . . . . . 3-\
55
. . . . . . . . . . . . . . . . . . . . . . . . . 3-56
3
Page 17 of 501
Safety features of your vehicle
23
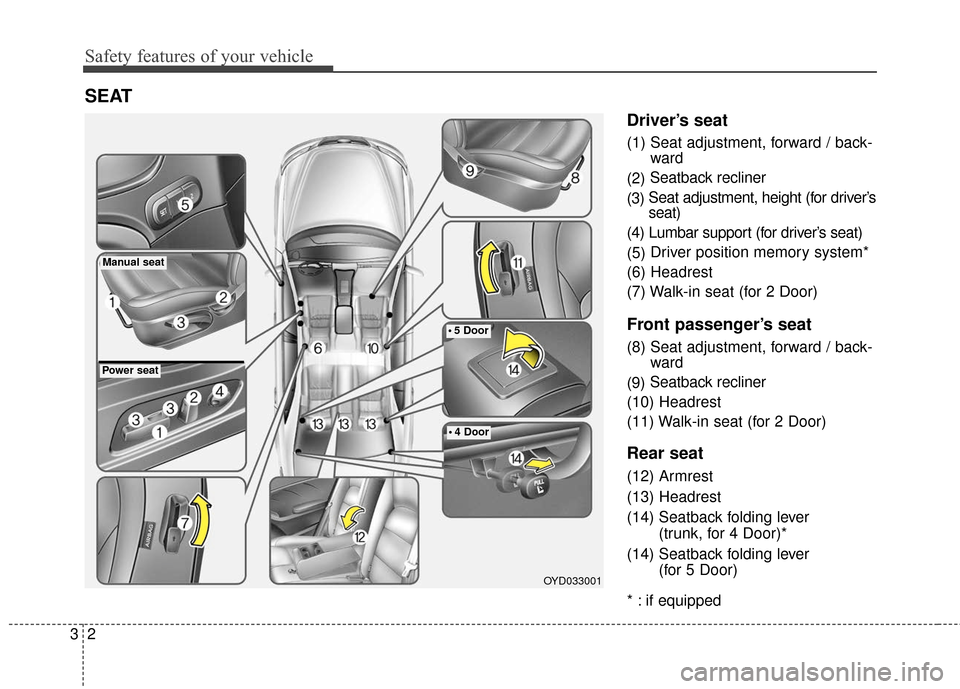
Driver’s seat
(1) Seat adjustment, forward / back-ward
(2) Seatback recliner
(3) Seat adjustment, height (for driver’s
seat)
(4) Lumbar support (for driver’s seat)
(5) Driver position memory system*
(6) Headrest
(7) Walk-in seat (for 2 Door)
Front passenger’s seat
(8) Seat adjustment, forward / back- ward
(9) Seatback recliner
(10) Headrest
(11) Walk-in seat (for 2 Door)
Rear seat
(12) Armrest
(13) Headrest
(14) Seatback folding lever (trunk, for 4 Door)*
(14) Seatback folding lever (for 5 Door)
* : if equipped
SEAT
OYD033001
Manual seat
5 Door
4 Door
Power seat
Page 18 of 501
33
Safety features of your vehicle
WARNING - Uprighting
seat
Do not press the release lever on
a manual seatback without hold-
ing and controlling the seatback.
The seatback will spring upright
possibly impacting you or other
passengers.
WARNING - Seat cushion
Occnpants should never sit on
aftermarket seat cushions or sit-
ting cushions. The passenger's
hips may slide under the lap por-
tion of the seat belt during an
accident or a sudden stop.
WARNING- Loose
objects
Do not place anything in the dri-
ver's foot well or under the front
seats. Loose objects in the dri-
ver's foot area could interfere with
the operation of the foot pedals.WARNING-Driver
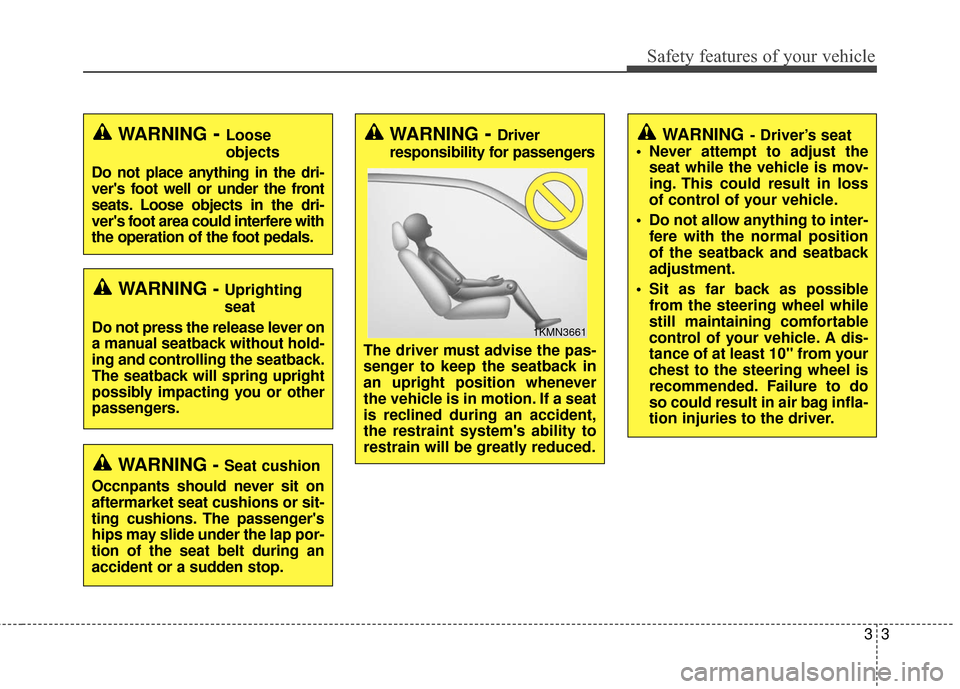
responsibility for passengers
The driver must advise the pas-
senger to keep the seatback in
an upright position whenever
the vehicle is in motion. If a seat
is reclined during an accident,
the restraint system's ability to
restrain will be greatly reduced.
1KMN3661
WARNING- Driver’s seat
Never attempt to adjust the seat while the vehicle is mov-
ing. This could result in loss
of control of your vehicle.
Do not allow anything to inter- fere with the normal position
of the seatback and seatback
adjustment.
Sit as far back as possible from the steering wheel while
still maintaining comfortable
control of your vehicle. A dis-
tance of at least 10" from your
chest to the steering wheel is
recommended. Failure to do
so could result in air bag infla-
tion injuries to the driver.
Page 19 of 501
Safety features of your vehicle
43
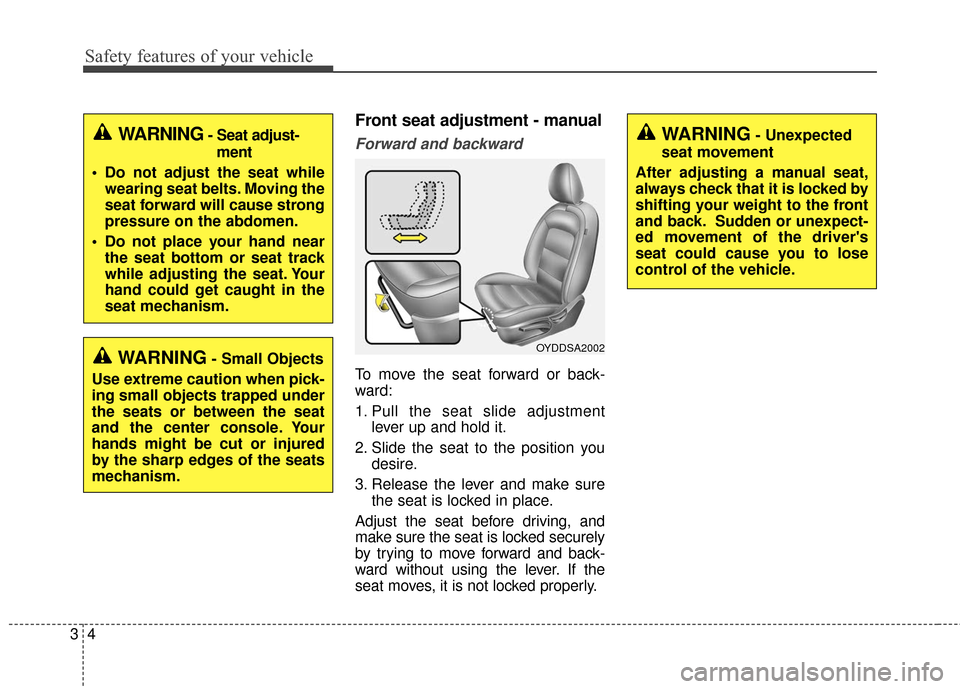
Front seat adjustment - manual
Forward and backward
To move the seat forward or back-
ward:
1. Pull the seat slide adjustmentlever up and hold it.
2. Slide the seat to the position you desire.
3. Release the lever and make sure the seat is locked in place.
Adjust the seat before driving, and
make sure the seat is locked securely
by trying to move forward and back-
ward without using the lever. If the
seat moves, it is not locked properly.
WARNING- Unexpected
seat movement
After adjusting a manual seat,
always check that it is locked by
shifting your weight to the front
and back. Sudden or unexpect-
ed movement of the driver's
seat could cause you to lose
control of the vehicle.
OYDDSA2002
WARNING- Seat adjust- ment
Do not adjust the seat while wearing seat belts. Moving the
seat forward will cause strong
pressure on the abdomen.
Do not place your hand near the seat bottom or seat track
while adjusting the seat. Your
hand could get caught in the
seat mechanism.
WARNING- Small Objects
Use extreme caution when pick-
ing small objects trapped under
the seats or between the seat
and the center console. Your
hands might be cut or injured
by the sharp edges of the seats
mechanism.
Page 20 of 501
35
Safety features of your vehicle
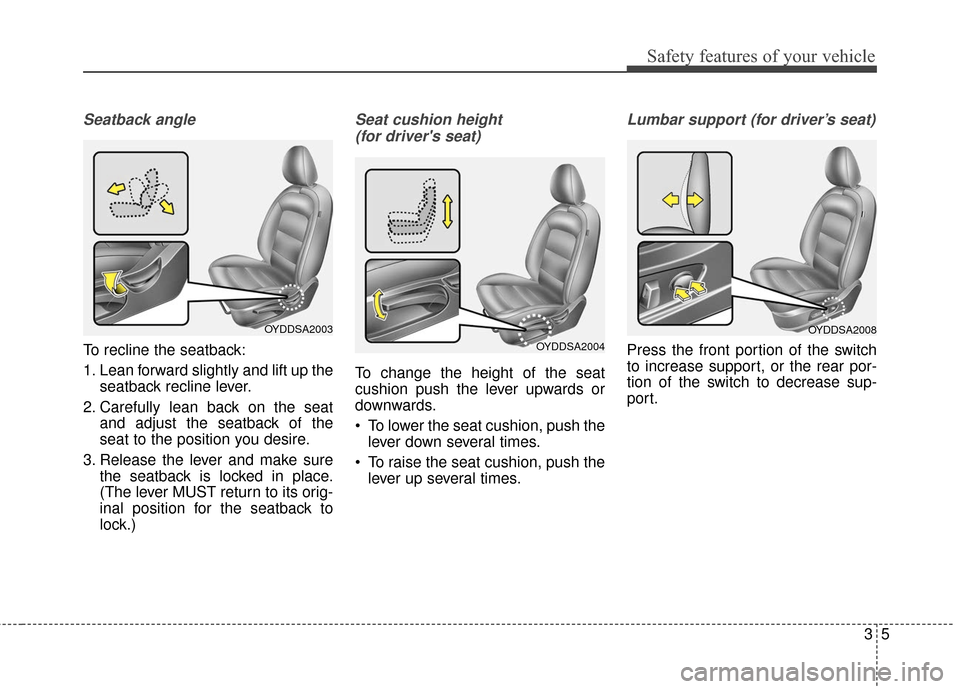
Seatback angle
To recline the seatback:
1. Lean forward slightly and lift up theseatback recline lever.
2. Carefully lean back on the seat and adjust the seatback of the
seat to the position you desire.
3. Release the lever and make sure the seatback is locked in place.
(The lever MUST return to its orig-
inal position for the seatback to
lock.)
Seat cushion height
(for driver's seat)
To change the height of the seat
cushion push the lever upwards or
downwards.
To lower the seat cushion, push the lever down several times.
To raise the seat cushion, push the lever up several times.
Lumbar support (for driver’s seat)
Press the front portion of the switch
to increase support, or the rear por-
tion of the switch to decrease sup-
port.OYDDSA2004
OYDDSA2003OYDDSA2008