display KIA Forte 2016 2.G Manual PDF
[x] Cancel search | Manufacturer: KIA, Model Year: 2016, Model line: Forte, Model: KIA Forte 2016 2.GPages: 501, PDF Size: 14.8 MB
Page 339 of 501
517
Driving your vehicle
For smooth operation, depress thebrake pedal when shifting from N(Neutral) to a forward or reversegear.
When stopped on an upgrade, do not
hold the vehicle with engine power.
Use the service brake or the parking
brake.
Transaxle ranges
The indicator light in the instrument
cluster displays the shift lever posi-
tion when the ignition switch is in the
ON position.
P (Park)
Always come to a complete stop
before shifting into P (Park). This
position locks the transaxle and pre-
vents the front wheels from rotating.
Shifting into P (Park) while the vehi-
cle is in motion will cause the drive
wheels to lock which will cause you
to lose control of the vehicle.CAUTION - Transaxle
To avoid damage to yourtransaxle, do not accelerate theengine in R (Reverse) or any for-ward gear position with thebrakes on. The transaxle may bedamaged if you shift into P(Park) while the vehicle is inmotion.
WARNING- Automatic
Transaxle
Before leaving the driver's seat,
always make sure the shift lever
is engaged in P (Park), set the
parking brake fully and shut the
engine off. Unexpected and
sudden vehicle movement may
occur if these precautions are
not followed.
Page 387 of 501
What to do in an emergency
10
6
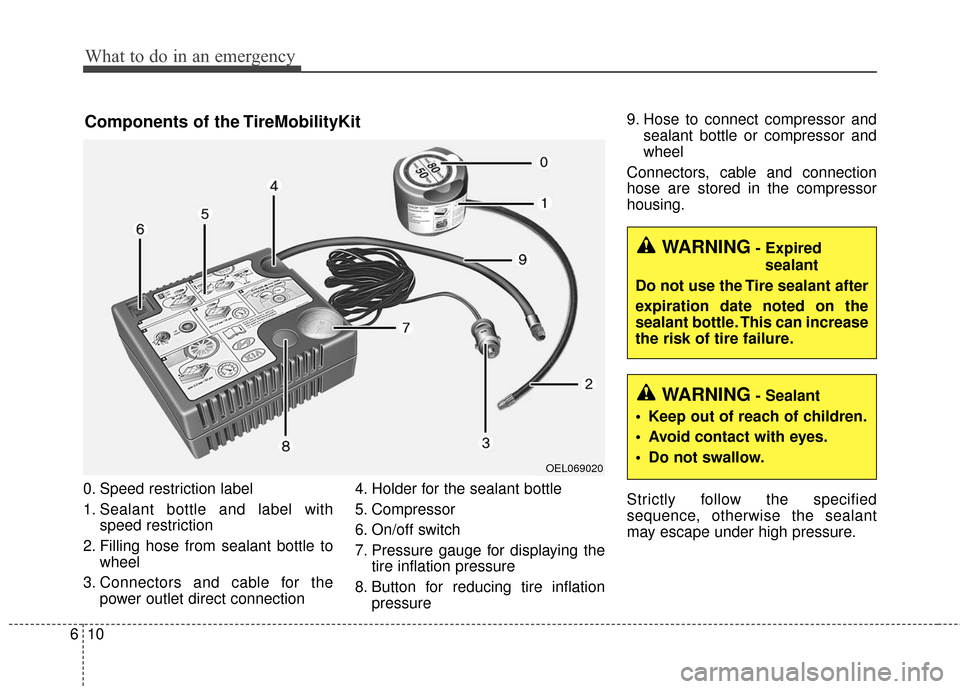
0. Speed restriction label
1. Sealant bottle and label with
speed restriction
2. Filling hose from sealant bottle to wheel
3. Connectors and cable for the power outlet direct connection 4. Holder for the sealant bottle
5. Compressor
6. On/off switch
7. Pressure gauge for displaying the
tire inflation pressure
8. Button for reducing tire inflation pressure 9. Hose to connect compressor and
sealant bottle or compressor and
wheel
Connectors, cable and connection
hose are stored in the compressor
housing.
Strictly follow the specified
sequence, otherwise the sealant
may escape under high pressure.
Components of the TireMobilityKit
OEL069020
WARNING- Expired sealant
Do not use the Tire sealant after
expiration date noted on the
sealant bottle. This can increase
the risk of tire failure.
WARNING- Sealant
• Keep out of reach of children.
Avoid contact with eyes.
Do not swallow.
Page 454 of 501
751
Maintenance
3. Checking tire life (TIN : TireIdentification Number)
Any tires that are over 6 years old,
based on the manufacturing date,
(including the spare tire) should be
replaced by new ones. You can find
the manufacturing date on the tire
sidewall (possibly on the inside of the
wheel), displaying the DOT Code.
The DOT Code is a series of num-
bers on a tire consisting of numbers
and English letters. The manufactur-
ing date is designated by the last four
digits (characters) of the DOT code.
DOT : XXXX XXXX OOOO
The front part of the DOT means a
plant code number, tire size and
tread pattern and the last four num-
bers indicate week and year manu-
factured.
For example:
DOT XXXX XXXX 1615 represents
that the tire was produced in the 16th
week of 2015.
4. Tire ply composition and mate-rial
The number of layers or plies of rub-
ber-coated fabric in the tire. Tire
manufacturers also must indicate the
materials in the tire, which include
steel, nylon, polyester, and others.
The letter "R" means radial ply con-
struction; the letter "D" means diago-
nal or bias ply construction; and the
letter "B" means belted-bias ply con-
struction.
5. Maximum permissible inflationpressure
This number is the greatest amount
of air pressure that should be put in
the tire. Do not exceed the maximum
permissible inflation pressure. Refer
to the Tire and Loading Information
label for recommended inflation
pressure.
6. Maximum load rating
This number indicates the maximum
load in kilograms and pounds that
can be carried by the tire. When
replacing the tires on the vehicle,
always use a tire that has the same
load rating as the factory installed
tire.
WARNING - Tire age
Replace tires within the recom-
mended time frame. Failure to
replace tires as recommended
can result in sudden tire failure,
which could lead to a loss of
control and an accident.
Page 497 of 501
Index
4I
Fuses . . . . . . . . . . . . . . . . . . . . . . . . . . . . . . . . . . . . \
. . . 7-58Engine compartment fuse panel . . . . . . . . . . . . . . . . 7-64
Engine compartment fuse replacement . . . . . . . . . . 7-61
Engine room (Battery terminal cover) . . . . . . . . . . . 7-65
Fuse/relay panel description. . . . . . . . . . . . . . . . . . . 7-63
Instrument panel fuse replacement . . . . . . . . . . . . . 7-59
Hood . . . . . . . . . . . . . . . . . . . . . . . . . . . . . . . . . . . . \
. . . 4-32 Closing the hood . . . . . . . . . . . . . . . . . . . . . . . . . . . 4-32
Opening the hood . . . . . . . . . . . . . . . . . . . . . . . . . . . 4-32
How to use this manual . . . . . . . . . . . . . . . . . . . . . . . . . 1-2
If the engine will not start . . . . . . . . . . . . . . . . . . . . . . . 6-4 If engine doesn't turn over or turns over slowly . . . . 6-4
If engine turns over normally but does not start . . . . 6-4
If you have a flat tire (with spare tire) . . . . . . . . . . . . . 6-14 Changing tires . . . . . . . . . . . . . . . . . . . . . . . . . . . . . 6-15
Jack and tools . . . . . . . . . . . . . . . . . . . . . . . . . . . . . . 6-14
Jack label . . . . . . . . . . . . . . . . . . . . . . . . . . . . . . . . . 6-22
Removing and storing the spare tire . . . . . . . . . . . 6-15
If you have a flat tire (with tire mobility kit) . . . . . . . . . 6-8 Components of the TireMobilityKit. . . . . . . . . . . . . 6-10
Introduction . . . . . . . . . . . . . . . . . . . . . . . . . . . . . . . . 6-8
Notes on the safe use of the Tire Mobility Kit . . . . . 6-9 Using the Tire Mobility Kit . . . . . . . . . . . . . . . . . . . 6-11
In case of an emergency while driving . . . . . . . . . . . . . . 6-3 If engine stalls while driving . . . . . . . . . . . . . . . . . . . 6-3
If the engine stalls at a crossroad or crossing . . . . . . 6-3
If you have a flat tire while driving . . . . . . . . . . . . . . 6-3
Instrument cluster . . . . . . . . . . . . . . . . . . . . . . . . . . . . . 4-55 Gauges . . . . . . . . . . . . . . . . . . . . . . . . . . . . . . . . . . . 4-\
57
Instrument Cluster Control. . . . . . . . . . . . . . . . . . . . 4-56
LCD Display Control . . . . . . . . . . . . . . . . . . . . . . . . 4-57
Transaxle Shift Indicator . . . . . . . . . . . . . . . . . . . . . 4-60
Instrument panel overview . . . . . . . . . . . . . . . . . . . . . . . 2-5
Interior features. . . . . . . . . . . . . . . . . . . . . . . . . . . . . . 4-138 Ashtray . . . . . . . . . . . . . . . . . . . . . . . . . . . . . . . . . . 4-13\
8
Cigarette lighter . . . . . . . . . . . . . . . . . . . . . . . . . . . 4-138
Climate control seat . . . . . . . . . . . . . . . . . . . . . . . . 4-142
Clothes hanger . . . . . . . . . . . . . . . . . . . . . . . . . . . . 4-145
Cup holder . . . . . . . . . . . . . . . . . . . . . . . . . . . . . . . 4-139
Floor mat anchor(s) . . . . . . . . . . . . . . . . . . . . . . . . 4-145
LCD monitor . . . . . . . . . . . . . . . . . . . . . . . . . . . . . 4-144
Navigation system . . . . . . . . . . . . . . . . . . . . . . . . . 4-146
Power outlet . . . . . . . . . . . . . . . . . . . . . . . . . . . . . . 4-143
Seat warmer . . . . . . . . . . . . . . . . . . . . . . . . . . . . . . 4-140
Sliding armrest . . . . . . . . . . . . . . . . . . . . . . . . . . . . 4-139
Sunvisor . . . . . . . . . . . . . . . . . . . . . . . . . . . . . . . . . 4-140
Interior light . . . . . . . . . . . . . . . . . . . . . . . . . . . . . . . . 4-104 Automatict turn off function . . . . . . . . . . . . . . . . . 4-104
Glove box lamp . . . . . . . . . . . . . . . . . . . . . . . . . . . 4-106
Map lamp . . . . . . . . . . . . . . . . . . . . . . . . . . . . . . . . 4-104
H
I
Page 498 of 501
I5
Index
Room lamp . . . . . . . . . . . . . . . . . . . . . . . . . . . . . . . 4-105
Trunk room lamp . . . . . . . . . . . . . . . . . . . . . . . . . . 4-106
Vanity mirror lamp . . . . . . . . . . . . . . . . . . . . . . . . . 4-107
Interior overview. . . . . . . . . . . . . . . . . . . . . . . . . . . . . . . 2-4
Key positions . . . . . . . . . . . . . . . . . . . . . . . . . . . . . . . . . 5-5
Keys . . . . . . . . . . . . . . . . . . . . . . . . . . . . . . . . . . . . \
. . . . 4-4 Key operations . . . . . . . . . . . . . . . . . . . . . . . . . . . . . . 4-4
Record your key number . . . . . . . . . . . . . . . . . . . . . . 4-4
LCD display . . . . . . . . . . . . . . . . . . . . . . . . . . . . . . . . . 4-61 A/V Mode. . . . . . . . . . . . . . . . . . . . . . . . . . . . . . . . . 4-66
LCD Modes . . . . . . . . . . . . . . . . . . . . . . . . . . . . . . . 4-61
Service Mode . . . . . . . . . . . . . . . . . . . . . . . . . . . . . . 4-62
Turn By Turn Mode . . . . . . . . . . . . . . . . . . . . . . . . . 4-66
User Settings Mode . . . . . . . . . . . . . . . . . . . . . . . . . 4-63
Warning Messages . . . . . . . . . . . . . . . . . . . . . . . . . . 4-67
Lighting. . . . . . . . . . . . . . . . . . . . . . . . . . . . . . . . . . . . \
. 4-96 Battery saver function . . . . . . . . . . . . . . . . . . . . . . . 4-96
Daytime running light . . . . . . . . . . . . . . . . . . . . . . . 4-97
Front fog light . . . . . . . . . . . . . . . . . . . . . . . . . . . . 4-101
Headlamp escort function . . . . . . . . . . . . . . . . . . . . 4-96
High - beam operation . . . . . . . . . . . . . . . . . . . . . . . 4-99
Lighting control . . . . . . . . . . . . . . . . . . . . . . . . . . . . 4-97
Turn signals and lane change signals . . . . . . . . . . . 4-100 Maintenance services . . . . . . . . . . . . . . . . . . . . . . . . . . . 7-4
Owner maintenance precautions . . . . . . . . . . . . . . . . 7-5
Owner’s responsibility . . . . . . . . . . . . . . . . . . . . . . . . 7-4
Manual climate control system. . . . . . . . . . . . . . . . . . 4-110 Climate control air filter. . . . . . . . . . . . . . . . . . . . . 4-118
Heating and air conditioning . . . . . . . . . . . . . . . . . 4-111
Refrigerant and compressor lubricant . . . . . . . . . . 4-119
System operation . . . . . . . . . . . . . . . . . . . . . . . . . . 4-116
Manual transaxle. . . . . . . . . . . . . . . . . . . . . . . . . . . . . . 5-13 Manual transaxle operation . . . . . . . . . . . . . . . . . . . 5-13
Mirrors . . . . . . . . . . . . . . . . . . . . . . . . . . . . . . . . . . . . \
. 4-46 Inside rearview mirror . . . . . . . . . . . . . . . . . . . . . . . 4-46
Outside rearview mirror . . . . . . . . . . . . . . . . . . . . . . 4-51
Owner maintenance . . . . . . . . . . . . . . . . . . . . . . . . . . . . 7-6 Owner maintenance schedule. . . . . . . . . . . . . . . . . . . 7-6
Parking assist system . . . . . . . . . . . . . . . . . . . . . . . . . . 4-89 Non-operational conditions . . . . . . . . . . . . . . . . . . . 4-92
Operation . . . . . . . . . . . . . . . . . . . . . . . . . . . . . . . . . 4-89
Self-diagnosis . . . . . . . . . . . . . . . . . . . . . . . . . . . . . . 4-94
K
L
M
O
P