low KIA FORTE 5 2016 Manual PDF
[x] Cancel search | Manufacturer: KIA, Model Year: 2016, Model line: FORTE 5, Model: KIA FORTE 5 2016Pages: 501, PDF Size: 14.8 MB
Page 118 of 501
447
Features of your vehicle
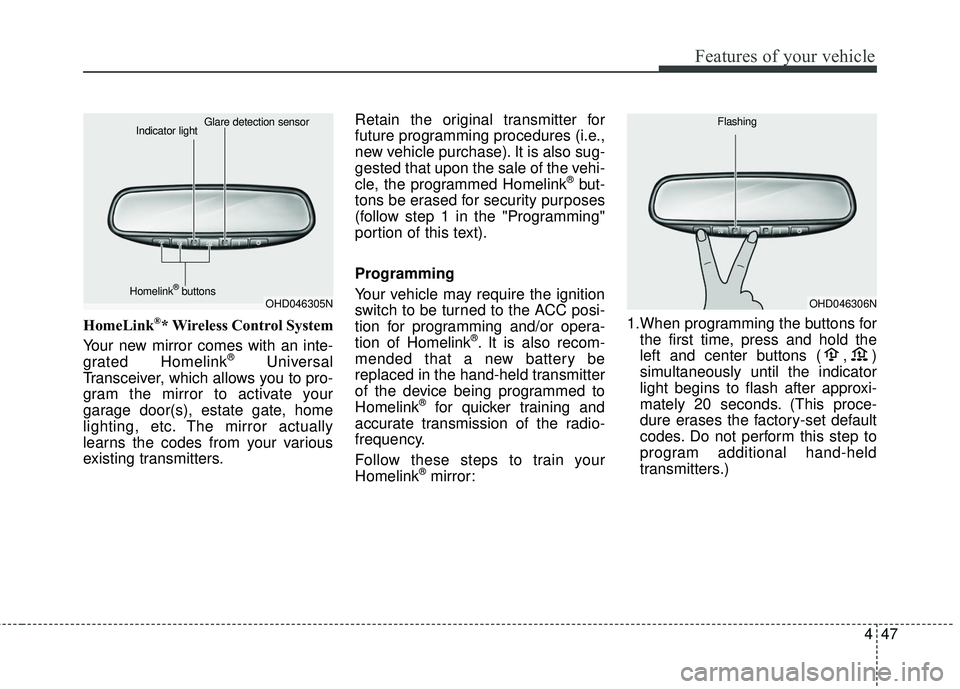
HomeLink®* Wireless Control System
Your new mirror comes with an inte-
grated Homelink
®Universal
Transceiver, which allows you to pro-
gram the mirror to activate your
garage door(s), estate gate, home
lighting, etc. The mirror actually
learns the codes from your various
existing transmitters. Retain the original transmitter for
future programming procedures (i.e.,
new vehicle purchase). It is also sug-
gested that upon the sale of the vehi-
cle, the programmed Homelink
®but-
tons be erased for security purposes
(follow step 1 in the "Programming"
portion of this text).
Programming
Your vehicle may require the ignition
switch to be turned to the ACC posi-
tion for programming and/or opera-
tion of Homelink
®. It is also recom-
mended that a new battery be
replaced in the hand-held transmitter
of the device being programmed to
Homelink
®for quicker training and
accurate transmission of the radio-
frequency.
Follow these steps to train your
Homelink
®mirror: 1.When programming the buttons for
the first time, press and hold the
left and center buttons ( , )
simultaneously until the indicator
light begins to flash after approxi-
mately 20 seconds. (This proce-
dure erases the factory-set default
codes. Do not perform this step to
program additional hand-held
transmitters.)
OHD046305N
Glare detection sensor
Indicator light
Homelink
®buttonsOHD046306N
Flashing
Page 119 of 501
Features of your vehicle
48
4
✽
✽
NOTICE
For non rolling code garage door
openers, follow steps 2 - 3.
For rolling code garage door open-
ers, follow steps 2 - 6.
For Canadian Programming, please
follow the Canadian Programming
section.
For help with determining whether
your garage is non-rolling code or
rolling code, please refer to the
garage door openers owner’s manu-
al or contact Homelink
®customer
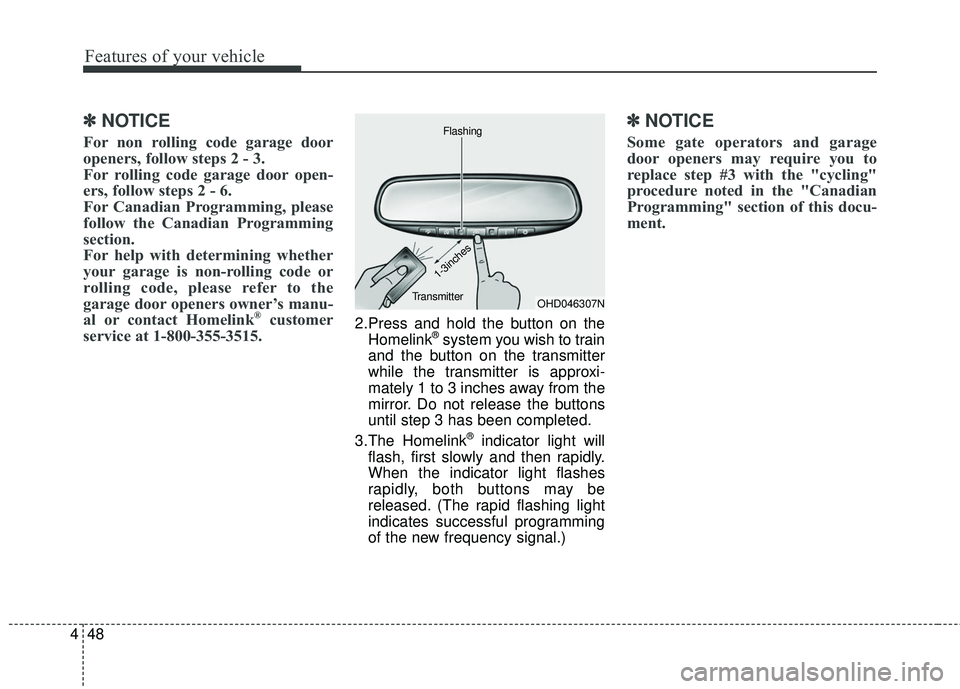
service at 1-800-355-3515.2.Press and hold the button on the
Homelink®system you wish to train
and the button on the transmitter
while the transmitter is approxi-
mately 1 to 3 inches away from the
mirror. Do not release the buttons
until step 3 has been completed.
3.The Homelink
®indicator light will
flash, first slowly and then rapidly.
When the indicator light flashes
rapidly, both buttons may be
released. (The rapid flashing light
indicates successful programming
of the new frequency signal.)
✽ ✽ NOTICE
Some gate operators and garage
door openers may require you to
replace step #3 with the "cycling"
procedure noted in the "Canadian
Programming" section of this docu-
ment.
OHD046307N
Flashing
1-3inches
Transmitter
Page 120 of 501
449
Features of your vehicle
Rolling code programming
To train a garage door opener (or
other rolling code equipped devices)
with the rolling code feature, follow
these instructions after completing
the "Programming" portion of this
text. (A second person may make the
following training procedures quicker
& easier.)
4. Locate the "learn" or "smart" but-ton on the device’s motor head
unit. Exact location and color of
the button may vary by product
brand. If there is difficulty locating
the "learn" or "smart" button, refer-
ence the device’s owner’s manual
or contact Homelink
®at 1-800-
355-3515 or on the internet at
www.homelink.com.
5. Press and release the "learn" or "smart" button on the device’s
motor head unit. You have 30 sec-
onds to complete step number 6. 6. Return to the vehicle and firmly
press and release the pro-
grammed Homelink
®button up to
three times. The rolling code
equipped device should now rec-
ognize the Homelink
®signal and
activate when the Homelink®but-
ton is pressed. The remaining two
buttons may now be programmed
if this has not previously been
done. Refer to the "Programming"
portion of this text. Operating Homelink
®
To operate, simply press the pro-
grammed Homelink®button.
Activation will now occur for the
trained product (garage door, securi-
ty system, entry door lock, estate
gate, or home or office lighting). For
convenience, the hand-held trans-
mitter of the device may also be used
at any time. The Homelink
®Wireless
Controls System (once programmed)
or the original hand-held transmitter
may be used to activate the device
(e.g. garage door, entry door lock,
etc.). In the event that there are still
programming difficulties, contact
Homelink
®at 1-800-355-3515 or on
the internet at www.homelink.com.
Page 121 of 501
Features of your vehicle
50
4
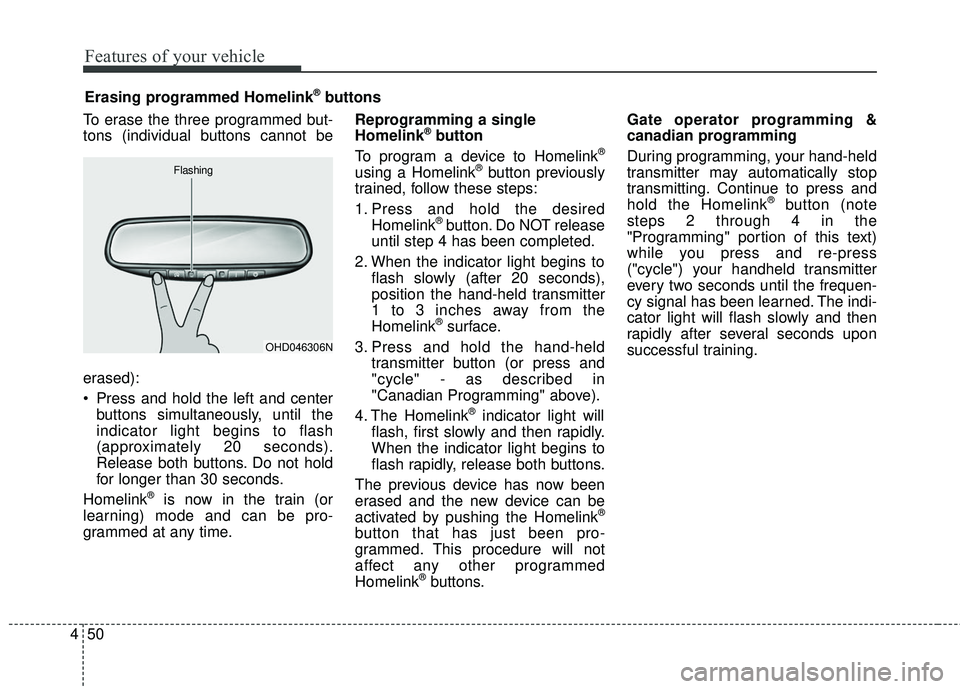
To erase the three programmed but-
tons (individual buttons cannot be
erased):
Press and hold the left and center
buttons simultaneously, until the
indicator light begins to flash
(approximately 20 seconds).
Release both buttons. Do not hold
for longer than 30 seconds.
Homelink
®is now in the train (or
learning) mode and can be pro-
grammed at any time. Reprogramming a single
Homelink
®button
To program a device to Homelink®
using a Homelink®button previously
trained, follow these steps:
1. Press and hold the desired Homelink
®button. Do NOT release
until step 4 has been completed.
2. When the indicator light begins to flash slowly (after 20 seconds),
position the hand-held transmitter
1 to 3 inches away from the
Homelink
®surface.
3. Press and hold the hand-held transmitter button (or press and
"cycle" - as described in
"Canadian Programming" above).
4. The Homelink
®indicator light will
flash, first slowly and then rapidly.
When the indicator light begins to
flash rapidly, release both buttons.
The previous device has now been
erased and the new device can be
activated by pushing the Homelink
®
button that has just been pro-
grammed. This procedure will not
affect any other programmed
Homelink
®buttons. Gate operator programming &
canadian programming
During programming, your hand-held
transmitter may automatically stop
transmitting. Continue to press and
hold the Homelink
®button (note
steps 2 through 4 in the
"Programming" portion of this text)
while you press and re-press
("cycle") your handheld transmitter
every two seconds until the frequen-
cy signal has been learned. The indi-
cator light will flash slowly and then
rapidly after several seconds upon
successful training.
Erasing programmed Homelink
®buttons
OHD046306N
Flashing
Page 122 of 501
451
Features of your vehicle
Accessories
If you would like additional informa-
tion on the Homelink
®Wireless
Control System, Homelink®compati-
ble products, or to purchase other
accessories such as the HomeLink
®
Lighting Package, please contact
Homelink®at 1-800-355-3515 or on
the internet at www.homelink.com.
This device complies with Industry
Canada Standard RSS-210.
Operation is subject to the following
two conditions:
1. This device may not cause harm- ful interference, and
2. This device must accept any inter- ference received, including inter-
ference that may cause undesired
operation. The Homelink
®transmitter has been
tested and complies with FCC and
DOC/MDC rules. Changes or modifi-
cations not expressly approved by
the party responsible for compliance
could void the user’s authority to
operate the equipment.
IC: 4112104541A Gentex
MODEL/FCC ID: NZLSTDHL3Outside rearview mirror
Be sure to adjust mirror angles
before driving.
Your vehicle is equipped with both
left-hand and right-hand outside
rearview mirrors. The mirrors can be
adjusted remotely with the remote
switch (if equipped). The mirror heads
can be folded to prevent damage dur-
ing an automatic car wash or when
passing through a narrow street.
The right outside rearview mirror is
convex. Objects seen in the mirror
are closer than they appear.
Use your interior rearview mirror or
direct observation to determine the
actual distance of following vehicles
when changing lanes.
Page 123 of 501
Features of your vehicle
52
4
Remote control
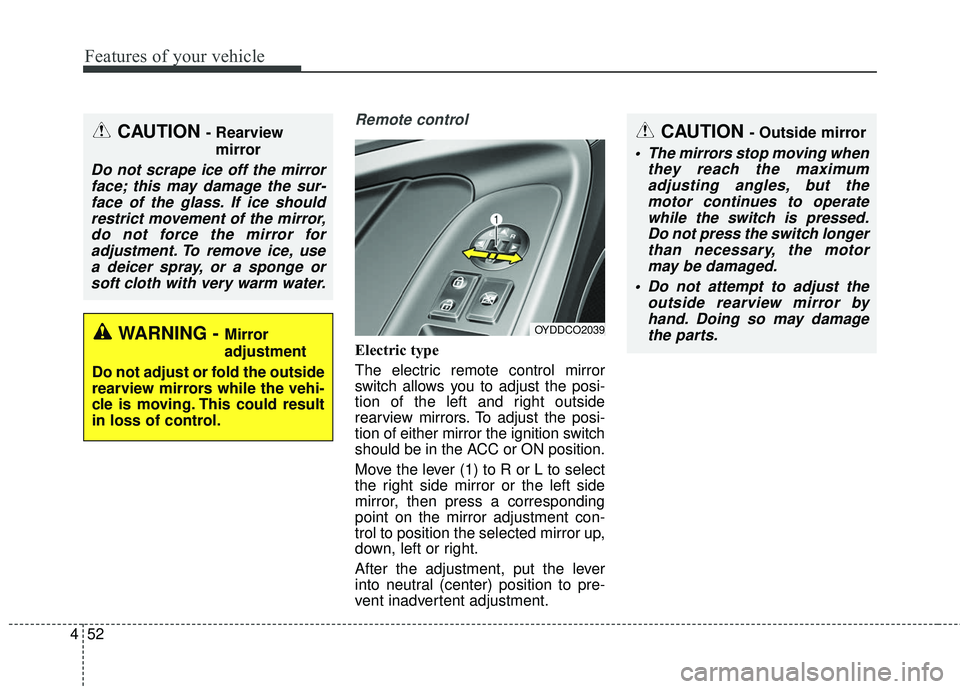
Electric type
The electric remote control mirror
switch allows you to adjust the posi-
tion of the left and right outside
rearview mirrors. To adjust the posi-
tion of either mirror the ignition switch
should be in the ACC or ON position.
Move the lever (1) to R or L to select
the right side mirror or the left side
mirror, then press a corresponding
point on the mirror adjustment con-
trol to position the selected mirror up,
down, left or right.
After the adjustment, put the lever
into neutral (center) position to pre-
vent inadvertent adjustment.
CAUTION - Outside mirror
The mirrors stop moving when
they reach the maximumadjusting angles, but themotor continues to operatewhile the switch is pressed.Do not press the switch longerthan necessary, the motormay be damaged.
Do not attempt to adjust the outside rearview mirror byhand. Doing so may damagethe parts.
OYDDCO2039
CAUTION - Rearview
mirror
Do not scrape ice off the mirrorface; this may damage the sur-face of the glass. If ice shouldrestrict movement of the mirror,do not force the mirror foradjustment. To remove ice, usea deicer spray, or a sponge orsoft cloth with very warm water.
WARNING - Mirror
adjustment
Do not adjust or fold the outside
rearview mirrors while the vehi-
cle is moving. This could result
in loss of control.
Page 124 of 501
453
Features of your vehicle
Folding the outside rearview mirror
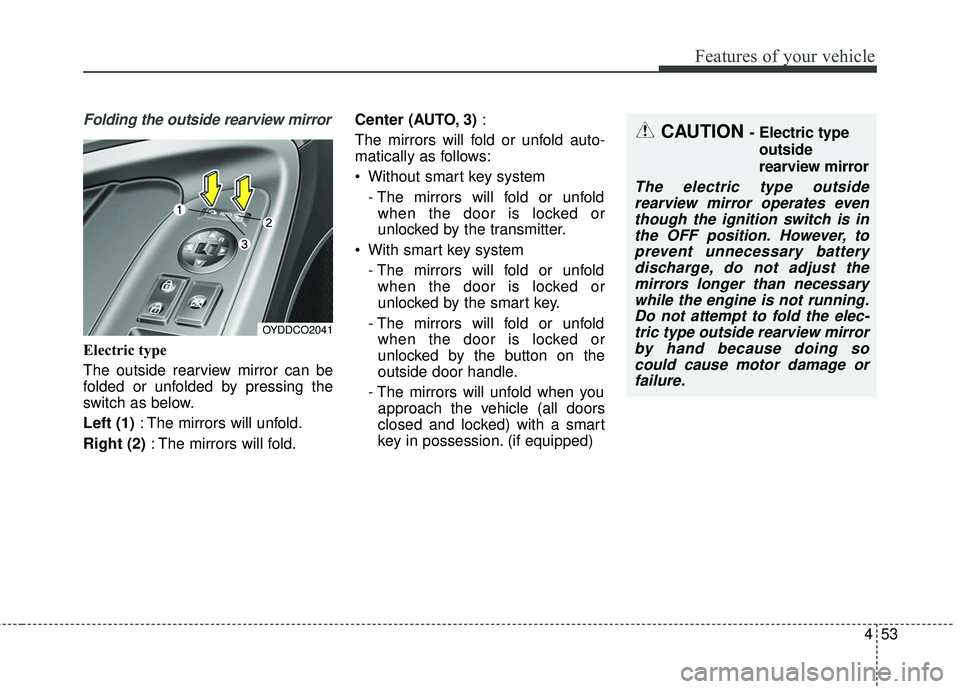
Electric type
The outside rearview mirror can be
folded or unfolded by pressing the
switch as below.
Left (1): The mirrors will unfold.
Right (2) : The mirrors will fold. Center (AUTO, 3)
:
The mirrors will fold or unfold auto-
matically as follows:
Without smart key system - The mirrors will fold or unfoldwhen the door is locked or
unlocked by the transmitter.
With smart key system - The mirrors will fold or unfoldwhen the door is locked or
unlocked by the smart key.
- The mirrors will fold or unfold when the door is locked or
unlocked by the button on the
outside door handle.
- The mirrors will unfold when you approach the vehicle (all doors
closed and locked) with a smart
key in possession. (if equipped)
OYDDCO2041
CAUTION - Electric type
outside
rearview mirror
The electric type outsiderearview mirror operates eventhough the ignition switch is inthe OFF position. However, toprevent unnecessary batterydischarge, do not adjust themirrors longer than necessarywhile the engine is not running.Do not attempt to fold the elec-tric type outside rearview mirrorby hand because doing socould cause motor damage orfailure.
Page 130 of 501
459
Features of your vehicle
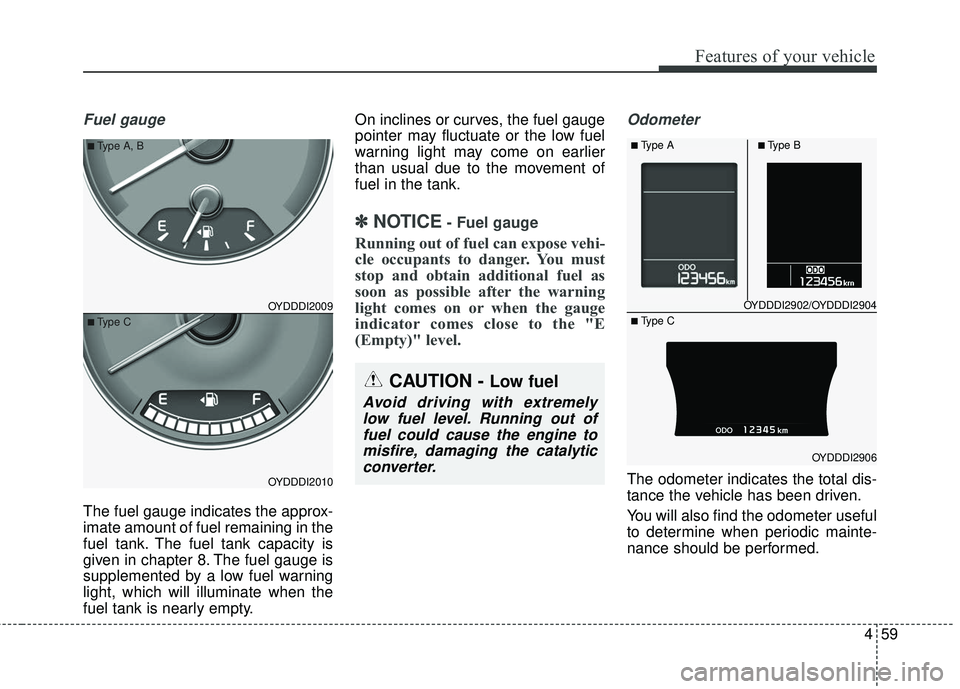
Fuel gauge
The fuel gauge indicates the approx-
imate amount of fuel remaining in the
fuel tank. The fuel tank capacity is
given in chapter 8. The fuel gauge is
supplemented by a low fuel warning
light, which will illuminate when the
fuel tank is nearly empty.On inclines or curves, the fuel gauge
pointer may fluctuate or the low fuel
warning light may come on earlier
than usual due to the movement of
fuel in the tank.
✽ ✽
NOTICE- Fuel gauge
Running out of fuel can expose vehi-
cle occupants to danger. You must
stop and obtain additional fuel as
soon as possible after the warning
light comes on or when the gauge
indicator comes close to the "E
(Empty)" level.
Odometer
The odometer indicates the total dis-
tance the vehicle has been driven.
You will also find the odometer useful
to determine when periodic mainte-
nance should be performed.
OYDDDI2009
OYDDDI2010
■Type A, B
■Type C
CAUTION - Low fuel
Avoid driving with extremely
low fuel level. Running out offuel could cause the engine tomisfire, damaging the catalyticconverter.
OYDDDI2902/OYDDDI2904
OYDDDI2906
■Type A■Type B
■ Type C
Page 133 of 501
Features of your vehicle
62
4
Service Mode
Service Interval
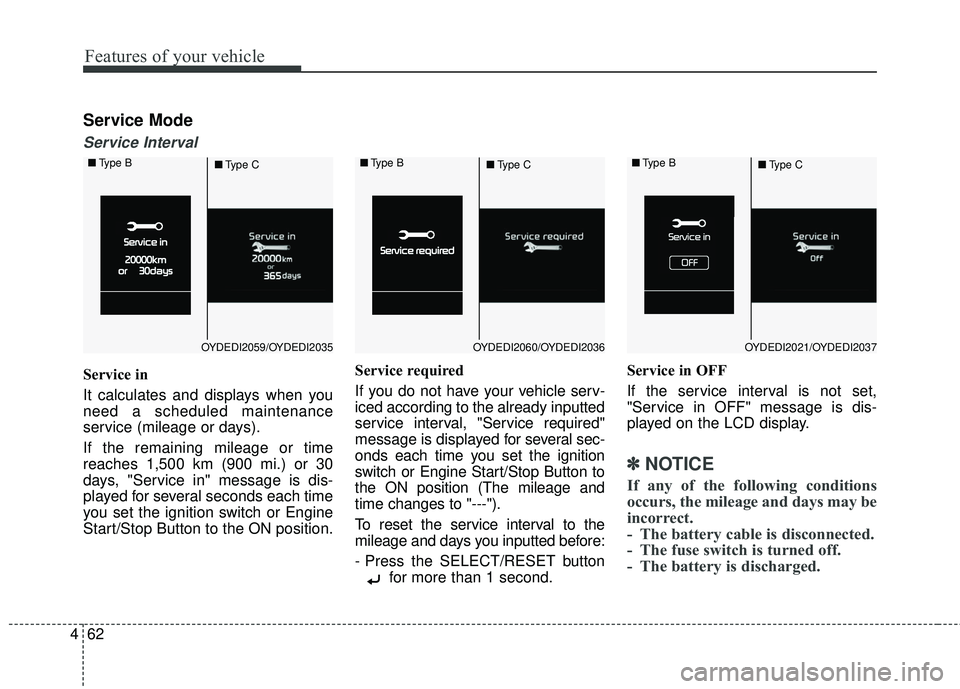
Service in
It calculates and displays when you
need a scheduled maintenance
service (mileage or days).
If the remaining mileage or time
reaches 1,500 km (900 mi.) or 30
days, "Service in" message is dis-
played for several seconds each time
you set the ignition switch or Engine
Start/Stop Button to the ON position. Service required
If you do not have your vehicle serv-
iced according to the already inputted
service interval, "Service required"
message is displayed for several sec-
onds each time you set the ignition
switch or Engine Start/Stop Button to
the ON position (The mileage and
time changes to "---").
To reset the service interval to the
mileage and days you inputted before:
- Press the SELECT/RESET button
for more than 1 second. Service in OFF
If the service interval is not set,
"Service in OFF" message is dis-
played on the LCD display.
✽ ✽
NOTICE
If any of the following conditions
occurs, the mileage and days may be
incorrect.
- The battery cable is disconnected.
- The fuse switch is turned off.
- The battery is discharged.
OYDEDI2059/OYDEDI2035
■
Type B
■Type COYDEDI2060/OYDEDI2036
■
Type B
■Type COYDEDI2021/OYDEDI2037
■
Type B
■Type C
Page 138 of 501
467
Features of your vehicle
Warning Messages
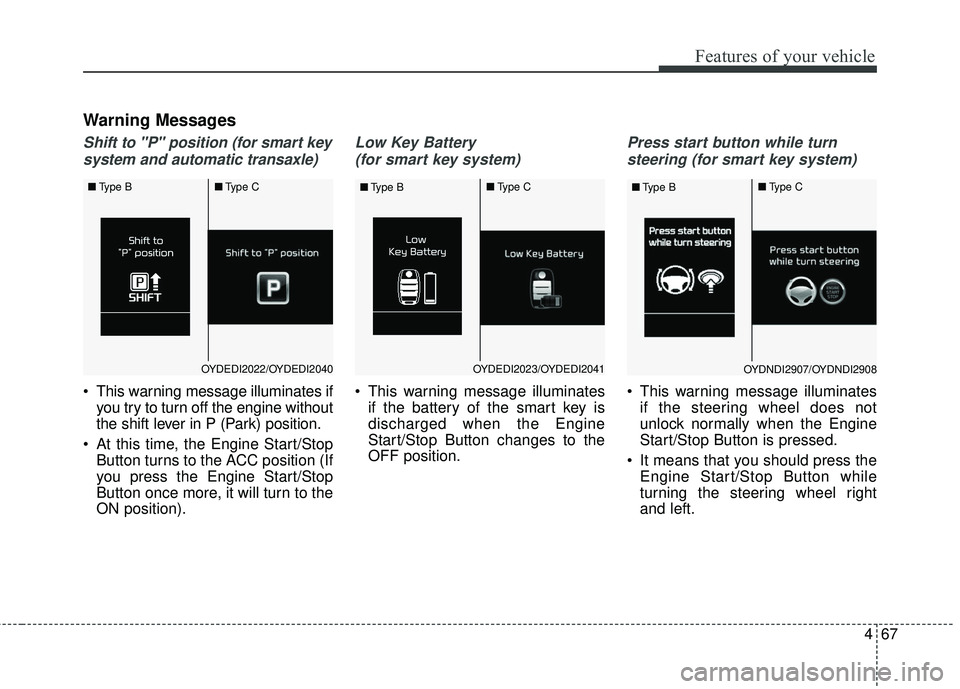
Shift to "P" position (for smart keysystem and automatic transaxle)
This warning message illuminates if you try to turn off the engine without
the shift lever in P (Park) position.
At this time, the Engine Start/Stop Button turns to the ACC position (If
you press the Engine Start/Stop
Button once more, it will turn to the
ON position).
Low Key Battery
(for smart key system)
This warning message illuminates if the battery of the smart key is
discharged when the Engine
Start/Stop Button changes to the
OFF position.
Press start button while turn
steering (for smart key system)
This warning message illuminates if the steering wheel does not
unlock normally when the Engine
Start/Stop Button is pressed.
It means that you should press the Engine Start/Stop Button while
turning the steering wheel right
and left.
OYDEDI2023/OYDEDI2041
■
Type B ■
Type COYDNDI2907/OYDNDI2908
■
Type B ■
Type COYDEDI2022/OYDEDI2040
■
Type B ■
Type C