tire pressure KIA FORTE 5 2018 Owners Manual
[x] Cancel search | Manufacturer: KIA, Model Year: 2018, Model line: FORTE 5, Model: KIA FORTE 5 2018Pages: 584, PDF Size: 15.16 MB
Page 142 of 584
467
Features of your vehicle
This information is displayed for a
few seconds when you turn off the
engine and then goes off automati-
cally. The information provided is cal-
culated according to each trip.
If the estimated distance is below 1
km (1 mi), the distance to empty (3)
will display as "---" and a refuel mes-
sage will appear (4).LCD Modes (for Type B, C
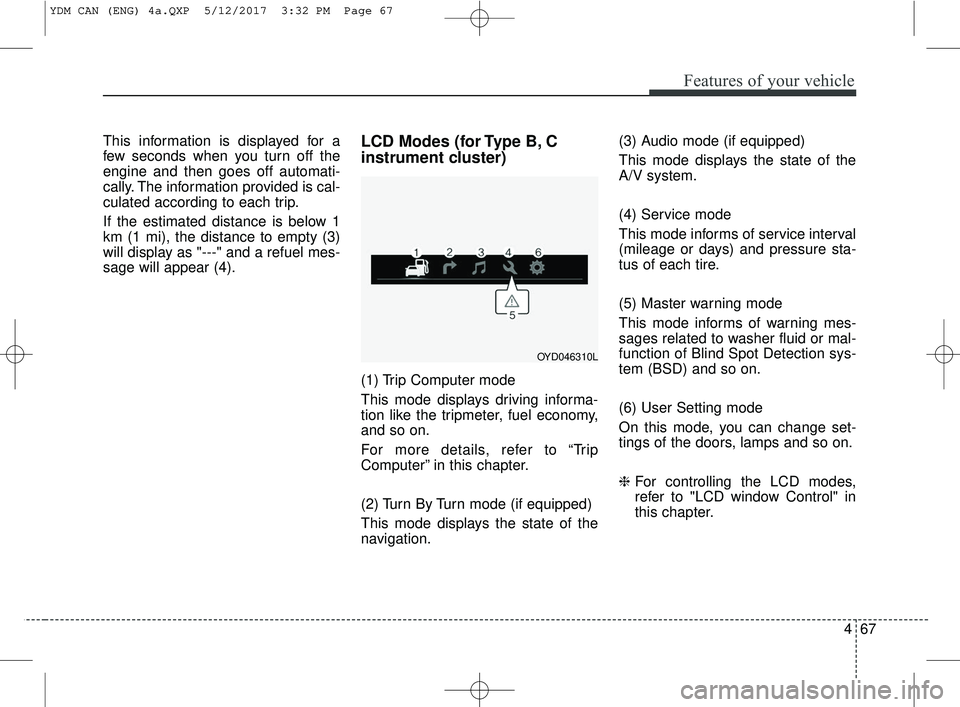
instrument cluster)
(1) Trip Computer mode
This mode displays driving informa-
tion like the tripmeter, fuel economy,
and so on.
For more details, refer to “Trip
Computer” in this chapter.
(2) Turn By Turn mode (if equipped)
This mode displays the state of the
navigation.(3) Audio mode (if equipped)
This mode displays the state of the
A/V system.
(4) Service mode
This mode informs of service interval
(mileage or days) and pressure sta-
tus of each tire.
(5) Master warning mode
This mode informs of warning mes-
sages related to washer fluid or mal-
function of Blind Spot Detection sys-
tem (BSD) and so on.
(6) User Setting mode
On this mode, you can change set-
tings of the doors, lamps and so on.
❈
For controlling the LCD modes,
refer to "LCD window Control" in
this chapter.
OYD046310L
YDM CAN (ENG) 4a.QXP 5/12/2017 3:32 PM Page 67
Page 420 of 584
579
Driving your vehicle
If the vehicle detected by sensorsapproaches your vehicle, the warn-
ing chime will sound and the warn-
ing light will blink on the outside
rearview mirror.
If the detected object is not in your way, move the vehicle away from
the detected object slowly; and the
warning will cancel once the object
has been safely cleared.
The system may not operate prop- erly due to other factors or circum-
stances. Always pay attention to
your surroundings.
❈ If your vehicle's left or right side
bumper is blinded by a barrier or
vehicles, the system sensing abili-
ty may be deteriorated.
✽ ✽
NOTICE
• The system may not work proper-
ly if the bumper has been replaced
or if repair work has been done
near the sensor.
• The detection area differs accord- ing to the road's width. If the road
is narrow the system may detect
other vehicles in the next lane.
• If the road is very wide the system may not detect other vehicles.
• The system may turn off due to strong electromagnetic interfer-
ence.
Limitations condition
Driver's Attention
The driver must be cautious in the
below situations for the system may
not assist the driver and may not
work properly.
- Curved roads, tollgates, etc.
- The surrounding of the sensor cover
is dirty with rain, snow, mud, etc.
- The rear bumper near the sensor is covered or obstructed with foreign
matter such as a sticker, bumper
guard, bicycle racks, etc.
- The rear bumper is damaged or the sensor is out of place.
- The height of the vehicle has signif- icantly changed such as when the
trunk is loaded with heavy objects,
abnormal tire pressure etc.
- Due to bad weather such as heavy rain or snow.
WARNING
The Blind Spot Detection
System with Lane Change
Assist and Rear Cross Traffic
Alert is not a substitute for
proper and safe lane changing
procedures. Always drive safely
and use caution when changing
lanes. The Blind Spot Detection
System may not detect every
object alongside the vehicle.
Page 423 of 584
Driving your vehicle
82
5
Your vehicle's fuel economy depends
mainly on your style of driving, where
you drive and when you drive.
Each of these factors affects how
many kilometers (miles) you can get
from a liter (gallon) of fuel. To operate
your vehicle as economically as pos-
sible, use the following driving sug-
gestions to help save money in both
fuel and repairs:
Drive smoothly. Accelerate at a
moderate rate. Don't make "jack-
rabbit" starts or full-throttle shifts
and maintain a steady cruising
speed. Don't race between stop-
lights. Try to adjust your speed to
the traffic so you don't have to
change speeds unnecessarily.
Avoid heavy traffic whenever pos-
sible. Always maintain a safe dis-
tance from other vehicles so you
can avoid unnecessary braking.
This also reduces brake wear.
Drive at a moderate speed. The faster you drive, the more fuel your
vehicle uses. Driving at a moderate
speed, especially on the highway,
is one of the most effective ways to
reduce fuel consumption. Don't "ride" the brake pedal. This
can increase fuel consumption and
also increase wear on these com-
ponents. In addition, driving with
your foot resting on the brake pedal
may cause the brakes to overheat,
which reduces their effectiveness
and may lead to more serious con-
sequences.
Take care of your tires. Keep them inflated to the recommended pres-
sure. Incorrect inflation, either too
much or too little, results in unnec-
essary tire wear. Check the tire
pressures at least once a month.
Be sure that the wheels are aligned correctly. Improper align-
ment can result from hitting curbs
or driving too fast over irregular
surfaces. Poor alignment causes
faster tire wear and may also result
in other problems as well as
greater fuel consumption. Keep your vehicle in good condi-
tion. For better fuel economy and
reduced maintenance costs, main-
tain your vehicle in accordance
with the maintenance schedule in
section 7. If you drive your vehicle
in severe conditions, more frequent
maintenance is required (see sec-
tion 7 for details).
Keep your vehicle clean. For maxi- mum service, your vehicle should
be kept clean and free of corrosive
materials. It is especially important
that mud, dirt, ice, etc. not be
allowed to accumulate on the
underside of the vehicle. This extra
weight can result in increased fuel
consumption and also contribute to
corrosion.
Travel lightly. Don't carry unneces- sary weight in your vehicle. Weight
reduces fuel economy.
Don't let the engine idle longer than necessary. If you are waiting
(and not in traffic), turn off your
engine and restart only when
you're ready to go.
ECONOMICAL OPERATION
Page 428 of 584
587
Driving your vehicle
Driving off-road
Drive carefully off-road because your
vehicle may be damaged by rocks or
roots of trees. Become familiar with
the off-road conditions where you
are going to drive before you begin
driving.
Highway driving
Tires
Adjust the tire inflation pressures to
specification. Low tire inflation pres-
sures will result in overheating and
possible failure of the tires.
Avoid using worn or damaged tires
which may result in reduced traction
or tire failure.
Never exceed the maximum tire
inflation pressure shown on the tires.
Fuel, engine coolant and engineoil
High speed travel consumes more
fuel than urban motoring. Do not for-
get to check both the engine coolant
and engine oil.
Drive belt
A loose or damaged drive belt may
overheat the engine.
WARNING- Tire tread
Always check the tire tread
before driving your vehicle.
Worn-out tires can result in loss
of vehicle control. Worn-out
tires should be replaced as
soon as possible. For further
information and tread limits,
refer to "Tires and wheels" in
section 7.
WARNING- Under/Over Inflated Tires
Always check the tires for prop-
er inflation before driving.
Underinflated or overinflated
tires can cause poor handling,
loss of vehicle control, and sud-
den tire failure leading to acci-
dents, injuries, and even death.
Page 432 of 584
591
Driving your vehicle
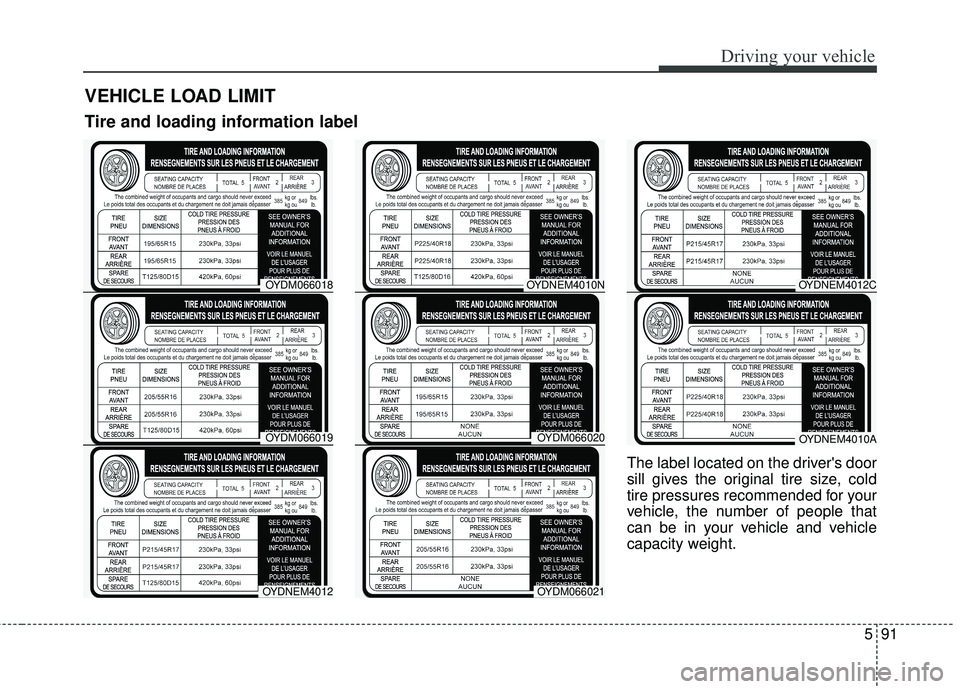
The label located on the driver's door
sill gives the original tire size, cold
tire pressures recommended for your
vehicle, the number of people that
can be in your vehicle and vehicle
capacity weight.
VEHICLE LOAD LIMIT
OYDM066018
OYDM066019
OYDNEM4012
OYDNEM4010N
OYDM066020
OYDM066021
OYDNEM4012C
OYDNEM4010A
Tire and loading information label
Page 438 of 584
What to do in an emergency
Road warning . . . . . . . . . . . . . . . . . . . . . . . . . . . . . . 6-2
• Hazard warning flasher . . . . . . . . . . . . . . . . . . . . . . . . 6-2
In case of an emergency while driving . . . . . . . . . . 6-3
• If the engine stalls at a crossroad or crossing. . . . . . . 6-3
• If you have a flat tire while driving . . . . . . . . . . . . . . . 6-3
• If engine stalls while driving . . . . . . . . . . . . . . . . . . . . 6-3
If the engine will not start . . . . . . . . . . . . . . . . . . . . 6-4
• If the engine doesn't turn over or turns over slowly. . 6-4
• If engine turns over normally but does not start . . . . 6-4
Emergency starting . . . . . . . . . . . . . . . . . . . . . . . . . 6-5
• Jump starting . . . . . . . . . . . . . . . . . . . . . . . . . . . . . . . . . 6-5
If the engine overheats . . . . . . . . . . . . . . . . . . . . . . . 6-6
If you have a flat tire (with tire mobility kit) . . . . 6-7
• Introduction . . . . . . . . . . . . . . . . . . . . . . . . . . . . . . . . . . 6-7
• Notes on the safe use of the Tire Mobility Kit . . . . . . 6-8
• Components of the Tire Mobility Kit . . . . . . . . . . . . . 6-9
• Using the Tire Mobility Kit . . . . . . . . . . . . . . . . . . . . 6-10
• Distributing the sealant . . . . . . . . . . . . . . . . . . . . . . . . 6-11
• Checking the tire inflation pressure . . . . . . . . . . . . . 6-11
• Technical Data . . . . . . . . . . . . . . . . . . . . . . . . . . . . . . . 6-12
If you have a flat tire . . . . . . . . . . . . . . . . . . . . . . . 6-13
• Jack and tools . . . . . . . . . . . . . . . . . . . . . . . . . . . . . . . 6-13
• Removing and storing the spare tire . . . . . . . . . . . . . 6-14
• Changing tires . . . . . . . . . . . . . . . . . . . . . . . . . . . . . . . 6-14
• Jack label . . . . . . . . . . . . . . . . . . . . . . . . . . . . . . . . . . . 6-\
21
Towing . . . . . . . . . . . . . . . . . . . . . . . . . . . . . . . . . . 6-22\
• Towing service . . . . . . . . . . . . . . . . . . . . . . . . . . . . . . . 6-22
• Removable towing hook (front) . . . . . . . . . . . . . . . . . 6-23
• Emergency towing . . . . . . . . . . . . . . . . . . . . . . . . . . . . 6-23
6
Page 445 of 584
What to do in an emergency
86
It is possible that some tires, espe-
cially with larger punctures or dam-
age to the sidewall, cannot be sealed
completely.
Air pressure loss in the tire may
adversely affect tire performance.
For this reason, you should avoid
abrupt steering or other driving
maneuvers, especially if the vehicle
is heavily loaded or if a trailer is in
use.
The Tire Mobility Kit is not designed
or intended as a permanent tire
repair method and is to be used for
one tire only.
This instruction shows you step by
step procedure to temporarily seal
the puncture.
Read the section "Notes on the safe
use of the Tire Mobility Kit".Notes on the safe use of the
Tire Mobility Kit
Park your car at the side of theroad so that you can work with the
Tire Mobility Kit away from moving
traffic.
To be sure your vehicle will not move, even when you're on fairly
level ground, always set your park-
ing brake.
Only use the Tire Mobility Kit for sealing/inflation passenger car
tires. Only punctured areas located
within the tread region of the tire
can be sealed using the tire mobil-
ity kit.
Do not use on motorcycles, bicy- cles or any other type of tires.
When the tire and wheel are dam- aged, do not use Tire Mobility Kit
for your safety.
Use of the Tire Mobility Kit may not be effective for tire damage larger
than approximately 6 mm (0.24 in).
Please contact the nearest Kia
dealership if the tire cannot be
made roadworthy with the Tire
Mobility Kit. Do not use the Tire Mobility Kit if a
tire is severely damaged by driving
run flat or with insufficient air pres-
sure.
Do not remove any foreign objects such as nails or screws that have
penetrated the tire.
Provided the car is outdoors, leave the engine running. Otherwise
operating the compressor may
eventually drain the car battery.
Never leave the Tire Mobility Kit unattended while it is being used.
Do not leave the compressor run- ning for more than 10 min. at a time
or it may overheat.
Do not use the Tire Mobility Kit if the ambient temperature is below -
30°C (-22°F).
Page 446 of 584
69
What to do in an emergency
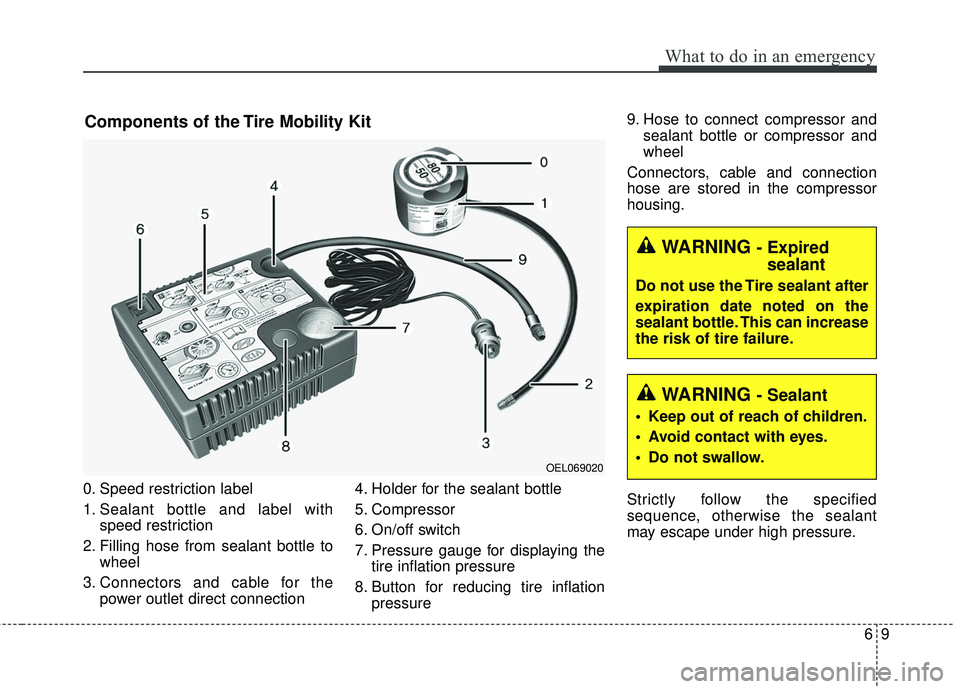
0. Speed restriction label
1. Sealant bottle and label withspeed restriction
2. Filling hose from sealant bottle to wheel
3. Connectors and cable for the power outlet direct connection 4. Holder for the sealant bottle
5. Compressor
6. On/off switch
7. Pressure gauge for displaying the
tire inflation pressure
8. Button for reducing tire inflation pressure 9. Hose to connect compressor and
sealant bottle or compressor and
wheel
Connectors, cable and connection
hose are stored in the compressor
housing.
Strictly follow the specified
sequence, otherwise the sealant
may escape under high pressure.
Components of the Tire Mobility Kit
OEL069020
WARNING - Expired sealant
Do not use the Tire sealant after
expiration date noted on the
sealant bottle. This can increase
the risk of tire failure.
WARNING - Sealant
• Keep out of reach of children.
Avoid contact with eyes.
Do not swallow.
Page 447 of 584
What to do in an emergency
10
6
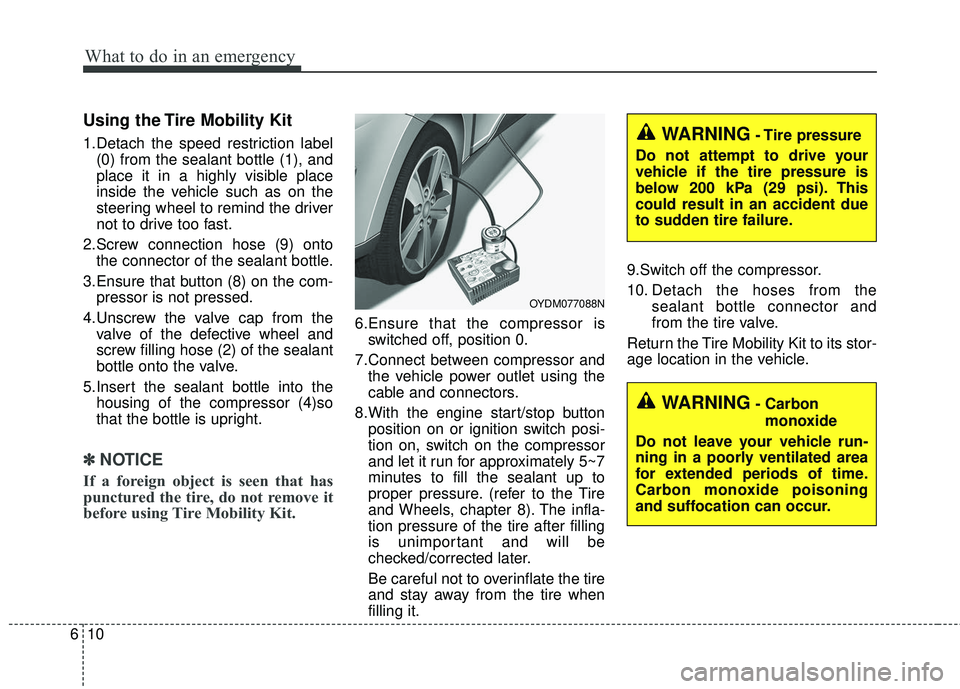
Using the Tire Mobility Kit
1.Detach the speed restriction label
(0) from the sealant bottle (1), and
place it in a highly visible place
inside the vehicle such as on the
steering wheel to remind the driver
not to drive too fast.
2.Screw connection hose (9) onto the connector of the sealant bottle.
3.Ensure that button (8) on the com- pressor is not pressed.
4.Unscrew the valve cap from the valve of the defective wheel and
screw filling hose (2) of the sealant
bottle onto the valve.
5.Insert the sealant bottle into the housing of the compressor (4)so
that the bottle is upright.
✽ ✽ NOTICE
If a foreign object is seen that has
punctured the tire, do not remove it
before using Tire Mobility Kit.
6.Ensure that the compressor is
switched off, position 0.
7.Connect between compressor and the vehicle power outlet using the
cable and connectors.
8.With the engine start/stop button position on or ignition switch posi-
tion on, switch on the compressor
and let it run for approximately 5~7
minutes to fill the sealant up to
proper pressure. (refer to the Tire
and Wheels, chapter 8). The infla-
tion pressure of the tire after filling
is unimportant and will be
checked/corrected later.
Be careful not to overinflate the tire
and stay away from the tire when
filling it. 9.Switch off the compressor.
10. Detach the hoses from the
sealant bottle connector and
from the tire valve.
Return the Tire Mobility Kit to its stor-
age location in the vehicle.
WARNING- Carbon monoxide
Do not leave your vehicle run-
ning in a poorly ventilated area
for extended periods of time.
Carbon monoxide poisoning
and suffocation can occur.
WARNING- Tire pressure
Do not attempt to drive your
vehicle if the tire pressure is
below 200 kPa (29 psi). This
could result in an accident due
to sudden tire failure.
OYDM077088N
Page 448 of 584
611
What to do in an emergency
Distributing the sealant
11. Immediately drive approximately7~10 km (4~6 miles or, about
10min) to evenly distribute the
sealant in the tire.
Do not exceed a speed of 80 km/h
(50 mph). If possible, do not fall
below a speed of 20 km/h (12 mph).
While driving, if you experience any
unusual vibration, ride disturbance or
noise, reduce your speed and drive
with caution until you can safely pull
off of the side of the road.
Call for road side service or towing.
When you use the Tire Mobility Kit,
the tire pressure sensors and wheel
may be stained by sealant.
Therefore, remove the tire pressure
sensors and wheel stained by
sealant and we recommend that
inspect at an authorized Kia dealer.
Checking the tire inflation
pressure
1.After driving approximately 7 ~ 10 km (4 ~ 6 miles or about 10 min),
stop at a safe location.
2.Connect connection hose (9) of the compressor directly to the tire
valve.
3.Plug the compressor power cord into the vehicle power outlet.
4.Adjust the tire inflation pressure to the recomended tire inflation.
With the ignition switch on, pro-
ceed as follows.
- To increase the inflation pres-sure : Switch on the compressor,
position I. To check the current
inflation pressure setting, briefly
switch off the compressor.
✽ ✽ NOTICE
The pressure gauge may show high-
er than actual reading when the
compressor is running. To get an
accurate tire reading, the compres-
sor needs to be turned off.
- To reduce the inflation pres-
sure: Press the button 8 on the
compressor.