buttons KIA K900 2017 Features and Functions Guide
[x] Cancel search | Manufacturer: KIA, Model Year: 2017, Model line: K900, Model: KIA K900 2017Pages: 62, PDF Size: 6.38 MB
Page 21 of 62
19
Standard Cruise Control
1 Cruise Control ON/OFF button: Press up to turn the
cruise control ON/OFF
2 Resume Cruising Speed button: Press up to resume or
increase cruising speed
3 Set Cruising Speed button: Press down to set or
decrease cruising speed
4 Cruise Control Cancel button: To cancel cruise control
setting, do one of the following:
§
Press the brake pedal
§
Press the CANCEL button
Quick Tip
The standard cruise control system is designed to function above approximately 20 mph only.
Advanced Smart Cruise Control (ASCC)* (Continued)
Audio Controls
REMINDERS:
- Your vehicle’s steering wheel buttons may differ from those in the images. See your Owner’s
Manual for more details
- Driving while distracted is dangerous and should be avoided. Drivers should remain attentive to
driving and always exercise caution when using the
steering-wheel-mounted controls while driving
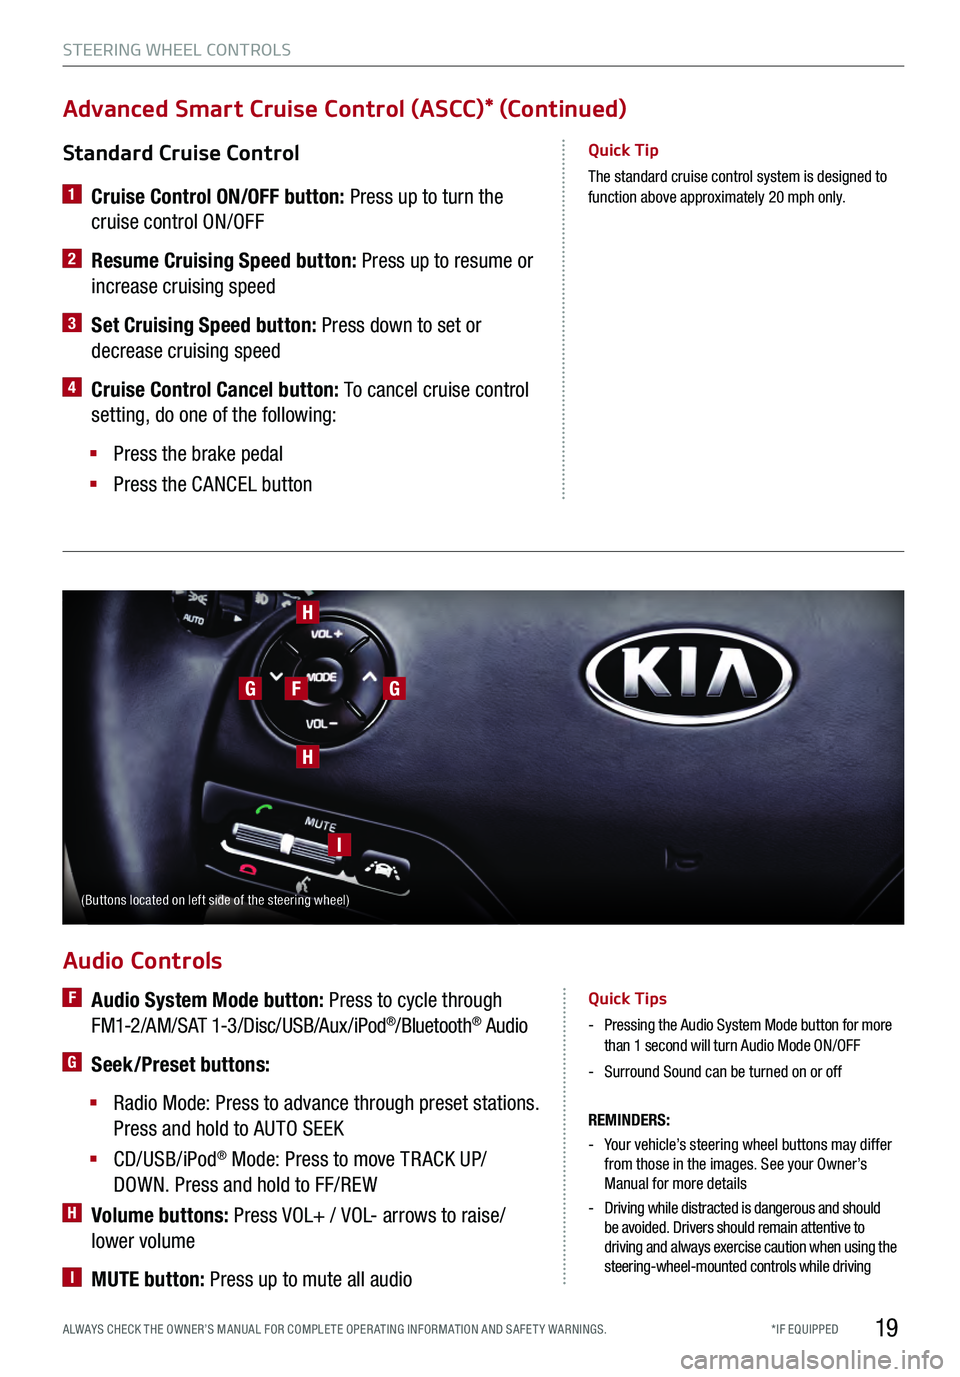
F Audio System Mode button: Press to cycle through
FM1-2/AM/SAT 1-3/Disc/USB/Aux/iPod®/Bluetooth® Audio
G Seek/Preset buttons:
§
Radio Mode: Press to advance through preset stations.
Press and hold to AUTO SEEK
§
CD/USB/iPod® Mode: Press to move TR ACK UP/
DOWN. Press and hold to FF/REW
H Volume buttons: Press VOL+ / VOL- arrows to raise/
lower volume
I MUTE button: Press up to mute all audio
Quick Tips
- Pressing the Audio System Mode button for more than 1 second will turn Audio Mode ON/OFF
-Surround Sound can be turned on or off
H
G
H
I
GF
(Buttons located on left side of the steering wheel)
STEERING WHEEL CONTROLS
*IF EQUIPPED
ALWAYS CHECK THE OWNER’S MANUAL FOR COMPLE TE OPER ATING INFORMATION AND SAFE T Y WARNINGS.
Page 22 of 62
20
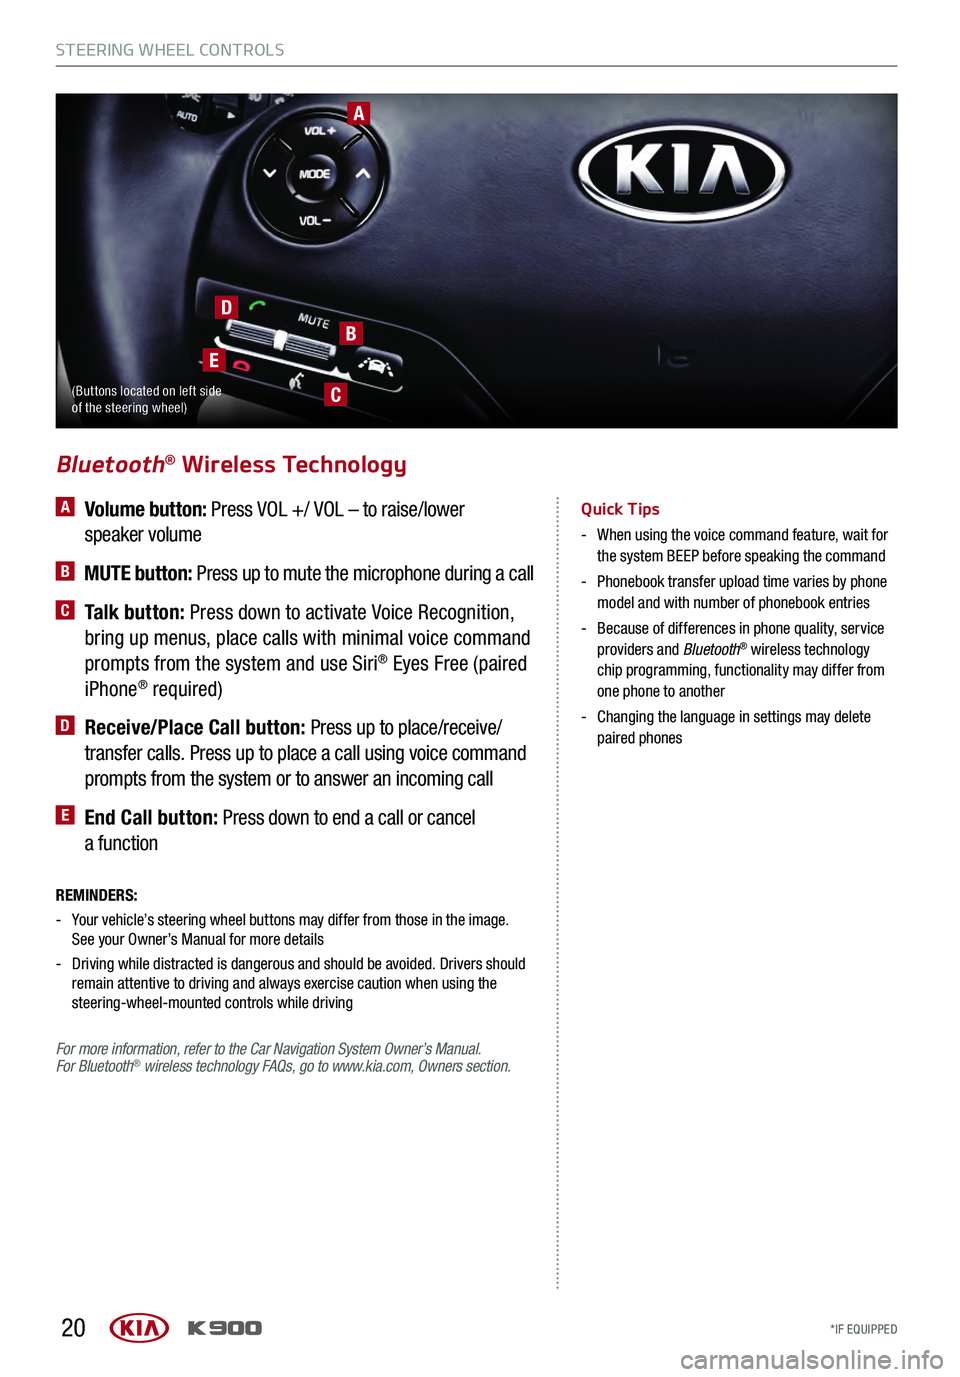
A Volume button: Press VOL +/ VOL – to raise/lower
speaker volume
B MUTE button: Press up to mute the microphone during a call
C Talk button: Press down to activate Voice Recognition,
bring up menus, place calls with minimal voice command
prompts from the system and use Siri
® Eyes Free (paired
iPhone® required)
D Receive/Place Call button: Press up to place/receive/
transfer calls. Press up to place a call using voice command
prompts from the system or to answer an incoming call
E End Call button: Press down to end a call or cancel
a function
Bluetooth® Wireless Technology
Quick Tips
- When using the voice command feature, wait for
the system BEEP before speaking the command
- Phonebook transfer upload time varies by phone
model and with number of phonebook entries
- Because of differences in phone quality, service
providers and Bluetooth® wireless technology
chip programming, functionality may differ from
one phone to another
- Changing the language in settings may delete
paired phones
REMINDERS:
- Your vehicle’s steering wheel buttons may differ from those in the image. See your Owner’s Manual for more details
- Driving while distracted is dangerous and should be avoided. Drivers should
remain attentive to driving and always exercise caution when using the
steering-wheel-mounted controls while driving
For more information, refer to the Car Navigation System Owner’s Manual.
For Bluetooth
® wireless technology FAQs, go to www.kia.com, Owners section.
A
B
C
D
E
(Buttons located on left side
of the steering wheel)
STEERING WHEEL CONTROLS
*IF EQUIPPED
STEERING WHEEL CONTROLS
*IF EQUIPPED
Page 24 of 62
22
Driver Information System (DIS) Controls
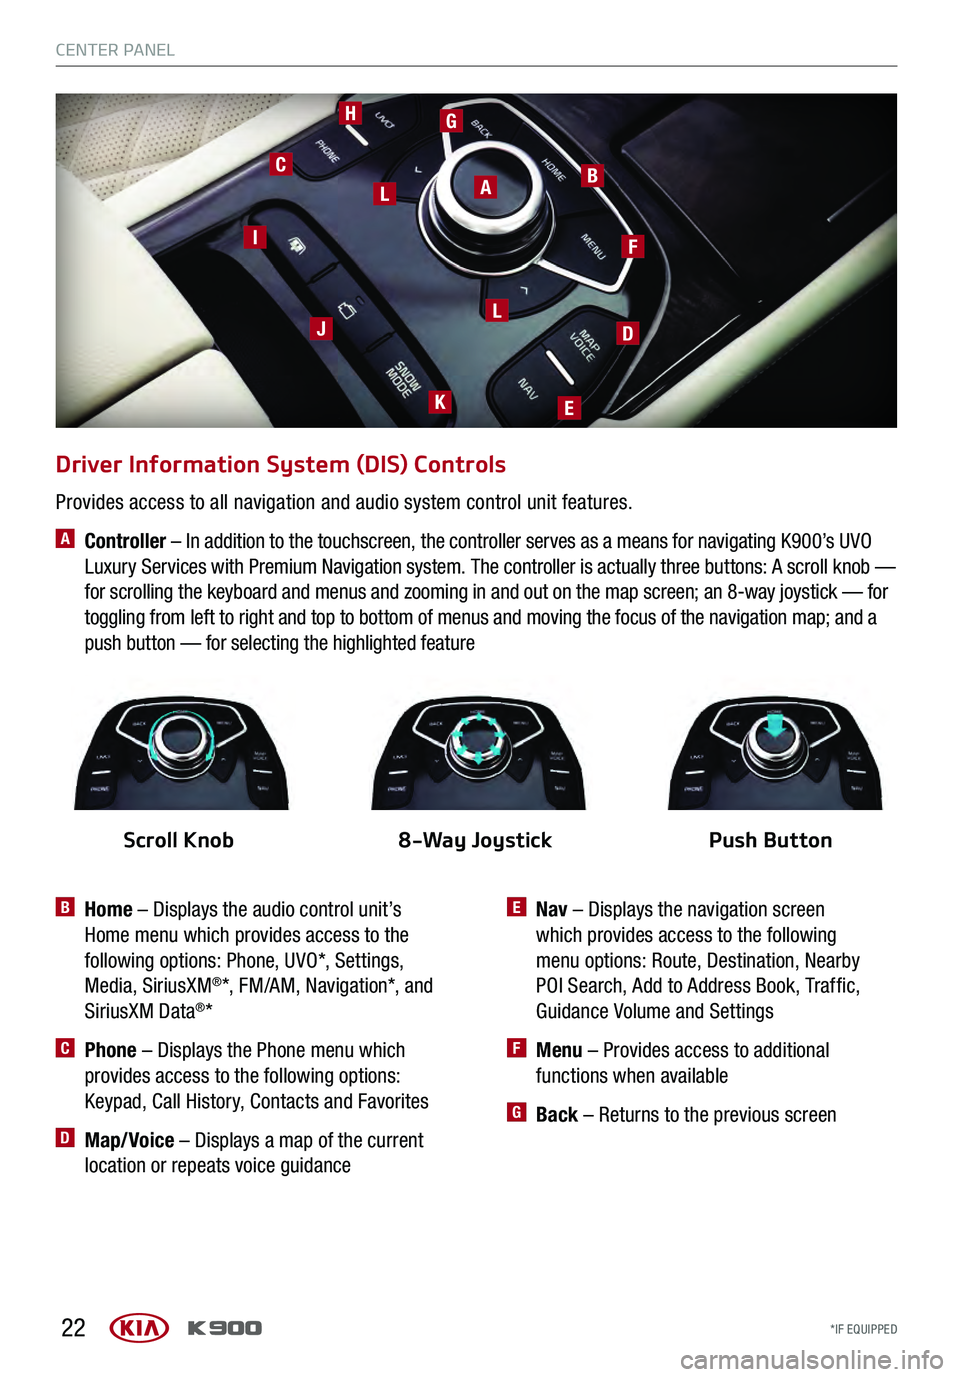
B Home – Displays the audio control unit’s
Home menu which provides access to the
following options: Phone, UVO*, Settings,
Media, SiriusXM
®*, FM/AM, Navigation*, and
SiriusXM Data®*
C Phone – Displays the Phone menu which
provides access to the following options:
Keypad, Call History, Contacts and Favorites
D Map/Voice – Displays a map of the current
location or repeats voice guidance
ABC
D
E
F
J
HG
K
L
L
I
E Nav – Displays the navigation screen
which provides access to the following
menu options: Route, Destination, Nearby
POI Search, Add to Address Book, Traffic,
Guidance Volume and Settings
F Menu – Provides access to additional
functions when available
G Back – Returns to the previous screen
Provides access to all navigation and audio system control unit features.
A Controller – In addition to the touchscreen, the controller serves as a means for navigating K900’s UVO
Luxury Services with Premium Navigation system. The controller is actually three buttons: A scroll knob —
for scrolling the keyboard and menus and zooming in and out on the map screen; an 8-way joystick — for
toggling from left to right and top to bottom of menus and moving the focus of the navigation map; and a
push button — for selecting the highlighted feature
Scroll Knob8-Way Joystick Push Button
CENTER PANEL
*IF EQUIPPED
CENTER PANEL
*IF EQUIPPED
Page 28 of 62
26
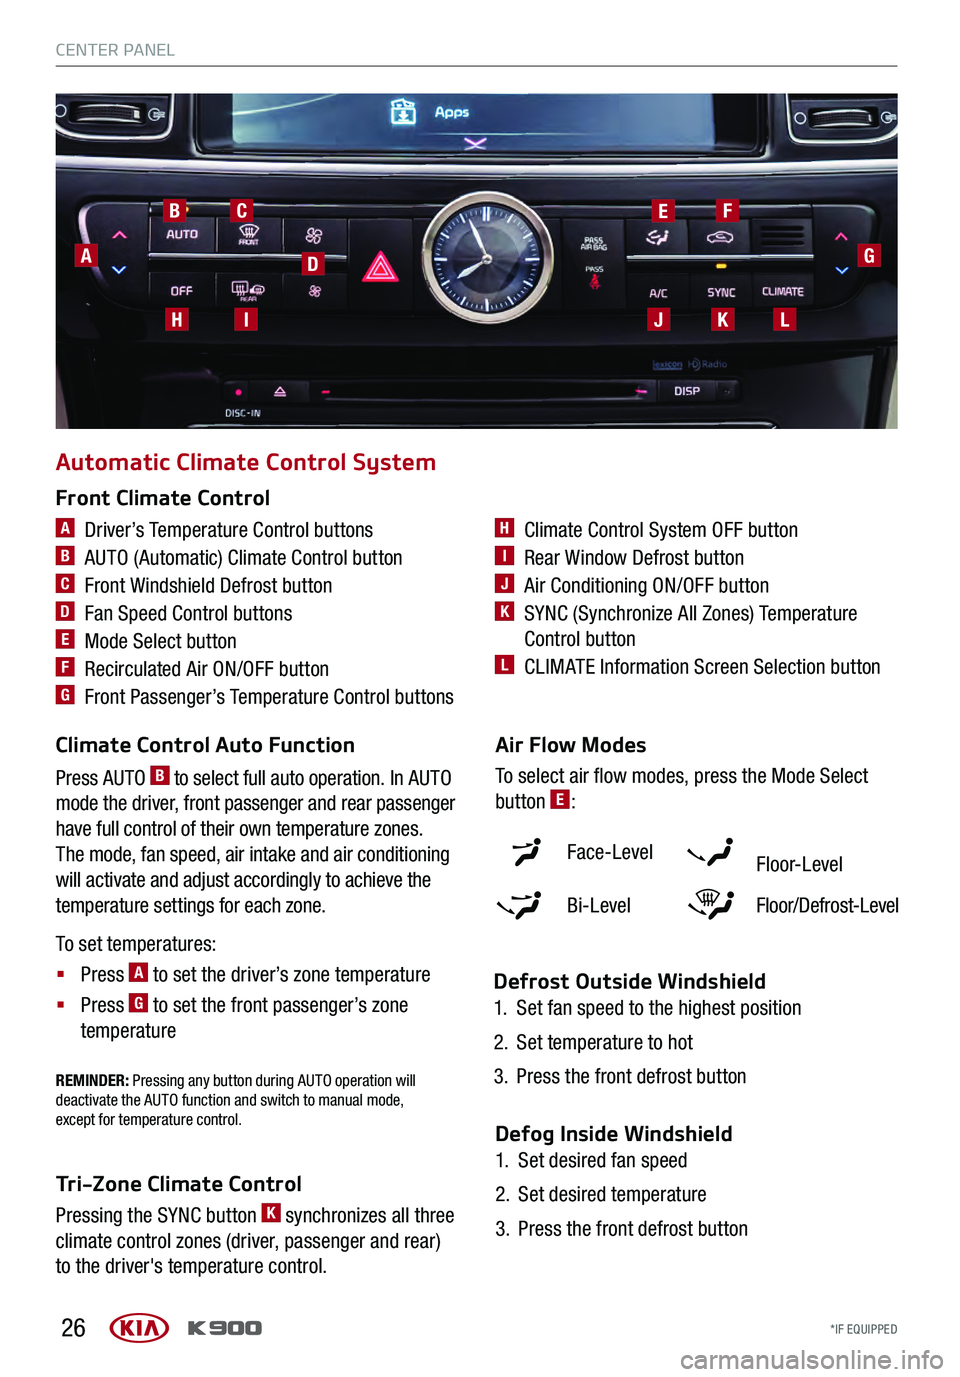
A Driver’s Temperature Control buttons
B AUTO (Automatic) Climate Control button
C Front Windshield Defrost button
D Fan Speed Control buttons
E Mode Select button
F Recirculated Air ON/OFF button
G Front Passenger’s Temperature Control buttons
H Climate Control System OFF button
I Rear Window Defrost button
J Air Conditioning ON/OFF button
K SYNC (Synchronize All Zones) Temperature
Control button
L CLIMATE Information Screen Selection button
Automatic Climate Control System
A
BC
D
EF
IJKL
G
H
Climate Control Auto Function
Press AUTO
B to select full auto operation. In AUTO
mode the driver, front passenger and rear passenger
have full control of their own temperature zones.
The mode, fan speed, air intake and air conditioning
will activate and adjust accordingly to achieve the
temperature settings for each zone.
To set temperatures:
§
Press A to set the driver’s zone temperature
§
Press G to set the front passenger’s zone
temperature
REMINDER: Pressing any button during AUTO operation will
deactivate the AUTO function and switch to manual mode,
except for temperature control.
Front Climate Control
Defrost Outside Windshield
1. Set fan speed to the highest position
2. Set temperature to hot
3. Press the front defrost button
Face-Level F lo or- L evel
Bi-Level Floor/Defrost-Level
Air Flow Modes
To select air flow modes, press the Mode Select
button
E:
Tri-Zone Climate Control
Pressing the SYNC button
K synchronizes all three
climate control zones (driver, passenger and rear)
to the driver's temperature control. Defog Inside Windshield
1. Set desired fan speed
2. Set desired temperature
3. Press the front defrost button
CENTER PANEL
*IF EQUIPPED
CENTER PANEL
*IF EQUIPPED
Page 36 of 62

34
Seat Warmers / Ventilated Seats
Quick Tip
With the seat warmer switch in the ON position,
the heating system in the seat turns OFF or ON
automatically depending on the seat temperature.
www.KuTechVideos.com/kh13/2017
SE AT WARMERS AND
V ENTIL ATED SE AT S
VIDEO
To view a video on
your mobile device,
snap this QR Code or
visit the listed website.
Refer to page 2 for
more information.Front Seats
Seat Warmers – Press button
A once for high setting (3
LEDs lit). Press button twice for medium setting (2 LEDs lit).
Press a third time for low setting (1 LED lit) and again to
turn OFF.
Ventilated Seats – Press button
B once for high setting (3
LEDs lit). Press twice for medium setting (2 LEDs lit). Press a
third time for low setting (1 LED lit) and again to turn OFF.
Rear Seats
Seat Warmers – Press top of button
C once for high setting
(3 LEDs lit). Press button twice for medium setting (2 LEDs
lit). Press a third time for low setting (1 LED lit) and again to
turn OFF.
Ventilated Seats* – Press bottom of button
D once for high
setting (3 LEDs lit). Press twice for medium setting (2 LEDs
lit). Press a third time for low setting (1 LED lit) and again to
turn OFF.
D
D
C
C
A
B
REMINDER: Use extreme caution when using the
seat warmers to avoid burns. Refer to the Owner’s
Manual for more information.
(Rear Passenger Controls are located in the middle of the rear seat) (Buttons are located on the door panel)
S E AT I N G
*IF EQUIPPED
S E AT I N G
*IF EQUIPPED
Page 37 of 62

35
Move/press controls to adjust headrest, seat forward/backward position, seat cushion length, seatback
angle or lumbar support.
Headrest Height Adjustment*: Move button
A up/down to adjust headrest height
Seatback Angle Adjustment: Move button
B forward/backward to adjust seatback angle
Seat Sliding, Seat Height and Cushion Length* Adjustments:
§
Move button C forward/backward to slide seat
§
Move front part of button D up/down to raise/lower front part of seat
§
Move back part of button E up/down to raise/lower back part of seat
§
Move button F forward/backward to increase/decrease cushion length*
Lumbar Support Adjustment:
§
Press G to increase support
§
Press H to decrease support
§
Press I to move lumbar support up/down
Power Adjustable Driver’s Seat
A
B
ED
F
C
GH
I
I
(Buttons located on left side of seat cushion)
(Controls located on door panel)
Power Height Adjustment* – To adjust the height, move
the seat control button A up/down.
Manual Tilt Adjustment – To adjust the headrest forward/
backward, tilt the lower part of the headrest at a slight angle.
Power Front Seat Headrest Adjustment*
S E AT I N G
*IF EQUIPPED
ALWAYS CHECK THE OWNER’S MANUAL FOR COMPLE TE OPER ATING INFORMATION AND SAFE T Y WARNINGS.
Page 38 of 62
36
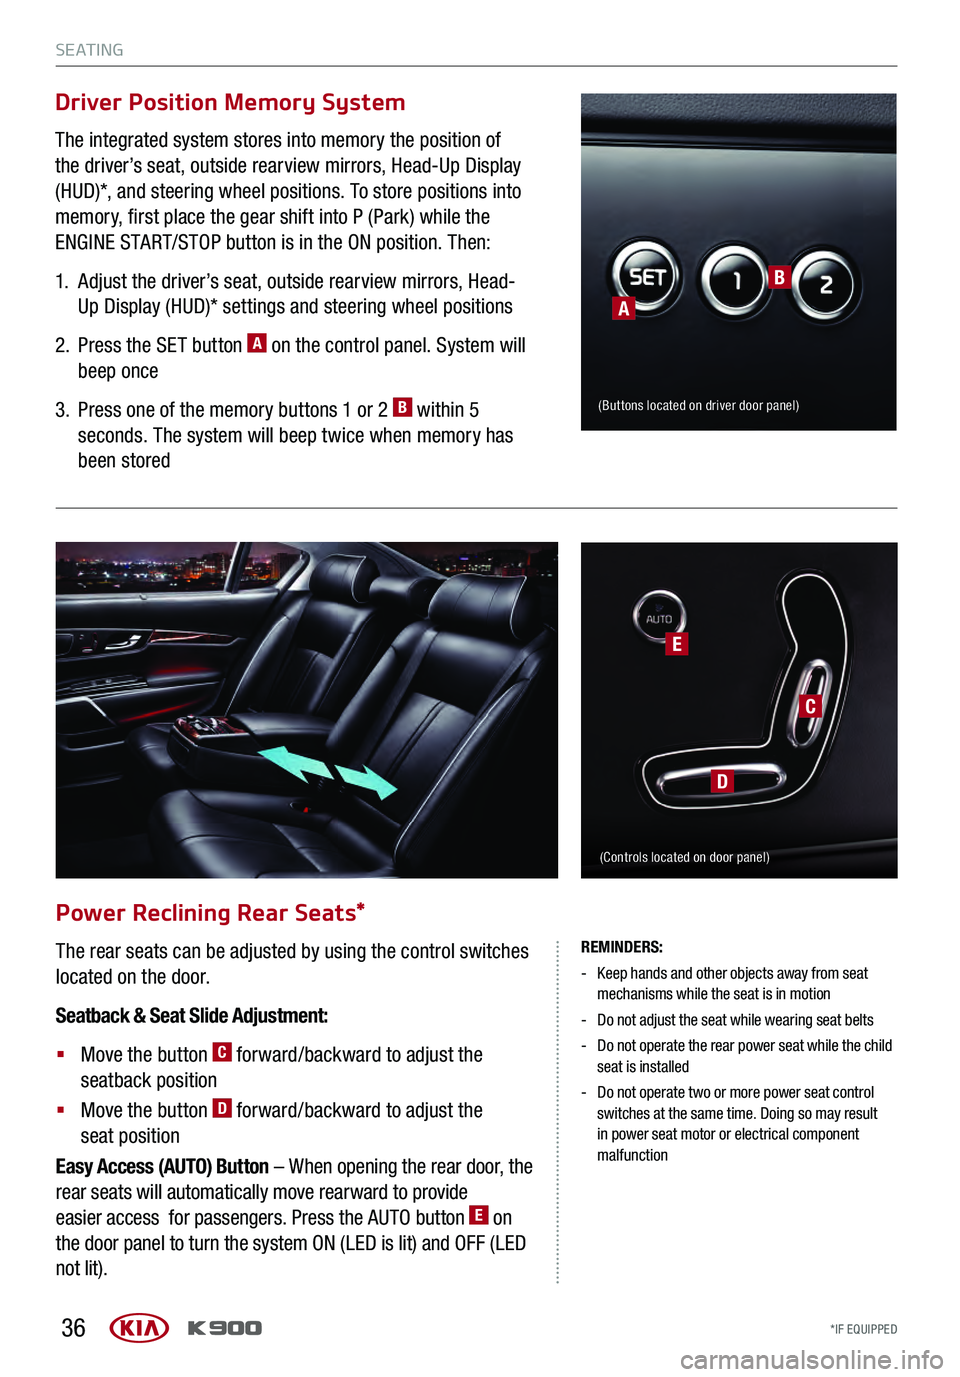
Power Reclining Rear Seats*
The rear seats can be adjusted by using the control switches
located on the door.
Seatback & Seat Slide Adjustment:
§
Move the button C forward/backward to adjust the
seatback position
§
Move the button D forward/backward to adjust the
seat position
Easy Access (AUTO) Button – When opening the rear door, the
rear seats will automatically move rearward to provide
easier access for passengers. Press the AUTO button
E on
the door panel to turn the system ON (LED is lit) and OFF (LED
not lit).
REMINDERS:
- Keep hands and other objects away from seat
mechanisms while the seat is in motion
- Do not adjust the seat while wearing seat belts
- Do not operate the rear power seat while the child
seat is installed
- Do not operate two or more power seat control
switches at the same time. Doing so may result
in power seat motor or electrical component
malfunction
C
D
E
(Controls located on door panel)
The integrated system stores into memory the position of
the driver’s seat, outside rearview mirrors, Head-Up Display
(HUD)*, and steering wheel positions. To store positions into
memory, first place the gear shift into P (Park) while the
ENGINE START/STOP button is in the ON position. Then:
1. Adjust the driver’s seat, outside rearview mirrors, Head-
Up Display (HUD)* settings and steering wheel positions
2. Press the SET button A on the control panel. System will
beep once
3. Press one of the memory buttons 1 or 2 B within 5
seconds. The system will beep twice when memory has
been stored
Driver Position Memory System
(Buttons located on driver door panel)
B
A
S E AT I N G
*IF EQUIPPED
S E AT I N G
*IF EQUIPPED
Page 39 of 62
37
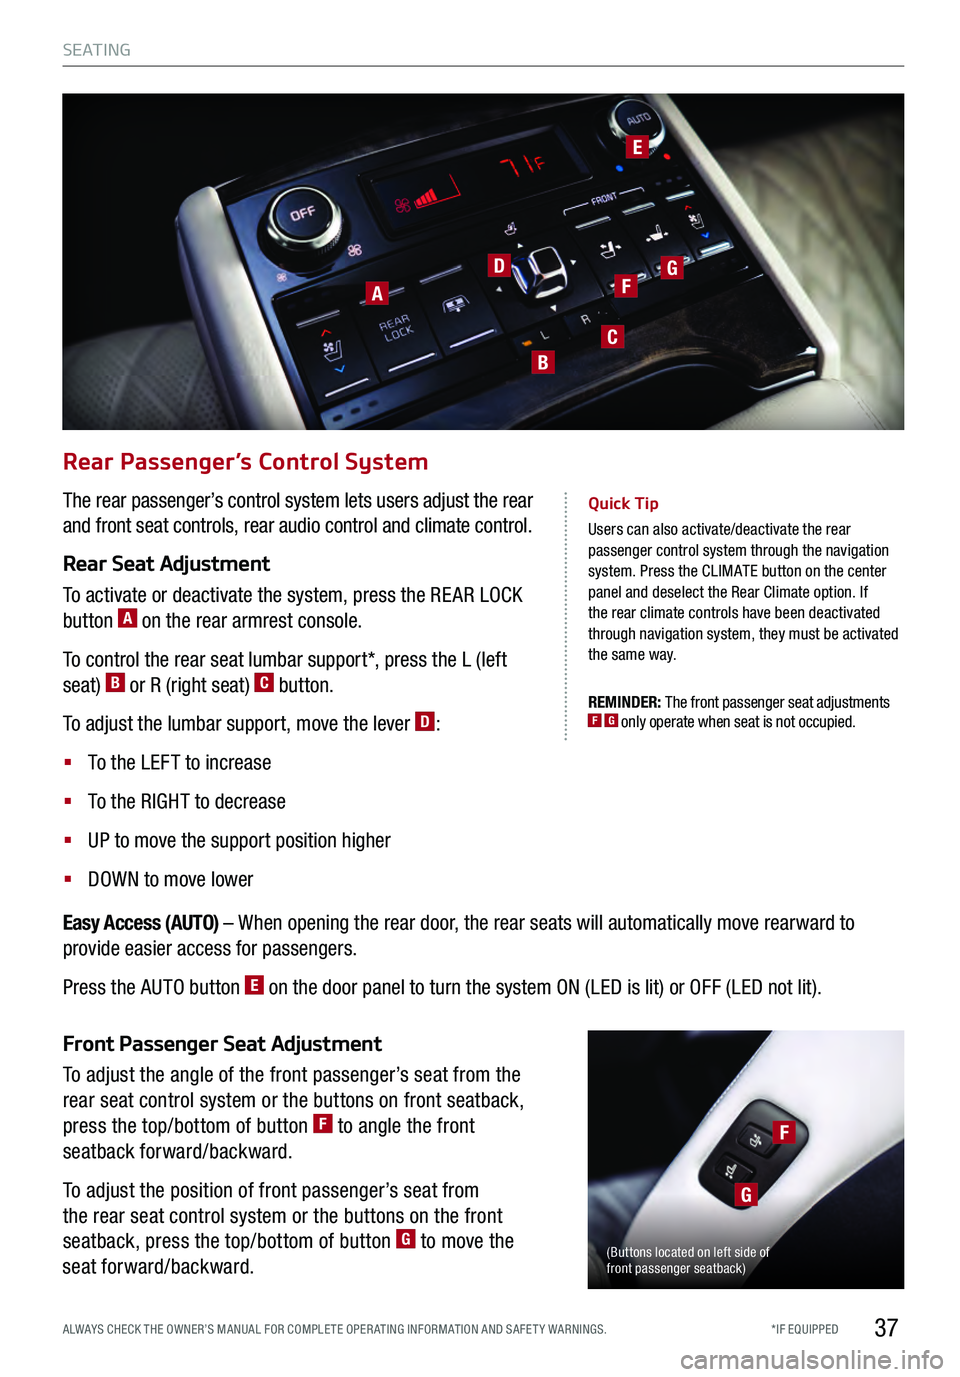
Rear Passenger’s Control System
The rear passenger’s control system lets users adjust the rear
and front seat controls, rear audio control and climate control.
Rear Seat Adjustment
To activate or deactivate the system, press the RE AR LOCK
button
A on the rear armrest console.
To control the rear seat lumbar support*, press the L (left
seat)
B or R (right seat) C button.
To adjust the lumbar support, move the lever
D:
§ To the LEFT to increase
§ To the RIGHT to decrease
§
UP to move the support position higher
§ DOWN to move lower
Quick Tip
Users can also activate/deactivate the rear passenger control system through the navigation
system. Press the CLIMATE button on the center
panel and deselect the Rear Climate option. If
the rear climate controls have been deactivated
through navigation system, they must be activated
the same way.
DF
E
G
C
B
A
Front Passenger Seat Adjustment
To adjust the angle of the front passenger’s seat from the
rear seat control system or the buttons on front seatback,
press the top/bottom of button
F to angle the front
seatback forward/backward.
To adjust the position of front passenger’s seat from
the rear seat control system or the buttons on the front
seatback, press the top/bottom of button
G to move the
seat forward/backward.
REMINDER: The front passenger seat adjustments F G only operate when seat is not occupied.
Easy Access (AUTO) – When opening the rear door, the rear seats will automatically move rearward to
provide easier access for passengers.
Press the AUTO button
E on the door panel to turn the system ON (LED is lit) or OFF (LED not lit).
(Buttons located on left side of
front passenger seatback)
F
G
S E AT I N G
*IF EQUIPPED
ALWAYS CHECK THE OWNER’S MANUAL FOR COMPLE TE OPER ATING INFORMATION AND SAFE T Y WARNINGS.
Page 41 of 62
39
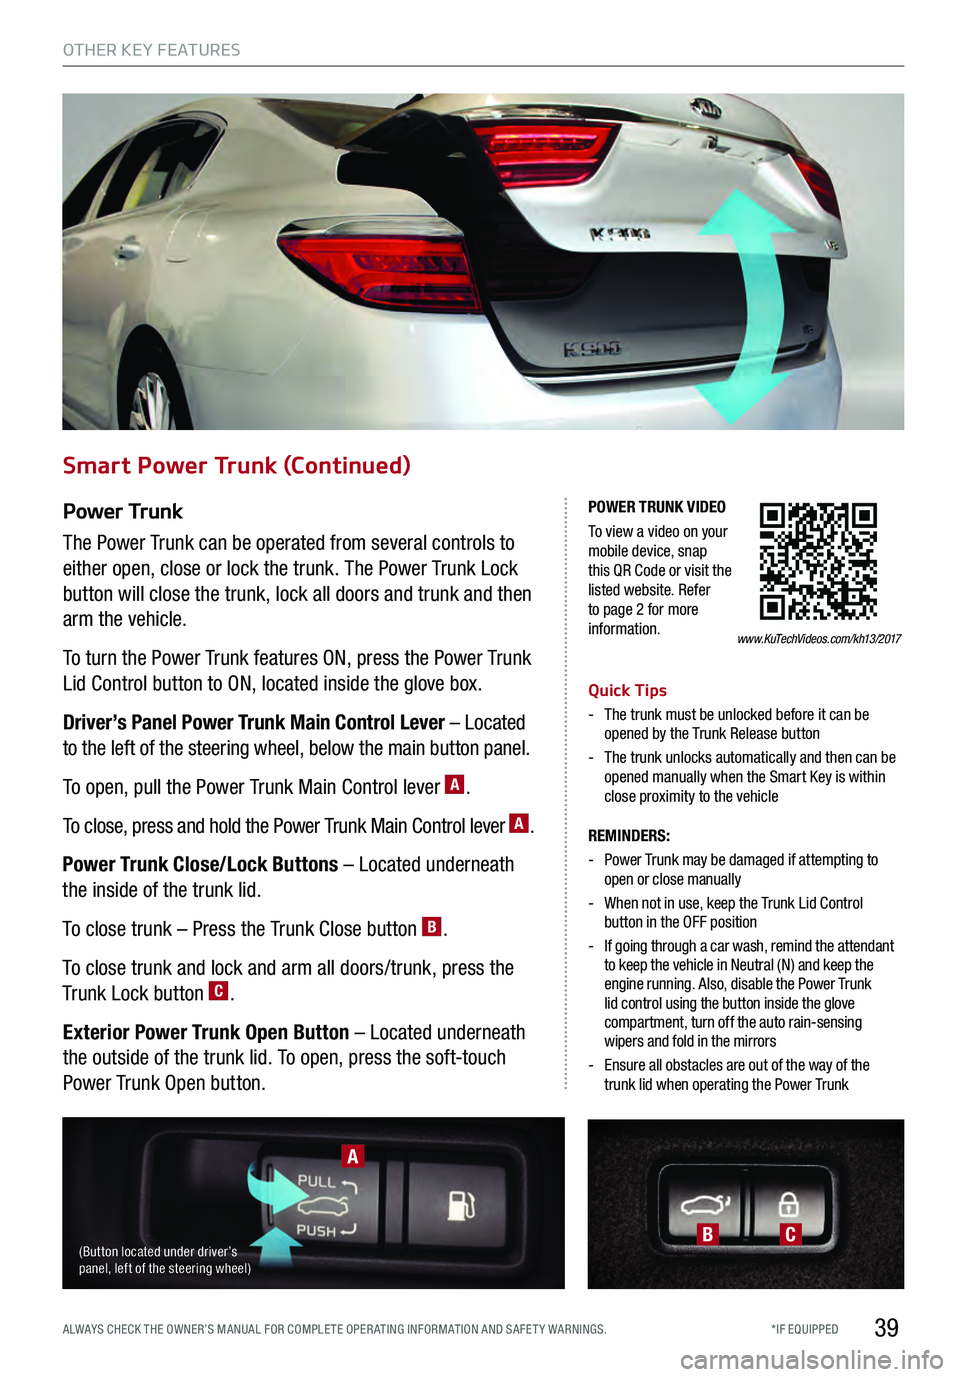
P o w e r Tr u n k
The Power Trunk can be operated from several controls to
either open, close or lock the trunk. The Power Trunk Lock
button will close the trunk, lock all doors and trunk and then
arm the vehicle.
To turn the Power Trunk features ON, press the Power Trunk
Lid Control button to ON, located inside the glove box.
Driver’s Panel Power Trunk Main Control Lever – Located
to the left of the steering wheel, below the main button panel.
To open, pull the Power Trunk Main Control lever
A.
To close, press and hold the Power Trunk Main Control lever
A.
Power Trunk Close/Lock Buttons – Located underneath
the inside of the trunk lid.
To close trunk – Press the Trunk Close button
B.
To close trunk and lock and arm all doors/trunk, press the
Trunk Lock button
C.
Exterior Power Trunk Open Button – Located underneath
the outside of the trunk lid. To open, press the soft-touch
Power Trunk Open button.
Quick Tips
- The trunk must be unlocked before it can be
opened by the Trunk Release button
- The trunk unlocks automatically and then can be
opened manually when the Smart Key is within
close proximity to the vehicle
BC
www.KuTechVideos.com/kh13/2017
POWER TRUNK VIDEO
To view a video on your
mobile device, snap
this QR Code or visit the
listed website. Refer
to page 2 for more
information.
A
(Button located under driver’s
panel, left of the steering wheel)
REMINDERS:
- Power Trunk may be damaged if attempting to
open or close manually
- When not in use, keep the Trunk Lid Control
button in the OFF position
- If going through a car wash, remind the attendant
to keep the vehicle in Neutral (N) and keep the
engine running. Also, disable the Power Trunk
lid control using the button inside the glove
compartment, turn off the auto rain-sensing
wipers and fold in the mirrors
- Ensure all obstacles are out of the way of the
trunk lid when operating the Power Trunk
Smart Power Trunk (Continued)
OTHER KEY FEATURES
*IF EQUIPPED
ALWAYS CHECK THE OWNER’S MANUAL FOR COMPLE TE OPER ATING INFORMATION AND SAFE T Y WARNINGS.
Page 44 of 62

42
Map/Room Lamps
Automatic Turn Off Function
The interior lights automatically turn off approximately 20
seconds after the ENGINE START/STOP button is turned OFF.
Map/Room Lamp Operation
Map Lamps – These lights produce spot beams for
convenient use as map lamps or as personal lamps for the
driver or the front passenger. Press the buttons
A to turn the
map lamps ON/OFF.
ROOM button – Press the button
B to turn the front and
rear lamps ON/OFF.
REAR ROOM button – Press the button
C to turn the rear
lamp ON/OFF.
DOOR button – When the DOOR button
D is pressed (LED
lit) the front and rear lamps will turn ON as follows:
§
When a door is opened or doors are unlocked with the
Smart Key, the lamps will turn ON for approximately
30 seconds
§
If the ENGINE START/STOP button is in the ACC/OFF
position and a door is open, the lamps will stay ON for
approximately 20 minutes
§
If the ENGINE START/STOP button is in the ACC/ON
position and a door is open, the lamps will stay ON
The lamps will turn OFF immediately if the ENG INE STA RT/
STOP button is turned ON or all doors are locked.
PRIVACY button – When button
E is pressed (LED lit) and
a door is opened, that door lamp will turn ON.
REMINDER: When room lamp lens is pressed ON it
will remain ON, even when the map lamp switch is in
the OFF position. Quick Tips
- When doors are unlocked by the Smart Key, the
lamp turns ON for approximately 30 seconds
- If your vehicle is equipped with the theft alarm
system, the interior lights automatically turn off
approximately 3 seconds after the system is in
armed stage
- Using interior lights for an extended period of time
may cause battery discharge
BC
D
E
AA
OTHER KEY FEATURES
*IF EQUIPPED
OTHER KEY FEATURES
*IF EQUIPPED