height KIA K900 2017 Owners Manual
[x] Cancel search | Manufacturer: KIA, Model Year: 2017, Model line: K900, Model: KIA K900 2017Pages: 542, PDF Size: 14.89 MB
Page 20 of 542
3-2
Seat and safety features of your vehicle
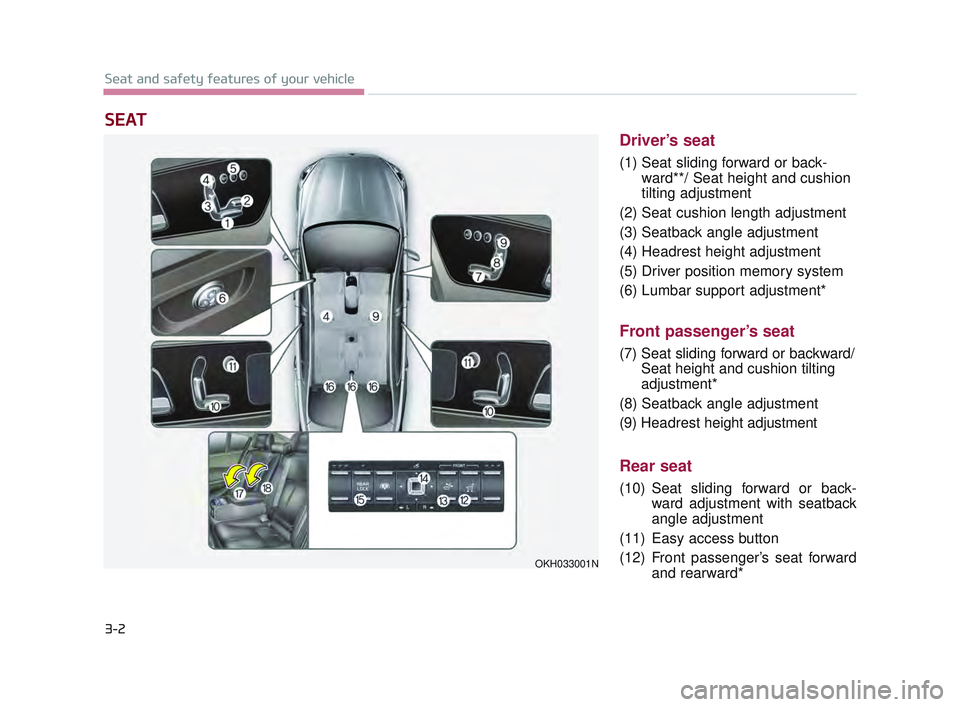
Driver’s seat
(1) Seat sliding forward or back-ward**/ Seat height and cushion
tilting adjustment
(2) Seat cushion length adjustment
(3) Seatback angle adjustment
(4) Headrest height adjustment
(5) Driver position memory system
(6) Lumbar support adjustment*
Front passenger’s seat
(7) Seat sliding forward or backward/ Seat height and cushion tilting
adjustment*
(8) Seatback angle adjustment
(9) Headrest height adjustment
Rear seat
(10) Seat sliding forward or back-
ward adjustment with seatback
angle adjustment
(11) Easy access button
(12) Front passenger’s seat forward and rearward*
SEAT
OKH033001N
KH USA 3:2016 12/2/2016 10:11 AM Page 2
Page 21 of 542
Seat and safety features of your vehicle
3
3-3
(13) Front passenger’s seat backangle*
(14) Lumber support adjustment*
(15) Rear lock button
(16) Headrest
(17) Armrest
(18) Ski through*
*: if equipped
**: The height of the driver's headrest is automatically adjusted simulta-
neously with the driver's seat slid-
ing adjustment operation.
Loose objects
Do not place anything in the dri-
ver's foot well or under the front
seats. Loose objects in the dri-
ver's foot area could interfere
with the operation of the foot
pedals.
WARNING
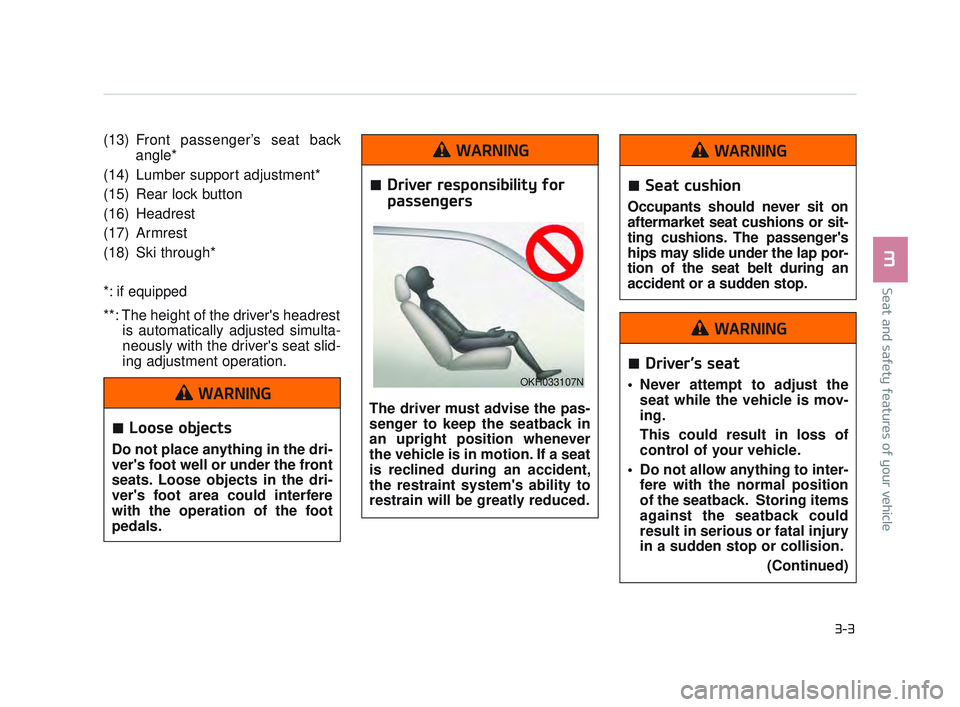
Driver responsibility for
passengers
The driver must advise the pas-
senger to keep the seatback in
an upright position whenever
the vehicle is in motion. If a seat
is reclined during an accident,
the restraint system's ability to
restrain will be greatly reduced.
WARNING
OKH033107N
Seat cushion
Occupants should never sit on
aftermarket seat cushions or sit-
ting cushions. The passenger's
hips may slide under the lap por-
tion of the seat belt during an
accident or a sudden stop.
WARNING
Driver’s seat
Never attempt to adjust theseat while the vehicle is mov-
ing.
This could result in loss of
control of your vehicle.
Do not allow anything to inter- fere with the normal position
of the seatback. Storing items
against the seatback could
result in serious or fatal injury
in a sudden stop or collision.
(Continued)
WARNING
KH USA 3:2016 12/2/2016 10:11 AM Page 3
Page 24 of 542
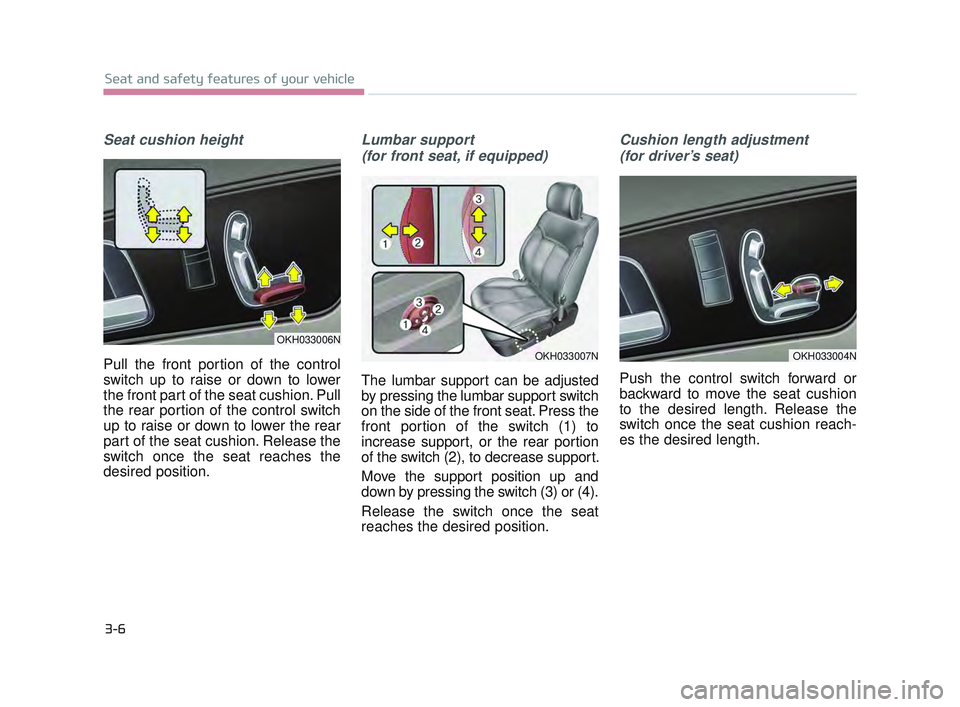
Seat cushion height
Pull the front portion of the control
switch up to raise or down to lower
the front part of the seat cushion. Pull
the rear portion of the control switch
up to raise or down to lower the rear
part of the seat cushion. Release the
switch once the seat reaches the
desired position.
Lumbar support (for front seat, if equipped)
The lumbar support can be adjusted
by pressing the lumbar support switch
on the side of the front seat. Press the
front portion of the switch (1) to
increase support, or the rear portion
of the switch (2), to decrease support.
Move the support position up and
down by pressing the switch (3) or (4).
Release the switch once the seat
reaches the desired position.
Cushion length adjustment (for driver’s seat)
Push the control switch forward or
backward to move the seat cushion
to the desired length. Release the
switch once the seat cushion reach-
es the desired length.
3-6
Seat and safety features of your vehicle
OKH033006N
OKH033007NOKH033004N
KH USA 3:2016 12/2/2016 10:11 AM Page 6
Page 27 of 542
Seat and safety features of your vehicle
3
3-9
For maximum effectiveness in case
of an accident, the headrest should
be adjusted so the middle of the
headrest is at the same height of the
center of gravity of an occupant's
head. Generally, the center of gravity
of most people's head is similar with
the height of the top of their eyes.
Also, adjust the headrest as close to
your head as possible.
For this reason, the use of a cushion
that holds the body away from the
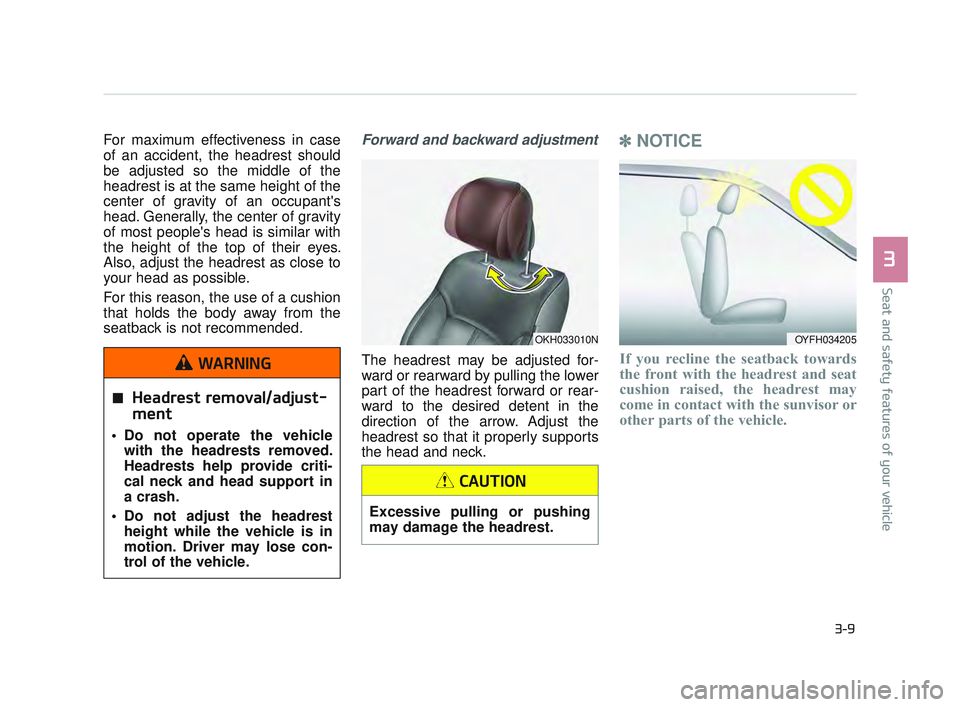
seatback is not recommended.Forward and backward adjustment
The headrest may be adjusted for-
ward or rearward by pulling the lower
part of the headrest forward or rear-
ward to the desired detent in the
direction of the arrow. Adjust the
headrest so that it properly supports
the head and neck.
✽NOTICE
If you recline the seatback towards
the front with the headrest and seat
cushion raised, the headrest may
come in contact with the sunvisor or
other parts of the vehicle.
OKH033010N
Headrest removal/adjust-
ment
Do not operate the vehicle
with the headrests removed.
Headrests help provide criti-
cal neck and head support in
a crash.
Do not adjust the headrest height while the vehicle is in
motion. Driver may lose con-
trol of the vehicle.
WARNING
OYFH034205
Excessive pulling or pushing
may damage the headrest.
CAUTION
KH USA 3:2016 12/2/2016 10:11 AM Page 9
Page 28 of 542
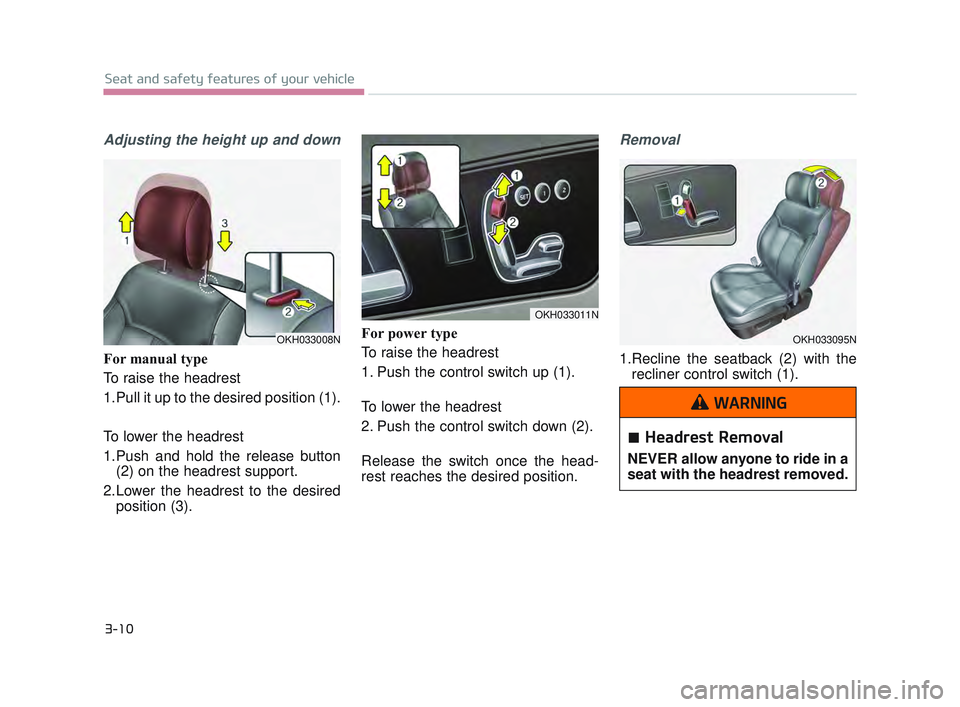
Adjusting the height up and down
For manual type
To raise the headrest
1.Pull it up to the desired position (1).
To lower the headrest
1.Push and hold the release button(2) on the headrest support.
2.Lower the headrest to the desired position (3). For power type
To raise the headrest
1. Push the control switch up (1).
To lower the headrest
2. Push the control switch down (2).
Release the switch once the head-
rest reaches the desired position.
Removal
1.Recline the seatback (2) with the
recliner control switch (1).
3-10
Seat and safety features of your vehicle
OKH033011N
OKH033095NOKH033008N
Headrest Removal
NEVER allow anyone to ride in a
seat with the headrest removed.
WARNING
KH USA 3:2016 12/2/2016 10:11 AM Page 10
Page 30 of 542
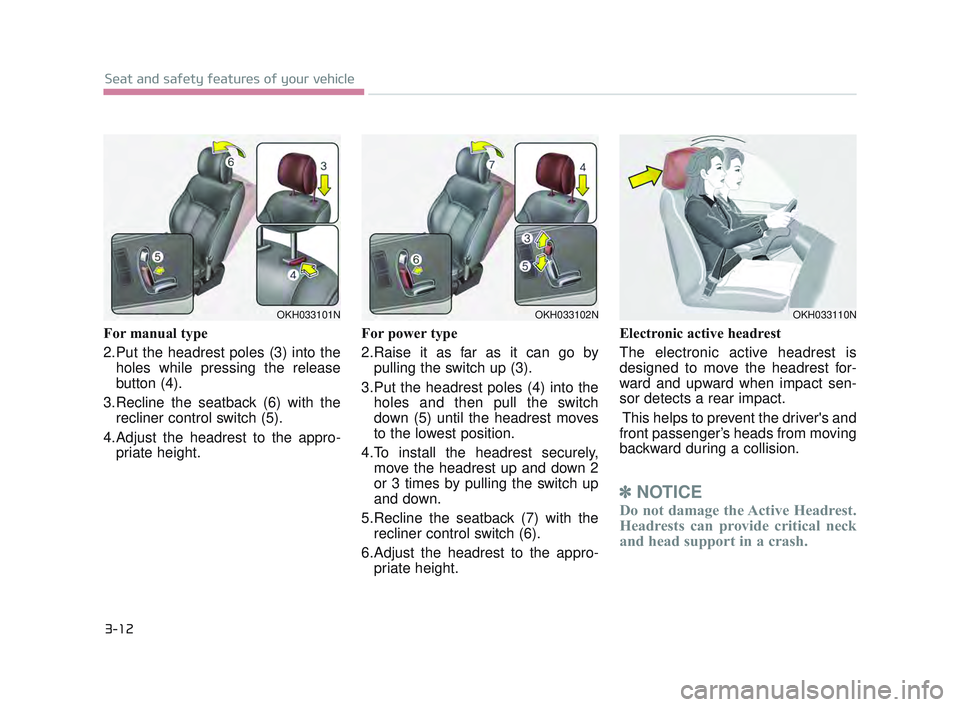
For manual type
2.Put the headrest poles (3) into theholes while pressing the release
button (4).
3.Recline the seatback (6) with the recliner control switch (5).
4.Adjust the headrest to the appro- priate height. For power type
2.Raise it as far as it can go by
pulling the switch up (3).
3.Put the headrest poles (4) into the holes and then pull the switch
down (5) until the headrest moves
to the lowest position.
4.To install the headrest securely, move the headrest up and down 2
or 3 times by pulling the switch up
and down.
5.Recline the seatback (7) with the recliner control switch (6).
6.Adjust the headrest to the appro- priate height. Electronic active headrest
The electronic active headrest is
designed to move the headrest for-
ward and upward when impact sen-
sor detects a rear impact.
This helps to prevent the driver's and
front passenger’s heads from moving
backward during a collision.
✽ NOTICE
Do not damage the Active Headrest.
Headrests can provide critical neck
and head support in a crash.
3-12
Seat and safety features of your vehicle
OKH033102NOKH033110NOKH033101N
KH USA 3:2016 12/2/2016 10:11 AM Page 12
Page 34 of 542

Rear switches operating limitation
You can activate or deactivate the
rear seat control, rear audio control
and climate control by using the
REAR LOCK button on the rear arm-
rest or “System Settings” in the AVN
(Audio, Video, and Navigation).
Detailed information for the “System
Settings” is described in a separately
supplied manual.
If the rear control button has deacti-
vated through AVN, you can reacti-
vate the rear control button only
through AVN.
Headrest (for rear seat)
The rear seat is equipped with head-
rests in all the seating positions for
the occupant's safety and comfort.
The headrest not only provides com-
fort for passengers, but also helps
protect the head and neck in the
event of a collision. For maximum effectiveness in case
of an accident, the headrest should
be adjusted so the middle of the
headrest is at the same height of the
center of gravity of an occupant's
head. Generally, the center of gravity
of most people's head is similar with
the height as the top of their eyes.
Also adjust the headrest as close to
your head as possible. For this rea-
son, the use of a cushion that holds
the body away from the seatback is
not recommended.
3-16
Seat and safety features of your vehicle
OKH033111NOKH033040N
KH USA 3:2016 12/2/2016 10:11 AM Page 16
Page 35 of 542

Seat and safety features of your vehicle
3
3-17
Adjusting the height up and down
To raise the headrest, pull it up to the
desired position (1). To lower the
headrest, push and hold the release
button (2) on the headrest support
and lower the headrest to the desired
position (3).Removal and installation
(for power seat)
To remove the headrest move the
seat forward as much as possible.
Raise it as far as it can go then press
the release button (1) while pulling
the headrest up (2).
To reinstall the headrest move the
seat forward as much as possible.
Put the headrest poles (3) into the
holes while pressing the release but-
ton (1). Then adjust it to the appro-
priate height (2).
OKH033026NOKH033024N
Do not operate the vehicle with
the headrests removed.
Headrests may provide critical
neck and head support in a
crash.
WARNING
Headrest Reinstallation
To reduce the risk of injury to
the head or neck, always make
sure the headrest is locked into
position and adjusted properly.
WARNING
KH USA 3:2016 12/2/2016 10:11 AM Page 17
Page 41 of 542
Seat and safety features of your vehicle
3
3-23
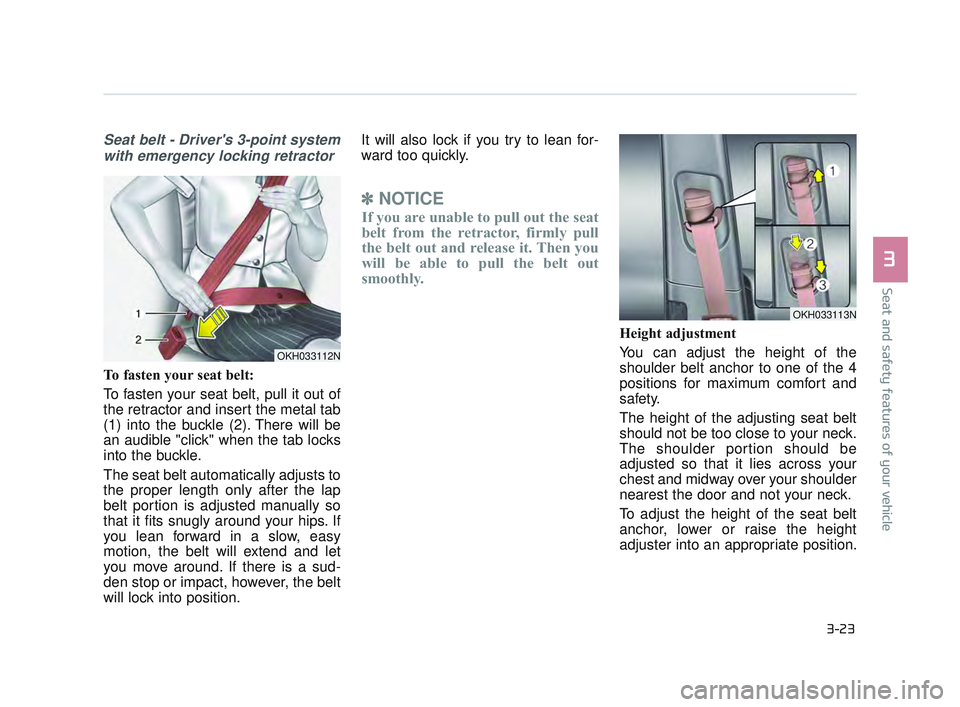
Seat belt - Driver's 3-point systemwith emergency locking retractor
To fasten your seat belt:
To fasten your seat belt, pull it out of
the retractor and insert the metal tab
(1) into the buckle (2). There will be
an audible "click" when the tab locks
into the buckle.
The seat belt automatically adjusts to
the proper length only after the lap
belt portion is adjusted manually so
that it fits snugly around your hips. If
you lean forward in a slow, easy
motion, the belt will extend and let
you move around. If there is a sud-
den stop or impact, however, the belt
will lock into position. It will also lock if you try to lean for-
ward too quickly.
✽
NOTICE
If you are unable to pull out the seat
belt from the retractor, firmly pull
the belt out and release it. Then you
will be able to pull the belt out
smoothly.
Height adjustment
You can adjust the height of the
shoulder belt anchor to one of the 4
positions for maximum comfort and
safety.
The height of the adjusting seat belt
should not be too close to your neck.
The shoulder portion should be
adjusted so that it lies across your
chest and midway over your shoulder
nearest the door and not your neck.
To adjust the height of the seat belt
anchor, lower or raise the height
adjuster into an appropriate position.
OKH033113N
OKH033112N
KH USA 3:2016 12/2/2016 10:12 AM Page 23
Page 42 of 542
3-24
Seat and safety features of your vehicle
To raise the height adjuster, pull it up
(1). To lower it, push it down (3) while
pressing the height adjuster button
(2).
Release the button to lock the
anchor into position. Try sliding the
height adjuster to make sure that it
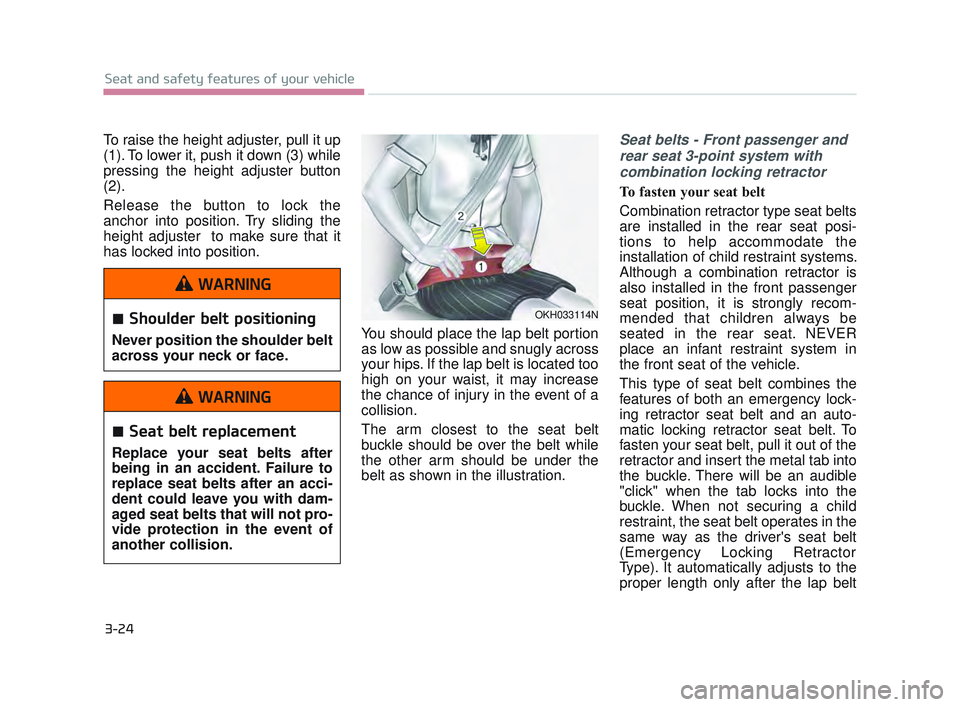
has locked into position.You should place the lap belt portion
as low as possible and snugly across
your hips. If the lap belt is located too
high on your waist, it may increase
the chance of injury in the event of a
collision.
The arm closest to the seat belt
buckle should be over the belt while
the other arm should be under the
belt as shown in the illustration.Seat belts - Front passenger andrear seat 3-point system withcombination locking retractor
To fasten your seat belt
Combination retractor type seat belts
are installed in the rear seat posi-
tions to help accommodate the
installation of child restraint systems.
Although a combination retractor is
also installed in the front passenger
seat position, it is strongly recom-
mended that children always be
seated in the rear seat. NEVER
place an infant restraint system in
the front seat of the vehicle.
This type of seat belt combines the
features of both an emergency lock-
ing retractor seat belt and an auto-
matic locking retractor seat belt. To
fasten your seat belt, pull it out of the
retractor and insert the metal tab into
the buckle. There will be an audible
"click" when the tab locks into the
buckle. When not securing a child
restraint, the seat belt operates in the
same way as the driver's seat belt
(Emergency Locking Retractor
Type). It automatically adjusts to the
proper length only after the lap belt
OKH033114NShoulder belt positioning
Never position the shoulder belt
across your neck or face.
WARNING
Seat belt replacement
Replace your seat belts after
being in an accident. Failure to
replace seat belts after an acci-
dent could leave you with dam-
aged seat belts that will not pro-
vide protection in the event of
another collision.
WARNING
KH USA 3:2016 12/2/2016 10:12 AM Page 24