fuel KIA K900 2019 Owners Manual
[x] Cancel search | Manufacturer: KIA, Model Year: 2019, Model line: K900, Model: KIA K900 2019Pages: 580, PDF Size: 15.11 MB
Page 6 of 580
Introduction
How to use this manual . . . . . . . . . . . . . . . . . . . . . . 1-2
Fuel requirements . . . . . . . . . . . . . . . . . . . . . . . . . . 1-3
ŌĆó Gasoline containing alcohol and methanol . . . . . . . . . 1-3
ŌĆó Do not use methanol . . . . . . . . . . . . . . . . . . . . . . . . . . . 1-4
ŌĆó Fuel Additives . . . . . . . . . . . . . . . . . . . . . . . . . . . . . . . . 1-5
ŌĆó Operation in foreign countries . . . . . . . . . . . . . . . . . . . 1-5
Vehicle break-in process . . . . . . . . . . . . . . . . . . . . . 1-5
Vehicle data collection and event data recorders. . 1-6
1
Page 8 of 580
13
Introduction
For the optimal engine performance,
we recommend you use unleaded
gasoline which has an octane rating
of RON (Research Octane Number)
95/AKI (Anti Knock Index) 91 or high-
er.
Using Unleaded gasoline with an
octane rating lower than RON 95
could result in loss of engine power
and increase in fuel consumption.
Your new vehicle is designed to
obtain maximum performance with
UNLEADED FUEL, as well as mini-
mize exhaust emissions and spark
plug fouling.
Never add any fuel system cleaning
agents to the fuel tank other than
what has been specified. (Consult an
authorized K900 Kia dealer for
details.)
Tighten the cap until it clicks onetime, otherwise the Check Engine light will illuminate.
Gasoline containing alcohol and
methanol
Gasohol, a mixture of gasoline and
ethanol (also known as grain alco-
hol), and gasoline or gasohol con-
taining methanol (also known as
wood alcohol) are being marketed
along with or instead of leaded or
unleaded gasoline. Pursuant to EPA regulations, ethanol
may be used in your vehicle.
Do not use gasohol containing more
than 15 percent ethanol, and do not
use gasoline or gasohol containing
any methanol. Ethanol provides less
energy than gasoline and it attracts
water, and it is thus likely to reduce
your fuel efficiency and could lower
your MPG results.
Methanol may cause drivability prob-
lems and damage to the fuel system,
engine control system and emission
control system.
Discontinue using gasohol of any
kind if drivability problems occur.
Vehicle damage or drivability prob-
lems may not be covered by the
manufacturerŌĆÖs warranty if they result
from the use of:
1. Gasoline or gasohol containing
methanol.
2. Leaded fuel or leaded gasohol.
3. Gasohol containing more than 15 percent ethanol.
WARNING - Refueling
ŌĆó Do not "top off" after the noz- zle automatically shuts off.
Attempts to force more fuel
into the tank can cause fuel
overflow onto you and the
ground causing a risk of fire.
Always check that the fuel cap is installed securely to pre-
vent fuel spillage, especially
in the event of an accident.
FUEL REQUIREMENTS
Page 9 of 580
Introduction
41
"E85" fuel is an alternative fuel com-
prised of 85 percent ethanol and 15
percent gasoline, and is manufac-
tured exclusively for use in Flexible
Fuel Vehicles. ŌĆ£E85ŌĆØ is not compati-
ble with your vehicle. Use of ŌĆ£E85ŌĆØ
may result in poor engine perform-
ance and damage to your vehicle's
engine and fuel system. Kia recom-
mends that customers do not use
fuel with an ethanol content exceed-
ing 15 percent.
Ō£Į Ō£Į
NOTICE
Your New Vehicle Limited Warranty
does not cover damage to the fuel sys-
tem or any performance problems
caused by the use of ŌĆ£E85ŌĆØ fuel.
Ō£Į Ō£Į
NOTICE
Never use any fuel containing
methanol. Discontinue use of any
methanol containing product which
may inhibit proper drivability.
Other fuels
Using fuels that contain Silicone (Si),
MMT (Manganese, Mn), Ferrocene
(Fe), and Other metalic additives,
may cause vehicle and engine dam-
age or cause misfiring, poor acceler-
ation, engine stalling, catalyst melt-
ing, clogging, abnormal corrosion,
life cycle reduction, etc.
Also, the Malfunction Indicator Lamp
(MIL) may illuminate.
Ō£Į Ō£Į
NOTICE
Damage to the fuel system or per-
formance problem caused by the use
of these fuels may not be covered by
your New Vehicle Limited
Warranty.
Gasoline containing MMT
Some gasoline contains harmful man-
ganese-based fuel additives Such as
MMT(Methylcyclopentadienyl
Manganese Tricarbonyl). Kia does not
recommend the use of gasoline con-
taining MMT. This type of fuel can
reduce vehicle performance and affect
your emission control system. The
Malfunction Indicator Lamp on the
cluster may come on.
Do not use methanol
Fuels containing methanol (wood
alcohol) should not be used in your
vehicle. This type of fuel can reduce
vehicle performance and damage
components of the fuel system,
engine control system and emission
control system.
Page 10 of 580
15
Introduction
Fuel Additives
Kia recommends that you use good
quality gasolines treated with deter-
gent additives such as TOP TIER
Detergent Gasoline, which help pre-
vent deposit formation in the engine.
These gasolines will help the engine
run cleaner and enhance performance
of the Emission Control System. For
more information on TOP TIER
Detergent Gasoline, please go to the
website (www.toptiergas.com)
For customers who do not use TOP
TIER Detergent Gasoline regularly,
and have problems starting or the
engine does not run smoothly, addi-
tives that can be purchased separate-
ly may be added to the gasoline.
If TOP TIER Detergent Gasoline is not
available, one bottle of additive should
be added to the fuel tank at every
7,500miles or every engine oil change
is recommended. Additives are avail-
able from your authorized K900 Kia
dealer along with information on how
to use them. Do not mix other addi-
tives.
Operation in foreign countries
If you are going to drive your vehicle
in another country, be sure to:
Observe all regulations regardingregistration and insurance.
Determine that acceptable fuel is available. No special break-in period is need-
ed. By following a few simple precau-
tions for the first 600 miles (1,000
km) you may add to the perform-
ance, economy and life of your vehi-
cle.
Do not race the engine.
While driving, keep your engine
speed (rpm, or revolutions per
minute) between 2,000 rpm and
4,000 rpm.
Do not maintain a single speed for long periods of time, either fast or
slow. Varying engine speed is
needed to properly break-in the
engine.
Avoid hard stops, except in emer- gencies, to allow the brakes to seat
properly.
Don't tow a trailer during the first 1,200 miles (2,000 km) of opera-
tion.
VEHICLE BREAK-IN
PROCESS
Page 14 of 580
23
Your vehicle at a glance
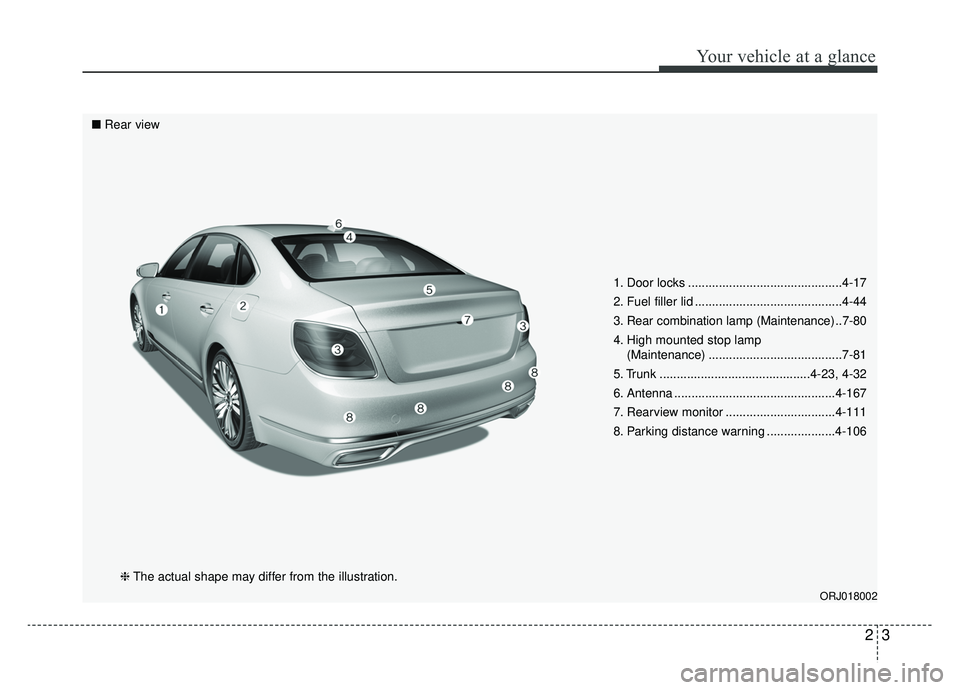
1. Door locks .............................................4-17
2. Fuel filler lid ...........................................4-44
3. Rear combination lamp (Maintenance) ..7-80
4. High mounted stop lamp(Maintenance) .......................................7-81
5. Trunk ............................................4-23, 4-32
6. Antenna ...............................................4-167
7. Rearview monitor ................................4-111
8. Parking distance warning ....................4-106
ORJ018002
Ō¢Ā Rear view
ŌØłThe actual shape may differ from the illustration.
Page 15 of 580
Your vehicle at a glance
42
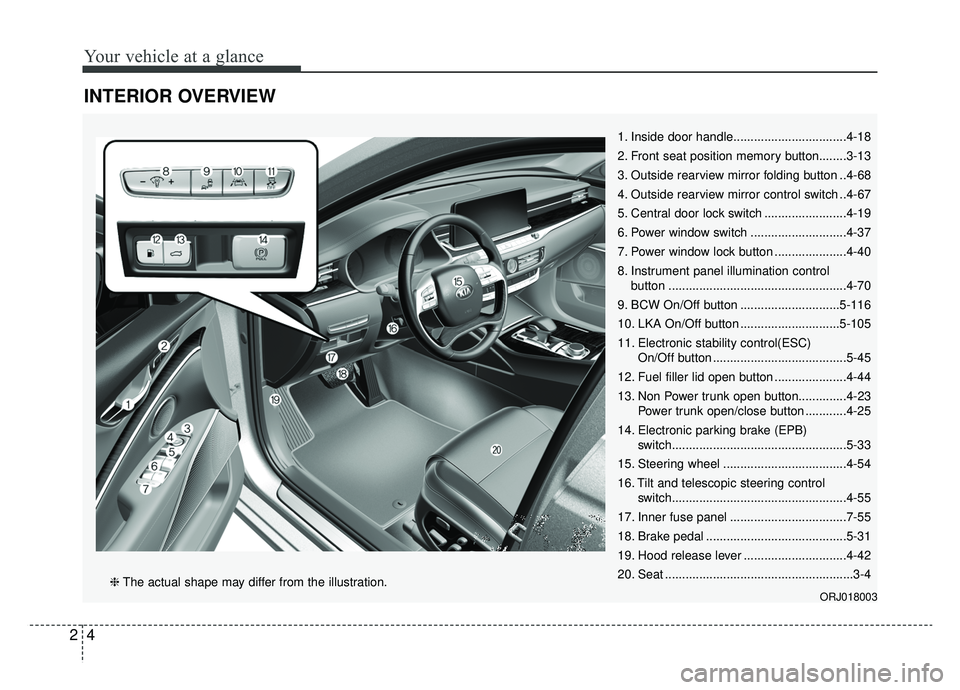
INTERIOR OVERVIEW
1. Inside door handle.................................4-18
2. Front seat position memory button........3-13
3. Outside rearview mirror folding button ..4-68
4. Outside rearview mirror control switch ..4-67
5. Central door lock switch ........................4-19
6. Power window switch ............................4-37
7. Power window lock button .....................4-40
8. Instrument panel illumination controlbutton ....................................................4-70
9. BCW On/Off button .............................5-116
10. LKA On/Off button .............................5-105
11. Electronic stability control(ESC) On/Off button .......................................5-45
12. Fuel filler lid open button .....................4-44
13. Non Power trunk open button..............4-23 Power trunk open/close button ............4-25
14. Electronic parking brake (EPB) switch...................................................5-33
15. Steering wheel ....................................4-54
16. Tilt and telescopic steering control switch...................................................4-55
17. Inner fuse panel ..................................7-55
18. Brake pedal .........................................5-31
19. Hood release lever ..............................4-42
20. Seat .......................................................3-4
ORJ018003ŌØł The actual shape may differ from the illustration.
Page 94 of 580
Features of your vehicle
Smart key . . . . . . . . . . . . . . . . . . . . . . . . . . . . . . . . . 4-4
ŌĆó Record your key number . . . . . . . . . . . . . . . . . . . . . . . 4-4
ŌĆó Smart key functions . . . . . . . . . . . . . . . . . . . . . . . . . . . 4-4
ŌĆó Remote keyless entry system operations . . . . . . . . . . . 4-7
ŌĆó Transmitter precautions . . . . . . . . . . . . . . . . . . . . . . . . 4-9
ŌĆó Battery replacement . . . . . . . . . . . . . . . . . . . . . . . . . . 4-10
ŌĆó Mechanical key operations . . . . . . . . . . . . . . . . . . . . . 4-11
ŌĆó Immobilizer system . . . . . . . . . . . . . . . . . . . . . . . . . . . 4-12
Theft-alarm system . . . . . . . . . . . . . . . . . . . . . . . . 4-14
ŌĆó Armed stage . . . . . . . . . . . . . . . . . . . . . . . . . . . . . . . . . 4-14
ŌĆó Theft-alarm stage . . . . . . . . . . . . . . . . . . . . . . . . . . . . 4-15
ŌĆó Disarmed stage. . . . . . . . . . . . . . . . . . . . . . . . . . . . . . . 4-15
Door locks . . . . . . . . . . . . . . . . . . . . . . . . . . . . . . . . 4-17
ŌĆó Operating door locks from outside the vehicle. . . . . 4-17
ŌĆó Operating door locks from inside the vehicle . . . . . . 4-18
ŌĆó Door lock/unlock features. . . . . . . . . . . . . . . . . . . . . . 4-20
ŌĆó Auto door lock/unlock feature . . . . . . . . . . . . . . . . . . 4-20
ŌĆó Child-protector rear door lock. . . . . . . . . . . . . . . . . . 4-21
Trunk . . . . . . . . . . . . . . . . . . . . . . . . . . . . . . . . . . . . \
4-23
ŌĆó Non-power trunk . . . . . . . . . . . . . . . . . . . . . . . . . . . . . 4-23
ŌĆó Power trunk . . . . . . . . . . . . . . . . . . . . . . . . . . . . . . . . . 4-25
Smart trunk . . . . . . . . . . . . . . . . . . . . . . . . . . . . . . 4-32
ŌĆó Emergency trunk safety release . . . . . . . . . . . . . . . . . 4-36
Windows . . . . . . . . . . . . . . . . . . . . . . . . . . . . . . . . . 4-37
ŌĆó Power windows . . . . . . . . . . . . . . . . . . . . . . . . . . . . . . 4-38
Hood. . . . . . . . . . . . . . . . . . . . . . . . . . . . . . . . . . . . \
. 4-42
ŌĆó Opening the hood . . . . . . . . . . . . . . . . . . . . . . . . . . . . 4-42
ŌĆó Closing the hood . . . . . . . . . . . . . . . . . . . . . . . . . . . . . 4-43
Fuel filler lid . . . . . . . . . . . . . . . . . . . . . . . . . . . . . . 4-44
ŌĆó Opening the fuel filler lid . . . . . . . . . . . . . . . . . . . . . . 4-44
ŌĆó Closing the fuel filler lid . . . . . . . . . . . . . . . . . . . . . . . 4-44
ŌĆó Emergency fuel filler lid release . . . . . . . . . . . . . . . . 4-45
Sunroof . . . . . . . . . . . . . . . . . . . . . . . . . . . . . . . . . . 4-48\
ŌĆó Sunroof open warning. . . . . . . . . . . . . . . . . . . . . . . . . 4-49
ŌĆó Sunshade. . . . . . . . . . . . . . . . . . . . . . . . . . . . . . . . \
. . . . 4-50
ŌĆó Sliding the sunroof . . . . . . . . . . . . . . . . . . . . . . . . . . . 4-50
ŌĆó Tilting the sunroof . . . . . . . . . . . . . . . . . . . . . . . . . . . . 4-52
ŌĆó Resetting the sunroof . . . . . . . . . . . . . . . . . . . . . . . . . 4-52
Steering wheel . . . . . . . . . . . . . . . . . . . . . . . . . . . . . 4-54
ŌĆó Electric Power Steering (EPS) . . . . . . . . . . . . . . . . . . 4-54
ŌĆó Tilt and telescopic steering . . . . . . . . . . . . . . . . . . . . . 4-55
ŌĆó Heated steering wheel . . . . . . . . . . . . . . . . . . . . . . . . . 4-56
ŌĆó Horn . . . . . . . . . . . . . . . . . . . . . . . . . . . . . . . . . . . . \
. . . 4-57
Mirrors . . . . . . . . . . . . . . . . . . . . . . . . . . . . . . . . . . 4-58\
ŌĆó Inside rearview mirror . . . . . . . . . . . . . . . . . . . . . . . . 4-58
ŌĆó Outside rearview mirror. . . . . . . . . . . . . . . . . . . . . . . 4-66
Instrument cluster . . . . . . . . . . . . . . . . . . . . . . . . . 4-69
ŌĆó Instrument cluster control . . . . . . . . . . . . . . . . . . . . . 4-70
ŌĆó LCD window control . . . . . . . . . . . . . . . . . . . . . . . . . . 4-70
4
Page 137 of 580
Features of your vehicle
44
4
Opening the fuel filler lid
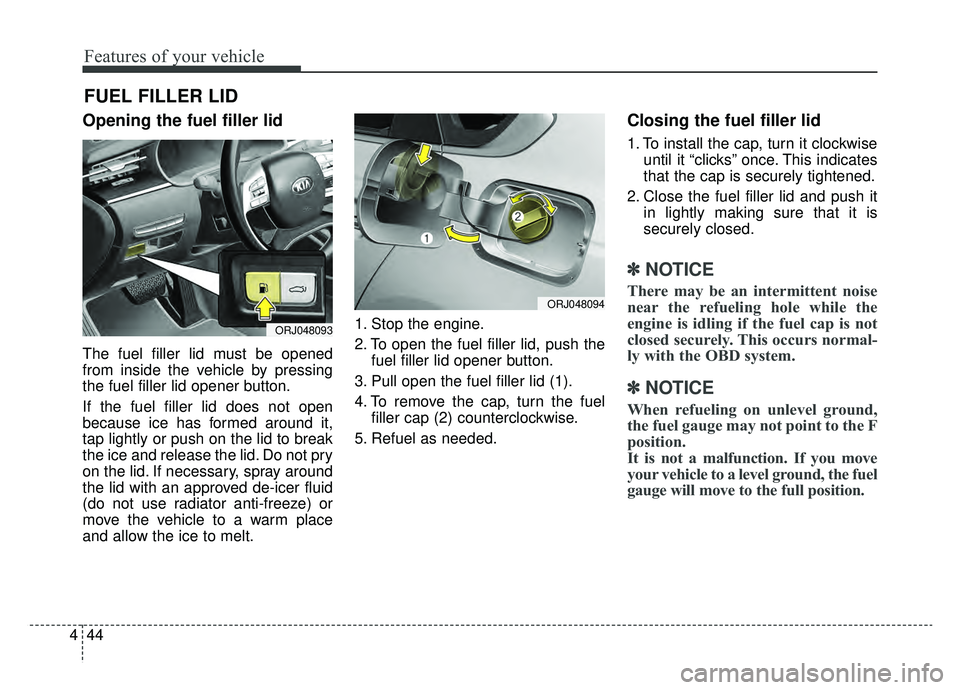
The fuel filler lid must be opened
from inside the vehicle by pressing
the fuel filler lid opener button.
If the fuel filler lid does not open
because ice has formed around it,
tap lightly or push on the lid to break
the ice and release the lid. Do not pry
on the lid. If necessary, spray around
the lid with an approved de-icer fluid
(do not use radiator anti-freeze) or
move the vehicle to a warm place
and allow the ice to melt. 1. Stop the engine.
2. To open the fuel filler lid, push the
fuel filler lid opener button.
3. Pull open the fuel filler lid (1).
4. To remove the cap, turn the fuel filler cap (2) counterclockwise.
5. Refuel as needed.
Closing the fuel filler lid
1. To install the cap, turn it clockwise until it ŌĆ£clicksŌĆØ once. This indicates
that the cap is securely tightened.
2. Close the fuel filler lid and push it in lightly making sure that it is
securely closed.
Ō£Į Ō£ĮNOTICE
There may be an intermittent noise
near the refueling hole while the
engine is idling if the fuel cap is not
closed securely. This occurs normal-
ly with the OBD system.
Ō£Į Ō£ĮNOTICE
When refueling on unlevel ground,
the fuel gauge may not point to the F
position.
It is not a malfunction. If you move
your vehicle to a level ground, the fuel
gauge will move to the full position.
FUEL FILLER LID
ORJ048093
ORJ048094
Page 138 of 580
445
Features of your vehicle
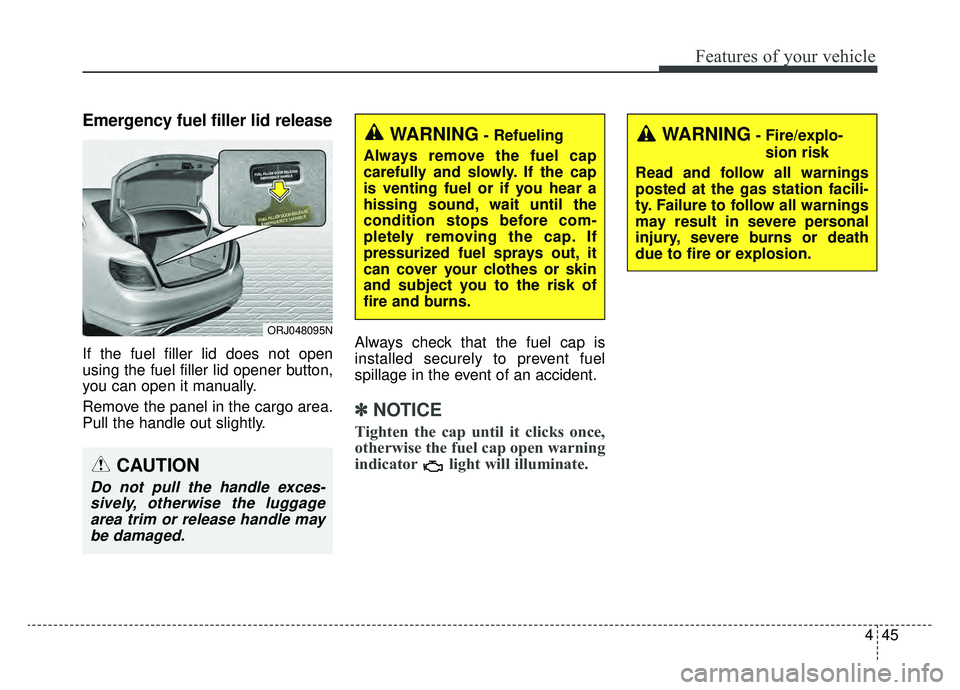
Emergency fuel filler lid release
If the fuel filler lid does not open
using the fuel filler lid opener button,
you can open it manually.
Remove the panel in the cargo area.
Pull the handle out slightly.Always check that the fuel cap is
installed securely to prevent fuel
spillage in the event of an accident.
Ō£Į Ō£Į
NOTICE
Tighten the cap until it clicks once,
otherwise the fuel cap open warning
indicator light will illuminate.
WARNING- Fire/explo-
sion risk
Read and follow all warnings
posted at the gas station facili-
ty. Failure to follow all warnings
may result in severe personal
injury, severe burns or death
due to fire or explosion.WARNING- Refueling
Always remove the fuel cap
carefully and slowly. If the cap
is venting fuel or if you hear a
hissing sound, wait until the
condition stops before com-
pletely removing the cap. If
pressurized fuel sprays out, it
can cover your clothes or skin
and subject you to the risk of
fire and burns.
CAUTION
Do not pull the handle exces- sively, otherwise the luggagearea trim or release handle maybe damaged.
ORJ048095N
Page 139 of 580
Features of your vehicle
46
4
WARNING- Static
electricity
Before touching the fuel noz- zle, you should eliminate
potentially dangerous static
electricity discharge by touch-
ing another metal part of the
vehicle, a safe distance away
from the fuel filler neck, noz-
zle, or other gas source.
Do not get back into a vehicle once you have begun refueling
since you can generate static
electricity by touching, rubbing
or sliding against any item or
fabric (polyester, satin, nylon,
etc.) capable of producing static
electricity.
(Continued)(Continued)Static electricity discharge can
ignite fuel vapors resulting in
rapid burning. If you must reen-
ter the vehicle, you should once
again eliminate potentially dan-
gerous static electricity dis-
charge by touching a metal part
of the vehicle, away from the
fuel filler neck, nozzle or other
gasoline source.WARNING- Portable fuelcontainer
When using an approved
portable fuel container, be sure
to place the container on the
ground prior to refueling. Static
electricity discharge from the
container can ignite fuel vapors
causing a fire. Once refueling
has begun, contact with the
vehicle should be maintained
until the filling is complete. Use
only approved portable plastic
fuel containers designed to
carry and store gasoline.