battery KIA K900 2020 Features and Functions Guide
[x] Cancel search | Manufacturer: KIA, Model Year: 2020, Model line: K900, Model: KIA K900 2020Pages: 66, PDF Size: 8.74 MB
Page 10 of 66
INSTRUMENT CLUSTER
8
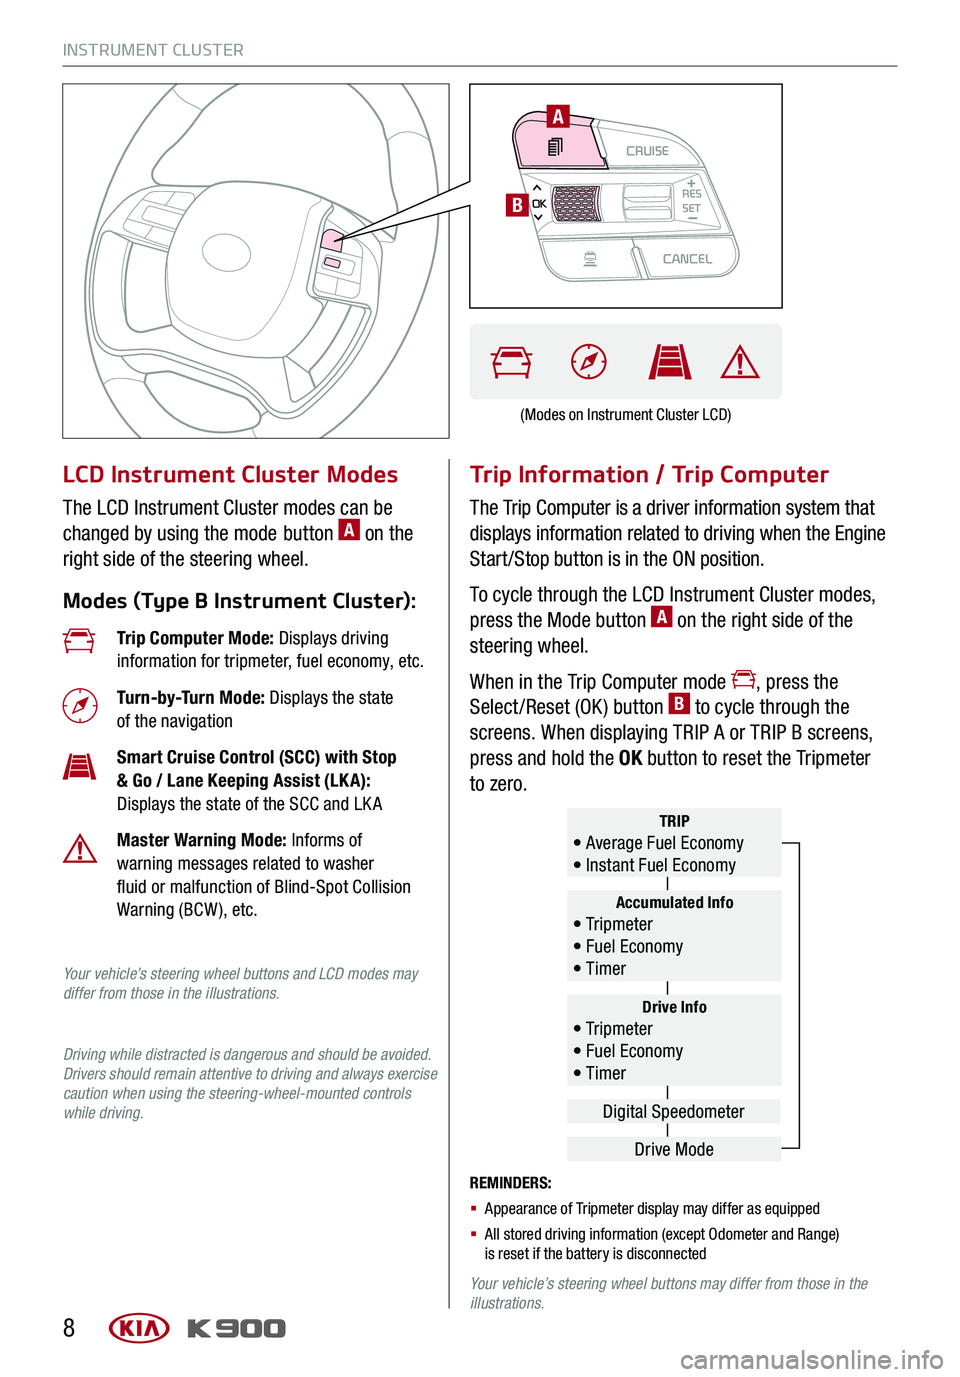
LCD Instrument Cluster Modes
The LCD Instrument Cluster modes can be
changed by using the mode button A on the
right side of the steering wheel.
Modes (Type B Instrument Cluster):
Trip Information / Trip Computer
The Trip Computer is a driver information system that
displays information related to driving when the Engine
Start /Stop button is in the ON position.
To cycle through the LCD Instrument Cluster modes,
press the Mode button A on the right side of the
steering wheel.
When in the Trip Computer mode , press the
Select /Reset (OK ) button B to cycle through the
screens. When displaying TRIP A or TRIP B screens,
press and hold the OK button to reset the Tripmeter
to zero.
REMINDERS:
§ Appearance of Tripmeter display may differ as equipped
§ All stored driving information (except Odometer and Range) is reset if the battery is disconnected
Your vehicle’s steering wheel buttons may differ from those in the illustrations.
Trip Computer Mode: Displays driving information for tripmeter, fuel economy, etc.
Turn-by-Turn Mode: Displays the state of the navigation
Smart Cruise Control (SCC) with Stop & Go / Lane Keeping Assist (LK A): Displays the state of the SCC and LK A
Master Warning Mode: Informs of warning messages related to washer fluid or malfunction of Blind-Spot Collision Warning (BCW ), etc.
Your vehicle’s steering wheel buttons and LCD modes may differ from those in the illustrations.
Driving while distracted is dangerous and should be avoided. Drivers should remain attentive to driving and always exercise caution when using the steering-wheel-mounted controls while driving.
Drive Info• Tr ipme t e r • Fuel Economy • Timer
Accumulated Info• Tr ipme t e r • Fuel Economy • Timer
TRIP• Average Fuel Economy • Instant Fuel Economy
Drive Mode
Digital Speedometer
(Modes on Instrument Cluster LCD)
CRUISECANCEL
RES
OKSET
A
B
Page 15 of 66
DRIVER’S PANEL
13ALWAYS CHECK THE OWNER’S MANUAL FOR COMPLE TE OPERATING INFORMATION AND SAFETY WARNINGS.
Idle, Stop and Go (ISG) System
The ISG system is designed to reduce fuel consumption by
automatically shutting down the engine when the vehicle
is at a standstill.
When the ISG system is ON and the vehicle is at a standstill,
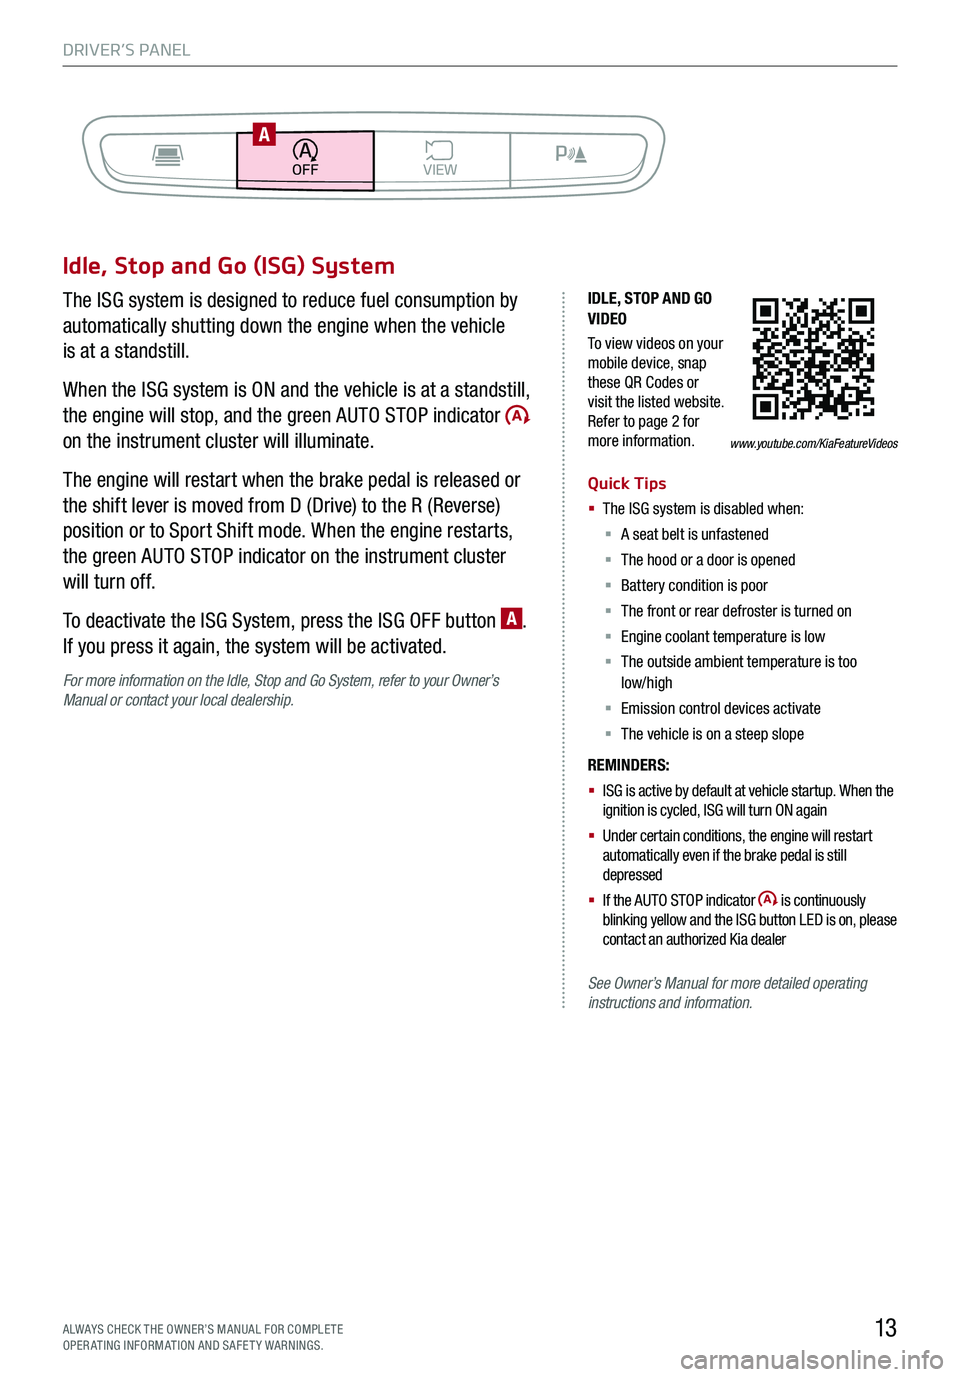
the engine will stop, and the green AUTO STOP indicator
on the instrument cluster will illuminate.
The engine will restart when the brake pedal is released or
the shift lever is moved from D (Drive) to the R (Reverse)
position or to Sport Shift mode. When the engine restarts,
the green AUTO STOP indicator on the instrument cluster
will turn off.
To deactivate the ISG System, press the ISG OFF button A.
If you press it again, the system will be activated.
For more information on the Idle, Stop and Go System, refer to your Owner’s Manual or contact your local dealership.
IDLE, STOP AND GO VIDEO
To view videos on your mobile device, snap these QR Codes or visit the listed website. Refer to page 2 for more information.
Quick Tips
§ The ISG system is disabled when:
§ A seat belt is unfastened
§ The hood or a door is opened
§ Battery condition is poor
§ The front or rear defroster is turned on
§ Engine coolant temperature is low
§ The outside ambient temperature is too low/high
§ Emission control devices activate
§ The vehicle is on a steep slope
REMINDERS:
§ ISG is active by default at vehicle startup. When the ignition is cycled, ISG will turn ON again
§ Under certain conditions, the engine will restart automatically even if the brake pedal is still depressed
§ If the AUTO STOP indicator is continuously blinking yellow and the ISG button LED is on, please contact an authorized Kia dealer
See Owner’s Manual for more detailed operating instructions and information.
www.youtube.com/KiaFeatureVideos
BACKMENUHOME
OFFVIEW
DRIVE
MODE AUTO
HOLD
PA
Page 24 of 66
DRIVER’S PANEL
22
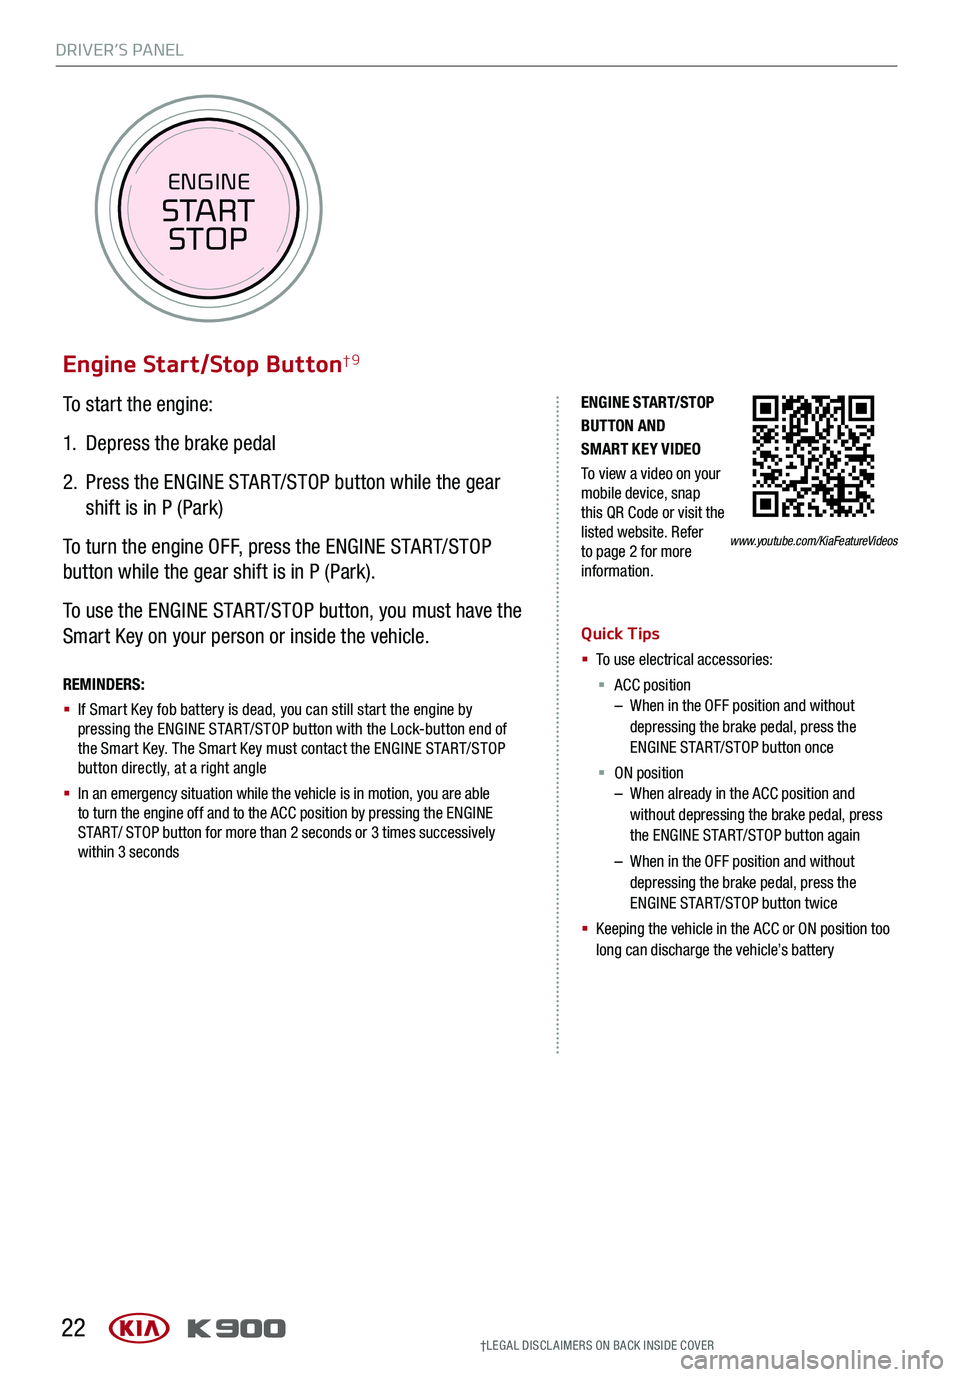
To start the engine:
1. Depress the brake pedal
2.
Press the ENGINE START/STOP button while the gear
shift is in P (Park)
To turn the engine OFF, press the ENGINE START/STOP
button while the gear shift is in P (Park).
To use the ENGINE START/STOP button, you must have the
Smart Key on your person or inside the vehicle.
Engine Start/Stop Button†9
ENGINE STA RT/STOP BUTTON AND SMART KEY VIDEO
To view a video on your mobile device, snap this QR Code or visit the listed website. Refer to page 2 for more information.
REMINDERS:
§ If Smart Key fob battery is dead, you can still start the engine by pressing the ENGINE START/STOP button with the Lock-button end of the Smart Key. The Smart Key must contact the ENGINE START/STOP button directly, at a right angle
§ In an emergency situation while the vehicle is in motion, you are able to turn the engine off and to the ACC position by pressing the ENGINE START/ STOP button for more than 2 seconds or 3 times successively within 3 seconds
Quick Tips
§ To use electrical accessories:
§ ACC position – When in the OFF position and without depressing the brake pedal, press the ENGINE START/STOP button once
§ ON position – When already in the ACC position and without depressing the brake pedal, press the ENGINE START/STOP button again
– When in the OFF position and without depressing the brake pedal, press the ENGINE START/STOP button twice
§ Keeping the vehicle in the ACC or ON position too long can discharge the vehicle’s battery
www.youtube.com/KiaFeatureVideos
†LEG AL DISCL AIMERS ON BACK INSIDE COVER
ENGINE
START
STOP
Page 35 of 66
CENTER PANEL
33
MAPN AV
RADIO MEDIA SEEKTRACK SETUP
MAP
N AV
RADIO MEDIA SEEKTRACK SETUP
MediaAudio Jukebox
Cherubic HymnTchalkovsky30 #1 Hits
Menu View2:47
TCHALKOVSKY 21:02
UVO link with Navigation† 1,15
FM/AM/SiriusXM®†22/Media (USB, Bluetooth® Audio, My Music)
Your vehicle’s audio system may differ from that in the illustration. For further UVO link operation, refer to the Car Multimedia System User's Manual. For other audio system information, refer to pages 30-32.
Sound Settings – To adjust the sound settings:
1.
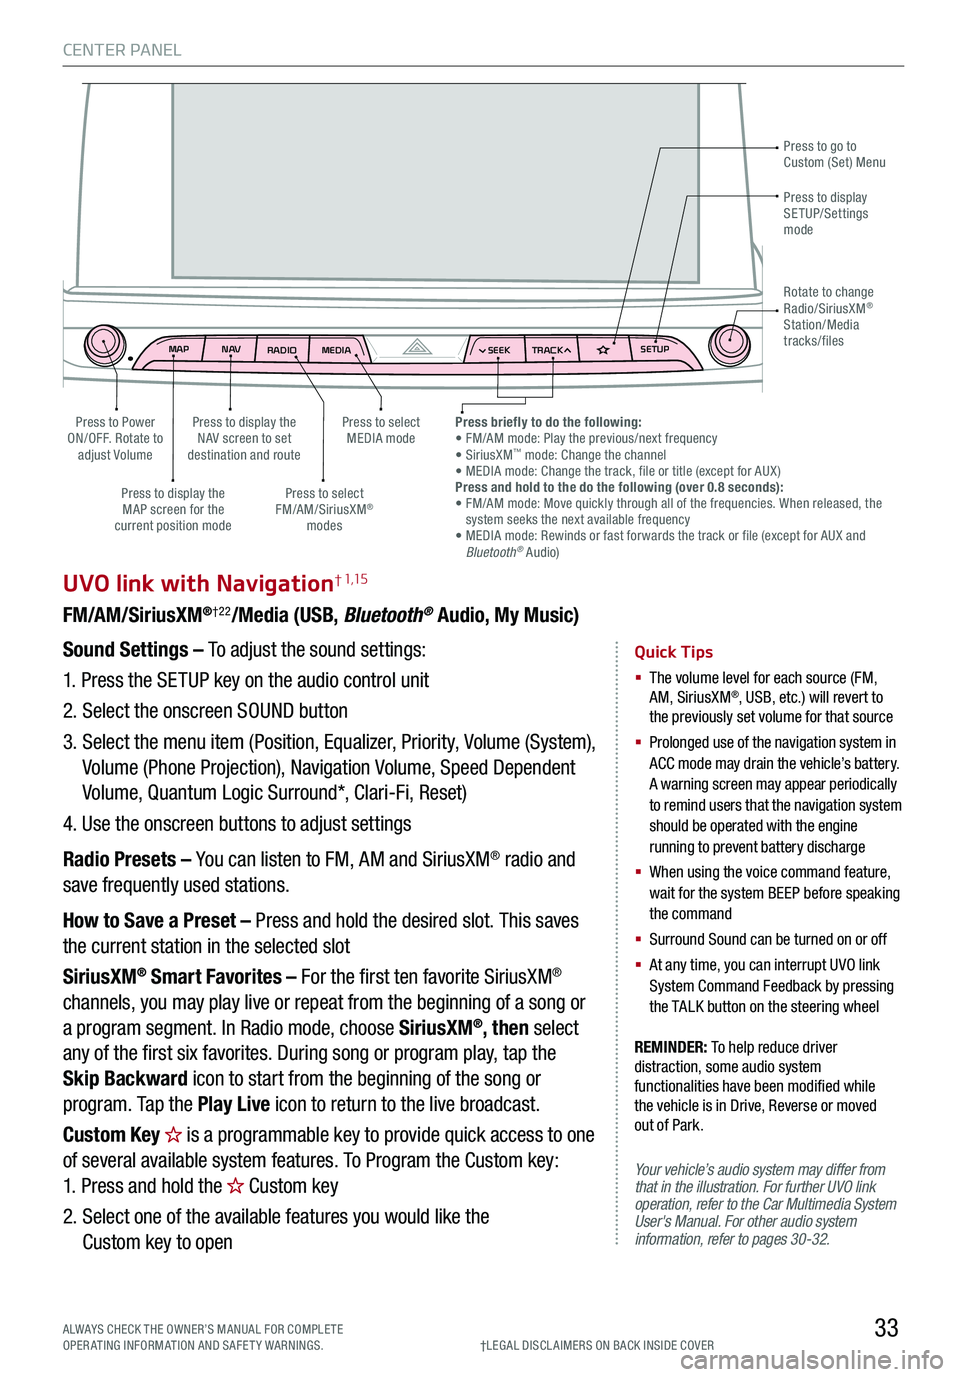
Press the SETUP key on the audio control unit
2. Select the onscreen SOUND button
3. Select the menu item (Position, Equalizer, Priority, Volume (System),
Volume (Phone Projection), Navigation Volume, Speed Dependent
Volume, Quantum Logic Surround*, Clari-Fi, Reset)
4. Use the onscreen buttons to adjust settings
Radio Presets – You can listen to FM, AM and SiriusXM® radio and
save frequently used stations.
How to Save a Preset – Press and hold the desired slot. This saves
the current station in the selected slot
SiriusXM® Smart Favorites – For the first ten favorite SiriusXM®
channels, you may play live or repeat from the beginning of a song or
a program segment. In Radio mode, choose SiriusXM®, then select
any of the first six favorites. During song or program play, tap the
Skip Backward icon to start from the beginning of the song or
program. Tap the Play Live icon to return to the live broadcast.
Custom Key is a programmable key to provide quick access to one
of several available system features. To Program the Custom key:
1. Press and hold the Custom key
2. Select one of the available features you would like the
Custom key to open
Quick Tips
§ The volume level for each source (FM, AM, SiriusXM®, USB, etc.) will revert to the previously set volume for that source
§
Prolonged use of the navigation system in ACC mode may drain the vehicle’s battery. A warning screen may appear periodically to remind users that the navigation system should be operated with the engine running to prevent battery discharge
§
When using the voice command feature, wait for the system BEEP before speaking the command
§ Surround Sound can be turned on or off
§
At any time, you can interrupt UVO link System Command Feedback by pressing the TALK button on the steering wheel
Press to go to Custom (Set) Menu
Press to display the NAV screen to set destination and route
Press to select MEDIA modePress to Power ON/OFF. Rotate to adjust Volume
Press to display the MAP screen for the current position mode
Press to select FM/AM/SiriusXM® modes
Press briefly to do the following: • FM/AM mode: Play the previous/next frequency• SiriusXM™ mode: Change the channel• MEDIA mode: Change the track, file or title (except for AUX )Press and hold to the do the following (over 0.8 seconds):• FM/AM mode: Move quickly through all of the frequencies. When released, the system seeks the next available frequency• MEDIA mode: Rewinds or fast forwards the track or file (except for AUX and Bluetooth® Audio)
Press to display SETUP/Settings mode
Rotate to change Radio/SiriusXM® Station/Media tracks/files
†LEG AL DISCL AIMERS ON BACK INSIDE COVERALWAYS CHECK THE OWNER’S MANUAL FOR COMPLE TE OPERATING INFORMATION AND SAFETY WARNINGS.
REMINDER: To help reduce driver distraction, some audio system functionalities have been modified while the vehicle is in Drive, Reverse or moved out of Park.
Page 37 of 66
CENTER PANEL
35ALWAYS CHECK THE OWNER’S MANUAL FOR COMPLE TE OPERATING INFORMATION AND SAFETY WARNINGS.
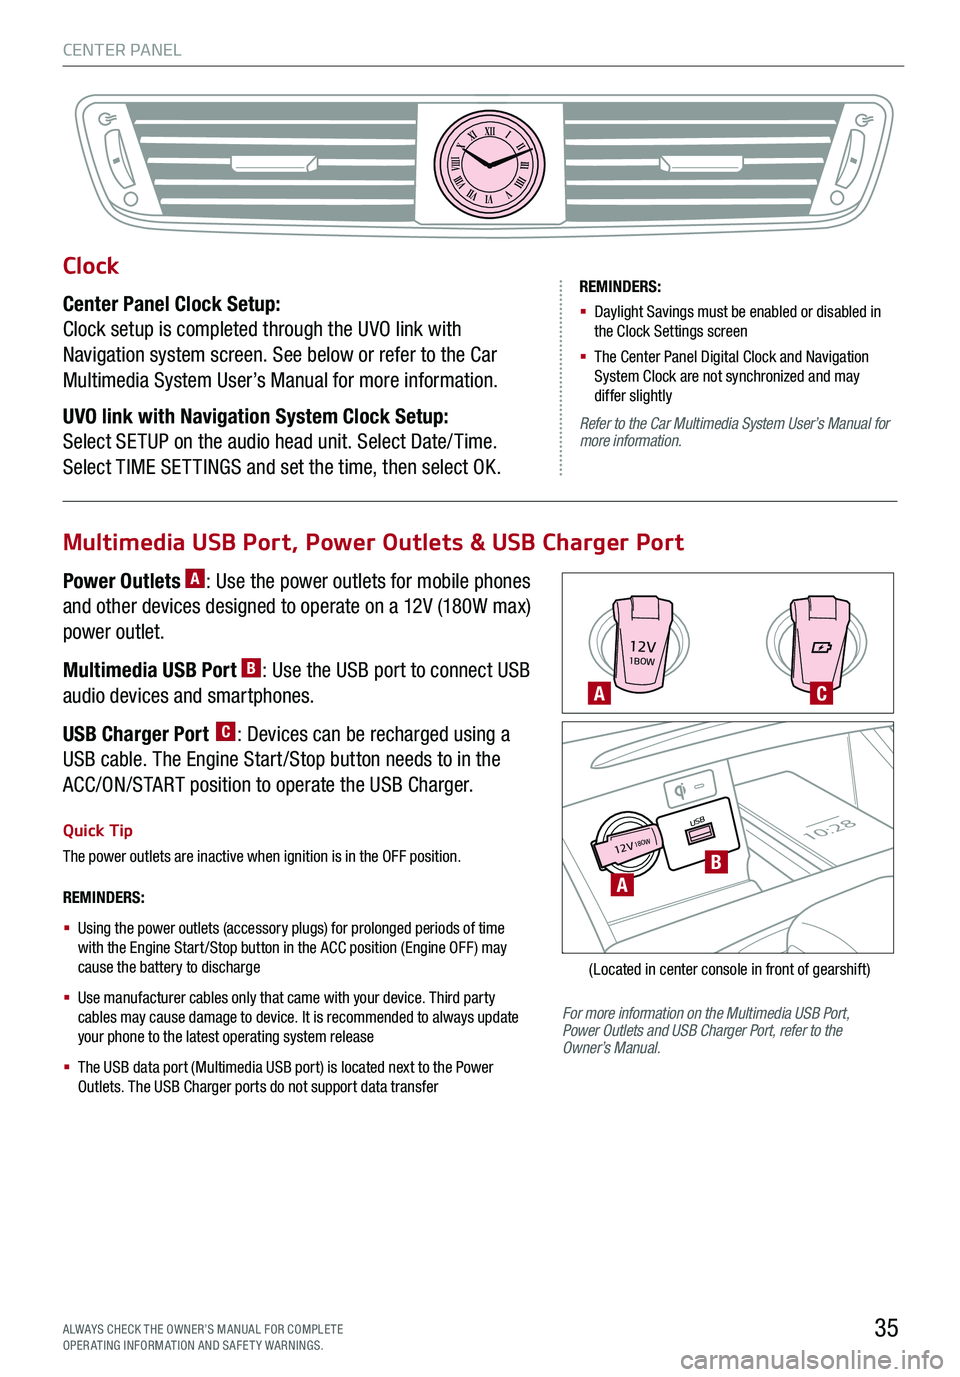
12V1BOW
USB10:2812V18OW
For more information on the Multimedia USB Port, Power Outlets and USB Charger Port, refer to the Owner’s Manual.
REMINDERS:
§
Using the power outlets (accessory plugs) for prolonged periods of time with the Engine Start /Stop button in the ACC position (Engine OFF ) may cause the battery to discharge
§
Use manufacturer cables only that came with your device. Third party cables may cause damage to device. It is recommended to always update your phone to the latest operating system release
§
The USB data port (Multimedia USB port) is located next to the Power Outlets. The USB Charger ports do not support data transfer
Quick Tip
The power outlets are inactive when ignition is in the OFF position.
A
A
C
B
(Located in center console in front of gearshift)
Multimedia USB Port, Power Outlets & USB Charger Port
Power Outlets A: Use the power outlets for mobile phones
and other devices designed to operate on a 12V (180W max)
power outlet.
Multimedia USB Port B: Use the USB port to connect USB
audio devices and smartphones.
USB Charger Port C: Devices can be recharged using a
USB cable. The Engine Start /Stop button needs to in the
ACC/ON/START position to operate the USB Charger.
Clock
Center Panel Clock Setup:
Clock setup is completed through the UVO link with
Navigation system screen. See below or refer to the Car
Multimedia System User’s Manual for more information.
UVO link with Navigation System Clock Setup:
Select SETUP on the audio head unit. Select Date/ Time.
Select TIME SET TINGS and set the time, then select OK.
XIIIIIIIIIIIIVVIVIIVIIIVIIIIXXI
REMINDERS:
§ Daylight Savings must be enabled or disabled in the Clock Settings screen
§ The Center Panel Digital Clock and Navigation System Clock are not synchronized and may differ slightly
Refer to the Car Multimedia System User’s Manual for more information.
Page 50 of 66
OTHER KEY FEATURES
48
LockUnlock
I
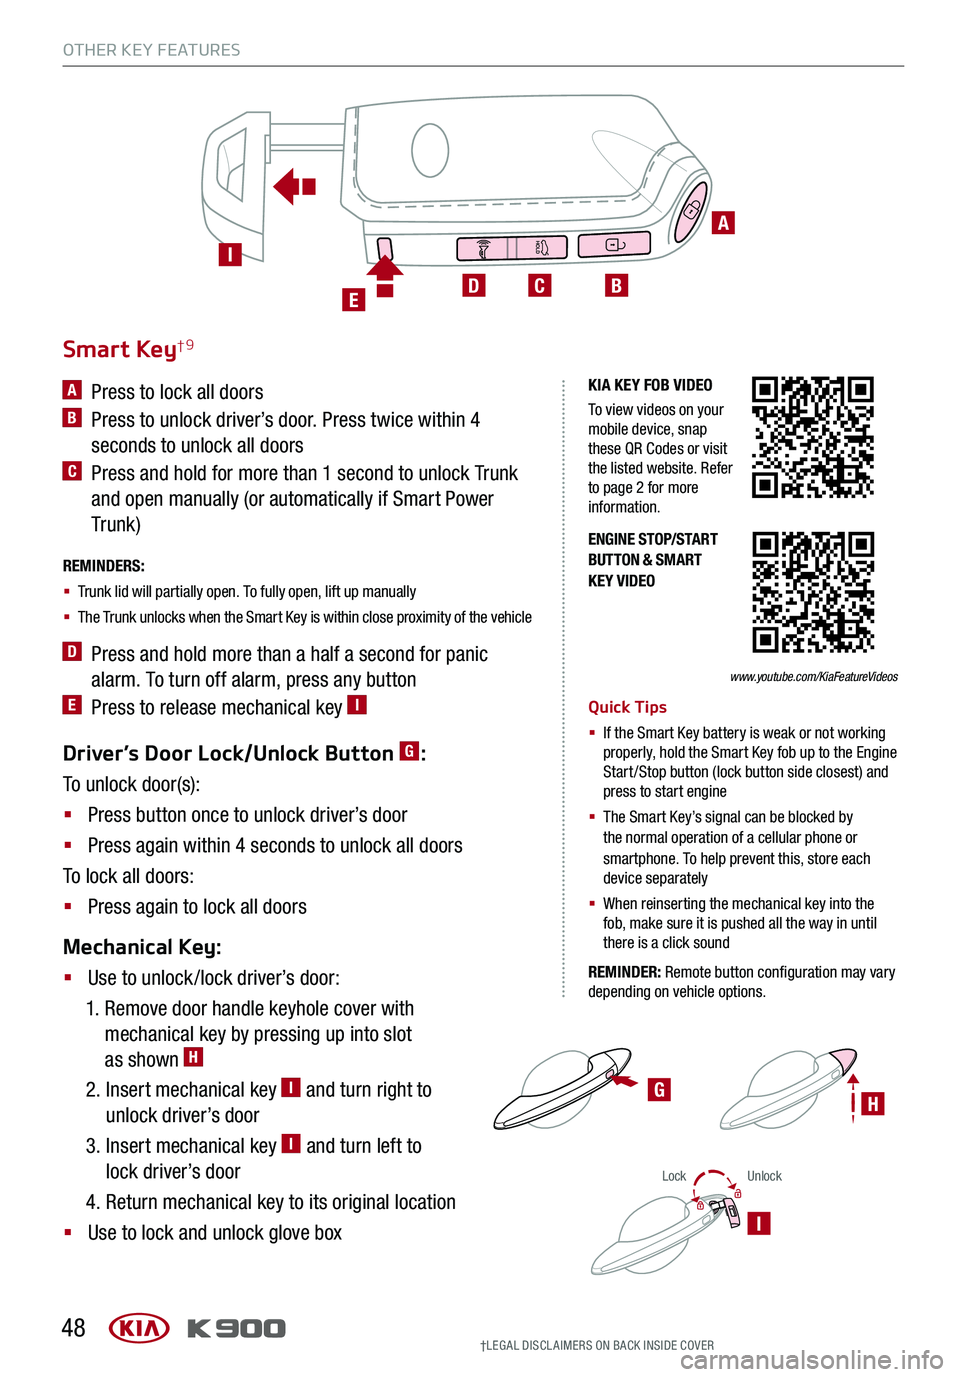
Driver’s Door Lock/Unlock Button G:
To unlock door(s):
§ Press button once to unlock driver’s door
§ Press again within 4 seconds to unlock all doors
To lock all doors:
§ Press again to lock all doors
Mechanical Key:
§ Use to unlock /lock driver’s door:
1. Remove door handle keyhole cover with
mechanical key by pressing up into slot
as shown H
2. Insert mechanical key I and turn right to
unlock driver’s door
3. Insert mechanical key I and turn left to
lock driver’s door
4. Return mechanical key to its original location
§ Use to lock and unlock glove box
ENGINE STOP/START BUTTON & SMART KEY VIDEO
G
Smart Key†9
A Press to lock all doors
B Press to unlock driver’s door. Press twice within 4
seconds to unlock all doors
C Press and hold for more than 1 second to unlock Trunk
and open manually (or automatically if Smart Power
Tr unk )
REMINDERS:
§ Trunk lid will partially open. To fully open, lift up manually
§ The Trunk unlocks when the Smart Key is within close proximity of the vehicle
D Press and hold more than a half a second for panic
alarm. To turn off alarm, press any button
E Press to release mechanical key IQuick Tips
§ If the Smart Key battery is weak or not working properly, hold the Smart Key fob up to the Engine Start /Stop button (lock button side closest) and press to start engine
§
The Smart Key’s signal can be blocked by the normal operation of a cellular phone or smartphone. To help prevent this, store each device separately
§ When reinserting the mechanical key into the fob, make sure it is pushed all the way in until there is a click sound
REMINDER: Remote button configuration may vary depending on vehicle options.
A
BCDE
I
KIA KEY FOB VIDEO
To view videos on your mobile device, snap these QR Codes or visit the listed website. Refer to page 2 for more information.
www.youtube.com/KiaFeatureVideos
†LEG AL DISCL AIMERS ON BACK INSIDE COVER
H
Page 54 of 66
OTHER KEY FEATURES
52
Map/Room Lamps
Automatic Turn Off Function
The interior lights automatically turn off approximately 20
seconds after the Engine Start /Stop button is turned OFF.
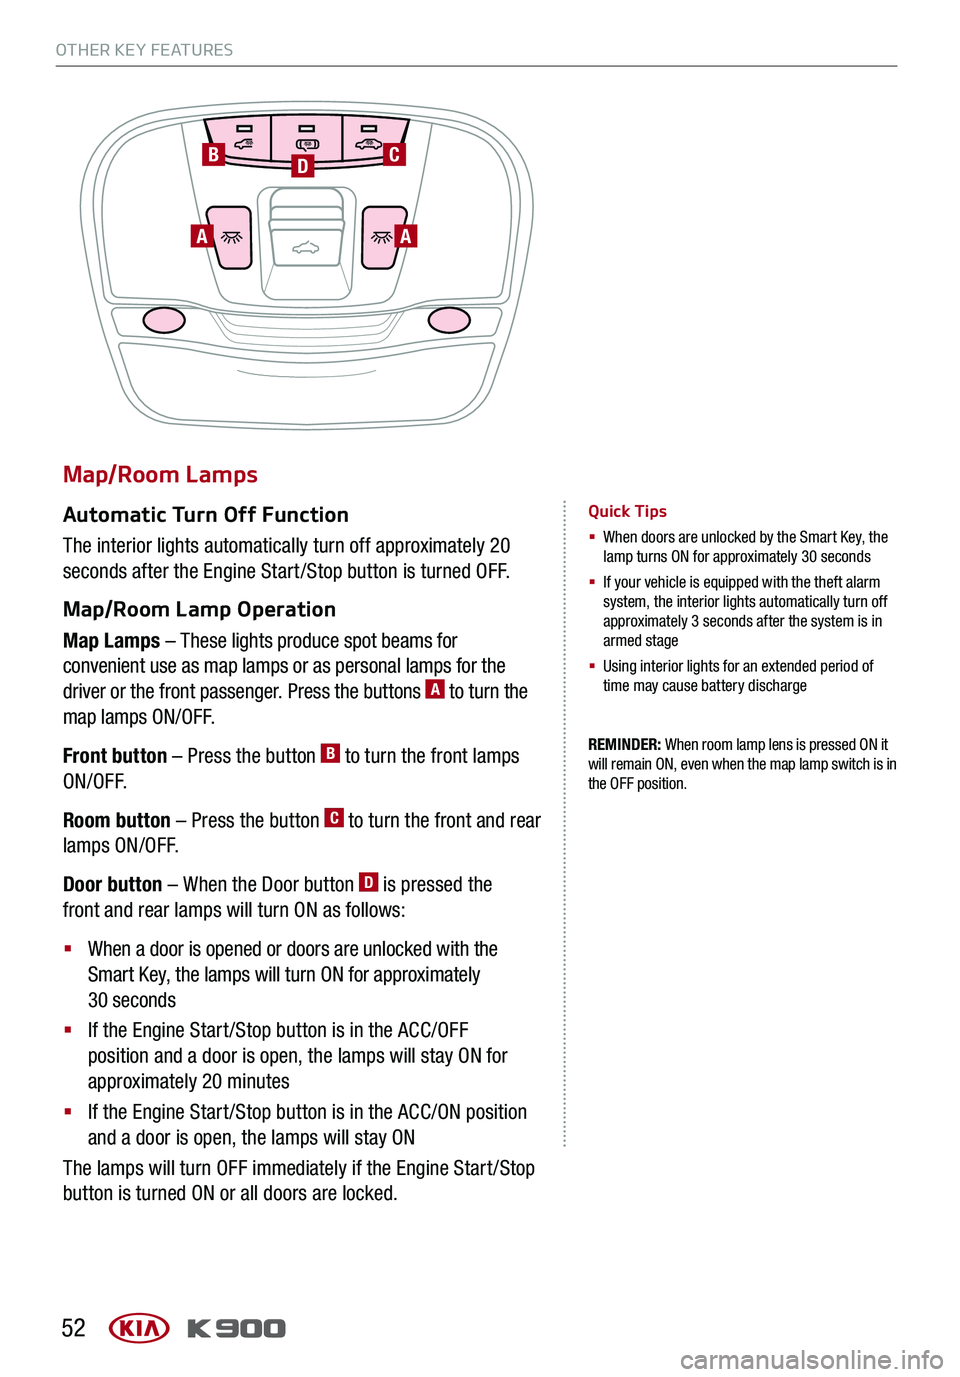
Map/Room Lamp Operation
Map Lamps – These lights produce spot beams for
convenient use as map lamps or as personal lamps for the
driver or the front passenger. Press the buttons A to turn the
map lamps ON/OFF.
Front button – Press the button B to turn the front lamps
ON/OFF.
Room button – Press the button C to turn the front and rear
lamps ON/OFF.
Door button – When the Door button D is pressed the
front and rear lamps will turn ON as follows:
§ When a door is opened or doors are unlocked with the
Smart Key, the lamps will turn ON for approximately
30 seconds
§ If the Engine Start /Stop button is in the ACC/OFF
position and a door is open, the lamps will stay ON for
approximately 20 minutes
§ If the Engine Start /Stop button is in the ACC/ON position
and a door is open, the lamps will stay ON
The lamps will turn OFF immediately if the Engine Start /Stop
button is turned ON or all doors are locked.
REMINDER: When room lamp lens is pressed ON it will remain ON, even when the map lamp switch is in the OFF position.
Quick Tips
§ When doors are unlocked by the Smart Key, the lamp turns ON for approximately 30 seconds
§ If your vehicle is equipped with the theft alarm system, the interior lights automatically turn off approximately 3 seconds after the system is in armed stage
§ Using interior lights for an extended period of time may cause battery discharge
AA
BDC
Page 65 of 66
K900 CUSTOMER DELIVERY CHECKLIST
Confirm “Good Battery” with a Kia battery tester
Verify all tire pressures are to spec (see driver’s door label) LF LR RF RR
Verify proper operation of Smart Key* lock /unlock
Ensure floormats are snapped into place (if applicable)
Verify vehicle is clean (interior and exterior), in good condition, free of chips and scratches
Ensure all key documents are in the vehicle (Owner’s Manual, Warranty and Consumer Information booklet, Tire Warranty
booklet, Features & Functions Guide and any supplemental audio/video/navigation user’s guides)
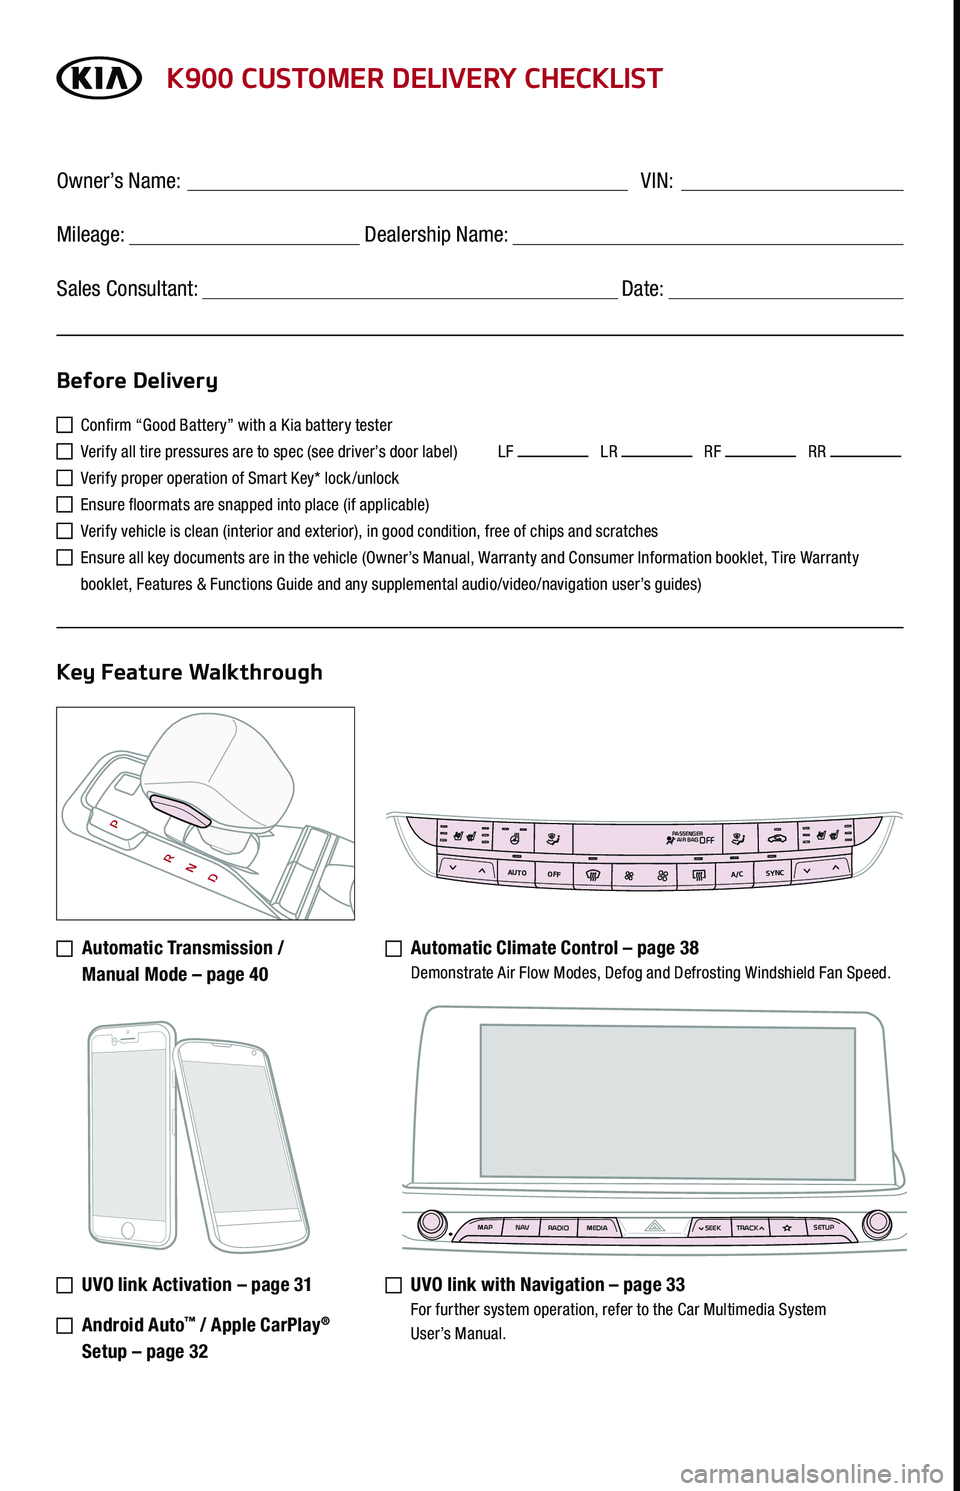
Automatic Transmission /
Manual Mode – page 40
Automatic Climate Control – page 38 Demonstrate Air Flow Modes, Defog and Defrosting Windshield Fan Speed.
UVO link Activation – page 31
Android Auto™ / Apple CarPlay®
Setup – page 32
UVO link with Navigation – page 33 For further system operation, refer to the Car Multimedia System User’s Manual.
Before Delivery
Key Feature Walkthrough
Owner’s Name: ____________________________________ VIN:
Mileage: __________________ Dealership Name: ______________________
Sales Consultant: _________________________________ Date: __________
MAP N AV
RADIO MEDIA SEEKTRACK SETUP
MAP
N AV
RADIO MEDIA SEEKTRACK SETUP
MediaAudio JukeboxCherubic HymnTchalkovsky30 #1 Hits
Menu View2:47
TCHALKOVSKY 21:02
AUTO
OFFA/C
SYNC
PASSENGER
AIR BAGOFF