warning light KIA Magnetis 2006 2.G Owner's Guide
[x] Cancel search | Manufacturer: KIA, Model Year: 2006, Model line: Magnetis, Model: KIA Magnetis 2006 2.GPages: 225, PDF Size: 3.77 MB
Page 145 of 225
5-9
If you believe you may have gottenyour brakes wet, apply them lightly
while driving until normal braking
operation returns.WINTER DRIVING We recommend that you carryemergency equipment. Some things
you might include are tire chains, a
window scraper, windshield de-icer,
a bag of sand or salt, flares, a small
shovel and jumper cables.
Make sure you have sufficient ethylene glycol coolant in the
radiator.
Check the battery condition and cables. Cold temperatures reduce the
capacity of any battery, so it must be
in top shape to provide enough
winter starting power.
Make sure the engine oil viscosity is suitable for cold weather.
Check the ignition system for loose connections and damage. Use antifreeze-formulated windshield
washer fluid and make sure you have
sufficient fluid for your trip. (Do not
use engine coolant antifreeze.)
Do not use the parking brake if it might freeze. This is most likely to
happen after driving in slushy or wet
conditions and temperatures drop into
the freezing range. When parking,
shift to P (Park) with automatic
transaxle, or to 1 (First) or R
(Reverse) with a manual transaxle
and block the rear wheels.
SNOW TIRESWhen snow tires are used, select the size
and construction specified on the Tire
Pressure Label. It is strongly
recommended that snow tires be used on
all four wheels, or poor handling may
result. Snow tires should not be operated
at speeds exceeding 120 km/h (75 mph).
These tires should be inflated 4 psi (28
kPa, 0.3 kg/cm
2) above the recommended pressures shown on the Tire
Specification/Pressure Label, but inflation
should never exceed the maximum cold-
tire pressure shown on the tire sidewalls.
Do not install studded tires without first
checking local, provincial and municipal
regulations for possible restrictions
against their use.
WARNING - Snow Tire
Size
Snow tires should be
equivalent in size and type to
the vehicle’s standard tires.
Otherwise, the safety and
handling of your vehicle may be
adversely affected.
MS-CNA-Eng 5 New.qxd 7/25/2005 5:21 PM Page 9
Page 149 of 225
5-13
ProgrammingYour vehicles may require the ignition
switch to be turned to the "ACC"
position for programming and/or
operation of HomeLink. It is also
recommended that a new battery be
replaced in the hand-held transmitter of
the device being programmed to
HomeLink for quicker training and
accurate transmission of the radio-
frequency.
Follow these steps to train your
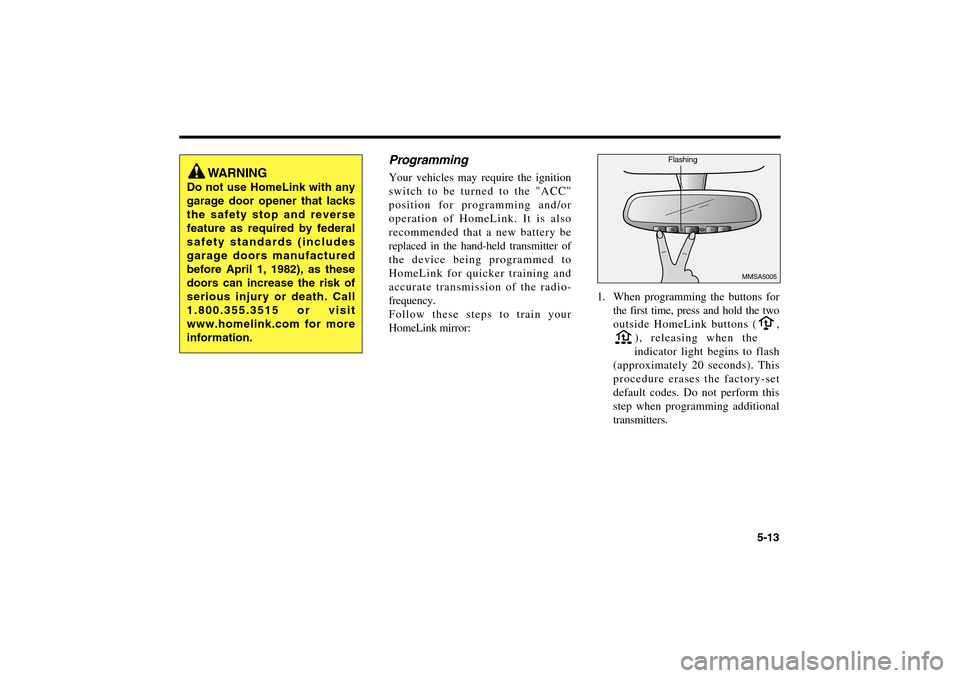
HomeLink mirror:1. When programming the buttons for
the first time, press and hold the two
outside HomeLink buttons ( ,
), releasing when the
indicator light begins to flash
(approximately 20 seconds). This
procedure erases the factory-set
default codes. Do not perform this
step when programming additional
transmitters.
MMSA5005
WARNING
Do not use HomeLink with any
garage door opener that lacks
the safety stop and reverse
feature as required by federal
safety standards (includes
garage doors manufactured
before April 1, 1982), as these
doors can increase the risk of
serious injury or death. Call
1.800.355.3515 or visit
www.homelink.com for more
information.
Flashing
MS-CNA-Eng 5 New.qxd 7/25/2005 5:21 PM Page 13
Page 153 of 225
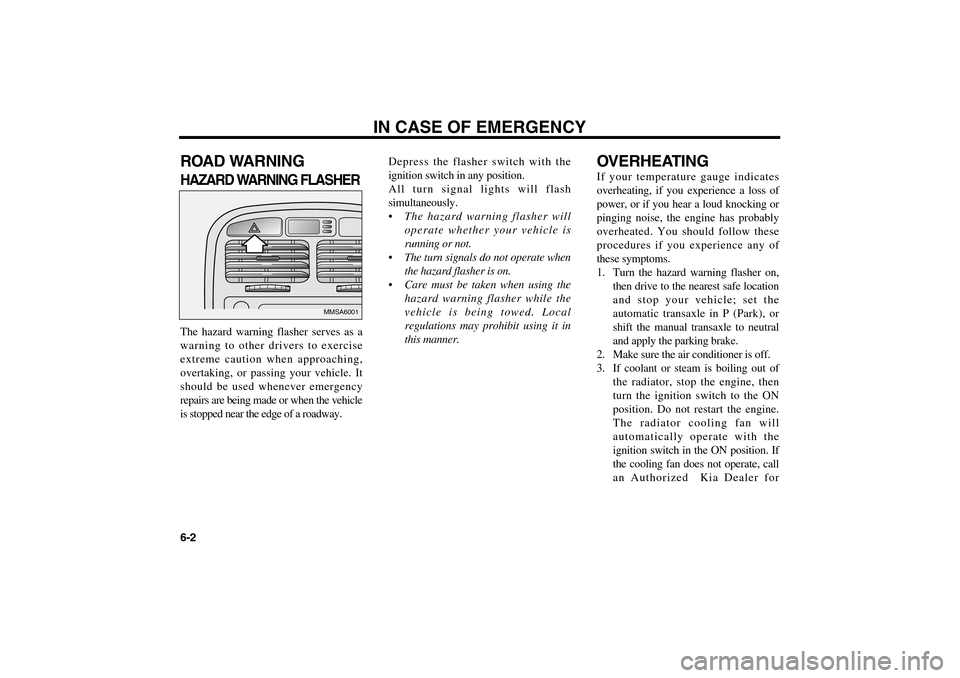
ROAD WARNINGHAZARD WARNING FLASHERThe hazard warning flasher serves as a
warning to other drivers to exercise
extreme caution when approaching,
overtaking, or passing your vehicle. It
should be used whenever emergency
repairs are being made or when the vehicle
is stopped near the edge of a roadway.Depress the flasher switch with the
ignition switch in any position.
All turn signal lights will flash
simultaneously.
• The hazard warning flasher will
operate whether your vehicle is
running or not.
The turn signals do not operate when
the hazard flasher is on.
Care must be taken when using the
hazard warning flasher while the
vehicle is being towed. Local
regulations may prohibit using it in
this manner.
OVERHEATINGIf your temperature gauge indicates
overheating, if you experience a loss of
power, or if you hear a loud knocking or
pinging noise, the engine has probably
overheated. You should follow these
procedures if you experience any of
these symptoms.
1. Turn the hazard warning flasher on,
then drive to the nearest safe location
and stop your vehicle; set the
automatic transaxle in P (Park), or
shift the manual transaxle to neutral
and apply the parking brake.
2. Make sure the air conditioner is off.
3. If coolant or steam is boiling out of
the radiator, stop the engine, then
turn the ignition switch to the ON
position. Do not restart the engine.
The radiator cooling fan will
automatically operate with the
ignition switch in the ON position. If
the cooling fan does not operate, call
an Authorized Kia Dealer for
IN CASE OF EMERGENCY
6-2
MMSA6001
MS-CNA-Eng 6.QXD 7/25/2005 5:13 PM Page 2
Page 158 of 225
ELECTRICAL CIRCUIT
PROTECTIONFUSESA vehicle’s electrical system is protected
from electrical overload damage by fuses.
This vehicle has two fuse panels, one
located in the driver’s side kick panel, the
other in the engine compartment near the
battery. A fuse panel chart is provided
later in this section.If any of your vehicle’s lights,
accessories, or controls do not work,
check the appropriate circuit fuse. If a
fuse has blown, the element inside the
fuse will be melted. Always replace a
blown fuse with one of the same rating.
If the replacement fuse blows out, this
indicates an electrical problem. Avoid
using the system involved and
immediately consult an Authorized Kia
Dealer.
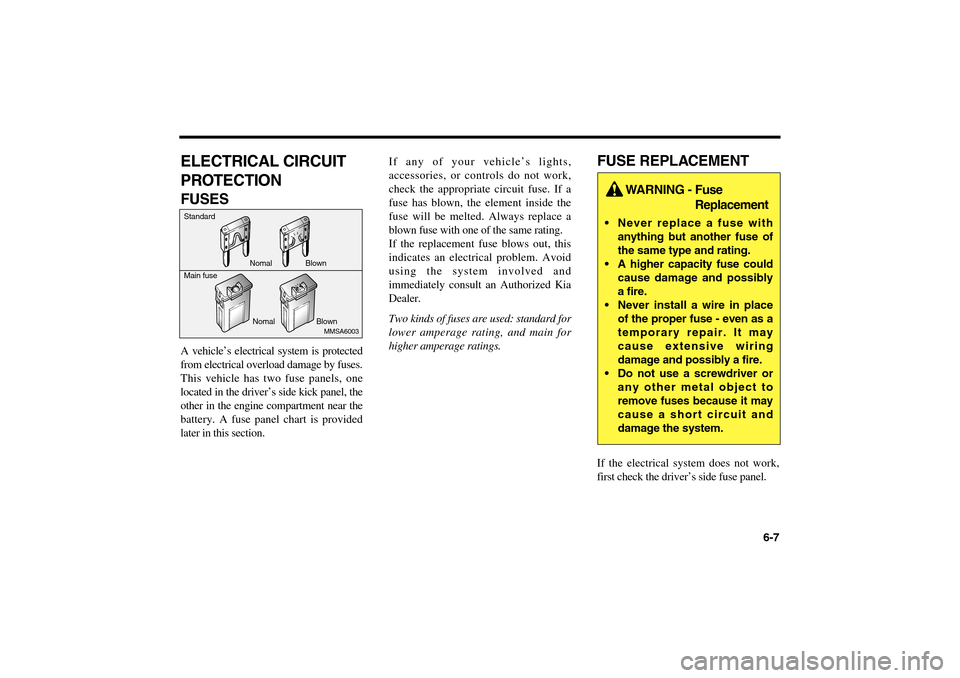
Two kinds of fuses are used: standard for
lower amperage rating, and main for
higher amperage ratings.
FUSE REPLACEMENTIf the electrical system does not work,
first check the driver’s side fuse panel.
6-7
MMSA6003
Standard
Main fuse
Nomal Blown Nomal Blown
WARNING - Fuse
Replacement
Never replace a fuse with
anything but another fuse of
the same type and rating.
A higher capacity fuse could
cause damage and possibly
a fire.
Never install a wire in place
of the proper fuse - even as a
temporary repair. It may
cause extensive wiring
damage and possibly a fire.
Do not use a screwdriver or
any other metal object to
remove fuses because it may
cause a short circuit and
damage the system.
MS-CNA-Eng 6.QXD 7/25/2005 5:13 PM Page 7
Page 162 of 225
6-11
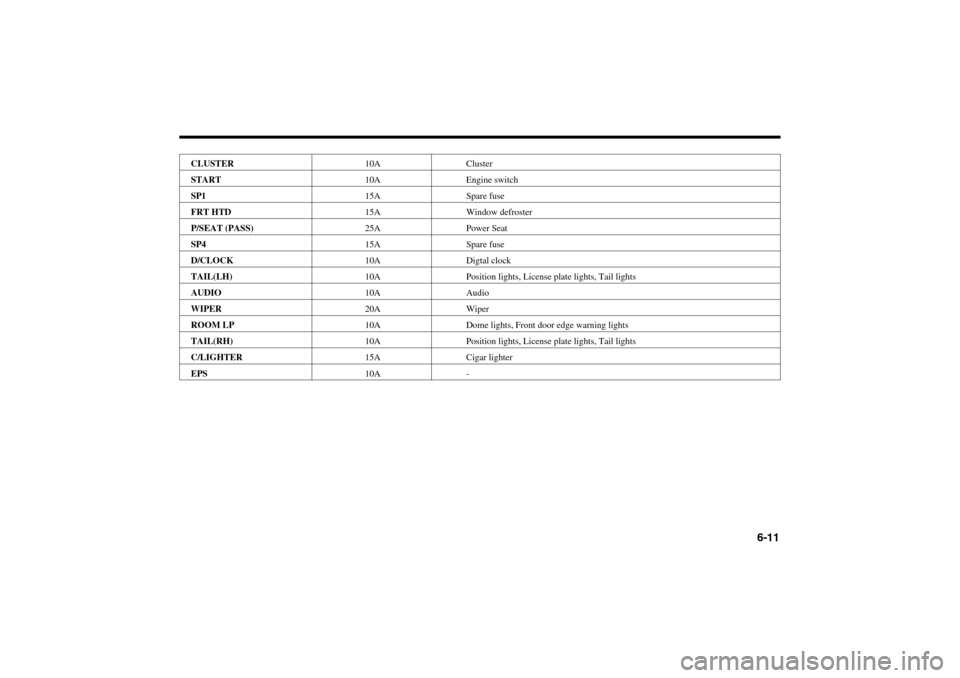
CLUSTER10A Cluster
START10A Engine switch
SP115A Spare fuse
FRT HTD15A Window defroster
P/SEAT (PASS)25A Power Seat
SP415A Spare fuse
D/CLOCK10A Digtal clock
TAIL(LH)10A Position lights, License plate lights, Tail lights
AUDIO10A Audio
WIPER20A Wiper
ROOM LP10A Dome lights, Front door edge warning lights
TAIL(RH)10A Position lights, License plate lights, Tail lights
C/LIGHTER15A Cigar lighter
EPS10A -
MS-CNA-Eng 6.QXD 7/25/2005 5:13 PM Page 11
Page 199 of 225
7-23
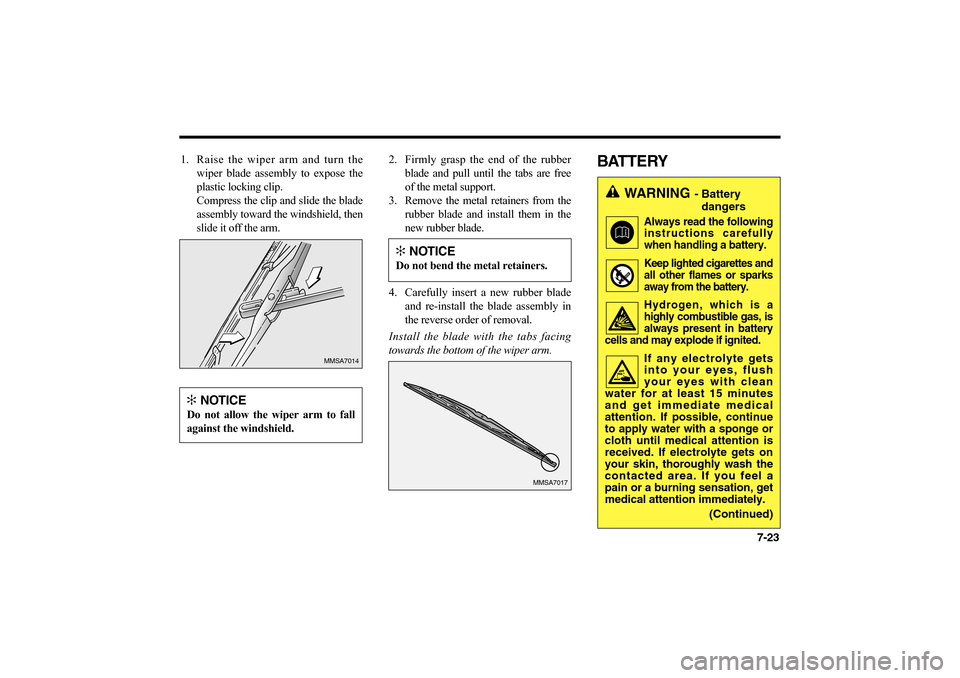
1. Raise the wiper arm and turn the
wiper blade assembly to expose the
plastic locking clip.
Compress the clip and slide the blade
assembly toward the windshield, then
slide it off the arm.2. Firmly grasp the end of the rubber
blade and pull until the tabs are free
of the metal support.
3. Remove the metal retainers from the
rubber blade and install them in the
new rubber blade.
4. Carefully insert a new rubber blade
and re-install the blade assembly in
the reverse order of removal.
Install the blade with the tabs facing
towards the bottom of the wiper arm.
BATTERY
MMSA7014
MMSA7017
✻
NOTICE
Do not allow the wiper arm to fall
against the windshield.
✻
NOTICE
Do not bend the metal retainers.
WARNING
- Battery
dangers
Always read the following
instructions carefully
when handling a battery.Keep lighted cigarettes and
all other flames or sparks
away from the battery.Hydrogen, which is a
highly combustible gas, is
always present in battery
cells and may explode if ignited.If any electrolyte gets
into your eyes, flush
your eyes with clean
water for at least 15 minutes
and get immediate medical
attention. If possible, continue
to apply water with a sponge or
cloth until medical attention is
received. If electrolyte gets on
your skin, thoroughly wash the
contacted area. If you feel a
pain or a burning sensation, get
medical attention immediately.
(Continued)
MS-CNA-Eng 7.QXD 7/25/2005 5:09 PM Page 23
Page 200 of 225
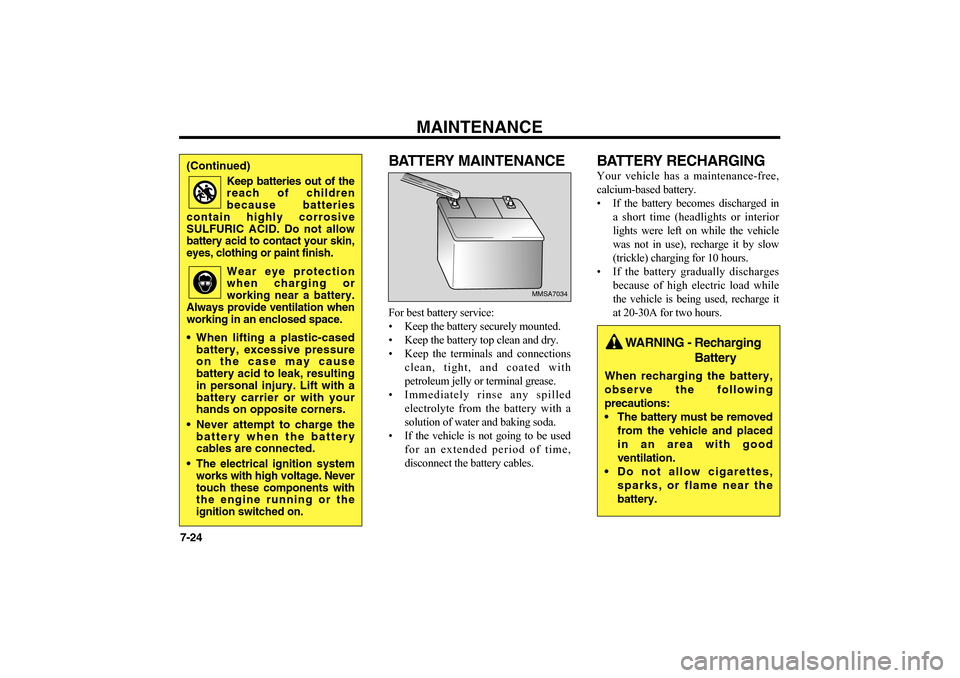
BATTERY MAINTENANCEFor best battery service:
• Keep the battery securely mounted.
• Keep the battery top clean and dry.
• Keep the terminals and connections
clean, tight, and coated with
petroleum jelly or terminal grease.
• Immediately rinse any spilled
electrolyte from the battery with a
solution of water and baking soda.
• If the vehicle is not going to be used
for an extended period of time,
disconnect the battery cables.
BATTERY RECHARGINGYour vehicle has a maintenance-free,
calcium-based battery.
• If the battery becomes discharged in
a short time (headlights or interior
lights were left on while the vehicle
was not in use), recharge it by slow
(trickle) charging for 10 hours.
• If the battery gradually discharges
because of high electric load while
the vehicle is being used, recharge it
at 20-30A for two hours.
MAINTENANCE
7-24
MMSA7034
(Continued)
Keep batteries out of the
reach of children
because batteries
contain highly corrosive
SULFURIC ACID. Do not allow
battery acid to contact your skin,
eyes, clothing or paint finish.
Wear eye protection
when charging or
working near a battery.
Always provide ventilation when
working in an enclosed space.
When lifting a plastic-cased
battery, excessive pressure
on the case may cause
battery acid to leak, resulting
in personal injury. Lift with a
battery carrier or with your
hands on opposite corners.
Never attempt to charge the
battery when the battery
cables are connected.
The electrical ignition system
works with high voltage. Never
touch these components with
the engine running or the
ignition switched on.
WARNING - Recharging
Battery
When recharging the battery,
observe the following
precautions:
The battery must be removed
from the vehicle and placed
in an area with good
ventilation.
Do not allow cigarettes,
sparks, or flame near the
battery.
MS-CNA-Eng 7.QXD 7/25/2005 5:09 PM Page 24
Page 208 of 225
MAINTENANCE
7-32WHEEL REPLACEMENTWhen replacing the metal wheels for any
reason, make sure the new wheels are
equivalent to the original factory units in
diameter, rim width and offset.
BULB REPLACEMENTHEADLIGHT BULB
REPLACEMENT
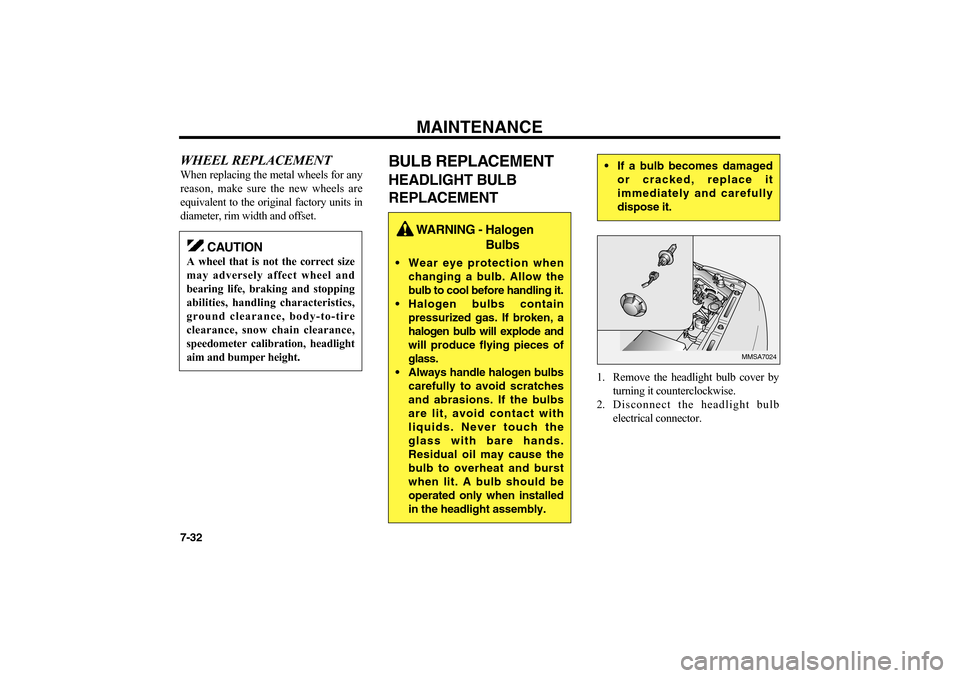
1. Remove the headlight bulb cover by
turning it counterclockwise.
2. Disconnect the headlight bulb
electrical connector.
MMSA7024
CAUTION
A wheel that is not the correct size
may adversely affect wheel and
bearing life, braking and stopping
abilities, handling characteristics,
ground clearance, body-to-tire
clearance, snow chain clearance,
speedometer calibration, headlight
aim and bumper height.
WARNING - Halogen
Bulbs
Wear eye protection when
changing a bulb. Allow the
bulb to cool before handling it.
Halogen bulbs contain
pressurized gas. If broken, a
halogen bulb will explode and
will produce flying pieces of
glass.
Always handle halogen bulbs
carefully to avoid scratches
and abrasions. If the bulbs
are lit, avoid contact with
liquids. Never touch the
glass with bare hands.
Residual oil may cause the
bulb to overheat and burst
when lit. A bulb should be
operated only when installed
in the headlight assembly.
If a bulb becomes damaged
or cracked, replace it
immediately and carefully
dispose it.
MS-CNA-Eng 7.QXD 7/25/2005 5:09 PM Page 32
Page 214 of 225
MAINTENANCE
7-38When choosing an oil, consider the range
of temperature your vehicle will be
operated in before the next oil change.
Then select the recommended oil
viscosity from the chart.EXTERIOR CAREEXTERIOR GENERAL
CAUTIONIt is very important to follow the
manufacturer’s directions when using
any chemical cleaner or polish. Read all
warning and caution statements that
appear on the label.FINISH MAINTENANCE
WASHINGTo help protect your vehicle’s finish from
rust and deterioration, wash it thoroughly
and frequently at least once a month with
special attention to the removal of any
accumulation of salt, dirt, mud, or other
foreign materials. Make sure the drainholes in the lower edges of the doors and
rocker panels are kept clear and clean.
Insects, tar, tree sap, bird droppings,
industrial fallout and similar deposits can
damage your vehicle’s finish if not
removed immediately.
Even prompt washing with plain water
may not completely remove all these
deposits. A mild soap, safe for use on
painted surfaces, can be used.
After washing, rinse the vehicle
thoroughly with lukewarm or cold water.
Do not allow soap to dry on the finish.
WAXINGWax the vehicle when water will no
longer bead on the paint.
Always wash and dry the vehicle before
waxing. Use a good quality liquid or
paste wax, and follow the manufacturer’s
instructions. Wax all metal trim as well,
to protect it and to maintain its luster.
Removing oil, tar, and similar materials
with a spot remover will usually strip the
wax from the finish. Be sure to re-wax
these areas even if the rest of the vehicle
does not yet need waxing.
✻
NOTICE
Do not use strong soap, chemical
detergents or hot water, and do not
wash the vehicle in direct sunlight
or when the body of the vehicle is
warm.
CAUTION
After washing the vehicle, test the
brakes while driving slowly to see if
they have been affected by water. If
braking performance is impaired,
dry the brakes by applying them
lightly while maintaining a slow
forward speed.
MS-CNA-Eng 7.QXD 7/25/2005 5:09 PM Page 38