display KIA MORNING 2015 Service Manual
[x] Cancel search | Manufacturer: KIA, Model Year: 2015, Model line: MORNING, Model: KIA MORNING 2015Pages: 420, PDF Size: 42.6 MB
Page 221 of 420
Features of your vehicle
148 4
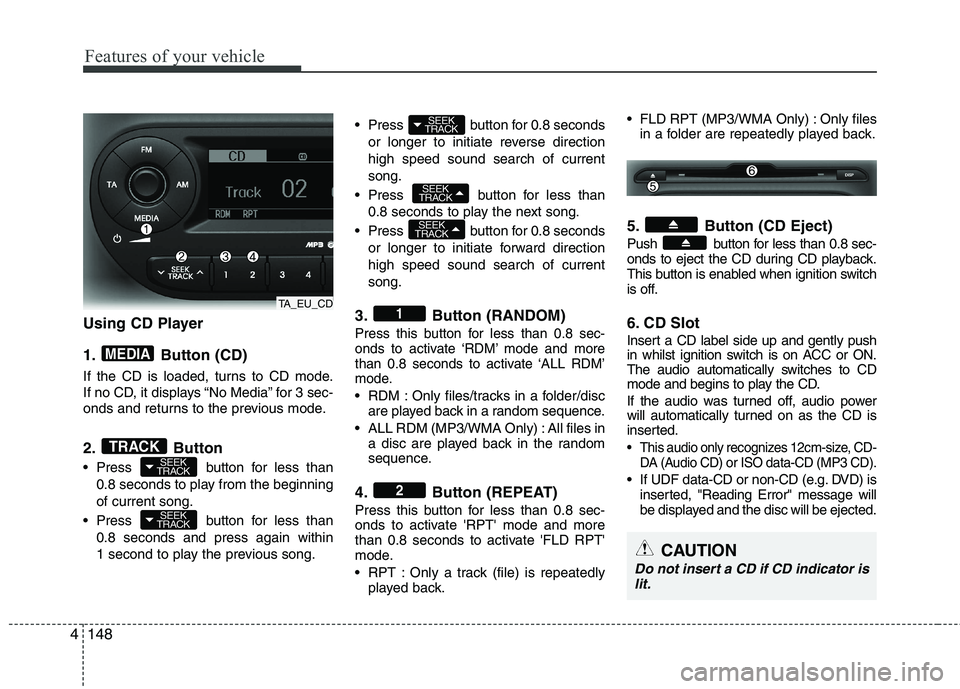
Using CD Player
1. Button (CD)
If the CD is loaded, turns to CD mode.
If no CD, it displays “No Media” for 3 sec-
onds and returns to the previous mode.
2. Button
Press button for less than
0.8 seconds to play from the beginning
of current song.
Press button for less than
0.8 seconds and press again within
1 second to play the previous song. Press button for 0.8 seconds
or longer to initiate reverse direction
high speed sound search of current
song.
Press button for less than
0.8 seconds to play the next song.
Press button for 0.8 seconds
or longer to initiate forward direction
high speed sound search of current
song.
3. Button (RANDOM)
Press this button for less than 0.8 sec-
onds to activate ‘RDM’ mode and more
than 0.8 seconds to activate ‘ALL RDM’
mode.
RDM : Only files/tracks in a folder/disc
are played back in a random sequence.
ALL RDM (MP3/WMA Only) : All files in
a disc are played back in the random
sequence.
4. Button (REPEAT)
Press this button for less than 0.8 sec-
onds to activate 'RPT' mode and more
than 0.8 seconds to activate 'FLD RPT'
mode.
RPT : Only a track (file) is repeatedly
played back. FLD RPT (MP3/WMA Only) : Only files
in a folder are repeatedly played back.
5. Button (CD Eject)
Push button for less than 0.8 sec-
onds to eject the CD during CD playback.
This button is enabled when ignition switch
is off.
6. CD Slot
Insert a CD label side up and gently push
in whilst ignition switch is on ACC or ON.
The audio automatically switches to CD
mode and begins to play the CD.
If the audio was turned off, audio power
will automatically turned on as the CD is
inserted.
This audio only recognizes 12cm-size, CD-
DA (Audio CD) or ISO data-CD (MP3 CD).
If UDF data-CD or non-CD (e.g. DVD) is
inserted, "Reading Error" message will
be displayed and the disc will be ejected.2
1
SEEK
TRACK
SEEK
TRACK
SEEK
TRACK
SEEK
TRACK
SEEK
TRACKTRACK
MEDIA
TA_EU_CD
CAUTION
Do not insert a CD if CD indicator is
lit.
Page 222 of 420
4149
Features of your vehicle
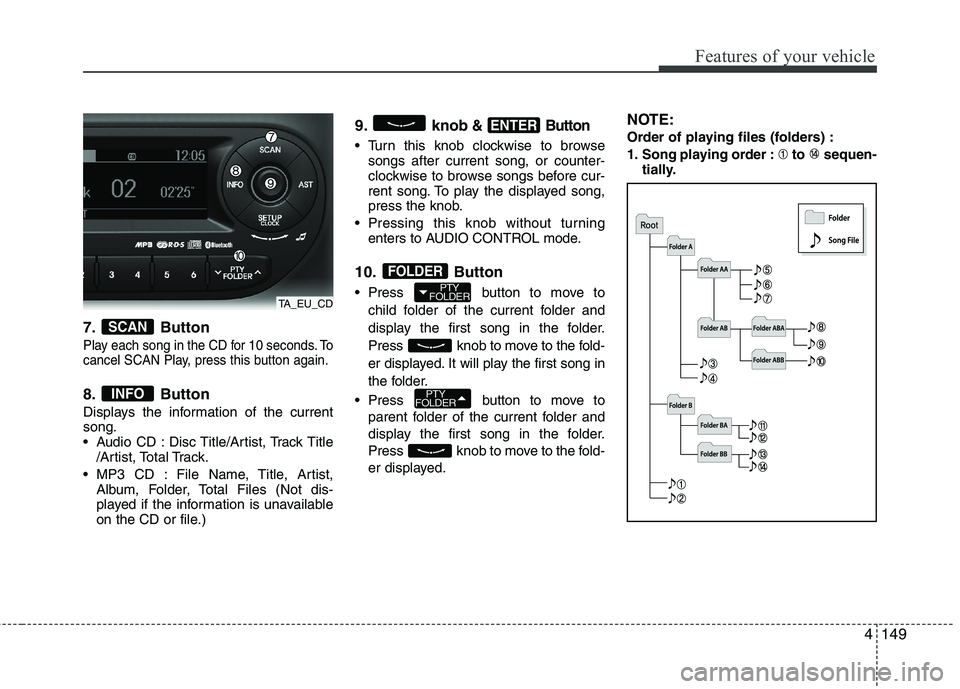
7. Button
Play each song in the CD for 10 seconds. To
cancel SCAN Play, press this button again.
8. Button
Displays the information of the current
song.
Audio CD : Disc Title/Artist, Track Title
/Artist, Total Track.
MP3 CD : File Name, Title, Artist,
Album, Folder, Total Files (Not dis-
played if the information is unavailable
on the CD or file.)
9. knob& Button
Turn this knob clockwise to browse
songs after current song, or counter-
clockwise to browse songs before cur-
rent song. To play the displayed song,
press the knob.
Pressing this knob without turning
enters to AUDIO CONTROL mode.
10. Button
Press button to move to
child folder of the current folder and
display the first song in the folder.
Press knob to move to the fold-
er displayed. It will play the first song in
the folder.
Press button to move to
parent folder of the current folder and
display the first song in the folder.
Press knob to move to the fold-
er displayed.
NOTE:
Order of playing files (folders) :
1. Song playing order : to sequen-
tially.
PTY
FOLDER
PTY
FOLDER
FOLDER
ENTER
INFO
SCAN
TA_EU_CD
Page 223 of 420
Features of your vehicle
150 4
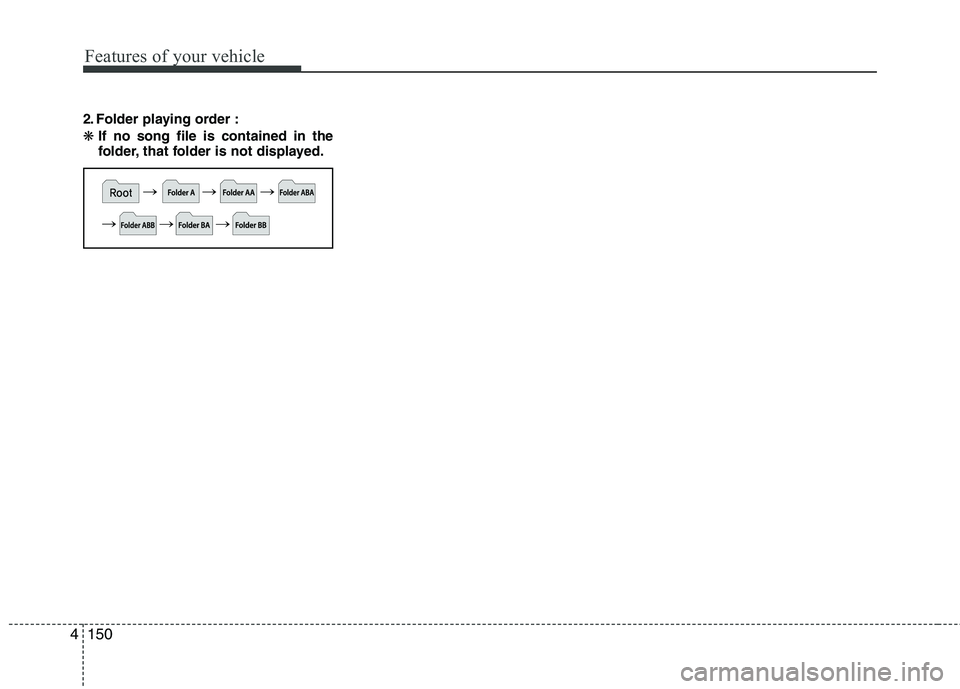
2. Folder playing order :
❋If no song file is contained in the
folder, that folder is not displayed.
Page 227 of 420
Features of your vehicle
154 4
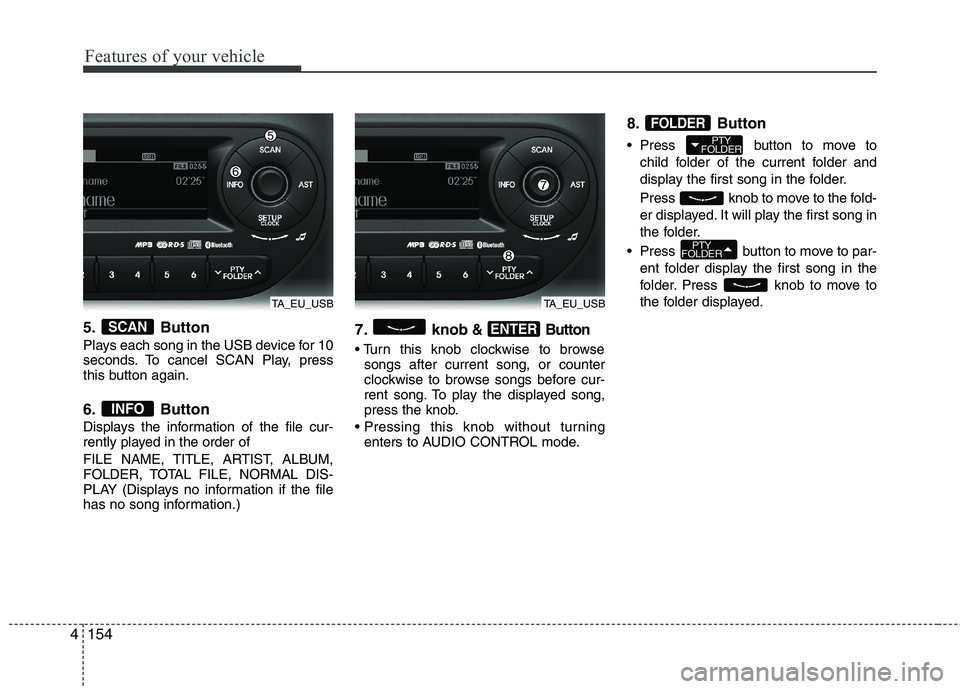
5. Button
Plays each song in the USB device for 10
seconds. To cancel SCAN Play, press
this button again.
6. Button
Displays the information of the file cur-
rently played in the order of
FILE NAME, TITLE, ARTIST, ALBUM,
FOLDER, TOTAL FILE, NORMAL DIS-
PLAY (Displays no information if the file
has no song information.)
7. knob& Button
songs after current song, or counter
clockwise to browse songs before cur-
rent song. To play the displayed song,
press the knob.
enters to AUDIO CONTROL mode.
8. Button
Press button to move to
child folder of the current folder and
display the first song in the folder.
Press knob to move to the fold-
er displayed. It will play the first song in
the folder.
Press button to move to par-
ent folder display the first song in the
folder. Press knob to move to
the folder displayed.
PTY
FOLDER
PTY
FOLDER
FOLDER
ENTER
INFO
SCAN
TA_EU_USBTA_EU_USB
Page 230 of 420
4157
Features of your vehicle
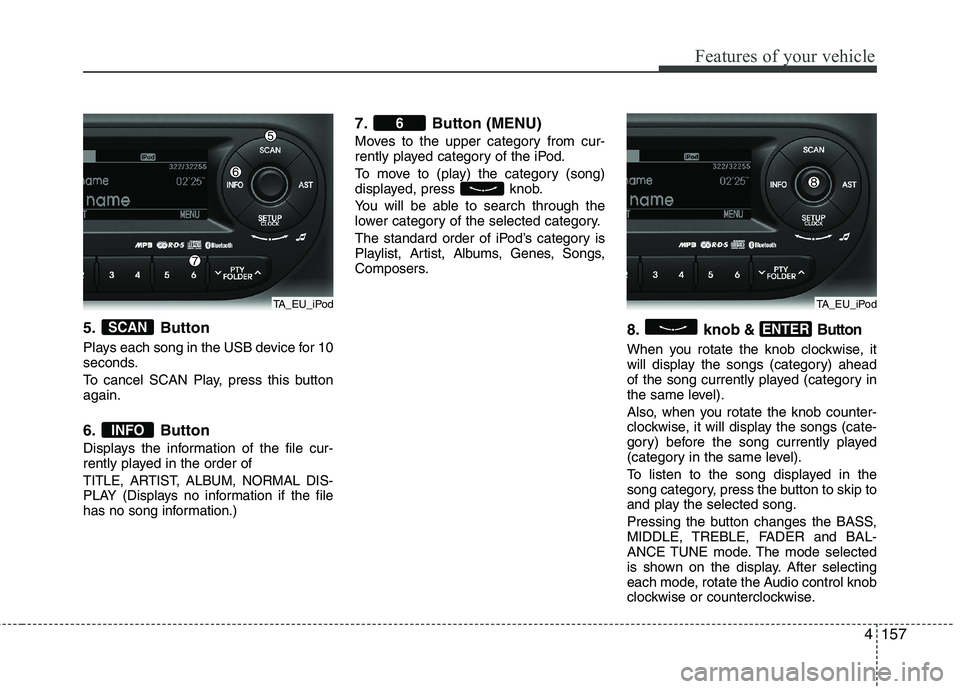
5. Button
Plays each song in the USB device for 10
seconds.
To cancel SCAN Play, press this button
again.
6. Button
Displays the information of the file cur-
rently played in the order of
TITLE, ARTIST, ALBUM, NORMAL DIS-
PLAY (Displays no information if the file
has no song information.)
7. Button (MENU)
Moves to the upper category from cur-
rently played category of the iPod.
To move to (play) the category (song)
displayed, press knob.
You will be able to search through the
lower category of the selected category.
The standard order of iPod’s category is
Playlist, Artist, Albums, Genes, Songs,
Composers.
8. knob& Button
When you rotate the knob clockwise, it
will display the songs (category) ahead
of the song currently played (category in
the same level).
Also, when you rotate the knob counter-
clockwise, it will display the songs (cate-
gory) before the song currently played
(category in the same level).
To listen to the song displayed in the
song category, press the button to skip to
and play the selected song.
Pressing the button changes the BASS,
MIDDLE, TREBLE, FADER and BAL-
ANCE TUNE mode. The mode selected
is shown on the display. After selecting
each mode, rotate the Audio control knob
clockwise or counterclockwise.
ENTER
6
INFO
SCAN
TA_EU_iPodTA_EU_iPod
Page 231 of 420
Features of your vehicle
158 4
CAUTION IN USING
BLUETOOTH®WIRELESS
TECHNOLOGYMOBILE
PHONE
Do not use a mobile phone or per-
form Bluetooth®Wireless
Technology settings (e.g. pairing
a phone) whilst driving.
Some Bluetooth
®Wireless
Technology-enabled phones may
not be recognized by the system
or fully compatible with the sys-
tem.
Before using Bluetooth
®Wireless
Technology related features of
the audio system, refer your
phone’s User’s Manual for phone-
side Bluetooth
®Wireless
Technology operations.
The phone must be paired to the
audio system to use Bluetooth®
Wireless Technologyrelated fea-
tures.
You will not be able to use the
hands-free feature when your
phone (in the car) is outside of
the mobile service area (e.g. in a
tunnel, in a underground, in a
mountainous area, etc.).
(Continued)
(continued)
If the mobile phone signal is poor
or the vehicles interior noise is
too loud, it may be difficult to hear
the other person’s voice during a
call.
Do not place the phone near or
inside metallic objects, otherwise
communications with Bluetooth
®
Wireless Technology system or
mobile service stations can be
disturbed.
While a phone is connected
through Bluetooth
®Wireless
Technology your phone may dis-
charge quicker than usual for
additional Bluetooth
®Wireless
Technology-related operations.
Some mobile phones or other
devices may cause interference
noise or malfunction to audio
system. In this case, store the
device in a different location may
resolve the situation.
Please save your phone name in
English, or your phone name may
not be displayed correctly.
Page 233 of 420
Features of your vehicle
160 4
■Bluetooth®Wireless Technology
Language Setting
The system language can be changed by
the following steps:
1. Power on the audio system with the
volume set to an audible level.
2. Press and hold button on the
steering wheel until the audio displays
“Please Wait”.
- The
Bluetooth®Wireless Technology
system will reply in currently selected
language that it is changing to the next
language.
- System language cycles between
FRENCH/GERMAN/UK ENGLISH
SPANISH/DUTCH/ITALIAN/DANISH/
RUSSIAN/POLISH/SWEDISH.
3. When completed, the audio display
returns to normal.
4. Repeat steps 2 and 3 for the next lan-
guage selection.
NOTE:
The phone needs to be paired again
after changing system language.
- Avoid resting your thumb or finger
on the button as the language
could unintentionally change.
■Voice Recognition Activation
in the Bluetooth®Wireless Technology
System can be activated in the follow-
ing conditions:
- Button Activation
The voice recognition system will be
active when the button is pressed
and after the sound of a Beep.
- Active Listening
The voice recognition system will be
active for a period of time when the
Voice Recognition system has asked
for a customer response.
from zero to nine whilst number greater
than ten will not be recognized.
system will announce "Pardon" or No
input voice signal from microphone. (No
response)
tion mode in following cases : When
pressing the button and saying
cancel following the beep. When not
making a call and pressing the
button. When voice recognition has
failed 3 consecutive times. At any time if you say “help”, the sys-
tem will announce what commands are
available.
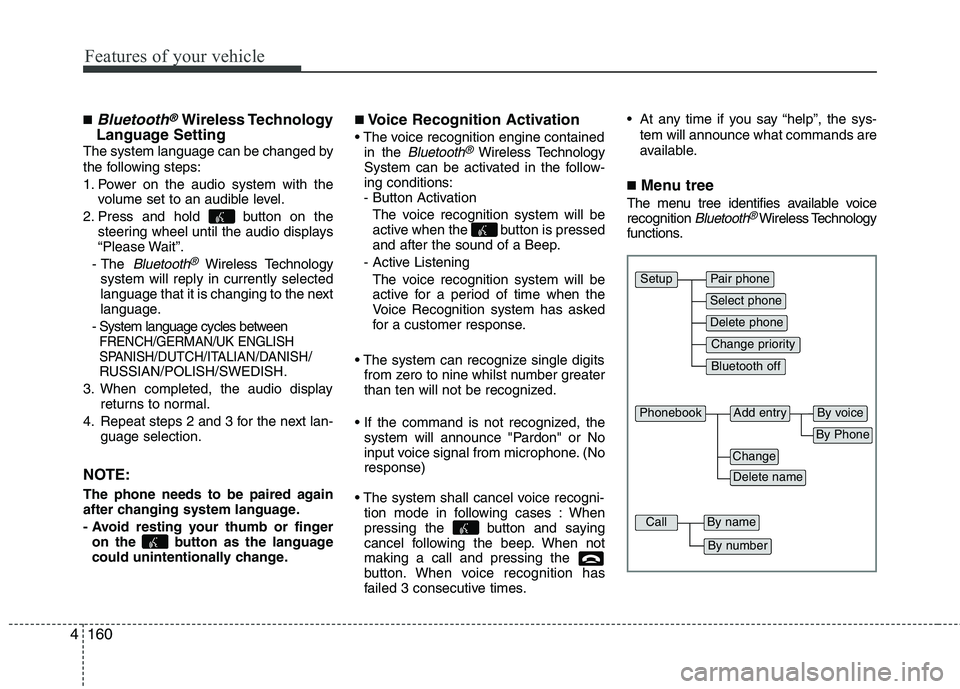
■Menu tree
The menu tree identifies available voice
recognition Bluetooth®Wireless Technology
functions.
Pair phone
Select phone
Change priority
Delete phone
Bluetooth off
Setup
Add entryPhonebook
Change
Delete name
By Phone
By voice
CallBy name
By number
Page 234 of 420
4161
Features of your vehicle
■Voice Operation Tip
To get the best performance out of the
Voice Recognition System, observe the
followings:
- Keep the interior of the vehicle as quiet
as possible. Close the window to elim-
inate surrounding noise (traffic noise,
vibration sounds, etc), which may dis-
turb recognizing the voice command
correctly.
- Speak a command after a beep sound
within 5 seconds. Otherwise the com-
mand will not be received properly.
- Speak in a natural voice without paus-
ing between words.
■Information Display
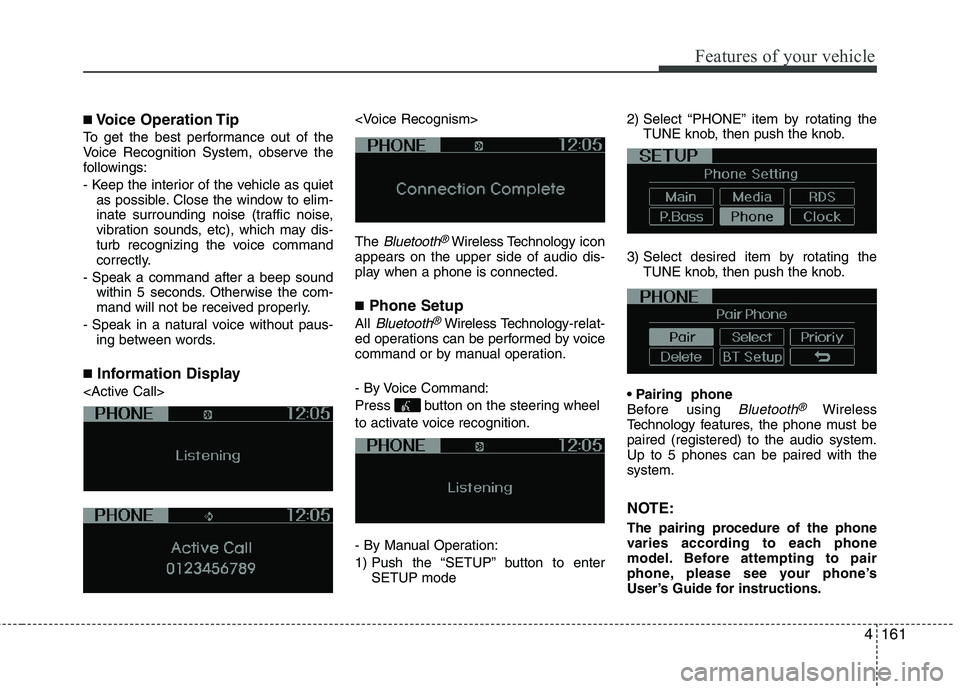
The
Bluetooth®Wireless Technologyicon
appears on the upper side of audio dis-
play when a phone is connected.
■Phone Setup
All Bluetooth®Wireless Technology-relat-
ed operations can be performed by voice
command or by manual operation.
- By Voice Command:
Press button on the steering wheel
to activate voice recognition.
- By Manual Operation:
1) Push the “SETUP” button to enter
SETUP mode2) Select “PHONE” item by rotating the
TUNE knob, then push the knob.
3) Select desired item by rotating the
TUNE knob, then push the knob.
Before using
Bluetooth®Wireless
Technology features, the phone must be
paired (registered) to the audio system.
Up to 5 phones can be paired with the
system.
NOTE:
The pairing procedure of the phone
varies according to each phone
model. Before attempting to pair
phone, please see your phone’s
User’s Guide for instructions.
Page 235 of 420
Features of your vehicle
162 4
NOTE:
Once pairing with the phone is com-
pleted, there is no need to pair with
that phone again unless the phone is
deleted manually from the audio sys-
tem (refer “Deleting Phone” section)
or the vehicle’s information is
removed from the phone.
1. Press button.
2. Say “Set Up”.
- The system replies with available
commands.
- To skip the information message,
press again and then a beep is
heard.
3. Say “Pair Phone”
4. Proceed at next step.
5. Say the name of your phone when
prompted.
- Use any name to uniquely describe
your phone.
- Use Full name to voice tag.
- Not use to short name or similar to
voice command.
6.
Bluetooth®Wireless Technologysys-
tem will repeat the name you stated.
7. Say “Yes” to confirm.
8. The audio displays “searching
----
passkey: 0000” and asks you to initiate
pairing procedure from the phone.9. Search the
Bluetooth®Wireless
Technologysystem on your phone
.Your phone should display your [vehi-
cle model name] on the Bluetooth
®
device list. Then attempt pairing on
your phone
10. After Pairing is completed, your
phone will start to transfer phone/con-
tact list to the audio system.
- This process may take from a few
minutes to over 10 minutes depend-
ing on the phone model and number
of entries in the phone/contact list.
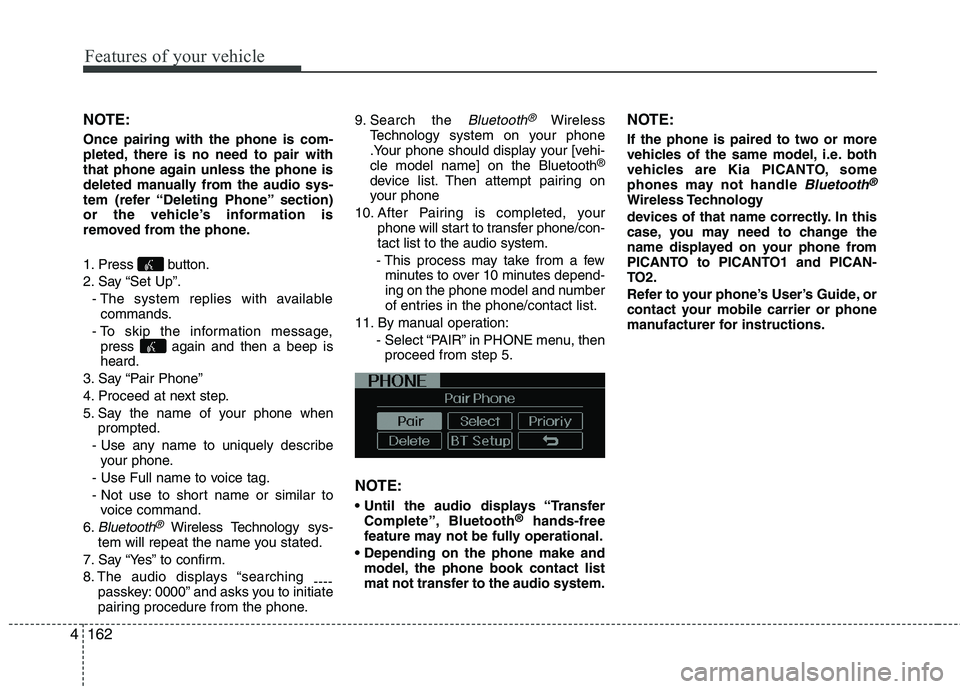
11. By manual operation:
- Select “PAIR” in PHONE menu, then
proceed from step 5.
NOTE:
Complete”, Bluetooth®hands-free
feature may not be fully operational.
model, the phone book contact list
mat not transfer to the audio system.
NOTE:
If the phone is paired to two or more
vehicles of the same model, i.e. both
vehicles are Kia PICANTO, some
phones may not handle
Bluetooth®
Wireless Technology
devices of that name correctly. In this
case, you may need to change the
name displayed on your phone from
PICANTO to PICANTO1 and PICAN-
TO2.
Refer to your phone’s User’s Guide, or
contact your mobile carrier or phone
manufacturer for instructions.
Page 238 of 420
4165
Features of your vehicle
✽ ✽
NOTICE
- The system can recognize single digits
from zero to nine. Numbers that are
ten or greater cannot be recognized.
- You can enter each digit individually
or group digits together in preferred
string lengths.
- To speed up input, it is a good idea to
group all digits into a continuous
string.
- Recommend to enter the numbers con-
stituted an grouping within all digit
numbers to dial 995 / 734 / 0000
- The display corresponding to each
operation appears on the screen as fol-
lows:
Input operation example:
1. Say: “Nine, nine, five”
➟ Display: “995”
2. And say: “Seven, three, four”
➟ Display: “995734”
1. Press button.
2. Say “Phonebook”.
3. Say “Add Entry” after prompt.
4. Say “By Phone” to proceed.
5. Say “Yes” to confirm.
6. Your phone will start to transfer
phone/contact list to the audio system.
This process may take over 10 minutes
depending on the phone model and
number of entries
7. Wait till the audio displays “Transfer
Complete” message.
Changing Name
The registered names can be modified.
1. Press button.
2. Say “Phonebook”.
3. Say “Change Name” after prompt.
4. Say the name of the entry (voice tag).
5. Say “Yes” to confirm.
6. Say new desired name.Deleting Name
The registered names can be deleted.
1. Press button.
2. Say “Phonebook”.
3. Say “Delete Name” after prompt.
4. Say the name of the entry (voice tag).
5. Say “Yes” to confirm.
■Making a Phone Call
A phone call can be made by speaking
names registered in the audio system.
1. Press button.
2. Say “Call”.
3. Say “Name” when prompted.
4. Say desired name (voice tag).
5. Say desired location (phone number
type). Only stored locations can be
selected.
6. Say “Yes” to confirm and make a call.
✽ ✽
Tip
A shortcut to each of the following func-
tions is available:
1. Say “Call Name”
2. Say “Call
3. Say “Call