KIA NIRO 2017 Owners Manual
Manufacturer: KIA, Model Year: 2017, Model line: NIRO, Model: KIA NIRO 2017Pages: 552, PDF Size: 14.92 MB
Page 201 of 552
Features of your vehicle
98
4
Pay close attention when the vehicle
is driven close to objects on the
road, particularly pedestrians, and
especially children. Be aware that
some objects may not be detected
by the sensors, due to the objects
distance, size or material, all of
which can limit the effectiveness of
the sensor. Always perform a visual
inspection to make sure the vehicle
is clear of all obstructions before
moving the vehicle in any direction.Self-diagnosis
When you shift the gear to the R
(Reverse) position and if one or more
of the below occurs you may have a
malfunction in the rear parking assist
system.
You don't hear an audible warning
sound or if the buzzer sounds inter-
mittently.
If this occurs, we recommend that the
system be checked by an authorized
Kia dealer.
✽ ✽ NOTICE
Your new vehicle warranty does not
cover any accidents or damage to
the vehicle or injuries to its occu-
pants related to a parking assist sys-
tem. Always drive safely and cau-
tiously.
is displayed. (if equipped)
(blinks)
Page 202 of 552
499
Features of your vehicle
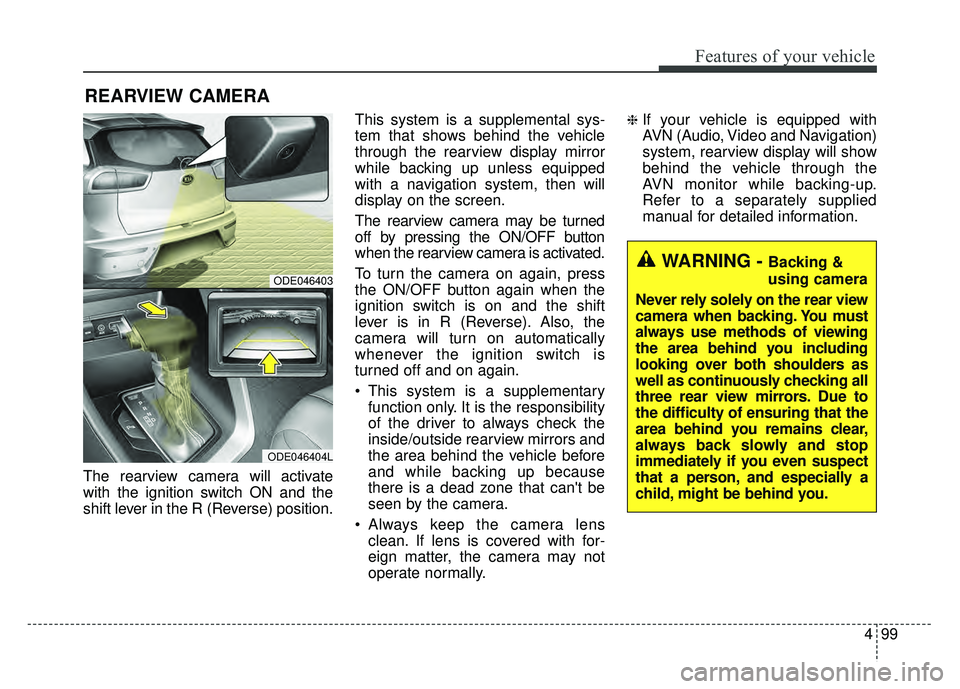
The rearview camera will activate
with the ignition switch ON and the
shift lever in the R (Reverse) position.This system is a supplemental sys-
tem that shows behind the vehicle
through the rearview display mirror
while backing up unless equipped
with a navigation system, then will
display on the screen.
The rearview camera may be turned
off by pressing the ON/OFF button
when the rearview camera is activated.
To turn the camera on again, press
the ON/OFF button again when the
ignition switch is on and the shift
lever is in R (Reverse). Also, the
camera will turn on automatically
whenever the ignition switch is
turned off and on again.
This system is a supplementary
function only. It is the responsibility
of the driver to always check the
inside/outside rearview mirrors and
the area behind the vehicle before
and while backing up because
there is a dead zone that can't be
seen by the camera.
Always keep the camera lens clean. If lens is covered with for-
eign matter, the camera may not
operate normally.
❈If your vehicle is equipped with
AVN (Audio, Video and Navigation)
system, rearview display will show
behind the vehicle through the
AVN monitor while backing-up.
Refer to a separately supplied
manual for detailed information.
REARVIEW CAMERA
WARNING - Backing &
using camera
Never rely solely on the rear view
camera when backing. You must
always use methods of viewing
the area behind you including
looking over both shoulders as
well as continuously checking all
three rear view mirrors. Due to
the difficulty of ensuring that the
area behind you remains clear,
always back slowly and stop
immediately if you even suspect
that a person, and especially a
child, might be behind you.
ODE046403
ODE046404L
Page 203 of 552
Features of your vehicle
100
4
Battery saver function
The purpose of this feature is to
prevent the battery from being dis-
charged if the lights are left in the
ON position. The system automati-
cally shuts off the parking lights 30
seconds after the ignition key is
removed and the driver’s door is
opened and closed.
With this feature, the parking lights will turn off automatically if the driver
parks on the side of the road at night
and opens the driver’s side door.
If necessary, to keep the parking
lights on when the ignition key is
removed, perform the following:
1) Open the driver-side door.
2) Turn the parking lights OFF and ON again using the light switch
on the steering column.
Headlight escort function
(if equipped)
If you turn the ignition switch to the
ACC or OFF position with the head-
lights ON, the headlights remain on
for about 5 minutes. However, if the
driver's door is opened and closed,
the headlights are turned off after 15
seconds.
The headlights can be turned off by
pressing the lock button on the trans-
mitter (or smart key) one more or
turning the light switch to the OFF
position.
Daytime running light
(if equipped)
The Daytime Running Lights (DRL)
can make it easier for others to see the
front of your vehicle during the day.
DRL can be helpful in many different
driving conditions, and it is especially
helpful after dawn and before sunset.
The DRL system will turn the dedi-
cated lamp OFF when:
1. The headlight switch is ON.
2. The engine is OFF.
LIGHTING
Page 204 of 552
4101
Features of your vehicle
Lighting control
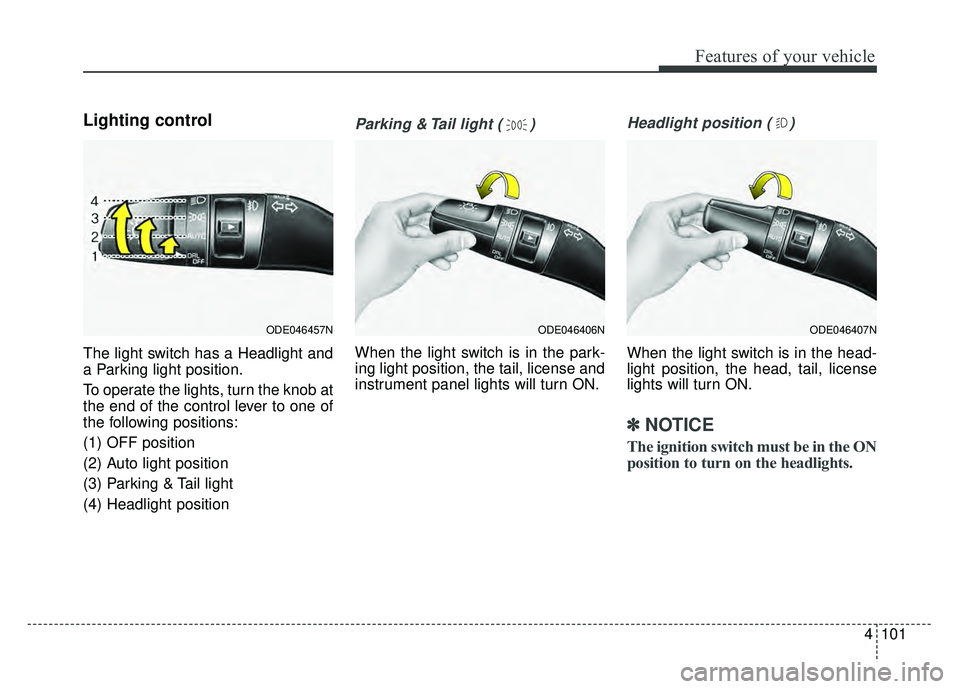
The light switch has a Headlight and
a Parking light position.
To operate the lights, turn the knob at
the end of the control lever to one of
the following positions:
(1) OFF position
(2) Auto light position
(3) Parking & Tail light
(4) Headlight position
Parking & Tail light ( )
When the light switch is in the park-
ing light position, the tail, license and
instrument panel lights will turn ON.
Headlight position ( )
When the light switch is in the head-
light position, the head, tail, license
lights will turn ON.
✽ ✽NOTICE
The ignition switch must be in the ON
position to turn on the headlights.
ODE046457NODE046407NODE046406N
Page 205 of 552

Features of your vehicle
102
4
Auto light position
When the light switch is in the AUTO
light position, the taillights and head-
lights will turn ON or OFF automati-
cally depending on the amount of
light outside the vehicle.
When the light switch is positioned at
an auto light position, at first, the
wiper will turn on and then, after 5
seconds the head lamp will turn on
automatically.
If the head lamp has been turned on
due to this function of the vehicle, the
head lamp will turn off 60 seconds
after the wiper has been turned off.
High beam operation
To turn on the high beam headlamp,
push the lever away from you. The
lever will return to its original position.
The high beam indicator will light
when the headlight high beams are
switched on.
To prevent the battery from being
discharged, do not leave the lights
on for a prolonged time while the
engine is not running.
ODE046408NODE046460N
WARNING - High beams
Do not use high beam when
there are other vehicles. Using
high beam could obstruct the
other driver’s vision.
Page 206 of 552
4103
Features of your vehicle
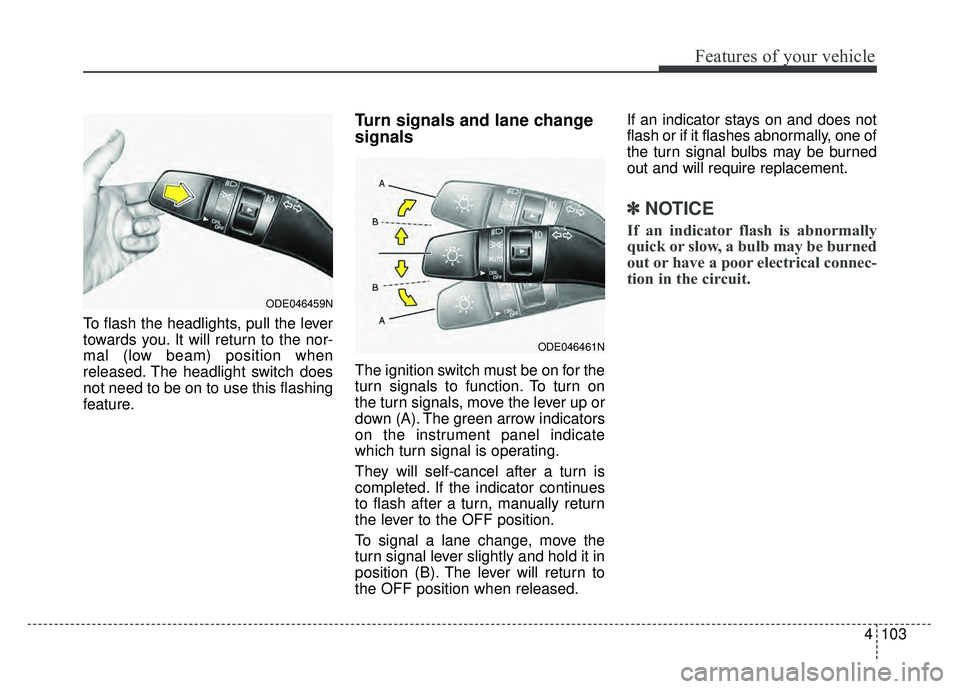
To flash the headlights, pull the lever
towards you. It will return to the nor-
mal (low beam) position when
released. The headlight switch does
not need to be on to use this flashing
feature.
Turn signals and lane change
signals
The ignition switch must be on for the
turn signals to function. To turn on
the turn signals, move the lever up or
down (A). The green arrow indicators
on the instrument panel indicate
which turn signal is operating.
They will self-cancel after a turn is
completed. If the indicator continues
to flash after a turn, manually return
the lever to the OFF position.
To signal a lane change, move the
turn signal lever slightly and hold it in
position (B). The lever will return to
the OFF position when released.If an indicator stays on and does not
flash or if it flashes abnormally, one of
the turn signal bulbs may be burned
out and will require replacement.
✽ ✽
NOTICE
If an indicator flash is abnormally
quick or slow, a bulb may be burned
out or have a poor electrical connec-
tion in the circuit.
ODE046459N
ODE046461N
Page 207 of 552

Features of your vehicle
104
4
Check headlight
This warning message illuminates if
there is a malfunction (burned-out
bulb except LED lamp or circuit mal-
function) with the headlamp. In this
case, have your vehicle inspected by
an authorized Kia dealer.
✽ ✽
NOTICE
• When replacing the bulb, use the
same wattage bulb.
For more information, refer to
“BULB WATTAGE” in chapter 9.
• If the different wattage bulb is equipped with the vehicle, this
warning message is not displayed.
Front fog light (if equipped)
Fog lights are used to provide
improved visibility when visibility is
poor due to fog, rain or snow, etc. The
fog lights will turn on when the fog light
switch (1) is turned to the on position
after the headlight is turned on.
To turn off the fog lights, turn the fog
light switch (1) to the OFF position.
When in operation, the fog lights
consume large amounts of vehicle
electrical power. Only use the fog
lights when visibility is poor.
OJFA055274ODE046458N
Page 208 of 552
4105
Features of your vehicle
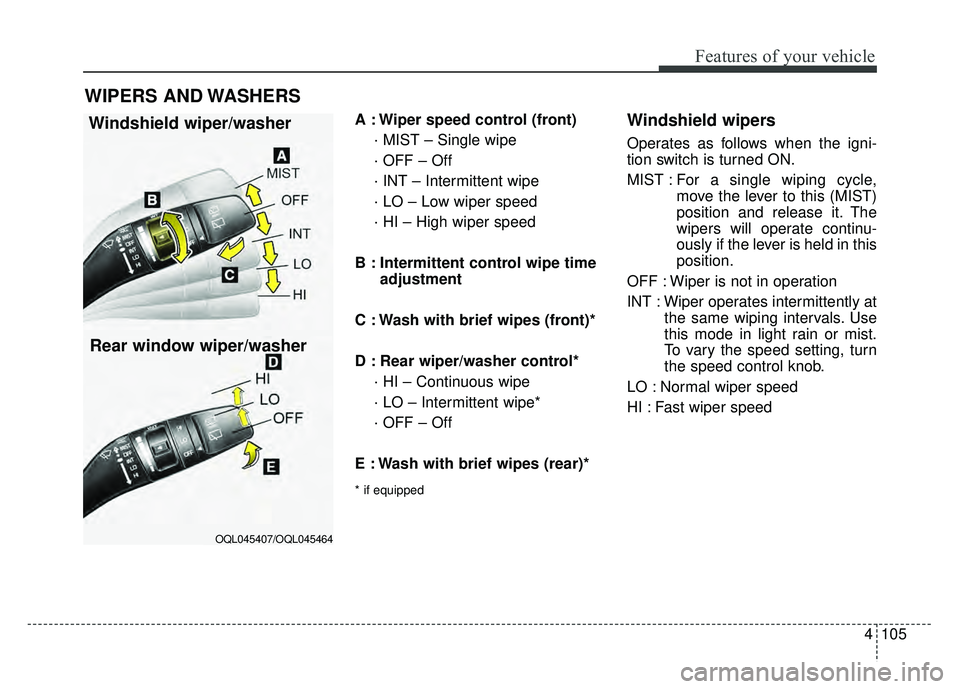
A : Wiper speed control (front)· MIST – Single wipe
· OFF – Off
· INT – Intermittent wipe
· LO – Low wiper speed
· HI – High wiper speed
B : Intermittent control wipe time adjustment
C : Wash with brief wipes (front)*
D : Rear wiper/washer control* · HI – Continuous wipe
· LO – Intermittent wipe*
· OFF – Off
E : Wash with brief wipes (rear)*
* if equipped
Windshield wipers
Operates as follows when the igni-
tion switch is turned ON.
MIST : For a single wiping cycle,
move the lever to this (MIST)
position and release it. The
wipers will operate continu-
ously if the lever is held in this
position.
OFF : Wiper is not in operation
INT : Wiper operates intermittently at the same wiping intervals. Use
this mode in light rain or mist.
To vary the speed setting, turn
the speed control knob.
LO : Normal wiper speed
HI : Fast wiper speed
WIPERS AND WASHERS
Windshield wiper/washer
OQL045407/OQL045464
Rear window wiper/washer
Page 209 of 552
Features of your vehicle
106
4
✽
✽
NOTICE
If there is heavy accumulation of
snow or ice on the windshield, defrost
the windshield for about 10 minutes,
or until the snow and/or ice is
removed before using the windshield
wipers to ensure proper operation.
Front windshield washers
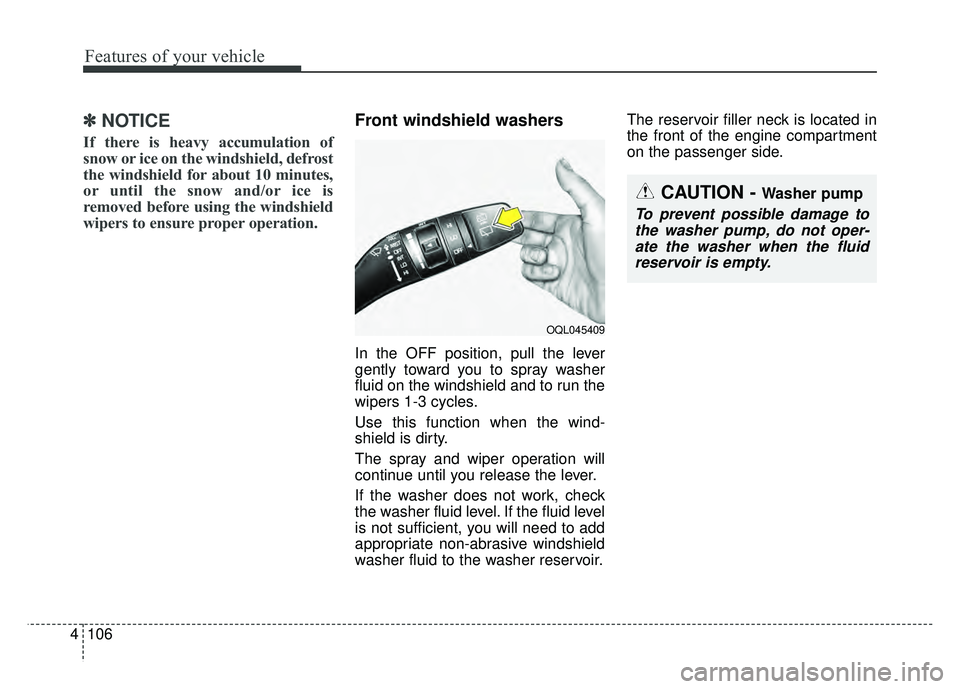
In the OFF position, pull the lever
gently toward you to spray washer
fluid on the windshield and to run the
wipers 1-3 cycles.
Use this function when the wind-
shield is dirty.
The spray and wiper operation will
continue until you release the lever.
If the washer does not work, check
the washer fluid level. If the fluid level
is not sufficient, you will need to add
appropriate non-abrasive windshield
washer fluid to the washer reservoir. The reservoir filler neck is located in
the front of the engine compartment
on the passenger side.
OQL045409
CAUTION - Washer pump
To prevent possible damage to
the washer pump, do not oper-ate the washer when the fluidreservoir is empty.
Page 210 of 552
4107
Features of your vehicle
Rear window wiper and wash-
er switch
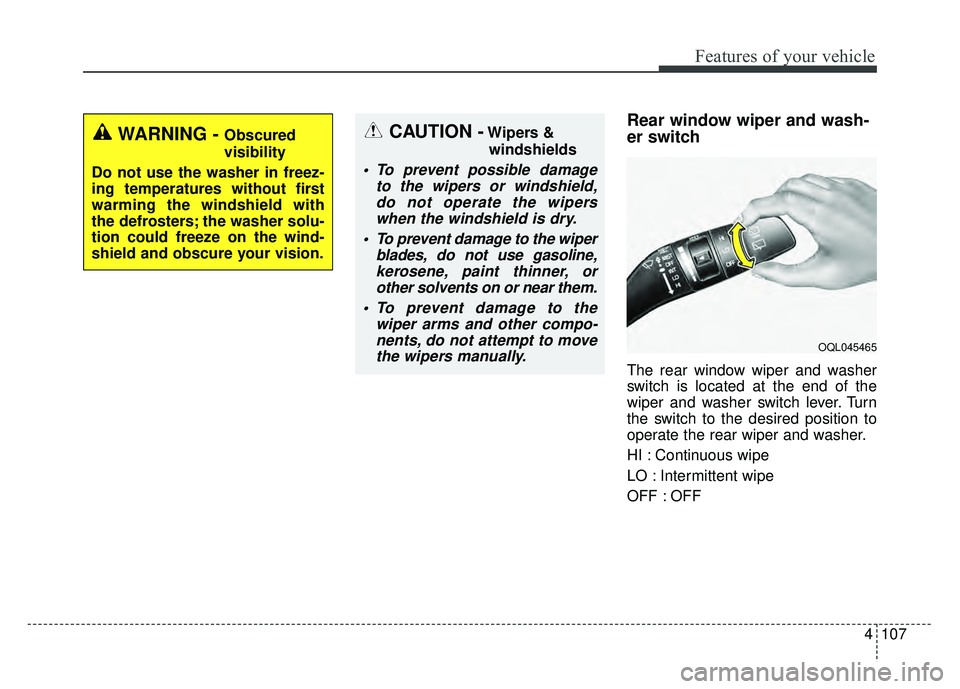
The rear window wiper and washer
switch is located at the end of the
wiper and washer switch lever. Turn
the switch to the desired position to
operate the rear wiper and washer.
HI : Continuous wipe
LO : Intermittent wipe
OFF : OFF
WARNING - Obscured
visibility
Do not use the washer in freez-
ing temperatures without first
warming the windshield with
the defrosters; the washer solu-
tion could freeze on the wind-
shield and obscure your vision.
OQL045465
CAUTION -Wipers & windshields
To prevent possible damage to the wipers or windshield,do not operate the wiperswhen the windshield is dry.
To prevent damage to the wiper blades, do not use gasoline,kerosene, paint thinner, orother solvents on or near them.
To prevent damage to the wiper arms and other compo-nents, do not attempt to movethe wipers manually.