stop start KIA NIRO 2018 Workshop Manual
[x] Cancel search | Manufacturer: KIA, Model Year: 2018, Model line: NIRO, Model: KIA NIRO 2018Pages: 616, PDF Size: 18.3 MB
Page 232 of 616
499
Features of your vehicle
Engine Oil PressureWarning Light
This warning light illuminates:
Once you set the Engine Start/Stop Button to the ON posi-
tion.
- It remains on until the engine isstarted.
When the engine oil pressure is low.
If the engine oil pressure is low:
1.Drive carefully to the nearest safe location and stop your vehicle.
2.Turn the engine off and check the engine oil level (For more details,
refer to “Engine Oil” in chapter 8). If
the level is low, add oil as required.
If the warning light remains on after
adding oil or if oil is not available,
have your vehicle inspected by an
authorized Kia dealer as soon as
possible. If the warning light stays on while the
engine is running, it indicates that
there may be serious engine dam-
age or malfunction. In this case,
1. Stop the vehicle as soon as it is
safe to do so.
2. Turn off the engine and check the oil level. If the oil level is low, fill the
engine oil to the proper level.
3. Start the engine again. If the warn- ing light stays on after the engine
is started, turn the engine off
immediately. In this case, have
your vehicle inspected by an
authorized Kia dealer.
Low Tire Pressure
Warning Light
This warning light illuminates:
Once you set the Engine Start/Stop Button to the ON posi-
tion.
- It illuminates for approximately 3seconds and then goes off.
When one or more of your tires are significantly underinflated.
❈ For more details, refer to “Tire
Pressure Monitoring System
(TPMS)” in chapter 7.
CAUTION - Engine
damage
If the engine is not stopped
immediately after the engine oilpressure warning light is illumi-nated and stays on while theengine is running, seriousengine damage may result.
Page 234 of 616
4101
Features of your vehicle
Autonomous EmergencyBraking (AEB) Warninglight (if equipped)
This indicator light illuminates:
When there is a malfunction with the AEB.
In this case, have the vehicle inspect-
ed by an authorized Kia dealer.
Engine Coolant Temperature WarningLight
This warning light illuminates:
When the engine coolant tempera- ture is above 248°F (120°C). This
means that the engine is overheat-
ed and may be damaged.
If your vehicle is overheated, refer
to “Overheating” in chapter 7.
LED Headlamp Warning
Light (if equipped)
This warning light illuminates:
Once you set the ignition switch or Engine Start/Stop Button to the ON
position.
- It illuminates for approximately 3seconds and then goes off.
When there is a malfunction with the LED headlamp.
In this case, have your vehicle inspect-
ed by an authorized Kia dealer.
This warning light blinks:
When there is a malfunction with a LED headlamp related part.
In this case, have your vehicle inspect-
ed by an authorized Kia dealer.
CAUTION - Engine
Overheating
Do not continue driving with the engine overheated. Otherwiseengine may be damaged.
CAUTION - LED
Headlamp Warning Light
Continuous driving with the LED Headlamp Warning Lighton or blinking can reduce LEDheadlamp (low beam) life.
Page 235 of 616
Features of your vehicle
102
4
Indicator Lights
Electronic Stability
Control (ESC) IndicatorLight
This indicator light illuminates:
Once you set the Engine Start/Stop Button to the ON posi-
tion.
- It illuminates for approximately 3seconds and then goes off.
When there is a malfunction with the ESC system.
In this case, have your vehicle
inspected by an authorized Kia
dealer.
This indicator light blinks:
While the ESC is operating.
❈ For more details, refer to
“Electronic Stability Control (ESC)”
in chapter 6.
Electronic Stability
Control (ESC) OFFIndicator Light
This indicator light illuminates:
Once you set the Engine Start/Stop Button to the ON posi-
tion.
- It illuminates for approximately 3seconds and then goes off.
When you deactivate the ESC sys- tem by pressing the ESC OFF but-
ton.
❈ For more details, refer to
“Electronic Stability Control (ESC)”
in chapter 6.
Charging Cable
Connection Indicator (Plug-in hybrid)
This indicator illuminates in red when
the charging cable is connected.
Immobilizer IndicatorLight (Without Smart Key)
This indicator light illuminates:
When the vehicle detects the immobilizer in your key properly
while the Engine Start/Stop button
is ON.
- At this time, you can start theengine.
- The indicator light goes off after starting the engine.
This indicator light blinks:
When there is a malfunction with the immobilizer system.
In this case, have your vehicle
inspected by an authorized Kia
dealer.
Page 236 of 616
4103
Features of your vehicle
Immobilizer IndicatorLight (With Smart Key)
This indicator light illuminates for up
to 30 seconds:
When the vehicle detects the smart key in the vehicle properly
while the Engine Start/Stop Button
is ACC or ON.
- At this time, you can start theengine.
- The indicator light goes off after starting the engine.
This indicator light blinks for a few
seconds:
When the smart key is not in the vehicle.
- At this time, you can not start theengine. This indicator light illuminates for 2
seconds and goes off:
When the vehicle can not detect
the smart key which is in the vehi-
cle while the Engine Start/Stop
Button is ON.
In this case, have your vehicle
inspected by an authorized Kia
dealer.
This indicator light blinks:
When the battery of the smart key is weak.
- At this time, you can not start theengine. However, you can start the
engine if you press the Engine
Start/Stop Button with the smart
key. (For more details, refer to
“Starting the Engine” in chapter 6).
When there is a malfunction with the immobilizer system.
In this case, have your vehicle
inspected by an authorized Kia
dealer.
Turn Signal Indicator
Light
This indicator light blinks:
When you turn the turn signal light on.
If any of the following occurs, there
may be a malfunction with the turn
signal system. In this case, have your
vehicle inspected by an authorized
Kia dealer. - The indicator light does not blinkbut illuminates.
- The indicator light blinks more rapidly.
- The indicator light does not illumi- nate at all.
Page 286 of 616
4153
Features of your vehicle
During mild weather or under condi-
tions where the operation of the seat
warmer is not needed, keep the
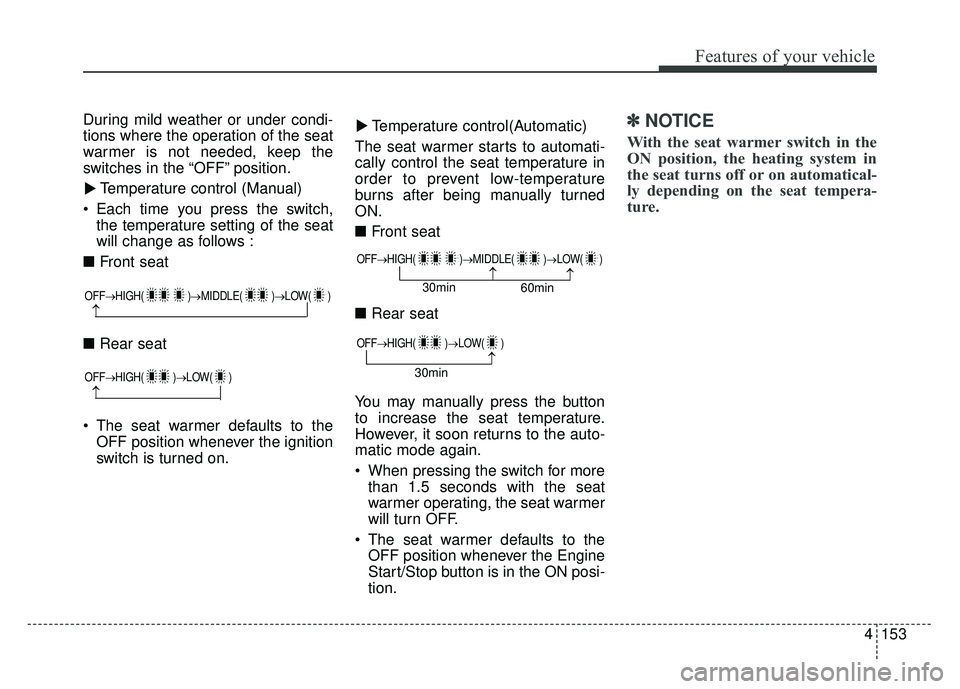
switches in the “OFF” position.Temperature control (Manual)
Each time you press the switch, the temperature setting of the seat
will change as follows :
■ Front seat
■ Rear seat
The seat warmer defaults to the OFF position whenever the ignition
switch is turned on. Temperature control(Automatic)
The seat warmer starts to automati-
cally control the seat temperature in
order to prevent low-temperature
burns after being manually turned
ON.
■ Front seat
■ Rear seat
You may manually press the button
to increase the seat temperature.
However, it soon returns to the auto-
matic mode again.
When pressing the switch for more than 1.5 seconds with the seat
warmer operating, the seat warmer
will turn OFF.
The seat warmer defaults to the OFF position whenever the Engine
Start/Stop button is in the ON posi-
tion.✽ ✽ NOTICE
With the seat warmer switch in the
ON position, the heating system in
the seat turns off or on automatical-
ly depending on the seat tempera-
ture.▼
▼
OFF→
HIGH( )→ MIDDLE( )→LOW( )
→
OFF→HIGH( )→ LOW( )
→
OFF→HIGH( )→ MIDDLE( )→LOW( )
→→30min
60min
OFF→HIGH( )→ LOW( )
→30min
Page 289 of 616
Features of your vehicle
156
4
Only use 12V electric accessories
which are less than 10A in electric
capacity.
Adjust the air-conditioner or heater to the lowest operating level when
using the power outlet.
Close the cover when not in use.
Some electronic devices can cause electronic interference when
plugged into a vehicle’s power out-
let. These devices may cause
excessive audio static and malfunc-
tions in other electronic systems or
devices used in your vehicle.
Push the plug in as far as it will go. If good contact is not made, the
plug may overheat and the fuse
may open.
Plug in battery equipped electronic devices with reverse current pro-
tection. The current from the bat-
tery may flow into the vehicle’s
electri cal/electronic system and
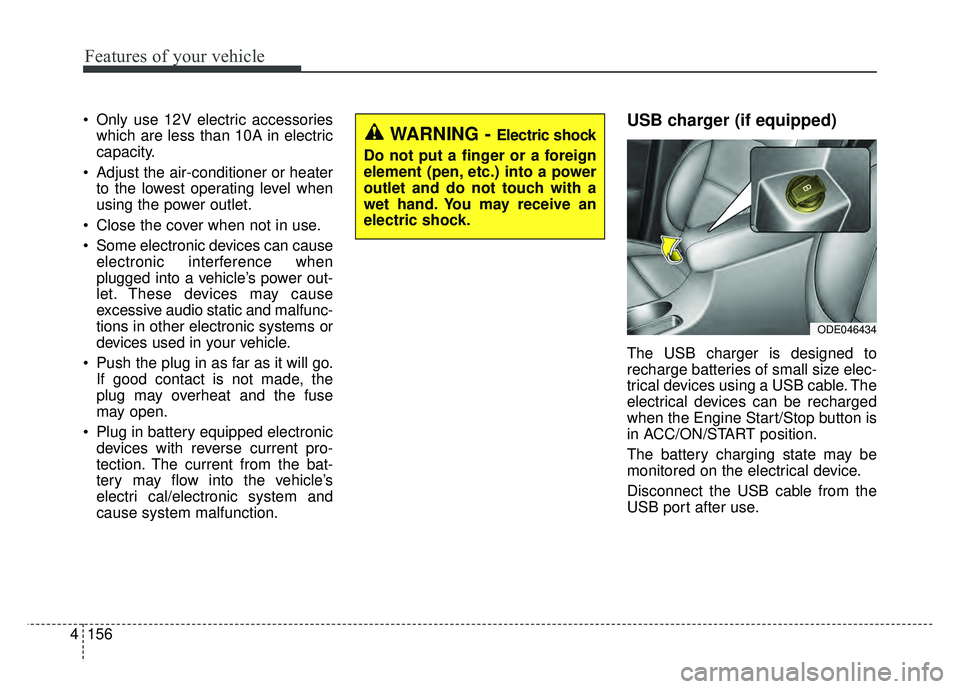
cause system malfunction.USB charger (if equipped)
The USB charger is designed to
recharge batteries of small size elec-
trical devices using a USB cable. The
electrical devices can be recharged
when the Engine Start/Stop button is
in ACC/ON/START position.
The battery charging state may be
monitored on the electrical device.
Disconnect the USB cable from the
USB port after use.
WARNING - Electric shock
Do not put a finger or a foreign
element (pen, etc.) into a power
outlet and do not touch with a
wet hand. You may receive an
electric shock.
ODE046434
Page 311 of 616
Audio system
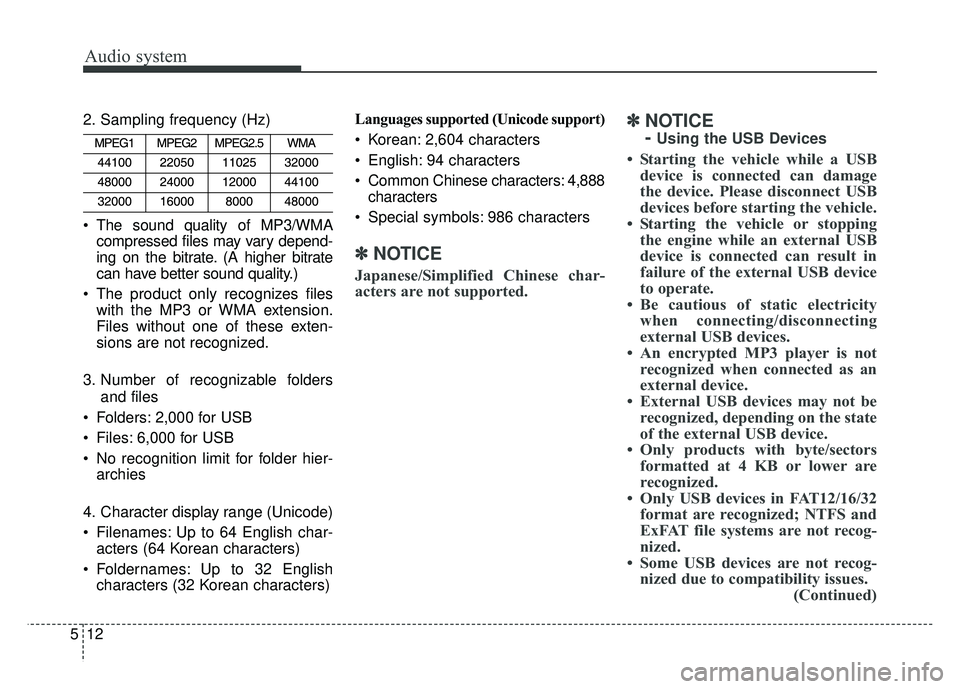
5122. Sampling frequency (Hz)
The sound quality of MP3/WMA
compressed files may vary depend-
ing on the bitrate. (A higher bitrate
can have better sound quality.)
The product only recognizes files with the MP3 or WMA extension.
Files without one of these exten-
sions are not recognized.
3. Number of recognizable folders and files
Folders: 2,000 for USB
Files: 6,000 for USB
No recognition limit for folder hier- archies
4. Character display range (Unicode)
Filenames: Up to 64 English char- acters (64 Korean characters)
Foldernames: Up to 32 English characters (32 Korean characters) Languages supported (Unicode support)
Korean: 2,604 characters
English: 94 characters
Common Chinese characters: 4,888
characters
Special symbols: 986 characters
✽ ✽ NOTICE
Japanese/Simplified Chinese char-
acters are not supported.
✽ ✽NOTICE
-
Using the USB Devices
• Starting the vehicle while a USB
device is connected can damage
the device. Please disconnect USB
devices before starting the vehicle.
• Starting the vehicle or stopping the engine while an external USB
device is connected can result in
failure of the external USB device
to operate.
• Be cautious of static electricity when connecting/disconnecting
external USB devices.
• An encrypted MP3 player is not recognized when connected as an
external device.
• External USB devices may not be recognized, depending on the state
of the external USB device.
• Only products with byte/sectors formatted at 4 KB or lower are
recognized.
• Only USB devices in FAT12/16/32 format are recognized; NTFS and
ExFAT file systems are not recog-
nized.
• Some USB devices are not recog- nized due to compatibility issues. (Continued)
Page 335 of 616
Driving your vehicle
Before driving . . . . . . . . . . . . . . . . . . . . . . . . . . . . . . 6-4
Before entering vehicle . . . . . . . . . . . . . . . . . . . . . . . . . 6-4
Necessary inspections . . . . . . . . . . . . . . . . . . . . . . . . . . 6-4
Before starting . . . . . . . . . . . . . . . . . . . . . . . . . . . . . . . . 6-4
Key positions . . . . . . . . . . . . . . . . . . . . . . . . . . . . . . . 6-6
Illuminated ignition switch . . . . . . . . . . . . . . . . . . . . . . 6-6
Ignition switch position . . . . . . . . . . . . . . . . . . . . . . . . . 6-6
Starting the hybrid system . . . . . . . . . . . . . . . . . . . . . . 6-7
Engine start/stop button . . . . . . . . . . . . . . . . . . . . . 6-9
Illuminated engine start/stop button . . . . . . . . . . . . . . 6-9
Engine start/stop button position. . . . . . . . . . . . . . . . . 6-9
Starting the hybrid system . . . . . . . . . . . . . . . . . . . . . 6-11
Dual Clutch Transmission (DCT) . . . . . . . . . . . . . 6-14
Dual clutch transmission operation . . . . . . . . . . . . . . 6-14
Good driving practices . . . . . . . . . . . . . . . . . . . . . . . . 6-21
Brake system . . . . . . . . . . . . . . . . . . . . . . . . . . . . . . 6-23
Power brakes . . . . . . . . . . . . . . . . . . . . . . . . . . . . . . . . 6-23
Parking brake – Foot type . . . . . . . . . . . . . . . . . . . . . 6-25
Anti-lock Brake System (ABS) . . . . . . . . . . . . . . . . . . 6-27
Electronic Stability Control (ESC) . . . . . . . . . . . . . . 6-29
Vehicle Stability Management (VSM) . . . . . . . . . . . . 6-32
Hill-start Assist Control (HAC) . . . . . . . . . . . . . . . . . 6-34
Good braking practices. . . . . . . . . . . . . . . . . . . . . . . . 6-34
Autonomous Emergency Braking (AEB) . . . . . . . 6-36
System setting and activation . . . . . . . . . . . . . . . . . . . 6-36
AEB warning message and system control . . . . . . . . 6-39
Brake operation . . . . . . . . . . . . . . . . . . . . . . . . . . . . . . 6-40
Sensor to detect the distance from the vehicle in front (Front radar) . . . . . . . . . . . . . . . . . . . . . . . . . . . . . . . 6-41
System malfunction . . . . . . . . . . . . . . . . . . . . . . . . . . . 6-42
Limitation of the system . . . . . . . . . . . . . . . . . . . . . . . 6-43
Cruise control system. . . . . . . . . . . . . . . . . . . . . . . 6-47
To set cruise control speed . . . . . . . . . . . . . . . . . . . . . 6-48
To increase cruise control set speed . . . . . . . . . . . . . . 6-48
To decrease the cruising speed . . . . . . . . . . . . . . . . . . 6-49
To temporarily accelerate with the cruise control on . 6-49
To cancel cruise control, do one of the following . . . 6-49
To resume cruising speed at more than approximately 20 mph (30 km/h) . . . . . . . . . . . . . . . . . . . . . . . . . . . 6-50
To turn cruise control off, do one of the following . . 6-50
Smart Cruise Control system (SCC) . . . . . . . . . . 6-51
Speed setting (SCC). . . . . . . . . . . . . . . . . . . . . . . . . . . 6-52
Vehicle to vehicle distance setting (SCC) . . . . . . . . . 6-57
To adjust the sensitivity of smart cruise control . . . 6-60
To convert to cruise control mode . . . . . . . . . . . . . . . 6-60
Limitations of the system . . . . . . . . . . . . . . . . . . . . . . 6-61
6
Page 338 of 616
Driving your vehicle
46
Before entering vehicle
• Be sure that all windows, outsidemirror(s), and outside lights are
clean.
Check the condition of the tires.
Check under the vehicle for any sign of leaks.
Be sure there are no obstacles behind you if you intend to back up.
Necessary inspections
Fluid levels, such as engine oil,
engine coolant, brake fluid, and
washer fluid should be checked on a
regular basis, at the exact interval
depending on the fluid. Further
details are provided in chapter 8,
“Maintenance”.
Before starting
Close and lock all doors.
Position the seat so that all con-trols are easily reached.
Buckle your seat belt.
Adjust the inside and outside rearview mirrors.
Be sure that all lights work.
Check all gauges.
Check the operation of warning lights when the engine start/stop
button is turned to the ON position.
Release the parking brake and make sure the brake warning light
goes out.
For safe operation, be sure you are
familiar with your vehicle and its
equipment.
BEFORE DRIVING
WARNING - Distracted driving
Focus on the road while driving.
The driver's primary responsi-
bility is in the safe and legal
operation of the vehicle. Use of
any handled devices, other
equipment or vehicle systems
that distract the drive should
not be used during vehicle
operation.
Page 343 of 616
69
Driving your vehicle
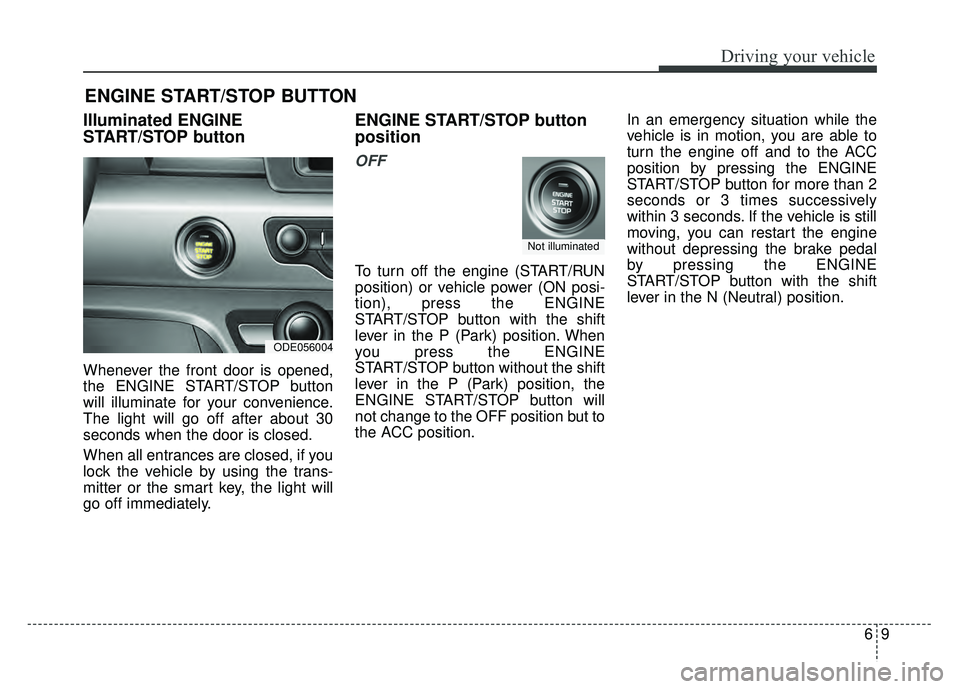
Illuminated ENGINE
START/STOP button
Whenever the front door is opened,
the ENGINE START/STOP button
will illuminate for your convenience.
The light will go off after about 30
seconds when the door is closed.
When all entrances are closed, if you
lock the vehicle by using the trans-
mitter or the smart key, the light will
go off immediately.
ENGINE START/STOP button
position
OFF
To turn off the engine (START/RUN
position) or vehicle power (ON posi-
tion), press the ENGINE
START/STOP button with the shift
lever in the P (Park) position. When
you press the ENGINE
START/STOP button without the shift
lever in the P (Park) position, the
ENGINE START/STOP button will
not change to the OFF position but to
the ACC position.In an emergency situation while the
vehicle is in motion, you are able to
turn the engine off and to the ACC
position by pressing the ENGINE
START/STOP button for more than 2
seconds or 3 times successively
within 3 seconds. If the vehicle is still
moving, you can restart the engine
without depressing the brake pedal
by pressing the ENGINE
START/STOP button with the shift
lever in the N (Neutral) position.
ENGINE START/STOP BUTTON
ODE056004
Not illuminated