warning light KIA NIRO 2020 Owner's Guide
[x] Cancel search | Manufacturer: KIA, Model Year: 2020, Model line: NIRO, Model: KIA NIRO 2020Pages: 687, PDF Size: 11.43 MB
Page 185 of 687

Features of your vehicle
48
4
(Continued)
• When the charging system warning
light comes on due to low voltage
(when the alternator or battery
does not operate normally or mal-
function), the steering wheel may
require increased steering effort.Tilt and telescopic steering
Tilt and telescopic steering allows
you to adjust the steering wheel
before you drive. You can also raise it
to give your legs more space when
you get on or off the vehicle.
The steering wheel should be posi-
tioned so that it is comfortable for
you to drive, while permitting you to
see the instrument panel warning
lights and gauges. To change the steering wheel angle,
pull down the lock-release lever (1),
adjust the steering wheel to the
desired angle (2) and height (3) then
pull up the lock-release lever to lock
(4) the steering wheel in place. Be
sure to adjust the steering wheel to
the desired position before driving.
✽ ✽NOTICE
After adjustment, sometimes the
lock release lever may not lock the
steering wheel. It is not a malfunc-
tion. This occurs when two gears are
not engaged correctly. In this case,
adjust the steering wheel again and
then lock the steering wheel.
WARNING- Steering
wheel adjustment
Never adjust the angle and
height of the steering wheel
while driving. You may lose
steering control.
ODE046022
Page 188 of 687
451
Features of your vehicle
MIRRORS
Inside rearview mirror
Adjust the rearview mirror so that the
center view through the rear window
is seen. Make this adjustment before
you start driving.
Do not place objects in the rear seat
or cargo area which would interfere
with your vision through the rear win-
dow.
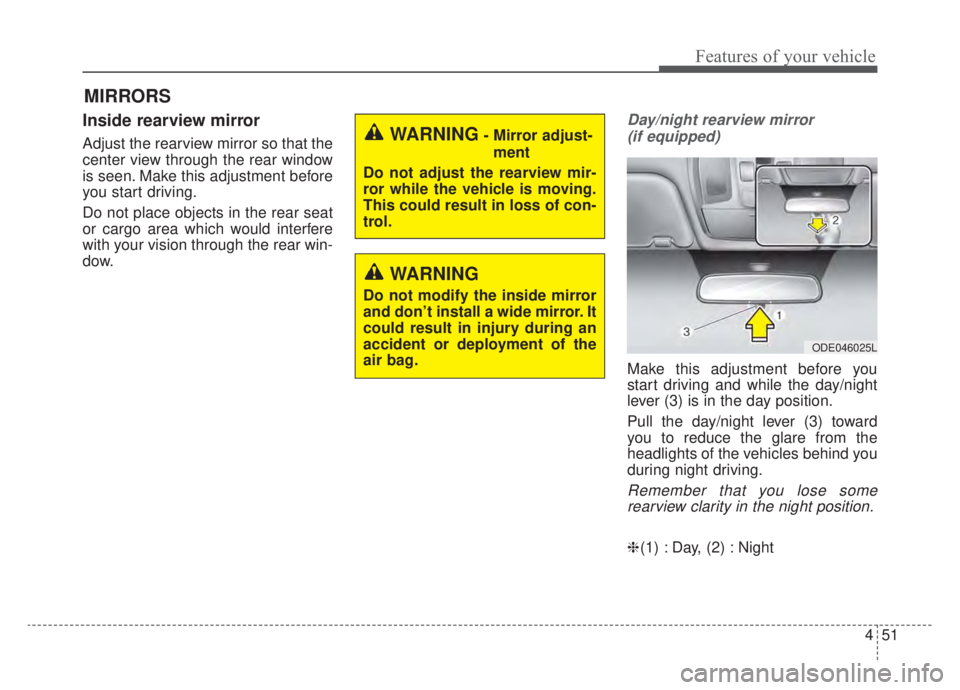
Day/night rearview mirror (if equipped)
Make this adjustment before you
start driving and while the day/night
lever (3) is in the day position.
Pull the day/night lever (3) toward
you to reduce the glare from the
headlights of the vehicles behind you
during night driving.
Remember that you lose somerearview clarity in the night position.
❈ (1) : Day, (2) : Night
WARNING- Mirror adjust-
ment
Do not adjust the rearview mir-
ror while the vehicle is moving.
This could result in loss of con-
trol.
WARNING
Do not modify the inside mirror
and don’t install a wide mirror. It
could result in injury during an
accident or deployment of the
air bag.
ODE046025L
Page 190 of 687

453
Features of your vehicle
The sensor (4) mounted in the mirror
senses the light level around the
vehicle, and automatically controls
the headlight glare from the vehicles
behind you.
When the engine is running, the
glare is automatically controlled by
the sensor mounted in the rearview
mirror.
Telematics buttons are also located
on the mirror.Outside rearview mirror
Be sure to adjust the mirror angles
before driving.
Your vehicle is equipped with both
left-hand and right-hand outside
rearview mirrors. The mirrors can be
adjusted remotely with the remote
switch. The mirror heads can be fold-
ed back to prevent damage during an
automatic vehicle wash or when
passing through a narrow street.
The right outside rearview mirror is
convex. Objects seen in the mirror
are closer than they appear.
Use your interior rearview mirror or
direct observation to determine the
actual distance of following vehicles
when changing lanes.If the mirror is jammed with ice, do
not adjust the mirror by force. Use an
approved spray de-icer (not radiator
antifreeze) to release the frozen
mechanism or move the vehicle to a
warm place and allow the ice to melt.
WARNING- Mirror
adjustment
Do not adjust or fold the outside
rearview mirrors while the vehi-
cle is moving. This could result
in loss of control.
CAUTION - Rearview
mirror
Do not scrape ice off the mirror face; this may damage the sur-face of the glass. If ice shouldrestrict the movement of the mir-ror, do not force the mirror foradjustment. To remove ice, use adeicer spray, a sponge or softcloth with very warm water.
Page 194 of 687
457
Features of your vehicle
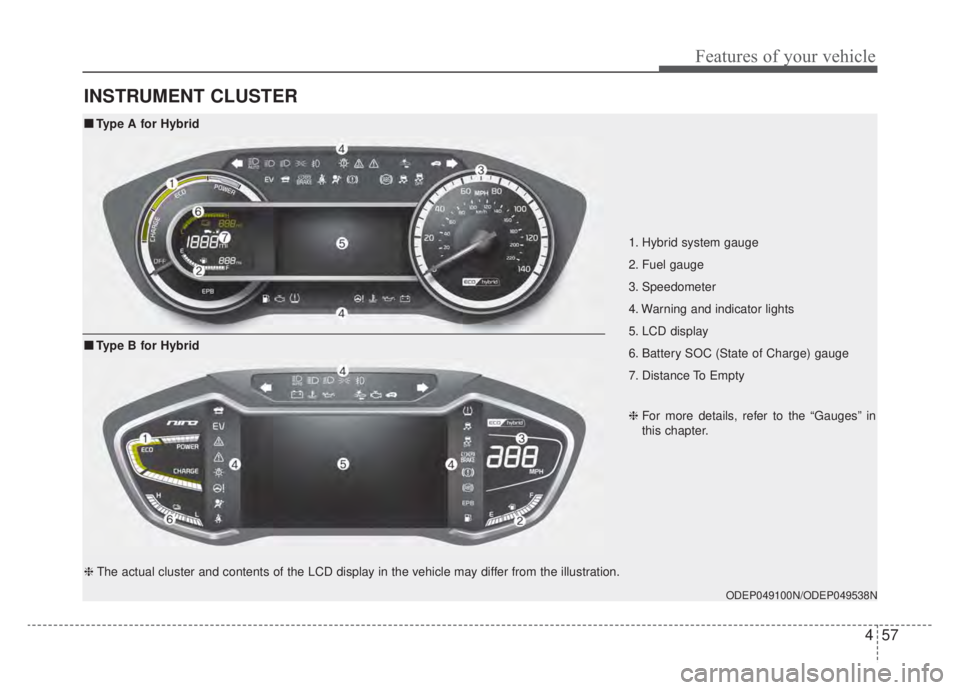
INSTRUMENT CLUSTER
1. Hybrid system gauge
2. Fuel gauge
3. Speedometer
4. Warning and indicator lights
5. LCD display
6. Battery SOC (State of Charge) gauge
7. Distance To Empty
ODEP049100N/ODEP049538N
■ ■Type A for Hybrid
❈For more details, refer to the “Gauges” in
this chapter.
■ ■
Type B for Hybrid
❈ The actual cluster and contents of the LCD display in the vehicle may differ from the illustration.
Page 195 of 687
Features of your vehicle
58
4
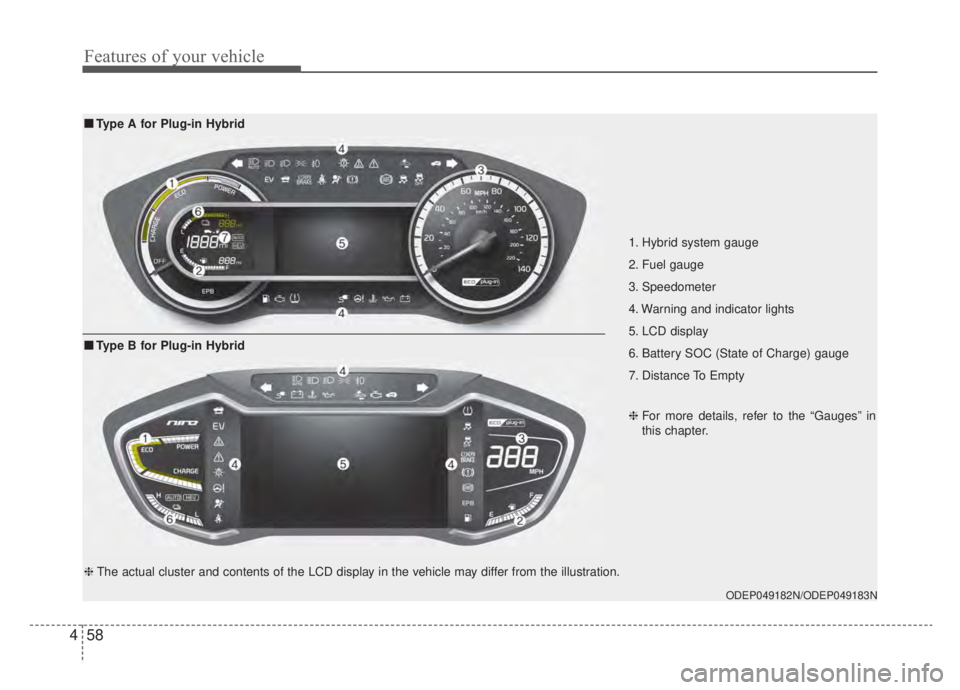
1. Hybrid system gauge
2. Fuel gauge
3. Speedometer
4. Warning and indicator lights
5. LCD display
6. Battery SOC (State of Charge) gauge
7. Distance To Empty
ODEP049182N/ODEP049183N
■ ■
Type A for Plug-in Hybrid
❈For more details, refer to the “Gauges” in
this chapter.
■ ■
Type B for Plug-in Hybrid
❈ The actual cluster and contents of the LCD display in the vehicle may differ from the illustration.
Page 200 of 687
463
Features of your vehicle
✽ ✽NOTICE
• The fuel tank capacity is given in
chapter 8.
• The fuel gauge is supplemented by a low fuel warning light which will
illuminate when the fuel tank is
nearly empty.
• On inclines or curves, the fuel gauge pointer may fluctuate or the
low fuel warning light may come
on earlier than usual due to the
movement of fuel in the tank.
✽ ✽ NOTICE - Fuel gauge
Running out of fuel can expose vehi-
cle occupants to danger. You must
obtain additional fuel as soon as pos-
sible after the warning light comes
on or when the gauge indicator
comes close to the “E (Empty)”
level.
✽ ✽NOTICE
Fuel display may not be accurate if
vehicle is being fueled while in an
incline.
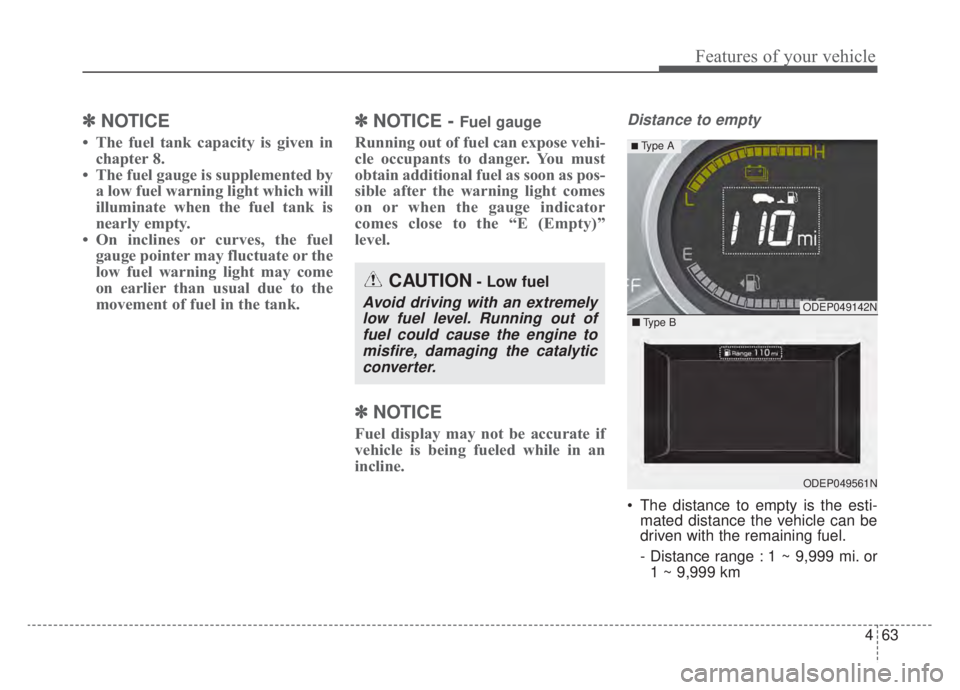
Distance to empty
The distance to empty is the esti-
mated distance the vehicle can be
driven with the remaining fuel.
- Distance range : 1 ~ 9,999 mi. or
1 ~ 9,999 km
CAUTION- Low fuel
Avoid driving with an extremelylow fuel level. Running out offuel could cause the engine tomisfire, damaging the catalyticconverter.ODEP049142N
ODEP049561N
■ Type B
■ Type A
Page 205 of 687
Features of your vehicle
68
4
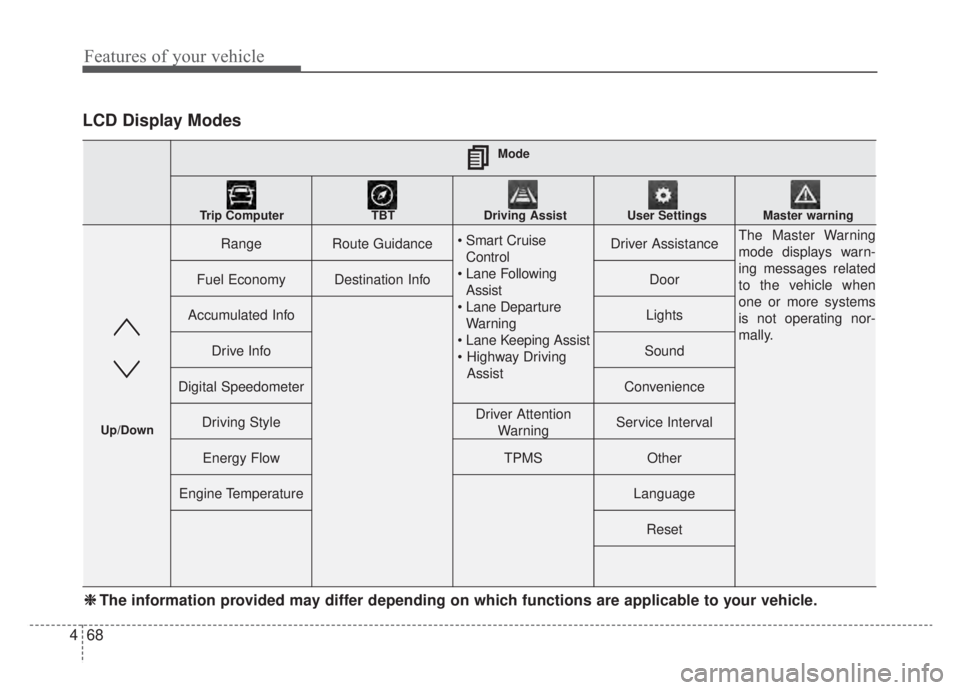
LCD Display Modes
RangeRoute Guidance
Control
Assist
Warning
AssistDriver AssistanceThe Master Warning
mode displays warn-
ing messages related
to the vehicle when
one or more systems
is not operating nor-
mally.
Fuel EconomyDestination InfoDoor
Accumulated InfoLights
Drive InfoSound
Digital SpeedometerConvenience
Driving StyleDriver Attention WarningService Interval
Energy FlowTPMSOther
Engine TemperatureLanguage
Reset
Mode
Trip Computer TBT Driving Assist User Settings Master warning
Up/Down
❈ ❈ The information provided may differ depending on which functions are applicable to your vehicle.
Page 207 of 687
Features of your vehicle
70
4
Tire Pressure
❈ For more details, refer to “Tire
Pressure Monitoring System
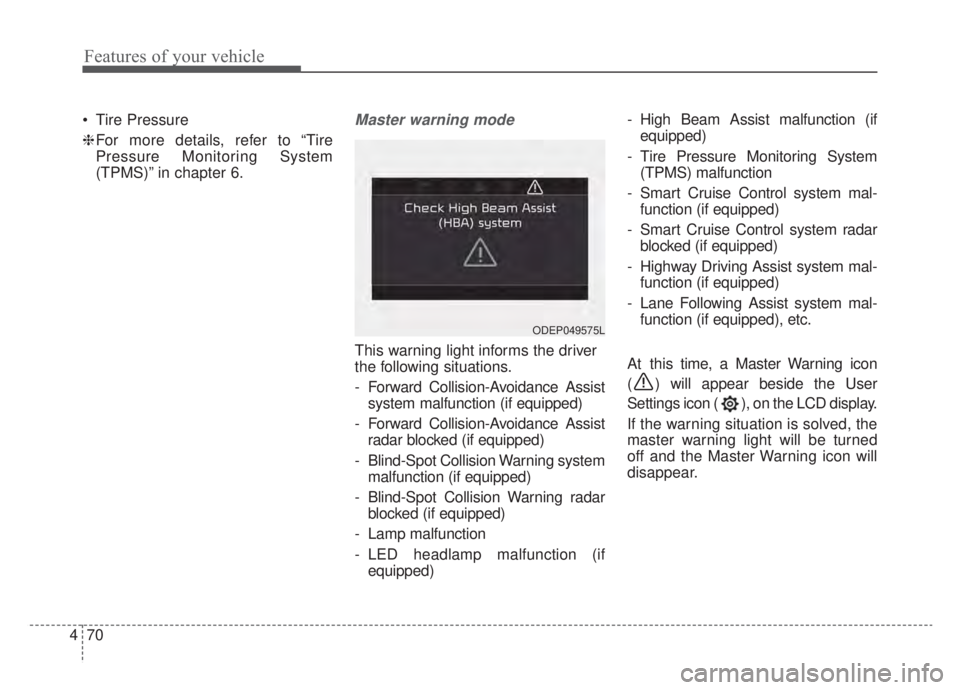
(TPMS)” in chapter 6.Master warning mode
This warning light informs the driver
the following situations.
- Forward Collision-Avoidance Assist system malfunction (if equipped)
- Forward Collision-Avoidance Assist radar blocked (if equipped)
- Blind-Spot Collision Warning system malfunction (if equipped)
- Blind-Spot Collision Warning radar blocked (if equipped)
- Lamp malfunction
- LED headlamp malfunction (if equipped) - High Beam Assist malfunction (if
equipped)
- Tire Pressure Monitoring System (TPMS) malfunction
- Smart Cruise Control system mal- function (if equipped)
- Smart Cruise Control system radar blocked (if equipped)
- Highway Driving Assist system mal- function (if equipped)
- Lane Following Assist system mal- function (if equipped), etc.
At this time, a Master Warning icon
( ) will appear beside the User
Settings icon ( ), on the LCD display.
If the warning situation is solved, the
master warning light will be turned
off and the Master Warning icon will
disappear.
ODEP049575L
Page 208 of 687
471
Features of your vehicle
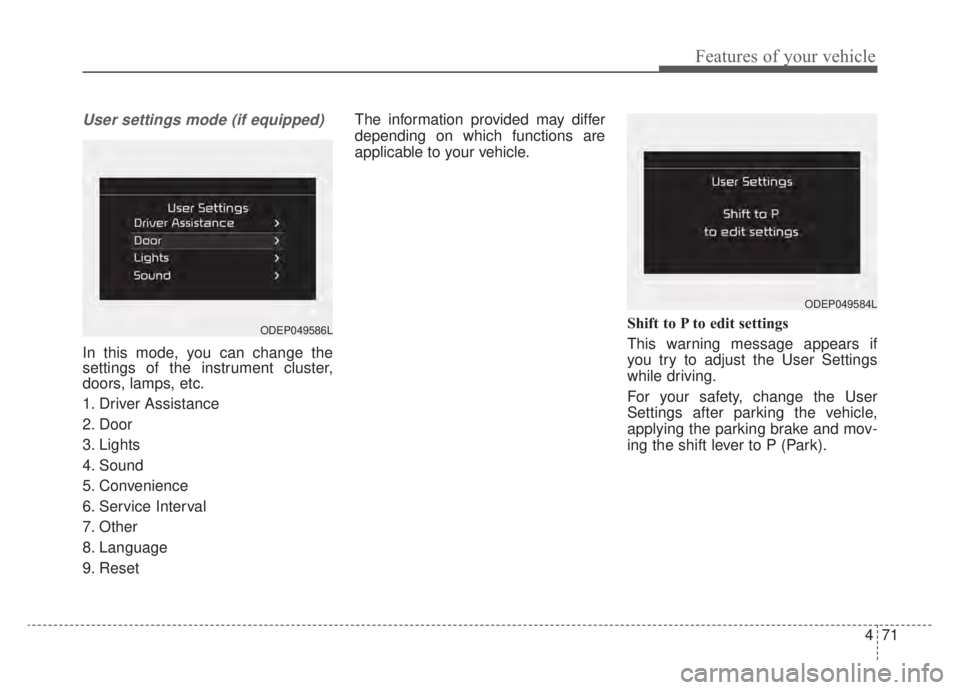
User settings mode (if equipped)
In this mode, you can change the
settings of the instrument cluster,
doors, lamps, etc.
1. Driver Assistance
2. Door
3. Lights
4. Sound
5. Convenience
6. Service Interval
7. Other
8. Language
9. ResetThe information provided may differ
depending on which functions are
applicable to your vehicle.
Shift to P to edit settings
This warning message appears if
you try to adjust the User Settings
while driving.
For your safety, change the User
Settings after parking the vehicle,
applying the parking brake and mov-
ing the shift lever to P (Park).
ODEP049584L
ODEP049586L
Page 212 of 687
475
Features of your vehicle
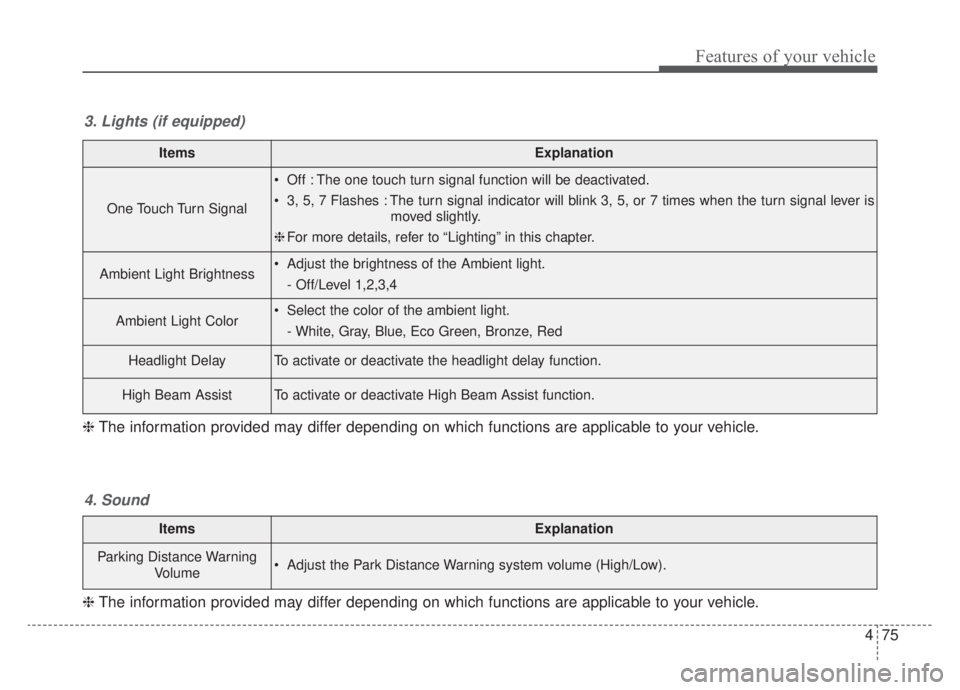
ItemsExplanation
One Touch Turn Signal
Off : The one touch turn signal function will be deactivated.
3, 5, 7 Flashes : The turn signal indicator will blink 3, 5, or 7 times when the turn signal lever ismoved slightly.
❈ For more details, refer to “Lighting” in this chapter.
Ambient Light Brightness Adjust the brightness of the Ambient light.
- Off/Level 1,2,3,4
Ambient Light Color Select the color of the ambient light.- White, Gray, Blue, Eco Green, Bronze, Red
Headlight DelayTo activate or deactivate the headlight delay function.
High Beam AssistTo activate or deactivate High Beam Assist function.
3. Lights (if equipped)
❈ The information provided may differ depending on which functions are applicable to your vehicle.
ItemsExplanation
Parking Distance Warning
Volume Adjust the Park Distance Warning system volume (High/Low).
4. Sound
❈The information provided may differ depending on which functions are applicable to your vehicle.