Head light KIA NIRO 2020 Service Manual
[x] Cancel search | Manufacturer: KIA, Model Year: 2020, Model line: NIRO, Model: KIA NIRO 2020Pages: 687, PDF Size: 11.43 MB
Page 543 of 687
77
Maintenance
OWNER MAINTENANCE
The following lists are vehicle checks
and inspections that should be per-
formed by the owner or an author-
ized Kia dealer at the frequencies
indicated to help ensure safe,
dependable operation of your vehi-
cle.
Any adverse conditions should be
brought to the attention of your deal-
er as soon as possible.
These Owner Maintenance Checks
are generally not covered by war-
ranties and you may be charged for
labor, parts and lubricants used.Owner maintenance schedule
When you stop for fuel:
Check the engine oil level.
Check the coolant level in coolantreservoir.
Check the windshield washer fluid level.
Look for low or under-inflated tires.
While operating your vehicle:
Note any changes in the sound of the exhaust or any smell of
exhaust fumes in the vehicle.
Check for vibrations in the steering wheel. Notice any increased steer-
ing effort or looseness in the steer-
ing wheel, or change in its straight-
ahead position.
Notice if your vehicle constantly turns slightly or “pulls” to one side
when traveling on smooth, level
road.
When stopping, listen and check for unusual sounds, pulling to one
side, increased brake pedal travel
or “hard-to-push” brake pedal.
If any slipping or changes in the operation of your transmission
occurs, check the transmission
fluid level.
Check the dual clutch transmission P (Park) function.
Check the parking brake.
Check for fluid leaks under your vehicle (water dripping from the air
conditioning system during or after
use is normal).
WARNING- Hot coolant
Be careful when checking your
engine coolant level when the
engine is hot. Scalding hot
coolant and steam may blow
out under pressure.
WARNING
When you open the engine
hood, turn the Hybrid system
off. If not, it may result in death
or serious injury because of the
high voltage flow.
Page 544 of 687
Maintenance
87
At least monthly:
Check the coolant level in theengine coolant reservoir.
Check the operation of all exterior lights, including the stoplights, turn
signals and hazard warning flash-
ers.
Check the inflation pressures of all tires including the spare for tires
that are worn, show uneven wear,
or are damaged.
Check for loose wheel lug nuts.
At least twice a year (i.e., every Spring and Fall) :
Check the radiator, heater and air conditioning hoses for leaks or
damage.
Check the windshield washer spray and wiper operation. Clean
the wiper blades with clean cloth
dampened with washer fluid.
Check the headlight alignment.
Check the muffler, exhaust pipes, shields and clamps.
Check the lap/shoulder belts for wear and function.
At least once a year :
Clean the body and door drainholes.
Lubricate the door hinges and check the hood hinges.
Lubricate the door and hood locks and latches.
Lubricate the door rubber weather- strips.
Check the air conditioning system.
Inspect and lubricate dual clutch transmission linkage and controls.
Clean the battery and terminals.
Check the brake fluid level.
Page 582 of 687
Maintenance
46
7
Tire replacement
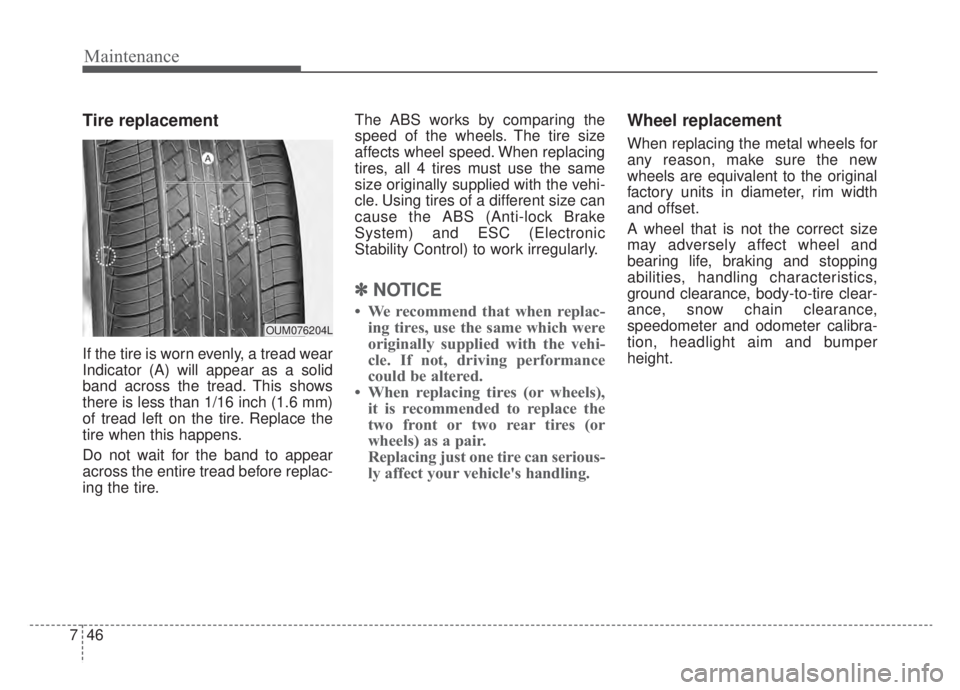
If the tire is worn evenly, a tread wear
Indicator (A) will appear as a solid
band across the tread. This shows
there is less than 1/16 inch (1.6 mm)
of tread left on the tire. Replace the
tire when this happens.
Do not wait for the band to appear
across the entire tread before replac-
ing the tire. The ABS works by comparing the
speed of the wheels. The tire size
affects wheel speed. When replacing
tires, all 4 tires must use the same
size originally supplied with the vehi-
cle. Using tires of a different size can
cause the ABS (Anti-lock Brake
System) and ESC (Electronic
Stability Control) to work irregularly.
✽ ✽
NOTICE
• We recommend that when replac-
ing tires, use the same which were
originally supplied with the vehi-
cle. If not, driving performance
could be altered.
• When replacing tires (or wheels), it is recommended to replace the
two front or two rear tires (or
wheels) as a pair.
Replacing just one tire can serious-
ly affect your vehicle's handling.
Wheel replacement
When replacing the metal wheels for
any reason, make sure the new
wheels are equivalent to the original
factory units in diameter, rim width
and offset.
A wheel that is not the correct size
may adversely affect wheel and
bearing life, braking and stopping
abilities, handling characteristics,
ground clearance, body-to-tire clear-
ance, snow chain clearance,
speedometer and odometer calibra-
tion, headlight aim and bumper
height.
OUM076204L
Page 596 of 687
Maintenance
60
7
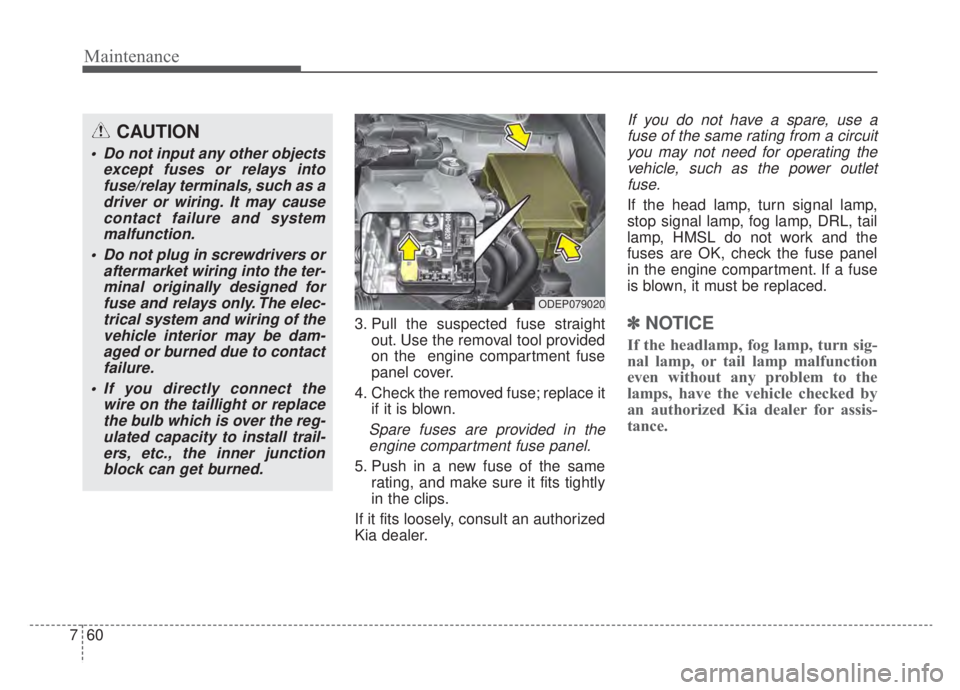
3. Pull the suspected fuse straight
out. Use the removal tool provided
on the engine compartment fuse
panel cover.
4. Check the removed fuse; replace it if it is blown.
Spare fuses are provided in theengine compartment fuse panel.
5. Push in a new fuse of the same rating, and make sure it fits tightly
in the clips.
If it fits loosely, consult an authorized
Kia dealer.
If you do not have a spare, use a fuse of the same rating from a circuityou may not need for operating thevehicle, such as the power outletfuse.
If the head lamp, turn signal lamp,
stop signal lamp, fog lamp, DRL, tail
lamp, HMSL do not work and the
fuses are OK, check the fuse panel
in the engine compartment. If a fuse
is blown, it must be replaced.
✽ ✽ NOTICE
If the headlamp, fog lamp, turn sig-
nal lamp, or tail lamp malfunction
even without any problem to the
lamps, have the vehicle checked by
an authorized Kia dealer for assis-
tance.
ODEP079020
CAUTION
Do not input any other objects
except fuses or relays intofuse/relay terminals, such as adriver or wiring. It may causecontact failure and systemmalfunction.
Do not plug in screwdrivers or aftermarket wiring into the ter-minal originally designed forfuse and relays only. The elec-trical system and wiring of thevehicle interior may be dam-aged or burned due to contactfailure.
If you directly connect the wire on the taillight or replacethe bulb which is over the reg-ulated capacity to install trail-ers, etc., the inner junctionblock can get burned.
Page 603 of 687

767
Maintenance
Fuse NameFuse ratingCircuit Protected
MODULE 210AEngine Room Junction Block (Power Outlet Relay), Wireless Charger, BCM (Body Control Module), USB
Charger, Smart Key Control Module, Audio, BMS (Battery Management System) Control Module,
Audio/Video & Navigation Head Unit, Driver Power Outside Mirror Switch, AMP (Amplifier)
PDM 37.5A[Without Smart Key] Immobilizer Module
[With Smart Key] Smart Key Control Module
MEMORY 110AInstrument Cluster, Driver IMS (Integrated memory system) Module, BCM (Body Control Module), Air
Conditioner Control Module, Auto Light & Photo Sensor, Driver Door Module, Passenger Door Module,
ECM (Electric Chromic Mirror)
MULTI MEDIA15AAudio, Audio/Video & Navigation Head Unit
EWP10AElectric Water Pump (HEV)
MDPS7.5AMDPS (Motor Driven Power Steering) Unit
TAIL GATE10ATail Gate Relay, ICM Relay Box (Fuel Filler Door Relay), Fuel Filler Switch
PDM 115ASmart Key Control Module
MODULE 77.5AFront Seat Warmer Control Module, AC Inverter (110V), Front Air Ventilation Seat Control Module, Rear
Seat Warmer Module, AC Inverter Module
WIPER (RR)15AEngine Room Junction Block (Wiper RR Relay), Rear Wiper Motor
HEATED
STEERING15ABCM (Body Control Module)
SUNROOF20ASunroof Motor
Page 607 of 687

771
Maintenance
Fuse NameFuse ratingCircuit Protected
START7.5AINHIBITOR SW
MODULE 210AEngine Room Junction Block (Power Outlet Relay), Wireless Charger, BCM (Body Control Module), USB
Charger, Smart Key Control Module, Audio, Audio / Video & Navigation Head Unit, Power Outside Mirror
Switch, AMP (Amplifier)
PDM37.5AImmobilizer Module, Smart Key Control Module
MEMORY 110AInstrument Cluster, Driver IMS (Integrated memory system) Module, BCM (Body Control Module), Air
Conditioner Control Module, Auto Light & Photo Sensor, Driver Door Module, Passenger Door Module,
ECM (Electric Chromic Mirror)
MULTI MEDIA15AAudio, Audio / Video & Navigation Head Unit
IG3 410AOBC (On-Board Charger) Unit, TCM (Transmission Control Module), ECM (Engine Control Module), HPCU
(Hybrid Power Control Unit)
IG3 310AElectric Water Pump (PHEV)
IG3 515ATransmission Range Switch, BMS (Battery Management System) Control Module, Engine Room Junction
Block (Battery C/Fan Relay)
IG3 120AICM Relay Box (IG3 #1, IG3 #2, IG3 #3 Relay)
MDPS7.5AMDPS (Motor Driven Power Steering) Unit
TAIL GATEOPEN10ATail Gate Relay, ICM Relay Box (Fuel Filler Door Relay, Charger Connector Lock/Unlock Relay), Fuel Filler
& Battery Charger Switch, Charge Connector Lamp
PDM 115ASmart Key Control Module
Page 622 of 687
Maintenance
86
7
LIGHT BULBS
Bulb replacement precaution
Please keep extra bulbs on hand
with appropriate wattage ratings in
case of emergencies.
Refer to “Bulb Wattage” in chapter 8.
When changing lamps, first turn off
the engine at a safe place, firmly
apply the parking brake and detach
the battery’s negative (-) terminal.
Use only bulbs of the specified
wattage.✽ ✽ NOTICE
• If the light bulb or lamp connector
is removed while the lamp is still
on, the fuse box's electronic sys-
tem may log it as a malfunction.
Therefore, a lamp malfunction
incident may be recorded as a
Diagnostic Trouble Code (DTC) in
the fuse box.
• It is normal for an operating lamp to flicker momentarily. This is due
to a stabilization function of the
vehicle’s electronic control device.
If the lamp lights up normally
after momentarily blinking, then
it is functioning as normal.
However, if the lamp continues to
flicker several times or turns off
completely, there may be an error
in the vehicle’s electronic control
device. Please have the vehicle
checked by an authorized Kia
dealer immediately.
✽ ✽ NOTICE
We recommend that the headlight
aiming be adjusted by an authorized
Kia dealer after an accident or after
the headlight assembly is reinstalled.
WARNING- Working on
the lights
Prior to working on the light,
firmly apply the parking brake,
ensure that the engine
start/stop button is in OFF posi-
tion and turn off the lights to
avoid sudden movement of the
vehicle and burning your fingers
or receiving an electric shock.
CAUTION -Light replace-
ment
Be sure to replace the burned- out bulb with one of the samewattage rating. Otherwise, itmay cause damage to the fuseor electric wiring system.
CAUTION -Headlamp
Lens
To prevent damage, do notclean the headlamp lens withchemical solvents or strongdetergents.
Page 623 of 687
787
Maintenance
✽ ✽NOTICE
You can find moisture inside the lens
of lamps after a car wash or driving
in the rain. It is a natural event
caused by the temperature differ-
ence between the inside and the out-
side of the lamp and does not mean a
problem with its functions. The
moisture inside the lamp would dis-
appear if you drive the vehicle with
the headlamp turned on, however,
the level at which the moisture is
removed may differ depending on
the size/location/condition of the
lamp. If the moisture continues to
stay inside the lamp, we recommend
that you have the vehicle checked by
an authorized Kia dealer.
If you don’t have the necessary tools,
the correct bulbs and the expertise,
consult an authorized Kia dealer. In
many cases, it is difficult to replace
vehicle light bulbs because other
parts of the vehicle must be removed
before you can get to the bulb. This is
especially true if you have to remove
the headlamp assembly to get to the
bulb(s).
Removing/installing the headlamp
assembly can result in damage to
the vehicle.
If non-genuine parts or substandard
bulbs are used, it may lead to blow-
ing a fuse or other wiring damages.
Do not install extra lamps or LEDs to
the vehicle. If additional lights are
installed, it may lead to lamp mal-
functions and flickering. Additionally,
the fuse box and other writing may
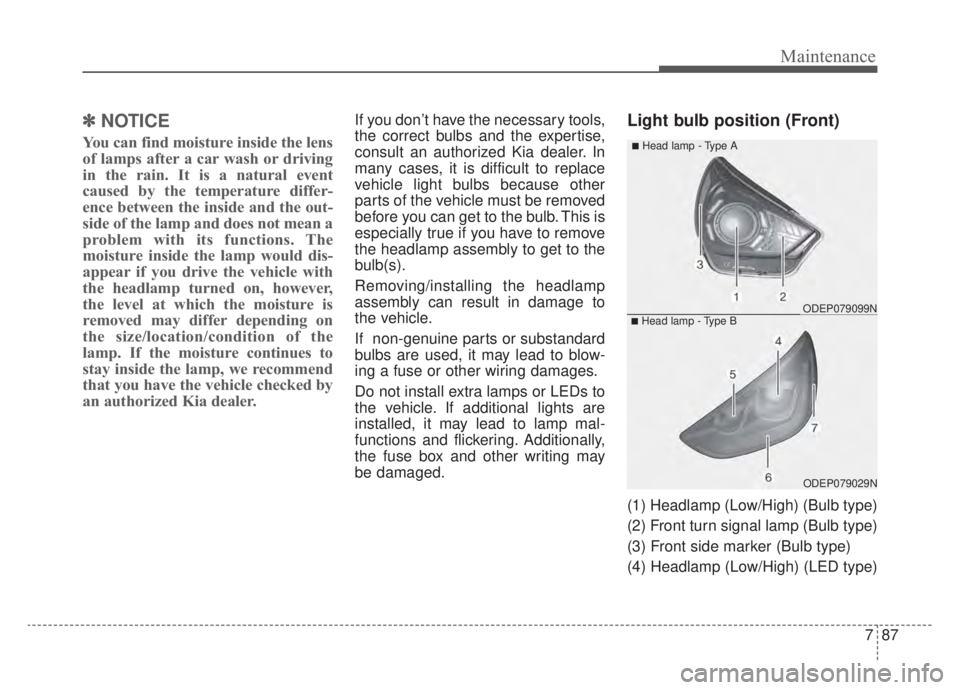
be damaged.Light bulb position (Front)
(1) Headlamp (Low/High) (Bulb type)
(2) Front turn signal lamp (Bulb type)
(3) Front side marker (Bulb type)
(4) Headlamp (Low/High) (LED type)
ODEP079029N
ODEP079099N
■Head lamp - Type A
■Head lamp - Type B
Page 624 of 687
Maintenance
88
7
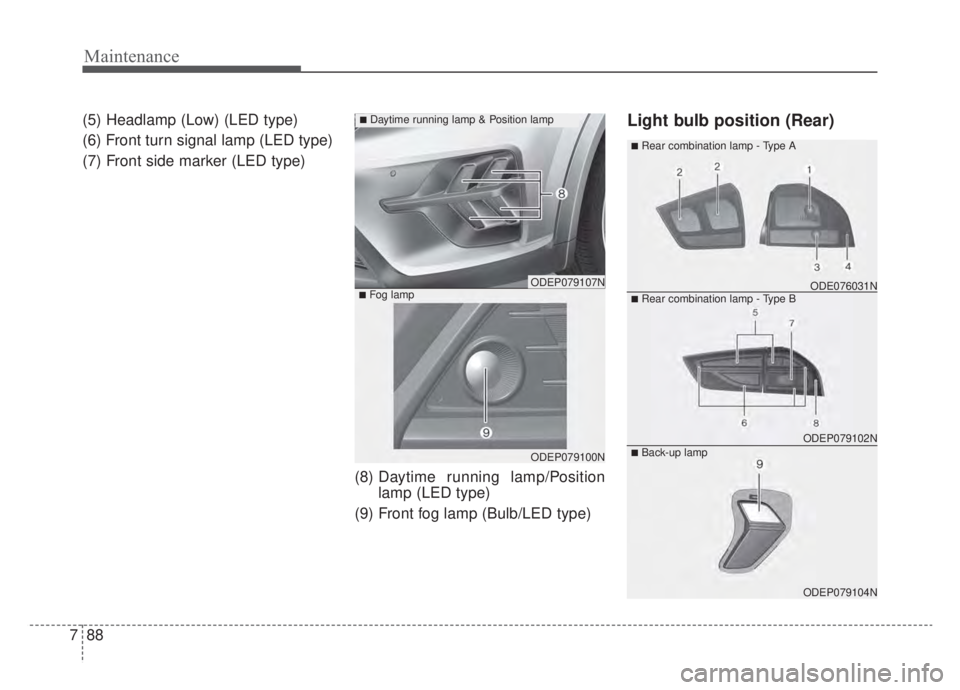
(5) Headlamp (Low) (LED type)
(6) Front turn signal lamp (LED type)
(7) Front side marker (LED type)
(8) Daytime running lamp/Position
lamp (LED type)
(9) Front fog lamp (Bulb/LED type)Light bulb position (Rear)
ODEP079100N
ODEP079107N
■Daytime running lamp & Position lamp
■Fog lamp
ODEP079102N
ODE076031N
ODEP079104N
■Rear combination lamp - Type A
■Rear combination lamp - Type B
■Back-up lamp
Page 627 of 687
791
Maintenance
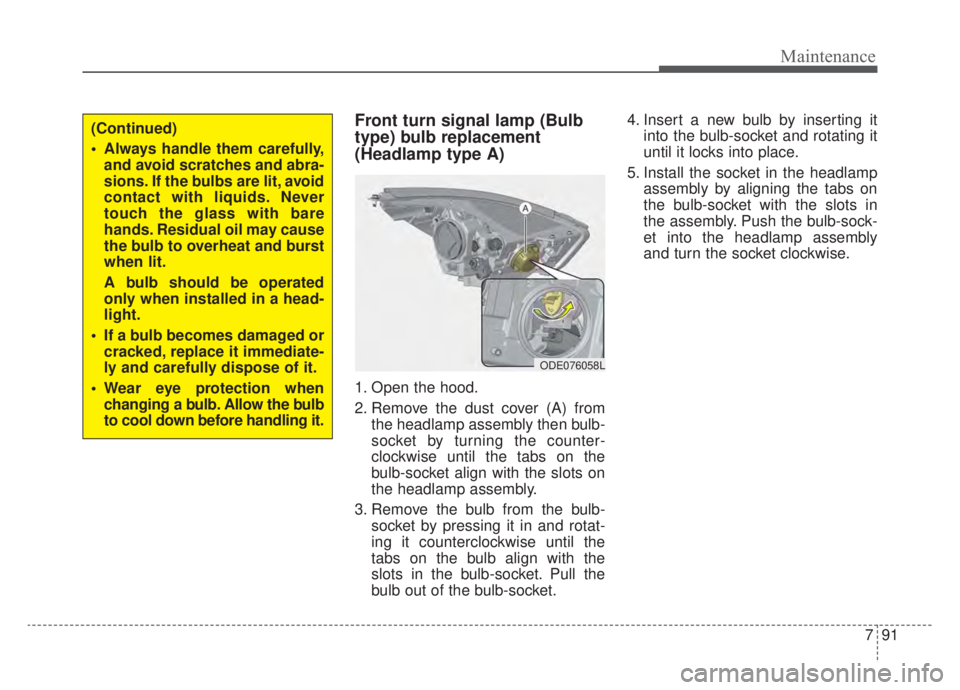
Front turn signal lamp (Bulb
type) bulb replacement
(Headlamp type A)
1. Open the hood.
2. Remove the dust cover (A) fromthe headlamp assembly then bulb-
socket by turning the counter-
clockwise until the tabs on the
bulb-socket align with the slots on
the headlamp assembly.
3. Remove the bulb from the bulb- socket by pressing it in and rotat-
ing it counterclockwise until the
tabs on the bulb align with the
slots in the bulb-socket. Pull the
bulb out of the bulb-socket. 4. Insert a new bulb by inserting it
into the bulb-socket and rotating it
until it locks into place.
5. Install the socket in the headlamp assembly by aligning the tabs on
the bulb-socket with the slots in
the assembly. Push the bulb-sock-
et into the headlamp assembly
and turn the socket clockwise.
(Continued)
Always handle them carefully,and avoid scratches and abra-
sions. If the bulbs are lit, avoid
contact with liquids. Never
touch the glass with bare
hands. Residual oil may cause
the bulb to overheat and burst
when lit.
A bulb should be operated
only when installed in a head-
light.
If a bulb becomes damaged or cracked, replace it immediate-
ly and carefully dispose of it.
Wear eye protection when changing a bulb. Allow the bulb
to cool down before handling it.
ODE076058L