Tire wheel lock KIA NIRO 2020 Owners Manual
[x] Cancel search | Manufacturer: KIA, Model Year: 2020, Model line: NIRO, Model: KIA NIRO 2020Pages: 687, PDF Size: 11.43 MB
Page 354 of 687
![KIA NIRO 2020 Owners Manual Driving your vehicle
44
5
AUTO HOLD conditions not met.
Close door and hood
When you press the [AUTO HOLD]
switch, if the driver’s door, engine
hood are not closed, a warning will
sound and a messag](/img/2/55189/w960_55189-353.png "KIA NIRO 2020 Owners Manual Driving your vehicle
44
5
AUTO HOLD conditions not met.
Close door and hood
When you press the [AUTO HOLD]
switch, if the driver’s door, engine
hood are not closed, a warning will
sound and a messag")
Driving your vehicle
44
5
AUTO HOLD conditions not met.
Close door and hood
When you press the [AUTO HOLD]
switch, if the driver’s door, engine
hood are not closed, a warning will
sound and a message will appear on
the LCD display. At this moment,
press the [AUTO HOLD] button after
closing the driver’s door and hood.
Anti-lock brake system (ABS)
ABS (or ESC) will not prevent acci-
dents due to improper or dangerous
driving maneuvers. Even though
vehicle control is improved during
emergency braking, always maintain
a safe distance between you and
objects ahead. Vehicle speeds
should always be reduced during
extreme road conditions. The vehicle
should be driven at reduced speeds
in the following circumstances:
When driving on rough, gravel or snow-covered roads
When driving with tire chains installed
When driving on roads where the road surface is pitted or has differ-
ent surface heights.
Driving in these conditions increases
the stopping distance for your vehicle. The ABS continuously senses the
speed of the wheels. If the wheels
are going to lock, the ABS system
repeatedly modulates the hydraulic
brake pressure to the wheels.
When you apply your brakes under
conditions which may lock the
wheels, you may hear a “tik-tik’’
sound from the brakes, or feel a cor-
responding sensation in the brake
pedal. This is normal and it means
your ABS is active.
In order to obtain the maximum benefit
from your ABS in an emergency situa-
tion, do not attempt to modulate your
brake pressure and do not try to pump
your brakes. Press your brake pedal as
hard as possible to allow the ABS to
control the force being delivered to the
brakes.
✽ ✽
NOTICE
A click sound may be heard in the
engine compartment when the vehi-
cle begins to move after the engine is
started. These conditions are normal
and indicate that the anti-lock brake
system is functioning properly.
ODEP059313L
Page 362 of 687
Driving your vehicle
52
5
Good braking practices
Check to be sure the parking brake
is not engaged and the parking
brake indicator light is out before
driving away.
Driving through water may get the brakes wet. They can also get wet
when the vehicle is washed. Wet
brakes can be dangerous! Your
vehicle will not stop as quickly if the
brakes are wet. Wet brakes may
cause the vehicle to pull to one side.
To dry the brakes, apply the brakes
lightly until the braking action
returns to normal, taking care to
keep the vehicle under control at all
times. If the braking action does not
return to normal, stop as soon as it
is safe to do so and call an author-
ized Kia dealer for assistance.
Don't coast down hills with the vehicle out of gear. This is extreme-
ly hazardous. Keep the vehicle in
gear at all times, use the brakes to
slow down, then shift to a lower
gear so that engine braking will
help you maintain a safe speed. Don't "ride" the brake pedal.
Resting your foot on the brake
pedal while driving can be danger-
ous because the brakes might
overheat and lose their effective-
ness. It also increases the wear of
the brake components.
If a tire goes flat while you are driv- ing, apply the brakes gently and
keep the vehicle pointed straight
ahead while you slow down. When
you are moving slowly enough for it
to be safe to do so, pull off the road
and stop in a safe place.
If your vehicle is equipped with a dual clutch transmission, don't let
your vehicle creep forward. To
avoid creeping forward, keep your
foot firmly on the brake pedal when
the vehicle is stopped.
Be cautious when parking on a hill. Firmly engage the parking brake
and place the shift lever in P (Dual
clutch transmission). If your vehicle
is facing downhill, turn the front
wheels into the curb to help keep
the vehicle from rolling. If your vehicle is facing uphill, turn
the front wheels away from the
curb to help keep the vehicle from
rolling. If there is no curb or if it is
required by other conditions to
keep the vehicle from rolling, block
the wheels.
Under some conditions your park- ing brake can freeze in the
engaged position. This is most like-
ly to happen when there is an
accumulation of snow or ice
around or near the rear brakes or if
the brakes are wet. If there is a risk
that the parking brake may freeze,
apply it only temporarily while you
put the shift lever in P (Dual clutch
transmission) and block the rear
wheels so the vehicle cannot roll.
Then release the parking brake.
Do not hold the vehicle on an incline with the accelerator pedal.
This can cause the transaxle to
overheat. Always use the brake
pedal or parking brake.
Page 513 of 687
621
What to do in an emergency
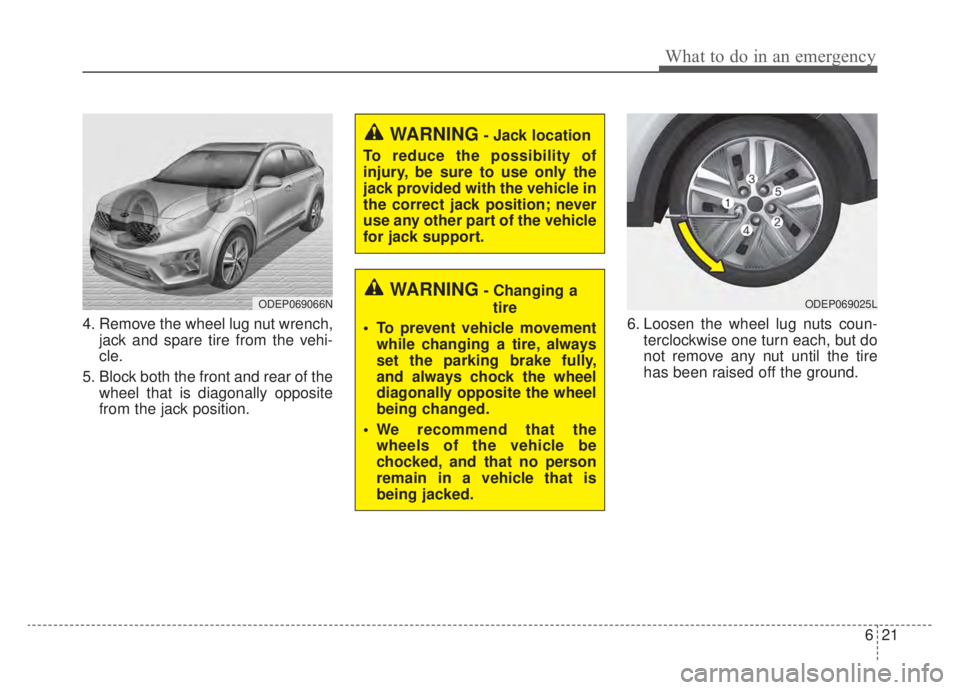
4. Remove the wheel lug nut wrench,jack and spare tire from the vehi-
cle.
5. Block both the front and rear of the wheel that is diagonally opposite
from the jack position. 6. Loosen the wheel lug nuts coun-
terclockwise one turn each, but do
not remove any nut until the tire
has been raised off the ground.
WARNING- Jack location
To reduce the possibility of
injury, be sure to use only the
jack provided with the vehicle in
the correct jack position; never
use any other part of the vehicle
for jack support.
WARNING- Changing a tire
To prevent vehicle movement while changing a tire, always
set the parking brake fully,
and always chock the wheel
diagonally opposite the wheel
being changed.
We recommend that the wheels of the vehicle be
chocked, and that no person
remain in a vehicle that is
being jacked.ODEP069066NODEP069025L
Page 514 of 687
What to do in an emergency
22
6
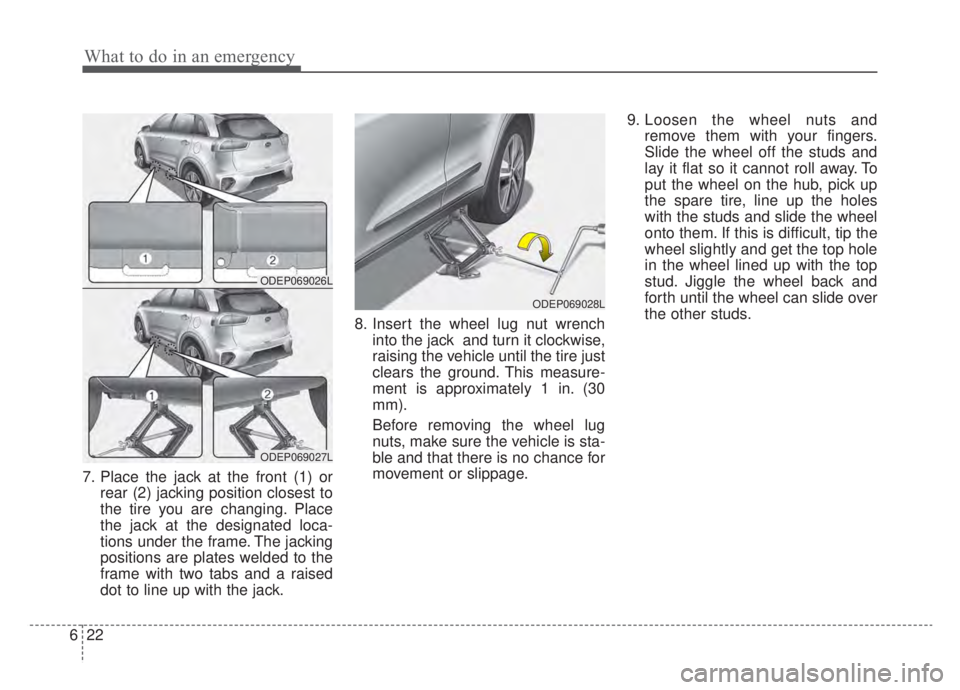
7. Place the jack at the front (1) or
rear (2) jacking position closest to
the tire you are changing. Place
the jack at the designated loca-
tions under the frame. The jacking
positions are plates welded to the
frame with two tabs and a raised
dot to line up with the jack. 8. Insert the wheel lug nut wrench
into the jack and turn it clockwise,
raising the vehicle until the tire just
clears the ground. This measure-
ment is approximately 1 in. (30
mm).
Before removing the wheel lug
nuts, make sure the vehicle is sta-
ble and that there is no chance for
movement or slippage. 9. Loosen the wheel nuts and
remove them with your fingers.
Slide the wheel off the studs and
lay it flat so it cannot roll away. To
put the wheel on the hub, pick up
the spare tire, line up the holes
with the studs and slide the wheel
onto them. If this is difficult, tip the
wheel slightly and get the top hole
in the wheel lined up with the top
stud. Jiggle the wheel back and
forth until the wheel can slide over
the other studs.
ODEP069028L
ODEP069026L
ODEP069027L
Page 515 of 687
623
What to do in an emergency
Wheels may have sharp edges.
Handle them carefully to avoid possi-
ble severe injury. Before putting the
wheel into place, be sure that there
is nothing on the hub or wheel (such
as mud, tar, gravel, etc.) that pre-
vents the wheel from fitting solidly
against the hub.10. To install the wheel, hold it on the
studs, put the wheel nuts on the
studs and tighten them finger
tight. Jiggle the tire to be sure it is
completely seated, then tighten
the nuts as much as possible
with your fingers again.
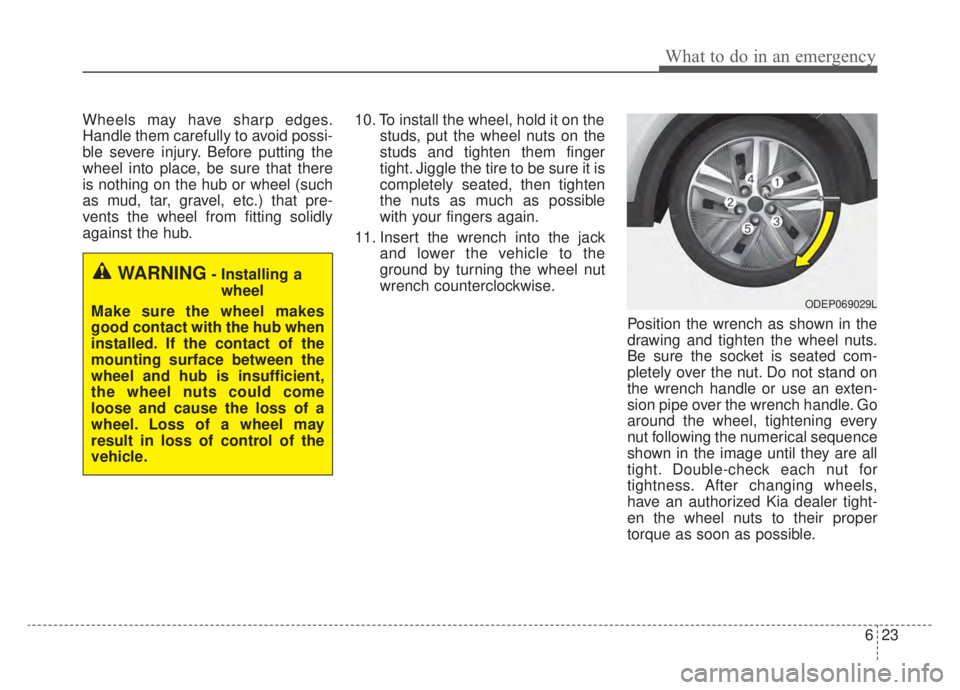
11. Insert the wrench into the jack and lower the vehicle to the
ground by turning the wheel nut
wrench counterclockwise.
Position the wrench as shown in the
drawing and tighten the wheel nuts.
Be sure the socket is seated com-
pletely over the nut. Do not stand on
the wrench handle or use an exten-
sion pipe over the wrench handle. Go
around the wheel, tightening every
nut following the numerical sequence
shown in the image until they are all
tight. Double-check each nut for
tightness. After changing wheels,
have an authorized Kia dealer tight-
en the wheel nuts to their proper
torque as soon as possible.
WARNING- Installing awheel
Make sure the wheel makes
good contact with the hub when
installed. If the contact of the
mounting surface between the
wheel and hub is insufficient,
the wheel nuts could come
loose and cause the loss of a
wheel. Loss of a wheel may
result in loss of control of the
vehicle.
ODEP069029L
Page 526 of 687
What to do in an emergency
34
6
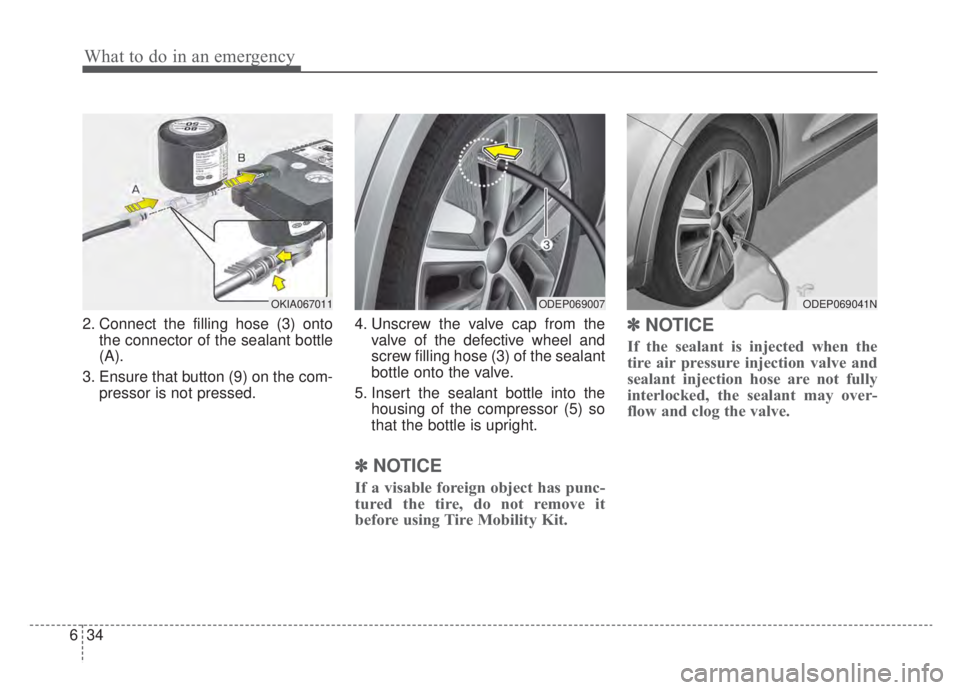
2. Connect the filling hose (3) onto
the connector of the sealant bottle
(A).
3. Ensure that button (9) on the com- pressor is not pressed. 4. Unscrew the valve cap from the
valve of the defective wheel and
screw filling hose (3) of the sealant
bottle onto the valve.
5. Insert the sealant bottle into the housing of the compressor (5) so
that the bottle is upright.
✽ ✽NOTICE
If a visable foreign object has punc-
tured the tire, do not remove it
before using Tire Mobility Kit.
✽ ✽NOTICE
If the sealant is injected when the
tire air pressure injection valve and
sealant injection hose are not fully
interlocked, the sealant may over-
flow and clog the valve.
ODEP069007OKIA067011ODEP069041N
Page 544 of 687
Maintenance
87
At least monthly:
Check the coolant level in theengine coolant reservoir.
Check the operation of all exterior lights, including the stoplights, turn
signals and hazard warning flash-
ers.
Check the inflation pressures of all tires including the spare for tires
that are worn, show uneven wear,
or are damaged.
Check for loose wheel lug nuts.
At least twice a year (i.e., every Spring and Fall) :
Check the radiator, heater and air conditioning hoses for leaks or
damage.
Check the windshield washer spray and wiper operation. Clean
the wiper blades with clean cloth
dampened with washer fluid.
Check the headlight alignment.
Check the muffler, exhaust pipes, shields and clamps.
Check the lap/shoulder belts for wear and function.
At least once a year :
Clean the body and door drainholes.
Lubricate the door hinges and check the hood hinges.
Lubricate the door and hood locks and latches.
Lubricate the door rubber weather- strips.
Check the air conditioning system.
Inspect and lubricate dual clutch transmission linkage and controls.
Clean the battery and terminals.
Check the brake fluid level.
Page 582 of 687
Maintenance
46
7
Tire replacement
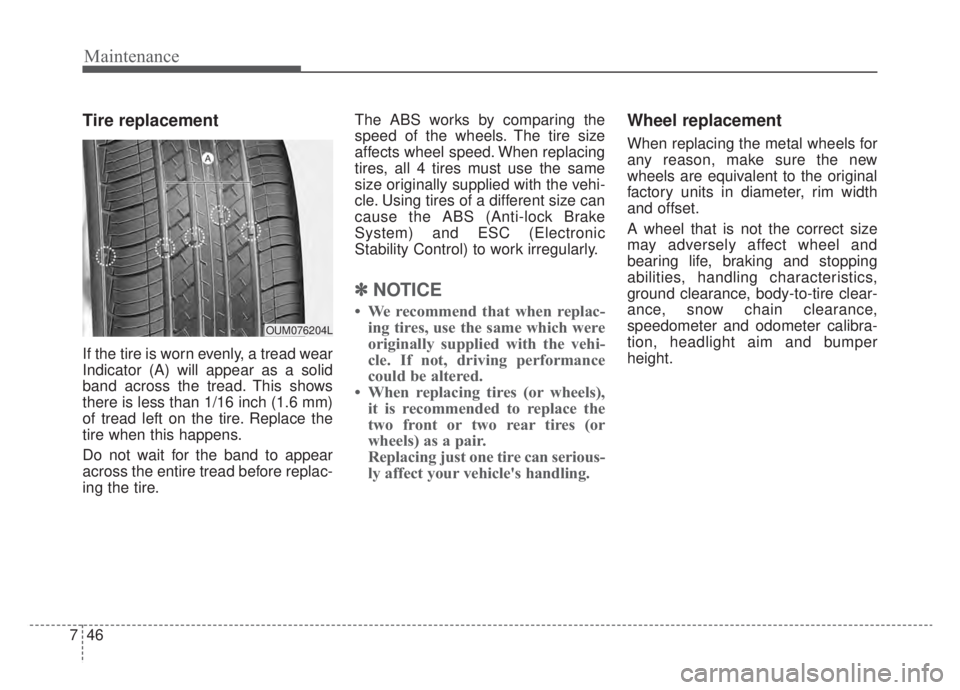
If the tire is worn evenly, a tread wear
Indicator (A) will appear as a solid
band across the tread. This shows
there is less than 1/16 inch (1.6 mm)
of tread left on the tire. Replace the
tire when this happens.
Do not wait for the band to appear
across the entire tread before replac-
ing the tire. The ABS works by comparing the
speed of the wheels. The tire size
affects wheel speed. When replacing
tires, all 4 tires must use the same
size originally supplied with the vehi-
cle. Using tires of a different size can
cause the ABS (Anti-lock Brake
System) and ESC (Electronic
Stability Control) to work irregularly.
✽ ✽
NOTICE
• We recommend that when replac-
ing tires, use the same which were
originally supplied with the vehi-
cle. If not, driving performance
could be altered.
• When replacing tires (or wheels), it is recommended to replace the
two front or two rear tires (or
wheels) as a pair.
Replacing just one tire can serious-
ly affect your vehicle's handling.
Wheel replacement
When replacing the metal wheels for
any reason, make sure the new
wheels are equivalent to the original
factory units in diameter, rim width
and offset.
A wheel that is not the correct size
may adversely affect wheel and
bearing life, braking and stopping
abilities, handling characteristics,
ground clearance, body-to-tire clear-
ance, snow chain clearance,
speedometer and odometer calibra-
tion, headlight aim and bumper
height.
OUM076204L