Lcd KIA NIRO 2021 Owners Manual
[x] Cancel search | Manufacturer: KIA, Model Year: 2021, Model line: NIRO, Model: KIA NIRO 2021Pages: 710, PDF Size: 14.77 MB
Page 32 of 710
H27
Action to be taken when
charging stops abruptly
When the high voltage battery does
not charge, check the followings:
1. Check the charging setting for the
vehicle.
(e.g. When scheduled charging is
set, charging is not initiated imme-
diately when the AC charger or
portable charger (ICCB: In-Cable
Control Box) is connected.)
2. Check the operation status of AC
charger, portable charger.
(Charging Status Indicator Lamp
for Portable Charger, refer to
“Checking Charging Status” for
trickle charge in this chapter.)
❈Actual method for indicating the
charging status may vary in accor-
dance with the charger manufac-
turer.
3. When the vehicle does not charge
and a warning message appears
on the cluster, check the corre-
sponding message. Refer to “LCD
Display Messages”, in this chap-
ter.4. If the vehicle is properly charged
when charged with another nor-
mally working charger, contact the
charger manufacturer.
5. If the vehicle does not charge
when charged with another nor-
mally working charger, we recom-
mend that you contact an author-
ized Kia dealer.
Page 37 of 710

H32
LCD Display Messages
Check Hybrid system
This message is displayed when
there is a problem with the hybrid
control system.
Refrain from driving when the warn-
ing message is displayed.
In this case, have your vehicle inspect-
ed by an authorized Kia dealer.
Check Hybrid system.
Turn off engine
This message is displayed when
there is a problem with the hybrid
system. The " " indicator will blink
and a warning chime will sound until
the problem is solved.
In this case, have your vehicle inspect-
ed by an authorized Kia dealer.
Check Hybrid system.
Do not start engine.
This message is displayed when the
hybrid battery power (SOC) level is
low. A warning chime will sound until
the problem is solved.
In this case, park the vehicle in a safe
location and have your vehicle
inspected by an authorized Kia dealer.
Stop vehicle and check power
Supply
This message is displayed when a
failure occurs in the power supply
system.
In this case, park the vehicle in a safe
location and have your vehicle
inspected by an authorized Kia dealer.
Refill inverter coolant
This message is displayed when the
inverter coolant is nearly empty.
You should refill the inverter coolant.
In this case, have your vehicle inspect-
ed by an authorized Kia dealer.
Stop vehicle and check brakes
This message is displayed when a
failure occurs in the brake system.
In this case, park the vehicle in a safe
location and have your vehicle
inspected by an authorized Kia dealer.
Check brakes
This message is displayed when the
brake performance is low or the
regenerative brake does not work
properly due to a failure in the brake
system.
In this case, it may take longer for the
brake pedal to operate and the brak-
ing distance may become longer.
DRIVING THE HYBRID/PLUG-IN HYBRID VEHICLE (CONT.)
Page 43 of 710

H38
AUX. BATTERY SAVER+ (For
Plug-in Hybrid, if equipped)
The Aux. Battery Saver+ is a function
that monitors the charging status of
the 12V auxiliary battery.
If the auxiliary battery level is low, the
main high voltage battery charges
the auxiliary battery.
✽ ✽
NOTICE
The Aux. Battery Saver+ function will
be ON when the vehicle is delivered. If
the function is not needed, you may
turn it off in the Users Settings mode
on the LCD display. For more infor-
mation, refer to the "System setting"
on the following page.
Mode
When the vehicle is OFF with all
doors, hood and liftgate closed, the
Aux. Battery Saver+ periodically acti-
vates according to the auxiliary bat-
tery status.
When the engine start/stop button is
in the ON position with the charging
connector plugged in, this function
activates according to the auxiliary
battery status to prevent over-dis-
charge of the auxiliary battery.
✽ ✽
NOTICE
The Aux. Battery Saver+ activates
for a maximum of 20 minutes. If the
Aux. Battery Saver+ function acti-
vates more than 10 times consecu-
tively, in the Automatic Mode, this
function will stop activating, judg-
ing that there is a problem with the
auxiliary battery. In this case, drive
the vehicle for some period of time.
The function will start activating if
the auxiliary battery returns to nor-
mal.
✽ ✽
NOTICE
If the Aux. Battery Saver+ function
was activated, the high voltage bat-
tery level may have decreased.
CAUTION
The Aux. Battery Saver+ func-
tion cannot prevent battery dis-
charge if the auxiliary battery is
damaged, worn out, used as a
power supply or if unauthorized
electronic devices are used.
PLUG-IN HYBRID ENERGY FLOW
Page 142 of 710
Mirrors . . . . . . . . . . . . . . . . . . . . . . . . . . . . . . . . . . 4-53
. . . . . . . . . . . . . . . . . . . . . . . . 4-53
Instrument cluster . . . . . . . . . . . . . . . . . . . . . . . . . 4-67
. . . . . . . . . . . . . . . . . . . . 4-69
. . . . . . . . . . . . . . . . . . . . . . . . . . . . . . . . . . . . . 4-69
. . . . . . . . . . 4-75
LCD Display . . . . . . . . . . . . . . . . . . . . . . . . . . . . . . 4-77
. . . . . . . . . . . . . . . . . . . . . . . . . 4-77
. . . . . . . . . . . . . . . . . . . . . . . . . . 4-78
. . . . . . . . . . . . . . . . . . . . 4-90
. . . . . . . . . . . . . . . . . . . . . . . . . . . . 4-95
Warning and indicator lights . . . . . . . . . . . . . . . 4-106
. . . . . . . . . . . . . . . . . . . . . . . . . . . . . . 4-106
. . . . . . . . . . . . . . . . . . . . . . . . . . . . . 4-115
Rear View Monitor (RVM) . . . . . . . . . . . . . . . . . 4-121
Reverse Parking Distance Warning (PDW) . . . . 4-122
. 4-122
Distance Warning . . . . . . . . . . . . . . . . . . . . . . . . . . 4-123
. . 4-124
. . . . . . . . . . . . . . . . . . . . . . . . . . . . . . . 4-124
Lighting . . . . . . . . . . . . . . . . . . . . . . . . . . . . . . . . . 4-125
. . . . . . . . . . . . . . . . . . . . . 4-125 . . . . . . . . . . . . . . . . . . . . . . . . 4-125
. . . . . . . . . . . . . . . . . . . . . . . . . . . . . 4-126
. . . . . . . . . . . . . . . . . . . . . 4-128
. . . . . . . . . . . 4-130
. . . . . . . . . . . . . . . . . . . . . . . . . . . . 4-131
. . . . . . . . . . . . . . . . . . . . . . . . . . . . . . 4-131
Wipers and washers . . . . . . . . . . . . . . . . . . . . . . . 4-132
. . . . . . . . . . . . . . . . . . . . . . . . . . 4-132
. . . . . . . . . . . . . . . . . . . . . 4-133
. . . . . . . . . 4-134
Interior lights . . . . . . . . . . . . . . . . . . . . . . . . . . . . 4-136
. . . . . . . . . . . . . . . . . . . 4-136
. . . . . . . . . . . . . . . . . . . . . . . . . . . . . . . . . 4-136
. . . . . . . . . . . . . . . . . . . . . . . . . . . . . . . . . 4-137
. . . . . . . . . . . . . . . . . . . . . . . . . . 4-138
. . . . . . . . . . . . . . . . . . . . . . . . . . 4-138
Welcome system . . . . . . . . . . . . . . . . . . . . . . . . . . 4-139
. . . . . . . . . . 4-139
. . . . . . . . . . . . . . . . . . . . . . . . . . . . . . . 4-139
Defroster . . . . . . . . . . . . . . . . . . . . . . . . . . . . . . . . 4-140
. . . . . . . . . . . . . . . . . . . . . . . 4-140
Automatic climate control system. . . . . . . . . . . . 4-141
. . . . . . . . . 4-142
4
Page 145 of 710
45
Features of your vehicle
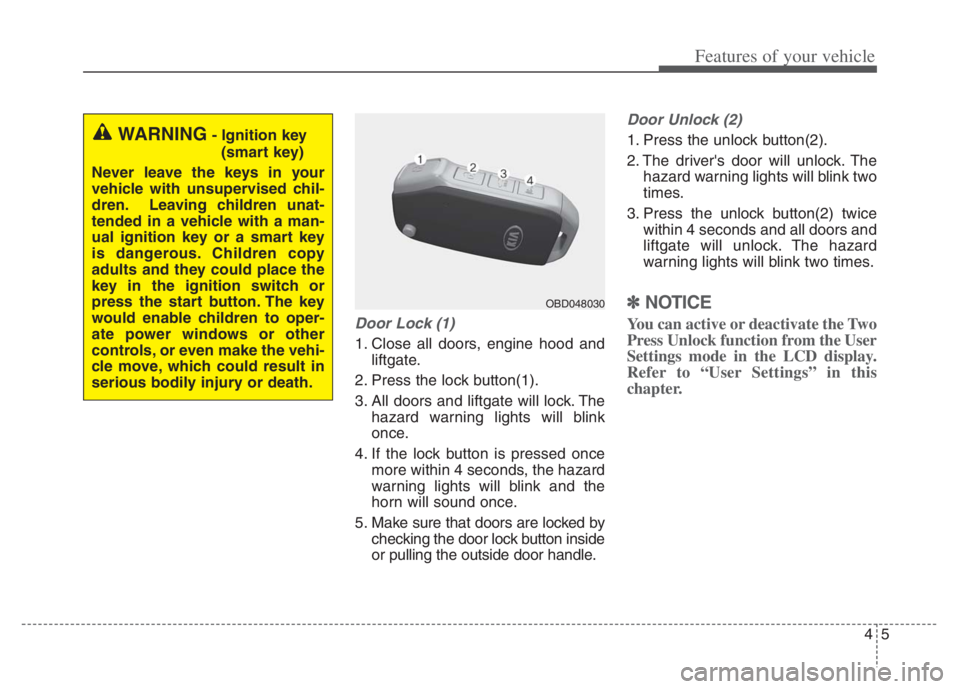
Door Lock (1)
1. Close all doors, engine hood and
liftgate.
2. Press the lock button(1).
3. All doors and liftgate will lock. The
hazard warning lights will blink
once.
4. If the lock button is pressed once
more within 4 seconds, the hazard
warning lights will blink and the
horn will sound once.
5. Make sure that doors are locked by
checking the door lock button inside
or pulling the outside door handle.
Door Unlock (2)
1. Press the unlock button(2).
2. The driver's door will unlock. The
hazard warning lights will blink two
times.
3. Press the unlock button(2) twice
within 4 seconds and all doors and
liftgate will unlock. The hazard
warning lights will blink two times.
✽ ✽
NOTICE
You can active or deactivate the Two
Press Unlock function from the User
Settings mode in the LCD display.
Refer to “User Settings” in this
chapter.
WARNING- Ignition key
(smart key)
Never leave the keys in your
vehicle with unsupervised chil-
dren. Leaving children unat-
tended in a vehicle with a man-
ual ignition key or a smart key
is dangerous. Children copy
adults and they could place the
key in the ignition switch or
press the start button. The key
would enable children to oper-
ate power windows or other
controls, or even make the vehi-
cle move, which could result in
serious bodily injury or death.
OBD048030
Page 153 of 710
413
Features of your vehicle
✽ ✽
NOTICE
You can active or deactivate the Two
Press Unlock function from the User
Settings mode in the LCD display.
Refer to “User Settings” in this
chapter.
Liftgate open
To open:
1. Make sure you have the smart key
in your possession.
2. Either press the switch inside the
liftgate emblem or press the lift-
gate open button (3) on the smart
key for more than one second.
3. Once the liftgate is opened and
then closed, the liftgate will lock
automatically.
✽ ✽
NOTICE
The Liftgate unlock will only oper-
ate when the smart key is within 28-
40 inches (0.7~1 m) from the trunk
Panic alarm
Press and hold the panic alarm but-
ton (4) for more than one second.
The horn sounds and hazard warn-
ing lights flash for 30 seconds. To
cancel the panic mode, press any
button on the smart key.
Page 165 of 710
425
Features of your vehicle
When pressing the door unlock
button (2), all vehicle doors will
unlock.
If the key is in the ignition switch or
the smart key in the vehicle and
any front door is opened, the doors
will not lock even though the door
lock button (1) is pressed.Impact sensing door unlock
system
In the event of air bag deployment
resulting from a vehicle impact, all
doors will automatically unlock.
Speed sensing door lock system
All doors will automatically lock after
the vehicle speed exceeds 10 mph
(15 km/h).
✽ ✽
NOTICE
You can select some auto door
lock/unlock features from the User
Settings mode in the LCD display. For
more information, refer to “User
Settings” in this chapter.
WARNING - Unattended
children/animals
Never leave children or animals
unattended in your vehicle. An
enclosed vehicle can become
extremely hot, causing death or
severe injury to unattended
children or animals who cannot
escape the vehicle.
WARNING - Doors
The doors should always be
fully closed and locked while
the vehicle is in motion to pre-
vent accidental opening of the
door.
Be careful when opening doors
and watch for vehicles, motor-
cycles, bicycles or pedestrians
approaching the vehicle in the
path of the door. Opening a
door when something is
approaching can cause injury.
Page 167 of 710
427
Features of your vehicle
You can activate or deactivate the
ROA from the User Settings mode in
the cluster LCD display.
The option can be found under the
following menu:
1. Press the MODE button ( ) sev-
eral times on the steering
wheel until 'User Settings' menu
appears on the LCD.
2. Select 'Convenience Rear
Occupant Alert‘ with the MOVE
switch ( / ) and the OK button
on the steering wheel.
WARNING
The Rear Occupant Alert (ROA)
system does not actually detect
objects or people in the rear
seat. By using a rear door
opened and closed history, the
system informs the driver that
there may be something in the
rear seat.
WARNING
The door lock system may not
work if the electrical system is
compromised. Accordingly,
please train children passen-
gers regarding how to open the
car door manually before an
emergency situation arises. That
way, they would be able to open
the door manually in the event
an emergency situation arises.
CAUTION
The Rear Occupant Alert (ROA)
system uses a rear door opened
and closed history.
The history is reset after the
driver turns off ignition normal-
ly, gets off the vehicle and locks
the door remotely using the
remote keyless entry. So even if
a rear door does not reopen, the
ROA system alert can occur.
For example, after the ROA sys-
tem alert occur, if the driver do
not lock the door then ride and
drive again, the alert can occur.
Page 177 of 710
437
Features of your vehicle
Hood open warning
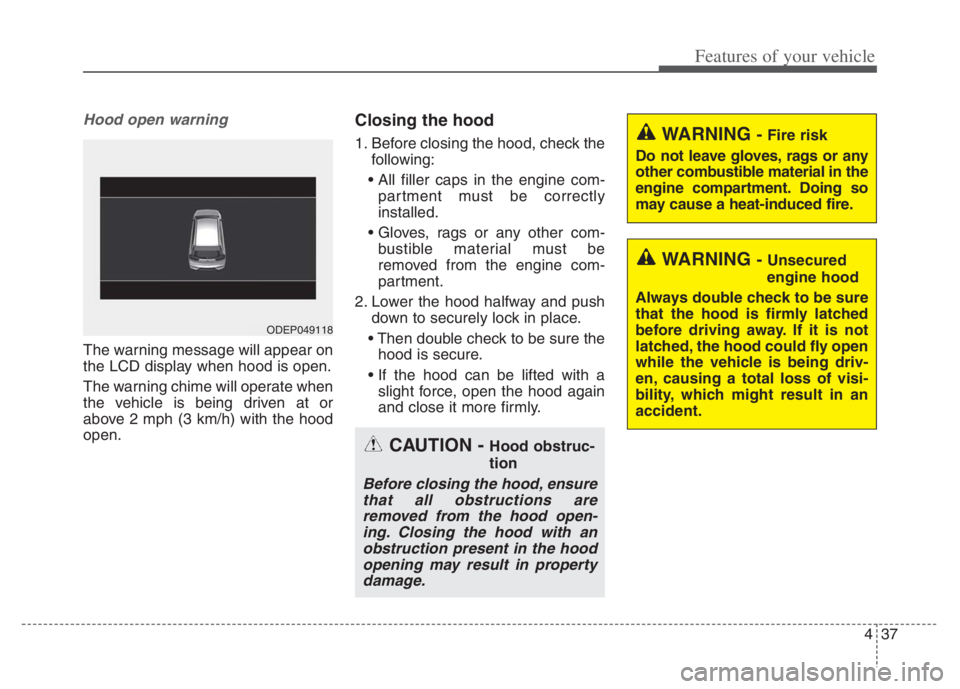
The warning message will appear on
the LCD display when hood is open.
The warning chime will operate when
the vehicle is being driven at or
above 2 mph (3 km/h) with the hood
open.
Closing the hood
1. Before closing the hood, check the
following:
partment must be correctly
installed.
bustible material must be
removed from the engine com-
partment.
2. Lower the hood halfway and push
down to securely lock in place.
hood is secure.
slight force, open the hood again
and close it more firmly.WARNING - Fire risk
Do not leave gloves, rags or any
other combustible material in the
engine compartment. Doing so
may cause a heat-induced fire.
WARNING - Unsecured
engine hood
Always double check to be sure
that the hood is firmly latched
before driving away. If it is not
latched, the hood could fly open
while the vehicle is being driv-
en, causing a total loss of visi-
bility, which might result in an
accident.
CAUTION - Hood obstruc-
tion
Before closing the hood, ensure
that all obstructions are
removed from the hood open-
ing. Closing the hood with an
obstruction present in the hood
opening may result in property
damage.
ODEP049118
Page 181 of 710
441
Features of your vehicle
✽ ✽
NOTICE
• Add fuel into the fuel tank within
20 minutes after opening the fuel
filler door. After 20 minutes, the
fuel tank may shut off, causing
fuel to overflow. In this case, re-
press the fuel filler door opening
button.
• Do not leave the fuel filler door
opened for an extended period of
time. It may discharge the battery.
• Close the fuel filler door after fuel-
ing the vehicle. If you start the
vehicle with the fuel filler door
opened, the message, “Check fuel
door”, illuminates on the LCD dis-
play.
Closing the fuel filler door
1. To install the cap, turn it clockwise
until it “clicks”. This indicates that
the cap is securely tightened.
2. Close the fuel filler door and push
it lightly and make sure that it is
securely closed.
Always check that the fuel cap is
installed securely to prevent fuel
spillage in the event of an accident.
✽ ✽
NOTICE
• There may be an intermittent
noise near the refueling hole while
the engine is idling if the fuel cap is
not closed securely. This occurs
normally with the OBD system.
• When refueling on unlevel
ground, the fuel gauge may not
point to the F position.
It is not a malfunction. If you
move your vehicle to a level
ground, the fuel gauge will move
to the full position.
• Tighten the cap until it clicks once,
otherwise the fuel cap open warn-
ing indicator light will illumi-
nate.
WARNING - For Plug-in
Hybrid
Avoid refueling the vehicle
while charging the (high-volt-
age) hybrid battery. It may
cause a fire or an explosion due
to static electricity.
WARNING
Before refueling, be sure to
check what type of fuel is used
for your vehicle.
If you put diesel fuel into a
gasoline-powered vehicle or
gasoline into a diesel-powered
vehicle, it may affect the fuel
system and cause serious dam-
age to the vehicle.