navigation KIA NIRO EV 2019 Features and Functions Guide
[x] Cancel search | Manufacturer: KIA, Model Year: 2019, Model line: NIRO EV, Model: KIA NIRO EV 2019Pages: 54, PDF Size: 3.49 MB
Page 3 of 54
VIDEOS & QR CODES . . . . . . . . . . . . . . . . .02
INSTRUMENT CLUSTERInstrument Cluster Overview . . . . . . . . . . . . . . . 03Indicators & Warning Lights . . . . . . . . . . . . . . . 04Electric Vehicle (E V ) Indicators . . . . . . . . . . . . . . 05Energy Consumption . . . . . . . . . . . . . . . . . . . 06Tire Pressure Monitoring System (TPMS) . . . . . . . . 06LCD Instrument Cluster Modes . . . . . . . . . . . . . . 07Trip Modes / Trip Computer . . . . . . . . . . . . . . . . 07Charge Warning Messages on LCD Display . . . . . . . . 08User Settings . . . . . . . . . . . . . . . . . . . . . . . 10Service Interval Mode . . . . . . . . . . . . . . . . . . 10
ELECTRIC VEHICLE (EV) FEATURESDrive Modes . . . . . . . . . . . . . . . . . . . . . . . 11Regenerative Braking with Paddle Shifters . . . . . . . . 12E V Mode - UVO link with Navigation . . . . . . . . . . . 13Charging Your Electric Vehicle . . . . . . . . . . . . . . 15Charging Connector Auto/Lock Mode . . . . . . . . . . 17Scheduled Charging* . . . . . . . . . . . . . . . . . . . 17
DRIVER’S PANELBlind-Spot Collision Warning (BCW ) w/ LCA* . . . . . . . 18Rear Cross-Traffic Collision Warning (RCCW )* . . . . . . 18Lane Keeping Assist (LK A)* . . . . . . . . . . . . . . . 19Forward Collision-Avoidance Assist (FCA) / Forward Collision Warning (FCW )* . . . . . . . . . . . 20Instrument Cluster Control . . . . . . . . . . . . . . . . 21Electronic Stability Control (ESC) . . . . . . . . . . . . . 21Hill-Start Assist Control (HAC) . . . . . . . . . . . . . . 21Reverse Parking Aid Function* . . . . . . . . . . . . . . 22Power Button . . . . . . . . . . . . . . . . . . . . . . . 22Power Windows, Window Lock & Central Door Lock . . . 23Automatic Door Lock . . . . . . . . . . . . . . . . . . . 23Power/Heated Outside Mirrors* . . . . . . . . . . . . . 23Power Folding Outside Mirrors* . . . . . . . . . . . . . 23
STEERING WHEEL CONTROLSHeadlights & High Beams . . . . . . . . . . . . . . . . . 24Turn Signals & Fog Lights* . . . . . . . . . . . . . . . . 24Windshield/Rear Wipers & Washers . . . . . . . . . . . 25Bluetooth® Wireless Technology . . . . . . . . . . . . . 26Audio Controls . . . . . . . . . . . . . . . . . . . . . . 28Standard Cruise Control . . . . . . . . . . . . . . . . . 28Smart Cruise Control (SCC) with Stop & Go* . . . . . . . 29Tilt/ Telescoping Steering Wheel . . . . . . . . . . . . . 30
AUDIO SYSTEMAndroid Auto™ / Apple CarPlay® Setup . . . . . . . . . . 31UVO link* Activation . . . . . . . . . . . . . . . . . . . 32UVO link* . . . . . . . . . . . . . . . . . . . . . . . . . 33UVO link with Premium Navigation* . . . . . . . . . . . 34
CENTER PANELDigital Clock . . . . . . . . . . . . . . . . . . . . . . . 35USB Chargers* . . . . . . . . . . . . . . . . . . . . . . 35USB/iPod® Port & Power Outlets* . . . . . . . . . . . . 35Wireless Smartphone Charging System* . . . . . . . . . 36Automatic Climate Control . . . . . . . . . . . . . . . . 37Rotary Dial Shifter Knob . . . . . . . . . . . . . . . . . 38Heated Steering Wheel Button* . . . . . . . . . . . . . . 38Electronic Parking Brake* . . . . . . . . . . . . . . . . 39Seat Warmers / Ventilated Seats* . . . . . . . . . . . . 40
S E AT I N GDriver Position Memory System* . . . . . . . . . . . . . 40Front Seat Headrest Adjustment . . . . . . . . . . . . . 40Power Adjustable Driver’s Seat* . . . . . . . . . . . . . 416-Way Manual Adjustable Driver’s Seat* . . . . . . . . . 41Folding Rear Seats . . . . . . . . . . . . . . . . . . . . 42
OTHER KEY FEATURESHood Release Lever and Latch . . . . . . . . . . . . . . 42Sunvisor . . . . . . . . . . . . . . . . . . . . . . . . . 42Smart Key* . . . . . . . . . . . . . . . . . . . . . . . . 43Double-Turn Lock /Unlock All . . . . . . . . . . . . . . . 43Map/Room Lamps . . . . . . . . . . . . . . . . . . . . 44Sunroof Operation . . . . . . . . . . . . . . . . . . . . 44Parking Distance Warning-Forward and Reverse* . . . . 45Rear-Camera Display* . . . . . . . . . . . . . . . . . . 45Driver Attention Warning (DAW)* . . . . . . . . . . . . . . 46Liftgate Release Button . . . . . . . . . . . . . . . . . . 47Child-Protector Rear Door Lock . . . . . . . . . . . . . 47Tire Mobility Kit . . . . . . . . . . . . . . . . . . . . . . 47
SAFETY FEATURESOccupant Detection System (ODS) /Passenger Airbag Off Indicator . . . . . . . . . . . . . . 48Seat Belts . . . . . . . . . . . . . . . . . . . . . . . . . 48Seat Belt Retractor Locks . . . . . . . . . . . . . . . . 48
NORMAL MAINTENANCE SCHEDULE . .Back CoverLEGAL DISCLAIMERS . . . . . . . . Inside Back Cover
ESSENTIAL FEATURES
*IF EQUIPPED
NIRO EV FE ATURES & FUNCTIONS GUIDE
Air Conditioning / Climate Control . . . . . . . . . . . . . . 37
Android Auto™ / Apple CarPlay® Setup . . . . . . . . . . . 31
Audio System – UVO link* Activation . . . . . . . . . . . .32
Audio System – UVO link* . . . . . . . . . . . . . . . . . . 33
Audio System – UVO link with Navigation* . . . . . . . . .34
Bluetooth® Wireless Technology . . . . . . . . . . . . . . 26
Charging Your Electric Vehicle . . . . . . . . . . . . . . . 15
Cruise Control . . . . . . . . . . . . . . . . . . . . . . . . 28
Digital Clock . . . . . . . . . . . . . . . . . . . . . . . . . 35
Electric Vehicle (E V ) Indicators . . . . . . . . . . . . . . .05
E V Mode Displays . . . . . . . . . . . . . . . . . . . . . . 13
Energy Consumption . . . . . . . . . . . . . . . . . . . . 06
Passenger Airbag Off Indicator . . . . . . . . . . . . . . .48
Sport/ECO/ECO+ Driving Modes . . . . . . . . . . . . . .11
Tire Mobility Kit . . . . . . . . . . . . . . . . . . . . . . .47
Tire Pressure Monitoring System (TPMS) . . . . . . . . . . 06
USB/iPod® Port, Power Outlets & USB Charger . . . . . . . 35
Windshield Wipers & Washers . . . . . . . . . . . . . . . 25
Driving while distracted can result in a loss of vehicle control that may lead to an accident, severe personal injury and death. The driver’s primary responsibility is in the safe and legal operation of a vehicle, and use of any handheld devices, other equipment or vehicle systems which take the driver’s eyes, attention and focus away from the safe operation of a vehicle or that are not permissible by law should never be used during operation of the vehicle.
Page 9 of 54
7*IF EQUIPPED ALWAYS CHECK THE OWNER’S MANUAL FOR COMPLETE OPER ATING INFORMATION AND SAFET Y WARNINGS .
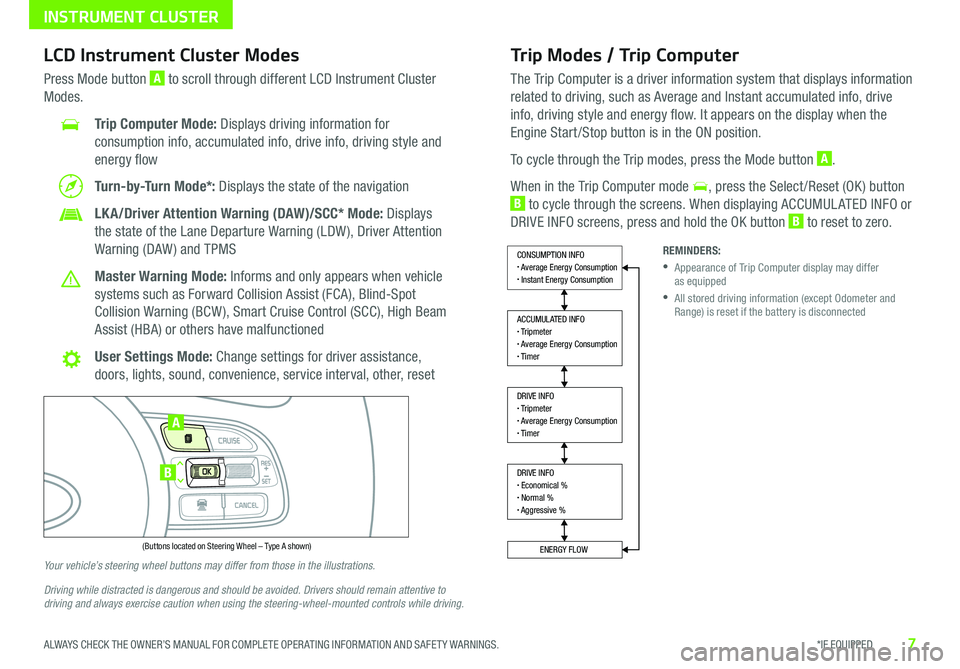
Trip Modes / Trip Computer
The Trip Computer is a driver information system that displays information
related to driving, such as Average and Instant accumulated info, drive
info, driving style and energy flow . It appears on the display when the
Engine Start /Stop button is in the ON position .
To cycle through the Trip modes, press the Mode button A .
When in the Trip Computer mode , press the Select /Reset (OK ) button
B to cycle through the screens . When displaying ACCUMUL ATED INFO or
DRIVE INFO screens, press and hold the OK button B to reset to zero .
LCD Instrument Cluster Modes
Press Mode button A to scroll through different LCD Instrument Cluster
Modes .
Trip Computer Mode: Displays driving information for
consumption info, accumulated info, drive info, driving style and
energy flow
Turn-by-Turn Mode*: Displays the state of the navigation
LKA/Driver Attention Warning (DAW)/SCC* Mode: Displays
the state of the Lane Departure Warning (LDW ), Driver Attention
Warning (DAW ) and TPMS
Master Warning Mode: Informs and only appears when vehicle
systems such as Forward Collision Assist (FCA), Blind-Spot
Collision Warning (BCW ), Smart Cruise Control (SCC), High Beam
Assist (HBA) or others have malfunctioned
User Settings Mode: Change settings for driver assistance,
doors, lights, sound, convenience, service interval, other, reset
Your vehicle’s steering wheel buttons may differ from those in the illustrations.
Driving while distracted is dangerous and should be avoided. Drivers should remain attentive to driving and always exercise caution when using the steering-wheel-mounted controls while driving.
REMINDERS:
•
Appearance of Trip Computer display may differ as equipped
•
All stored driving information (except Odometer and Range) is reset if the battery is disconnected
DRIVE INFO• Economical %• Normal %• Aggressive %
CONSUMPTION INFO• Average Energy Consumption• Instant Energy Consumption
ACCUMULATED INFO• Tripmeter• Average Energy Consumption• Timer
DRIVE INFO• Tripmeter• Average Energy Consumption• Timer
ENERGY FLOW
Accumulated Info
T rip
Average
Ti mer 247.5
15.7
17:42mi
MPG
h
(Buttons located on Steering Wheel – Type A shown)
MODE
RES
CRUISE
CAN CELOKSET
MODE
RES
CRUISE
CAN CELOKSET
MODE
A
B
INSTRUMENT CLUSTER
Page 15 of 54
13*IF EQUIPPED ALWAYS CHECK THE OWNER’S MANUAL FOR COMPLETE OPER ATING INFORMATION AND SAFET Y WARNINGS .
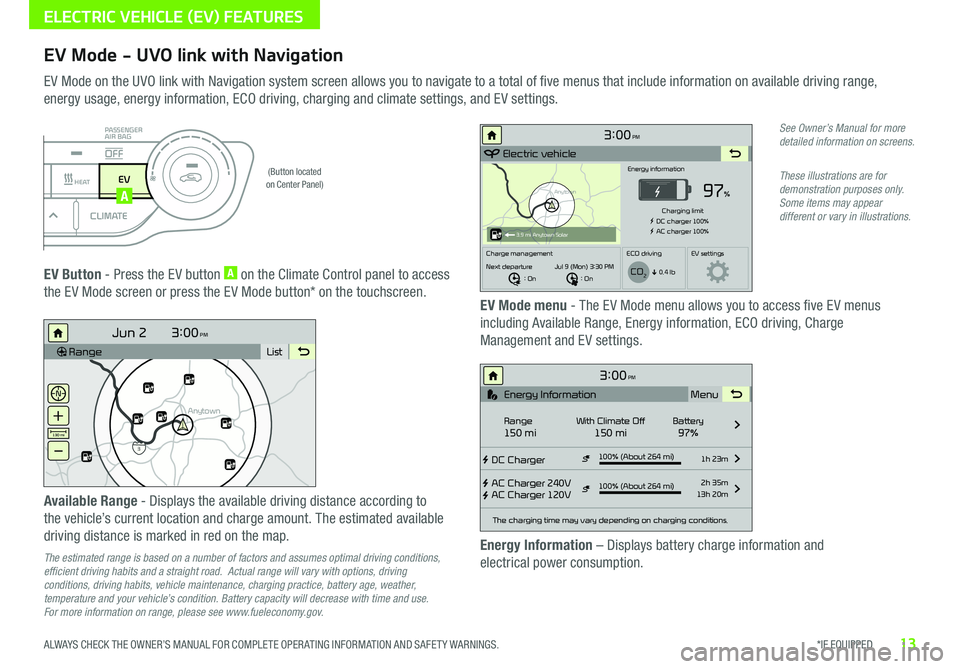
EV Mode - UVO link with Navigation
EV Mode on the UVO link with Navigation system screen allows you to navigate to a total of five menus that include information on available driving range,
energy usage, energy information, ECO driving, charging and climate settings, and EV settings .
(Button located on Center Panel)
EV Button - Press the EV button A on the Climate Control panel to access
the EV Mode screen or press the EV Mode button* on the touchscreen .EV Mode menu - The EV Mode menu allows you to access five EV menus
including Available Range, Energy information, ECO driving, Charge
Management and EV settings .
Available Range - Displays the available driving distance according to
the vehicle’s current location and charge amount . The estimated available
driving distance is marked in red on the map .
The estimated range is based on a number of factors and assumes optimal driving conditions, efficient driving habits and a straight road. Actual range will vary with options, driving conditions, driving habits, vehicle maintenance, charging practice, battery age, weather, temperature and your vehicle’s condition. Battery capacity will decrease with time and use. For more information on range, please see www.fueleconomy.gov.
Energy Information – Displays battery charge information and
electrical power consumption .
See Owner’s Manual for more detailed information on screens.
These illustrations are for demonstration purposes only. Some items may appear different or vary in illustrations.
3:00PM
Range List
Anytown
3
Jun 2
+
–
130 mi
Anytown
3:00PM
Electric vehicle
97%
Energy information
Charging limit
DC charger 100% AC charger 100%
Charge management ECO drivingEV settings
Next departure : On : On
Jul 9 (Mon) 3:30 PM
0.4 lb
3.9 mi Anytown Solar
CO2
3:00PM
DC Charger
AC Charger 240V
AC Charger 120V100% (About 264 mi) 1h 23m
2h 35m
13h 20m
The charging time may vary depending on charging conditions.
Range150 miWith Climate Off150 miBattery97% Menu
Energy Information
100% (About 264 mi)
i
DRIVERAUTOACHEAT
CLIMATEOFF
ONLYEV
PASSENGER
AIR BAG
OFF
ELECTRIC VEHICLE (EV) FEATURES
A
Page 16 of 54
14*IF EQUIPPED NIRO EV FEATURES & FUNCTIONS GUIDE
See Owner’s Manual for more detailed information on screens.
These illustrations are for demonstration purposes only. Some items may appear different or vary in illustrations.
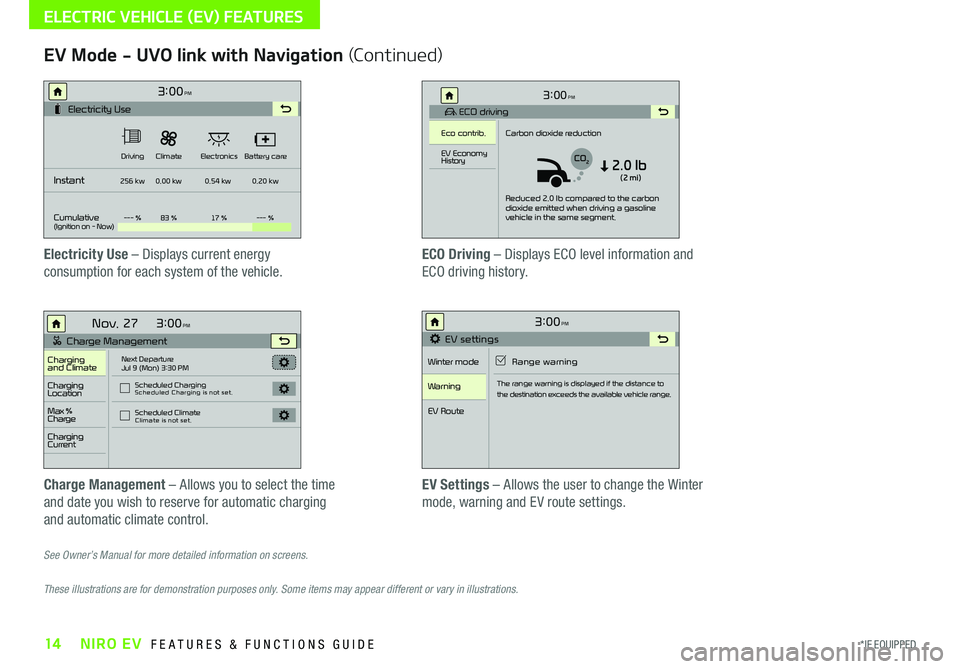
EV Mode - UVO link with Navigation (Continued)
Electricity Use – Displays current energy
consumption for each system of the vehicle .
ECO Driving – Displays ECO level information and
ECO driving history .
Charge Management – Allows you to select the time
and date you wish to reserve for automatic charging
and automatic climate control .
EV Settings – Allows the user to change the Winter
mode, warning and EV route settings .
3:00PM
Instant
Cumulative(Ignition on - Now)Driving
256 kw
--- % 83 % 17 %--- %
0.00 kw
0.54 kw0.20 kw
Climate
ElectronicsBattery care
Electricity Use
3:00
Nov. 27PM
Charge Management
Charging
and ClimateNext Departure
Jul 9 (Mon) 3:30 PM
Scheduled Charging
Scheduled Charging is not set.
Scheduled ClimateClimate is not set.
Charging
Location
Charging
Current
Max %
Charge
3:00PM
EV settings
Winter mode Range warning
Warning
EV Route
The range warning is displayed if the distance to
the destination exceeds the available vehicle range.
3:00PM
ECO driving
Eco contrib. Carbon dioxide reduction
Reduced 2.0 lb compared to the carbon
dioxide emitted when driving a gasoline
vehicle in the same segment.
EV Economy
History
CO22.0 lb(2 mi)
ELECTRIC VEHICLE (EV) FEATURES
Page 19 of 54
17*IF EQUIPPED ALWAYS CHECK THE OWNER’S MANUAL FOR COMPLETE OPER ATING INFORMATION AND SAFET Y WARNINGS .
AUTO
OFF
AUTO
OFF
(Buttons are located left of the Steering Wheel)
AB
Scheduled Charging*Charging Connector Auto/Lock Mode
Charging times can be set using the UVO link with Navigation
.*
You can also use the Scheduled Charging* App on your
smartphone .
Charging with the UVO link smartphone app:
The Kia Access with UVO link smartphone app can help you find
the nearest charging station, and also displays charging status
and Scheduled Charging information . On your smartphone, go
to an app store or marketplace to download the Kia Access with
UVO link smartphone app .
REMINDER: When Scheduled Charging is set and the charger is plugged in, charging of the electric vehicle will not begin until the time and date set .
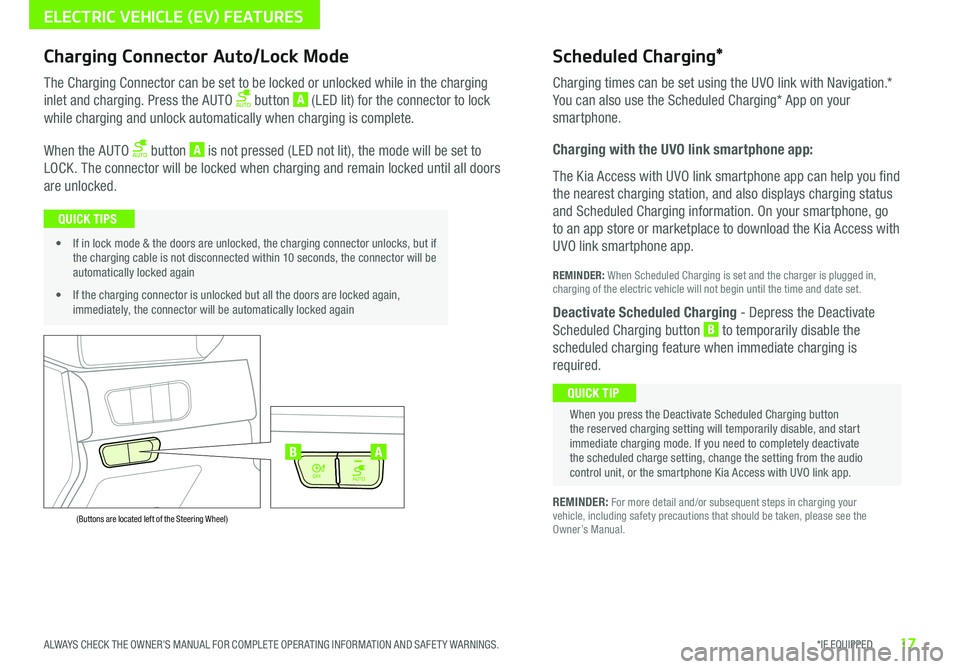
Deactivate Scheduled Charging - Depress the Deactivate
Scheduled Charging button B to temporarily disable the
scheduled charging feature when immediate charging is
required .
The Charging Connector can be set to be locked or unlocked while in the charging
inlet and charging . Press the AUTO button A (LED lit) for the connector to lock
while charging and unlock automatically when charging is complete .
When the AUTO button A is not pressed (LED not lit), the mode will be set to
LOCK . The connector will be locked when charging and remain locked until all doors
are unlocked .
REMINDER: For more detail and/or subsequent steps in charging your vehicle, including safety precautions that should be taken, please see the Owner’s Manual .
When you press the Deactivate Scheduled Charging button the reserved charging setting will temporarily disable, and start immediate charging mode . If you need to completely deactivate the scheduled charge setting, change the setting from the audio control unit, or the smartphone Kia Access with UVO link app .
QUICK TIP
• If in lock mode & the doors are unlocked, the charging connector unlocks, but if the charging cable is not disconnected within 10 seconds, the connector will be automatically locked again
• If the charging connector is unlocked but all the doors are locked again, immediately, the connector will be automatically locked again
QUICK TIPS
ELECTRIC VEHICLE (EV) FEATURES
Page 28 of 54
26NIRO EV FEATURES & FUNCTIONS GUIDE*IF EQUIPPED †LEGAL DISCL AIMERS ON BACK INSIDE COVER
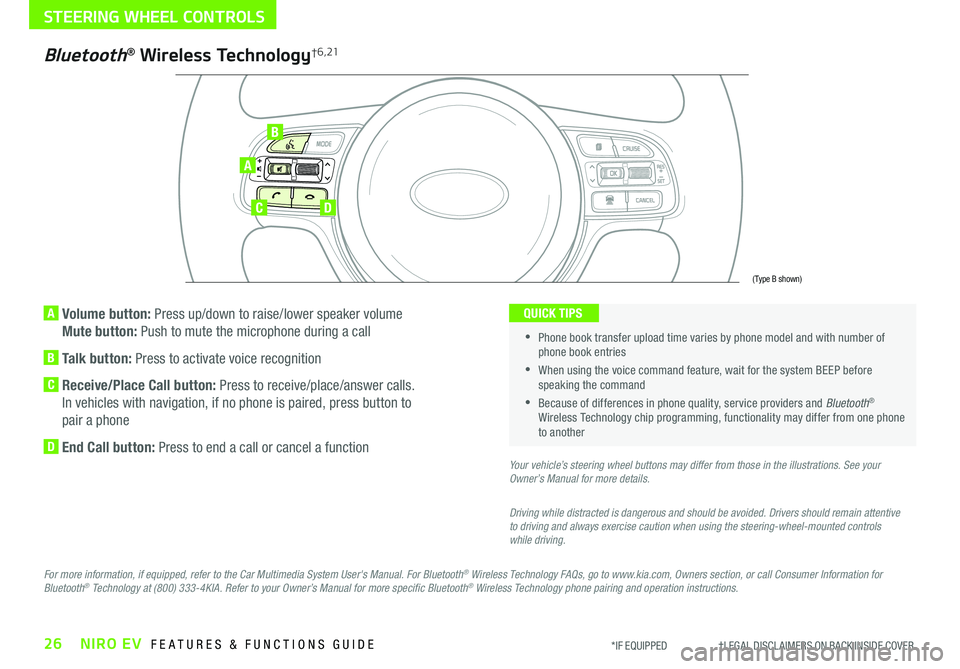
A Volume button: Press up/down to raise/lower speaker volume
Mute button: Push to mute the microphone during a call
B Talk button: Press to activate voice recognition
C Receive/Place Call button: Press to receive/place/answer calls .
In vehicles with navigation, if no phone is paired, press button to
pair a phone
D End Call button: Press to end a call or cancel a function
A
CD
B
Bluetooth® Wireless Technology† 6 , 21
For more information, if equipped, refer to the Car Multimedia System User's Manual. For Bluetooth® Wireless Technology FAQs, go to www.kia.com, Owners section, or call Consumer Information for Bluetooth® Technology at (800) 333-4KIA. Refer to your Owner’s Manual for more specific Bluetooth® Wireless Technology phone pairing and operation instructions.
•
Phone book transfer upload time varies by phone model and with number of phone book entries
•When using the voice command feature, wait for the system BEEP before speaking the command
•Because of differences in phone quality, service providers and Bluetooth® Wireless Technology chip programming, functionality may differ from one phone to another
QUICK TIPS
Your vehicle’s steering wheel buttons may differ from those in the illustrations. See your Owner’s Manual for more details.
Driving while distracted is dangerous and should be avoided. Drivers should remain attentive to driving and always exercise caution when using the steering-wheel-mounted controls while driving.
(Type B shown)
STEERING WHEEL CONTROLS
Page 35 of 54
33ALWAYS CHECK THE OWNER’S MANUAL FOR COMPLETE OPER ATING INFORMATION AND SAFET Y WARNINGS . *IF EQUIPPED †LEGAL DISCL AIMERS ON BACK INSIDE COVER
AUDIO SYSTEMS
UVO link Videos To view a video on your mobile device, snap this QR Code or visit the listed website . Refer to page 2 for more information .
QR CODE
www.youtube.com/KiaFeatureVideos
UVO link*†1 – FM/AM/SiriusXM® †2 0/Media (USB, iPod®, AUX, Bluetooth® Audio, My Music)
•Using Android Auto™ or Apple CarPlay® and a supported smartphone, the phone’s Navigation App may be displayed on the head unit
•At any time, you can interrupt Command Feedback by pressing the TALK button
•Prolonged use of the audio system in ACC mode may drain the vehicle’s 12V battery
•A warning screen may appear periodically to remind users that the audio system should be operated when the engine is running to prevent 12V battery discharge
QUICK TIPS
Sound Settings
To adjust the audio system sound settings:
1 . Press the SETUP key on the audio control unit
2 . Select the onscreen SOUND button, or SOUND SET TINGS
3 . Select the menu item (Position, Volume, Tone, Priority, Advanced, Default)
4 . Use the onscreen buttons to adjust settings . Press the return button to save settings
Radio Presets: You can listen to FM, AM and SiriusXM® radio and save frequently used stations
How to Save a Preset: Press and hold the desired slot .This saves the current station in the selected slot
SiriusXM® Smart Favorites: For the first ten favorite SiriusXM® channels, you may play live or repeat from the beginning of a song or a program segment . In Radio mode, choose SiriusXM®, then select any of the first six favorites . During song or program play, tap the Skip Backward icon to start from the beginning of the song or program . Tap the Play Live icon to return to the live broadcast
Custom Button : A programmable key to provide quick access to one of several available system features
To program the Custom Button: Press the SETUP key, then press the Custom button .
Select one of the available features you would like the Custom button to open
Your audio system may differ from those in the illustrations. For further UVO link operations, refer to the Car Multimedia System User's Manual. For further audio system operations, refer to pages 31-34.
Driving while distracted is dangerous and should be avoided. Drivers should remain attentive to driving and always exercise caution when using the audio system controls while driving. To help minimize driver distraction, some audio system functionalities have been modified while the vehicle is in Drive, Reverse or moved out of Park.
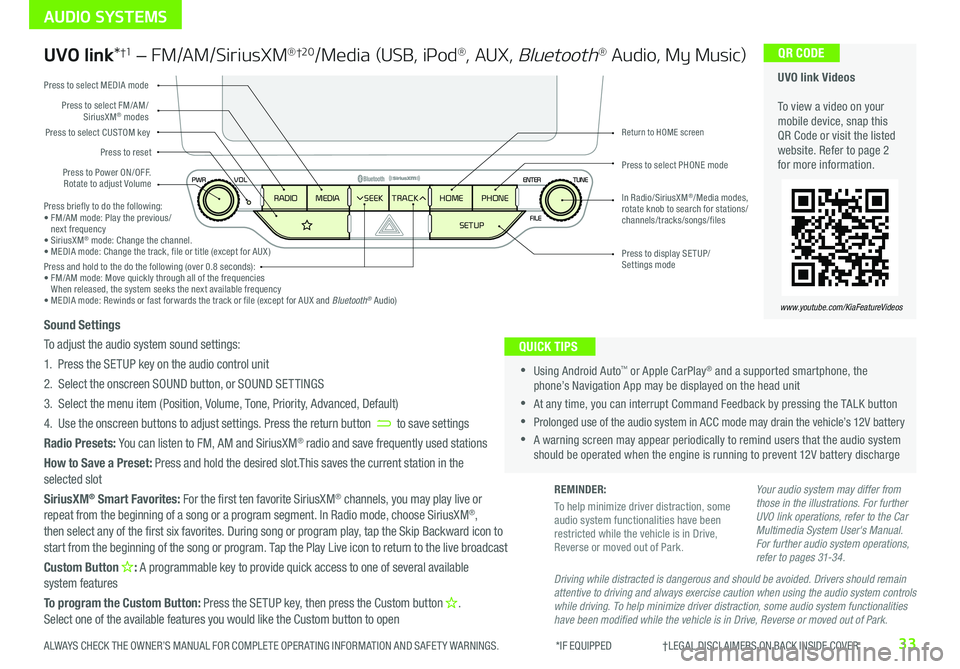
Press to Power ON/OFF . Rotate to adjust Volume
Press to reset
Press to select CUSTOM key
Press to select PHONE mode
Press to select FM/AM/SiriusXM® modes
Press to select MEDIA mode
Press to display SE TUP/Settings mode
Return to HOME screen
In Radio/SiriusXM®/Media modes, rotate knob to search for stations/ channels/tracks/songs/files
HOME
SETUP
SEEK
TRACK
MEDIA
RADIO PHONEPress briefly to do the following:• FM/AM mode: Play the previous/ next frequency• SiriusXM® mode: Change the channel .• MEDIA mode: Change the track, file or title (except for AUX )Press and hold to the do the following (over 0 .8 seconds):• FM/AM mode: Move quickly through all of the frequencies When released, the system seeks the next available frequency• MEDIA mode: Rewinds or fast forwards the track or file (except for AUX and Bluetooth® Audio)
REMINDER:
To help minimize driver distraction, some audio system functionalities have been restricted while the vehicle is in Drive, Reverse or moved out of Park .
Page 36 of 54
34NIRO EV FEATURES & FUNCTIONS GUIDE*IF EQUIPPED †LEGAL DISCL AIMERS ON BACK INSIDE COVER
AUDIO SYSTEMS
UVO link with Navigation Videos
To view a video on your mobile device, snap this QR Code or visit the listed website . Refer to page 2 for more information .
QR CODE
www.youtube.com/KiaFeatureVideos
UVO link with Navigation*†1,13
– FM/AM/SiriusXM®/Media (USB, iPod®, AUX, Bluetooth® Au d io)
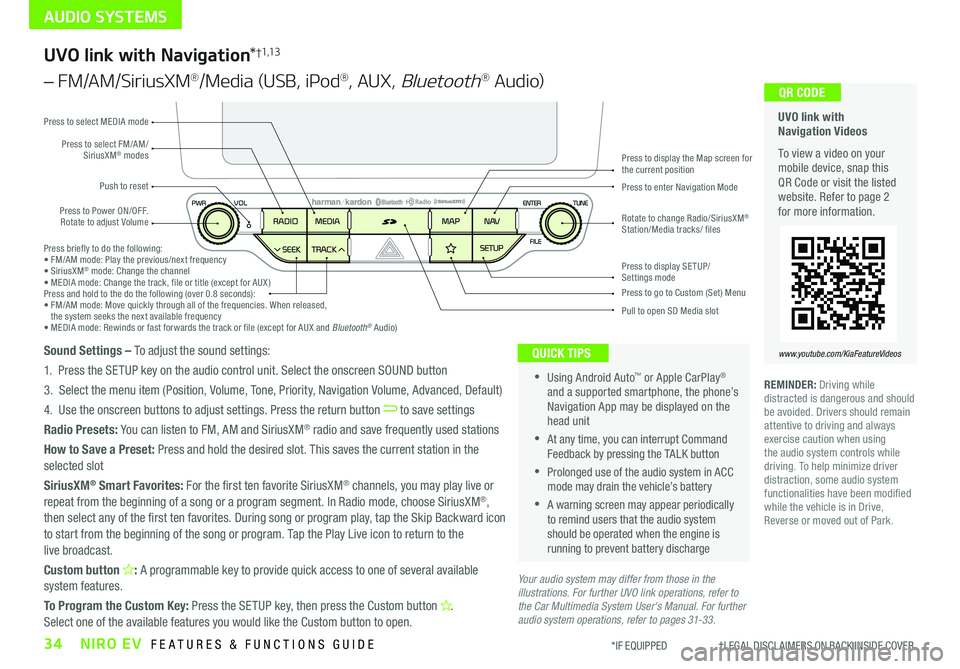
Press to Power ON/OFF . Rotate to adjust Volume
Press to enter Navigation Mode
Press to select FM/AM/SiriusXM® modes
Push to reset
Press to select MEDIA mode
Press to display SE TUP/Settings mode
Press to display the Map screen for the current position
Press to go to Custom (Set) Menu
Pull to open SD Media slot
Rotate to change Radio/SiriusXM® Station/Media tracks/ files
•Using Android Auto™ or Apple CarPlay® and a supported smartphone, the phone’s Navigation App may be displayed on the head unit
•At any time, you can interrupt Command Feedback by pressing the TALK button
•Prolonged use of the audio system in ACC mode may drain the vehicle’s battery
•A warning screen may appear periodically to remind users that the audio system should be operated when the engine is running to prevent battery discharge
QUICK TIPSSound Settings – To adjust the sound settings:
1 . Press the SETUP key on the audio control unit . Select the onscreen SOUND button
3 . Select the menu item (Position, Volume, Tone, Priority, Navigation Volume, Advanced, Default)
4 . Use the onscreen buttons to adjust settings . Press the return button to save settings
Radio Presets: You can listen to FM, AM and SiriusXM® radio and save frequently used stations
How to Save a Preset: Press and hold the desired slot . This saves the current station in the selected slot
SiriusXM® Smart Favorites: For the first ten favorite SiriusXM® channels, you may play live or repeat from the beginning of a song or a program segment . In Radio mode, choose SiriusXM®, then select any of the first ten favorites . During song or program play, tap the Skip Backward icon to start from the beginning of the song or program . Tap the Play Live icon to return to the live broadcast .
Custom button : A programmable key to provide quick access to one of several available system features .
To Program the Custom Key: Press the SETUP key, then press the Custom button .
Select one of the available features you would like the Custom button to open .
Press briefly to do the following:• FM/AM mode: Play the previous/next frequency• SiriusXM® mode: Change the channel• MEDIA mode: Change the track, file or title (except for AUX )Press and hold to the do the following (over 0 .8 seconds):• FM/AM mode: Move quickly through all of the frequencies . When released, the system seeks the next available frequency• MEDIA mode: Rewinds or fast forwards the track or file (except for AUX and Bluetooth® Audio)
Your audio system may differ from those in the illustrations. For further UVO link operations, refer to the Car Multimedia System User's Manual. For further audio system operations, refer to pages 31-33.
REMINDER: Driving while distracted is dangerous and should be avoided . Drivers should remain attentive to driving and always exercise caution when using the audio system controls while driving . To help minimize driver distraction, some audio system functionalities have been modified while the vehicle is in Drive, Reverse or moved out of Park .
Page 37 of 54
35*IF EQUIPPED ALWAYS CHECK THE OWNER’S MANUAL FOR COMPLETE OPER ATING INFORMATION AND SAFET Y WARNINGS .
Digital Clock
Press the SETUP key on the head unit . Then press the onscreen
Clock icon to enter clock settings . Follow the onscreen options to
adjust the clock settings .
• Daylight Savings must be enabled or disabled in the Clock Settings screen
• To access manual date and time setting, turn GPS Time OFF in the Clock Settings (UVO link / UVO link with Navigation*)
QUICK TIPS
USB/iPod® Port & Power Outlets*
The power outlets are inactive when ignition is in the OFF position .
QUICK TIP
REMINDERS:
• Using the power outlets (accessory plugs) for prolonged periods of time with the POWER button in the ACC position (Power OFF ) may cause the 12V battery to discharge
• Only use cables made by your device manufacturer . Third party cables may damage your device
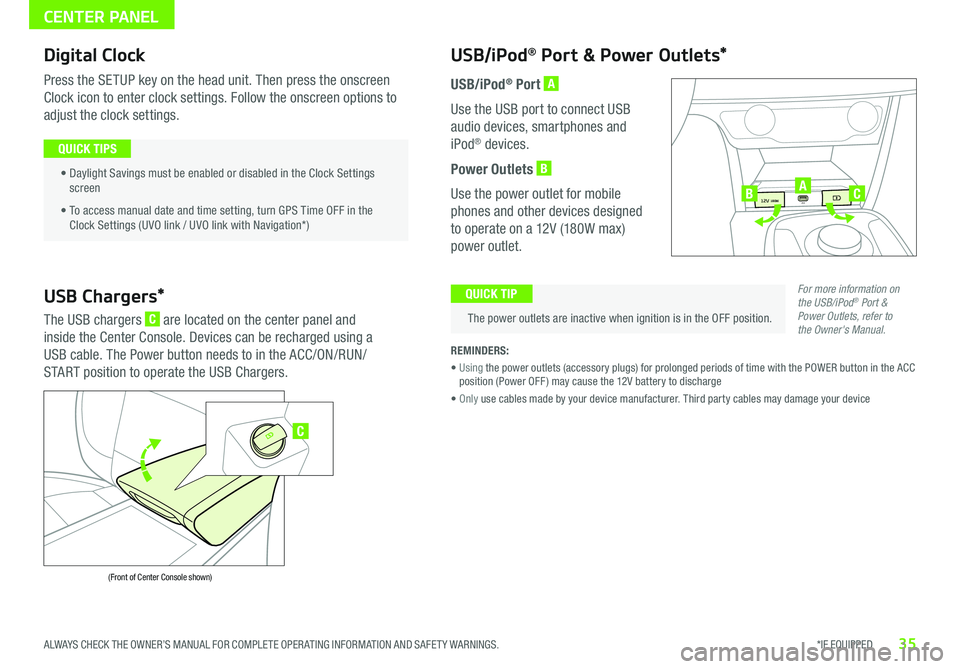
USB/iPod® Port A
Use the USB port to connect USB
audio devices, smartphones and
iPod® devices .
Power Outlets B
Use the power outlet for mobile
phones and other devices designed
to operate on a 12V (180W max)
power outlet .
USB Chargers*
The USB chargers C are located on the center panel and
inside the Center Console . Devices can be recharged using a
USB cable . The Power button needs to in the ACC/ON/RUN/
START position to operate the USB Chargers .
(Front of Center Console shown)
For more information on the USB/iPod® Port & Power Outlets, refer to the Owner's Manual.
CENTER PANEL
C
USB
12V 180W
12V 180W
12V 180WUSBABC
Page 47 of 54
45ALWAYS CHECK THE OWNER’S MANUAL FOR COMPLETE OPER ATING INFORMATION AND SAFET Y WARNINGS . *IF EQUIPPED †LEGAL DISCL AIMERS ON BACK INSIDE COVER
N
PRELEASE
AUTO
HOLD
D
R
DRIVE
MODE
P
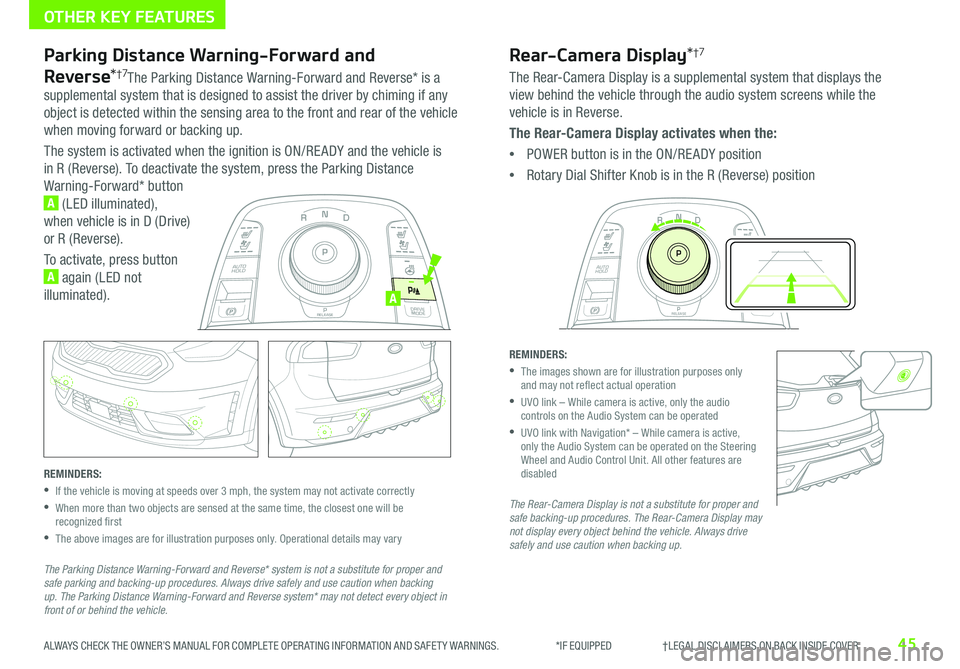
Parking Distance Warning-Forward and
Reverse*†7The Parking Distance Warning-Forward and Reverse* is a
supplemental system that is designed to assist the driver by chiming if any
object is detected within the sensing area to the front and rear of the vehicle
when moving forward or backing up .
The system is activated when the ignition is ON/RE ADY and the vehicle is
in R (Reverse) . To deactivate the system, press the Parking Distance
Warning-Forward* button
A (LED illuminated),
when vehicle is in D (Drive)
or R (Reverse) .
To activate, press button
A again (LED not
illuminated) .
REMINDERS:
•If the vehicle is moving at speeds over 3 mph, the system may not activate correctly
•
When more than two objects are sensed at the same time, the closest one will be recognized first
•
The above images are for illustration purposes only . Operational details may vary
The Parking Distance Warning-Forward and Reverse* system is not a substitute for proper and safe parking and backing-up procedures. Always drive safely and use caution when backing up. The Parking Distance Warning-Forward and Reverse system* may not detect every object in front of or behind the vehicle.
Rear-Camera Display*†7
The Rear-Camera Display is a supplemental system that displays the
view behind the vehicle through the audio system screens while the
vehicle is in Reverse .
The Rear-Camera Display activates when the:
•POWER button is in the ON/RE ADY position
•Rotary Dial Shifter Knob is in the R (Reverse) position
REMINDERS:
•
The images shown are for illustration purposes only and may not reflect actual operation
•
UVO link – While camera is active, only the audio controls on the Audio System can be operated
•
UVO link with Navigation* – While camera is active, only the Audio System can be operated on the Steering Wheel and Audio Control Unit . All other features are disabled
The Rear-Camera Display is not a substitute for proper and safe backing-up procedures. The Rear-Camera Display may not display every object behind the vehicle. Always drive safely and use caution when backing up.
OTHER KEY FEATURES
N
P
PRELEASE
AUTO
HOLD
DRIVE
MODE
D
R
A