reset KIA NIRO PHEV 2020 Navigation System Quick Reference Guide
[x] Cancel search | Manufacturer: KIA, Model Year: 2020, Model line: NIRO PHEV, Model: KIA NIRO PHEV 2020Pages: 235, PDF Size: 6.13 MB
Page 6 of 235
4
Component names and functions
Control panel
0000AThe system shape and menu arrangement may differ depending on the vehicle model and specifications.
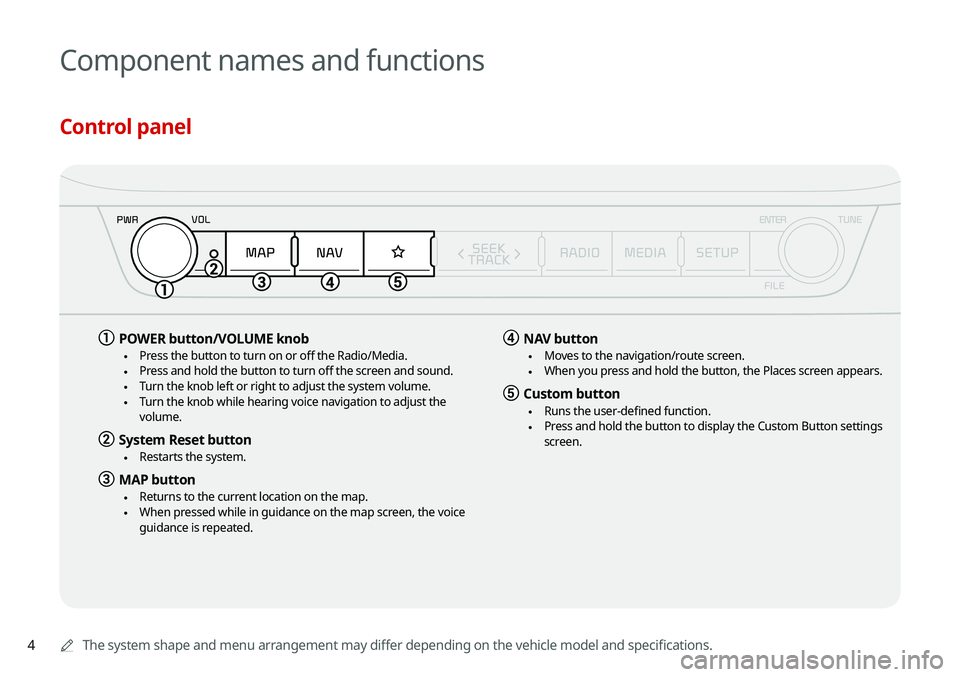
a POWER button/VOLUME knob
\225Press the button to turn on or off the Radio/Media. \225Press and hold the button to turn off the screen and sound. \225Turn the knob left or right to adjust the system volume. \225Turn the knob while hearing voice navigation to adjust the
volume.
b System Reset button
\225Restarts the system.
c MAP button
\225Returns to the current location on the map. \225When pressed while in guidance on the map screen, the voice
guidance is repeated.
d NAV button
\225Moves to the navigation/route screen. \225When you press and hold the button, the Places screen appears.
e Custom button
\225Runs the user-defined function. \225Press and hold the button to display the Custom Button settings
screen.
Page 22 of 235
10
Configuring the sound settings 9-11
Position 9-11
Volume 9-12
Advanced 9-12
Tone 9-13
Priority 9-13
Navigation Volume 9-14
Reset 9-15
Turning on/off the screen touch sound 9-15
Configuring the voice recognition settings 9-15
Use Network 9-16
Guidance 9-16
Configuring the navigation settings 9-16
Display 9-16
Guidance 9-18
Traffic 9-18
Volume Control 9-19
Reset 9-19
Configuring the UVO settings 9-20
Activate UVO 9-20
911 Connect 9-20
Modem Information 9-21
Modem Status 9-21
09 Settings
Configuring the vehicle settings 9-2
Drive Mode 9-2
Climate 9-3
Lights 9-4
Seat/Steering Wheel 9-5
Configuring the device connection settings 9-6
Bluetooth 9-6
Android Auto 9-7
Apple CarPlay 9-7
Configuring the advanced system settings 9-8
Return to Map: Set Time 9-8
TUNE Knob Function 9-8
Custom Button ☆ 9-9
Steering Wheel MODE Button 9-9
Home Screen 9-9
Split Screen 9-10
My Data 9-10
Extend Rear Camera Use 9-10
Page 23 of 235
11
10 Appendix
Solutions 10-2
System status indicator icons 10-9
FAQ 10-11
Product specifications 10-13
Important information 10-17
Index 10-20
Trademarks 10-25
Open Source Information 10-26
Configuring the general system settings 9-22
Date/Time 9-22
Language 9-23
Keyboard 9-23
Screen Saver 9-24
SW Info/Update 9-24
System Info 9-25
Configuring the display settings 9-26
Mode 9-26
Illumination 9-27
Blue Light Filter 9-27
Reset 9-28
Configuring the media settings 9-28
Media Change Notifications 9-28
Repeat Folder 9-29
Updating the system software and map 9-29
Page 27 of 235
1-3
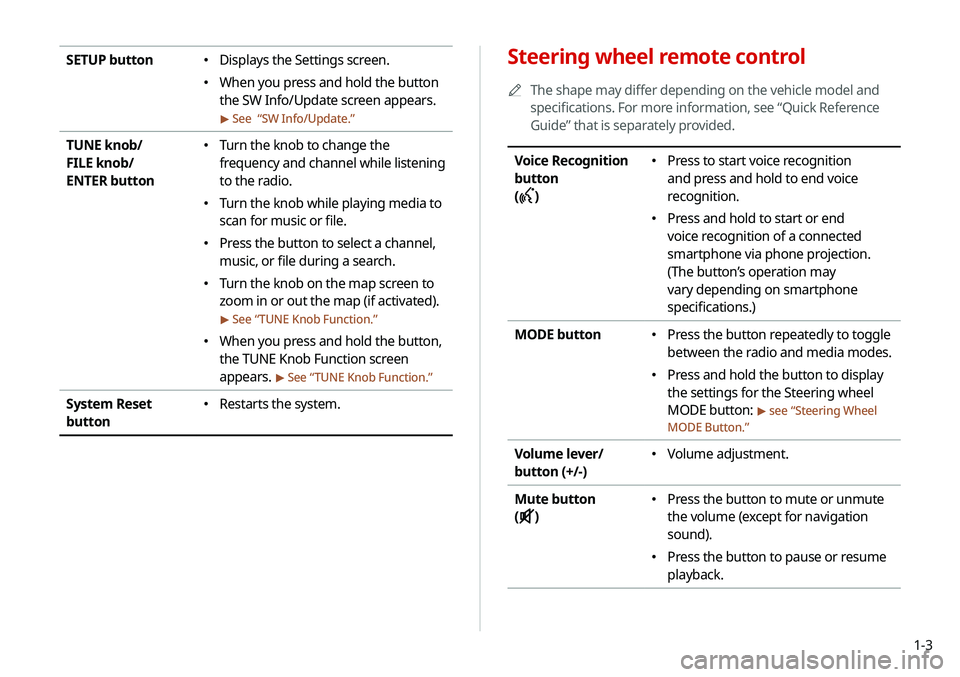
Steering wheel remote control
0000
A
The shape may differ depending on the vehicle model and
specifications. For more information, see “Quick Reference
Guide” that is separately provided.
Voice Recognition
button
(
)
000E Press to start voice recognition
and press and hold to end voice
recognition.
000EPress and hold to start or end
voice recognition of a connected
smartphone via phone projection.
(The button’s operation may
vary depending on smartphone
specifications.)
MODE button
000E Press the button repeatedly to toggle
between the radio and media modes.
000EPress and hold the button to display
the settings for the Steering wheel
MODE button:
> see “
Steering Wheel
MODE Button.”
Volume lever/
button (+/-) 000E Volume adjustment.
Mute button
(
)
000E Press the button to mute or unmute
the volume (except for navigation
sound).
000EPress the button to pause or resume
playback.
SETUP button 000EDisplays the Settings screen.
000EWhen you press and hold the button
the SW Info/Update screen appears.
> See “
SW Info/Update.”
TUNE knob/
FILE knob/
ENTER button 000E Turn the knob to change the
frequency and channel while listening
to the radio.
000ETurn the knob while playing media to
scan for music or file.
000EPress the button to select a channel,
music, or file during a search.
000ETurn the knob on the map screen to
zoom in or out the map (if activated).
> See “
TUNE Knob Function.”
000E When you press and hold the button,
the TUNE Knob Function screen
appears.
> See “
TUNE Knob Function.”
System Reset
button 000E Restarts the system.
Page 35 of 235
1-11
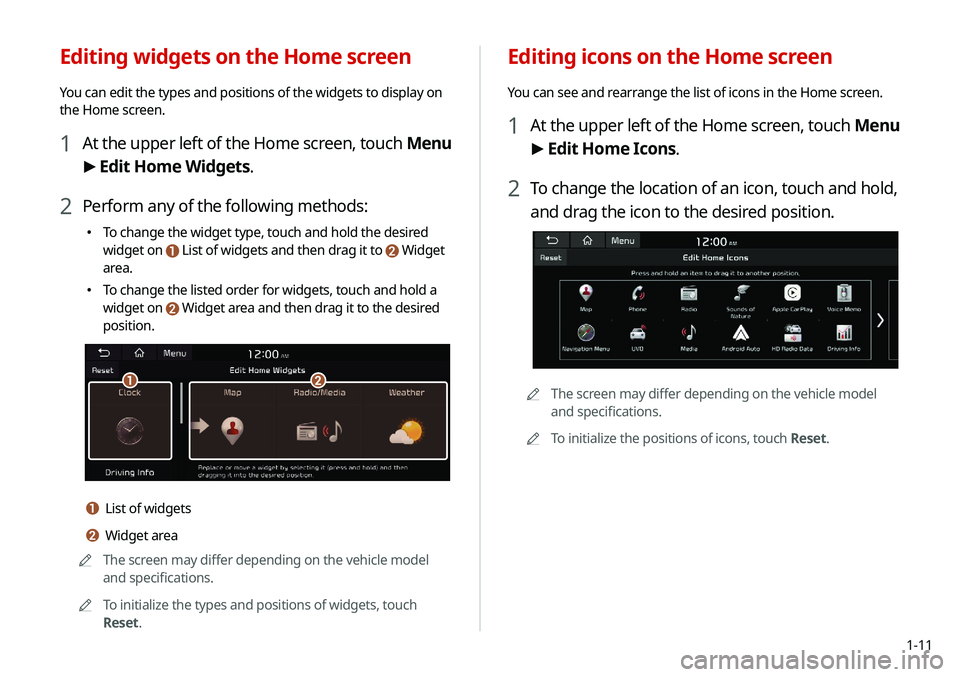
Editing icons on the Home screen
You can see and rearrange the list of icons in the Home screen.
1 At the upper left of the Home screen, touch Menu
> Edit Home Icons.
2 To change the location of an icon, touch and hold,
and drag the icon to the desired position.
0000A
The screen may differ depending on the vehicle model
and specifications.
0000
A
To initialize the positions of icons, touch Reset.
Editing widgets on the Home screen
You can edit the types and positions of the widgets to display on
the Home screen.
1 At the upper left of the Home screen, touch Menu
>
Edit Home Widgets.
2 Perform any of the following methods:
000E To change the widget type, touch and hold the desired
widget on
List of widgets and then drag it to Widget
area.
000ETo change the listed order for widgets, touch and hold a
widget on
Widget area and then drag it to the desired
position.
\037\036
a List of widgets
b Widget area
0000
A
The screen may differ depending on the vehicle model
and specifications.
0000
A
To initialize the types and positions of widgets, touch
Reset.
Page 53 of 235
2-15
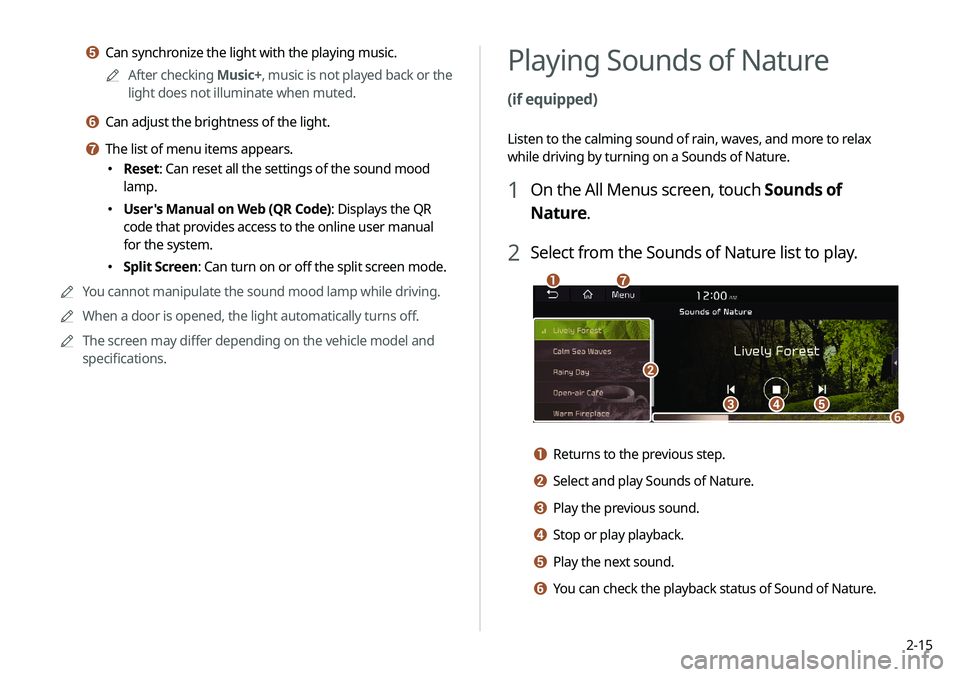
Playing Sounds of Nature
(if equipped)
Listen to the calming sound of rain, waves, and more to relax
while driving by turning on a Sounds of Nature.
1 On the All Menus screen, touch Sounds of
Nature.
2 Select from the Sounds of Nature list to play.
\037\036\035
\034\033
\032
\031
a Returns to the previous step.
b Select and play Sounds of Nature.
c Play the previous sound.
d Stop or play playback.
e Play the next sound.
f You can check the playback status of Sound of Nature.
e Can synchronize the light with the playing music.0000
A
After checking Music+, music is not played back or the
light does not illuminate when muted.
f Can adjust the brightness of the light.
g The list of menu items appears.
000E Reset: Can reset all the settings of the sound mood
lamp.
000EUser's Manual on Web (QR Code): Displays the QR
code that provides access to the online user manual
for the system.
000ESplit Screen: Can turn on or off the split screen mode.
0000
A
You cannot manipulate the sound mood lamp while driving.
0000
A
When a door is opened, the light automatically turns off.
0000
A
The screen may differ depending on the vehicle model and
specifications.
Page 61 of 235
2-23
Using the charging management
features
(PHEV only)
You can set to automatically charge the battery according to the
preset departure time. In addition, you can set to automatically
charge the battery according to the options for off-peak electricity
time and off-peak charging priority.
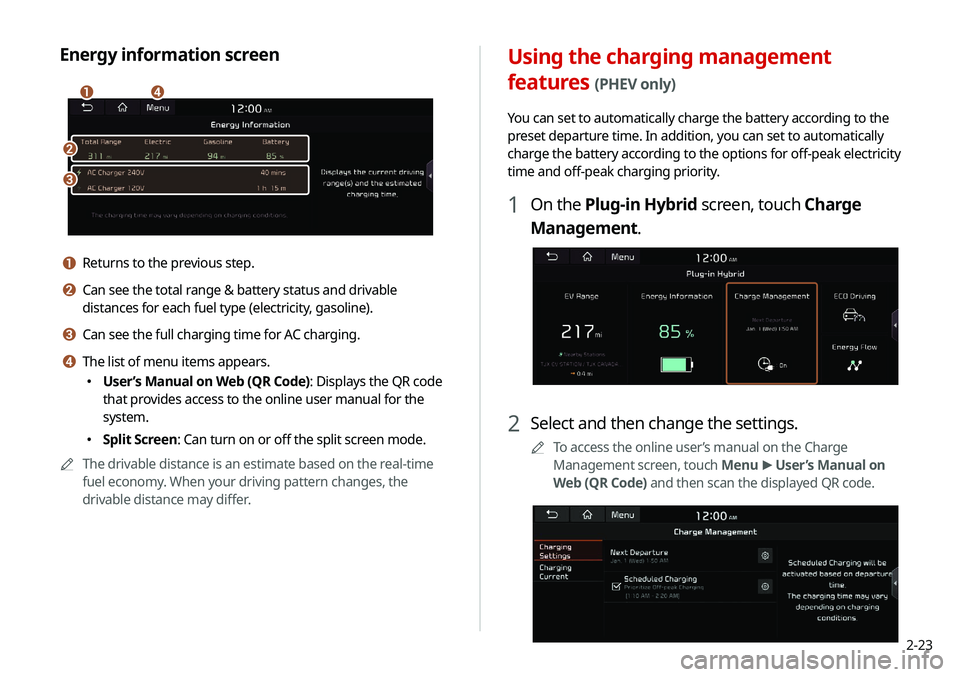
1 On the Plug-in Hybrid screen, touch Charge
Management.
2 Select and then change the settings.
0000
A
To access the online user’s manual on the Charge
Management screen, touch Menu >
User’s Manual on
Web (QR Code) and then scan the displayed QR code.
Energy information screen
\037
\036
\035\034
a Returns to the previous step.
b Can see the total range & battery status and drivable
distances for each fuel type (electricity, gasoline).
c Can see the full charging time for AC charging.
d The list of menu items appears.
000E User’s Manual on Web (QR Code): Displays the QR code
that provides access to the online user manual for the
system.
000ESplit Screen: Can turn on or off the split screen mode.
0000
A
The drivable distance is an estimate based on the real-time
fuel economy. When your driving pattern changes, the
drivable distance may differ.
Page 64 of 235
2-26
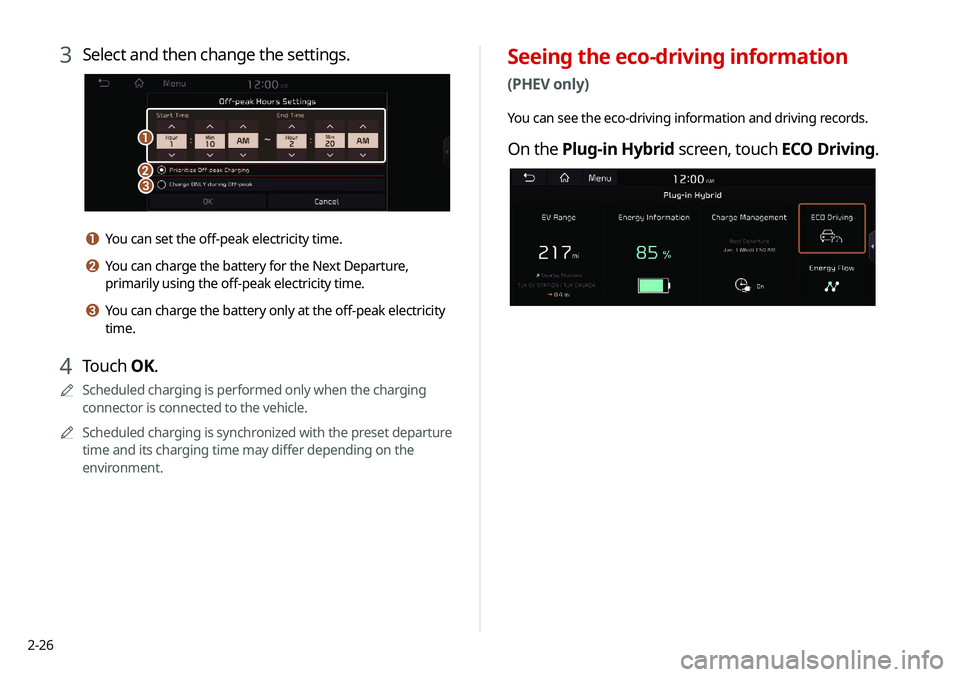
Seeing the eco-driving information
(PHEV only)
You can see the eco-driving information and driving records.
On the Plug-in Hybrid screen, touch ECO Driving.
3 Select and then change the settings.
\037
\036\035
a You can set the off-peak electricity time.
b You can charge the battery for the Next Departure,
primarily using the off-peak electricity time.
c You can charge the battery only at the off-peak electricity
time.
4 Touch OK.
0000
A
Scheduled charging is performed only when the charging
connector is connected to the vehicle.
0000
A
Scheduled charging is synchronized with the preset departure
time and its charging time may differ depending on the
environment.
Page 70 of 235
3-2
Listening to the radio
You can scan radio channels by using various options. Save your
favorite channels to the presets list.
Perform any of the following methods:
000EOn the All Menus screen, touch Radio.
000EOn the control panel, press the [
RADIO] button.
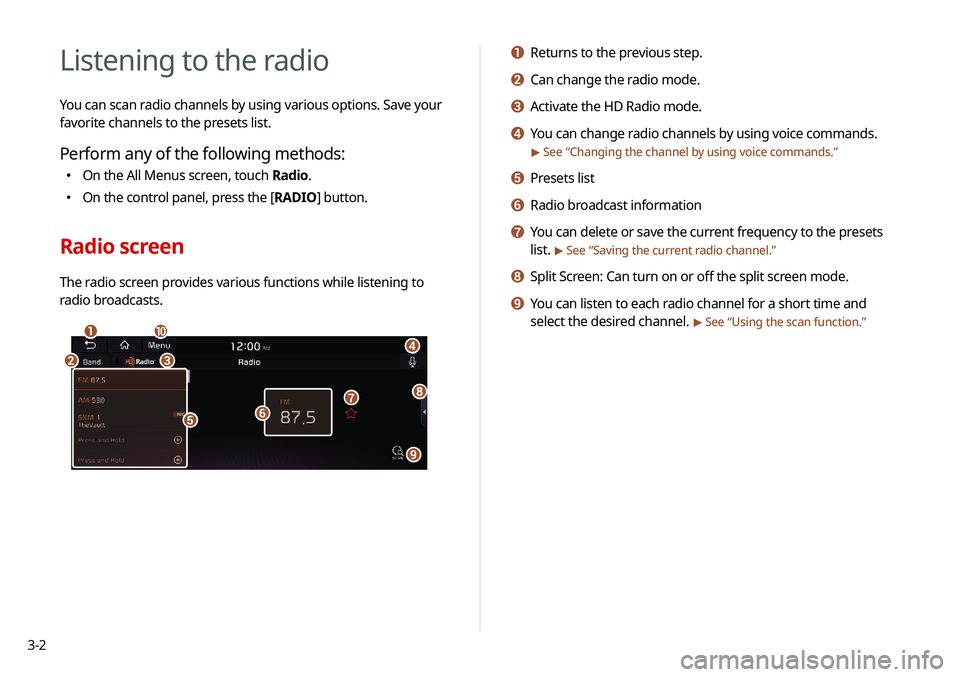
Radio screen
The radio screen provides various functions while listening to
radio broadcasts.
\037
\036\035
\034
\033\032
\031
\030
\027
\026
a Returns to the previous step.
b Can change the radio mode.
c Activate the HD Radio mode.
d You can change radio channels by using voice commands.
> See “Changing the channel by using voice commands.”
e Presets list
f Radio broadcast information
g You can delete or save the current frequency to the presets
list.
> See “Saving the current radio channel.”
h Split Screen: Can turn on or off the split screen mode.
i You can listen to each radio channel for a short time and
select the desired channel.
> See “Using the scan function.”
Page 71 of 235
3-3
\335Warning
Driving while distracted can result in a loss of vehicle control
that may lead to an accident, severe bodily injury, or death. The
driver's primary responsibility is the safe and legal operation of
the vehicle, and the use of any vehicle systems, including the
touch screen and steering wheel controls, which take the driver's
eyes, attention, and focus away from the safe operation of the
vehicle, or which are not permissible by law, should never be used
during the operation of the vehicle.
j The list of menu items appears.
000EEnter Station: Can select or directly enter the desired
radio frequency.
000EStation List: Can see the list of available radio stations.
000EInfo: Turns the Radio text information transmitted from
the broadcasting station on and off.
000EReorder Presets: Can change the location of a channel by
dragging on the presets list.
> See “
Changing the order of
registered channels.”
000E Delete Presets: Can delete a registered channel from the
presets list.
> See “
Deleting a registered channel.”
000E Set Number of Presets: Used to set the number of
channels to display on the preset list.
> See “
Changing the
number of channels to display on the preset list.”
000E Sound Settings: Can configure system sound settings.
> See “
Configuring the sound settings.”
000E User's Manual on Web (QR Code): Displays the QR code
that provides access to the online user manual for the
system.
000ESplit Screen: Can turn on or off the split screen mode.
0000
A
The broadcast station names and local information are
displayed using GPS data. Those information may not appear
when there is no GPS data received.
0000
A
The displayed broadcast station names may not match the
actual ones.