schedule KIA NIRO PHEV 2020 Owners Manual
[x] Cancel search | Manufacturer: KIA, Model Year: 2020, Model line: NIRO PHEV, Model: KIA NIRO PHEV 2020Pages: 687, PDF Size: 11.43 MB
Page 10 of 687

H8
Scheduled Charging
(if equipped)
You can set reserved chargingusing the Infotainment System.
Refer to the Infotainment System
for detailed information about set-
ting reserved charging.
Scheduled charging can only be done when using a AC Charger or
the portable charging cable (ICCB:
In-Cable Control Box).
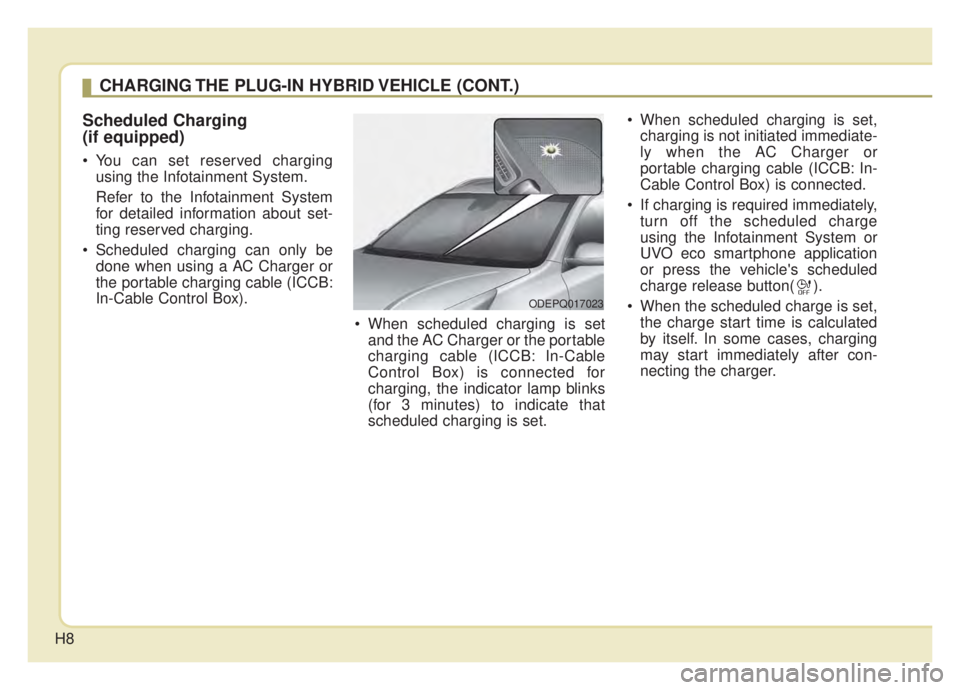
When scheduled charging is setand the AC Charger or the portable
charging cable (ICCB: In-Cable
Control Box) is connected for
charging, the indicator lamp blinks
(for 3 minutes) to indicate that
scheduled charging is set. When scheduled charging is set,
charging is not initiated immediate-
ly when the AC Charger or
portable charging cable (ICCB: In-
Cable Control Box) is connected.
If charging is required immediately, turn off the scheduled charge
using the Infotainment System or
UVO eco smartphone application
or press the vehicle's scheduled
charge release button( ).
When the scheduled charge is set, the charge start time is calculated
by itself. In some cases, charging
may start immediately after con-
necting the charger.
CHARGING THE PLUG-IN HYBRID VEHICLE (CONT.)
ODEPQ017023
Page 11 of 687

H9
If you press the scheduled chargingdeactivation ( ) button to immedi-
ately charge the battery, charging
must be initiated 3 minutes after the
charging cable has been connected.
When you press the scheduled
charging deactivation ( ) button
for immediate charging, the sched-
uled charge setting is not com-
pletely deactivated. If you need to
completely deactivate the sched-
uled charge setting, use the
Infotainment System to finalize the
deactivation. Refer to "AC Charge or Trickle
Charge" for details about connect-
ing the AC Charger and the
portable charger (ICCB: In-Cable
Control Box).
Charging Precautions
ODEPQ019022
OJFHPQ016021L
\b
AC Charger
WARNING
-
Fires caused by dust or
water
Do not connect the charging
cable connector plug to the vehi-
cle if there is water or dust on the
charging inlet. Connecting while
there is water or dust on the
charging cable connector and
plug may cause a fire or electric
shock.
Page 15 of 687

H13
7. Check if the charging cable con-nection indicator of the high volt-
age battery in the instrument clus-
ter is turned ON.
Charging does not occur when the
indicator is OFF. When the charg-
ing connector is not connected
properly, reconnect the charging
cable to charge.
✽ ✽ NOTICE
• Charging is in progress only when
the shift lever is in P (Park).
Charging the battery with the
Engine Start/Stop button in the
ACC position is possible. However,
it may discharge the 12-V battery.
Thus, if possible, charge the bat-
tery with the Engine Start/Stop
button in the OFF position.
• The charging process is interrupt- ed temporarily when the shift lever
is moved from P (Park) to Not P(R
(Reverse)/N (Neutral)/D (Drive))
during charging. To resume(restart)
charging, move the shift lever to the
P (park) position. Then, the charging
process is resumed(restarted).
8. After charging has started, the
estimated charging time is dis-
played on the instrument cluster
for about 1 minute. It is also dis-
played, when the driver’s door is
opened with charging in progress.
When scheduled charging is set,
the estimated charging time is dis-
played as “--” .
ODEPQ017028L
ODEPQ019027
ODEPQ019125
\bType A
\bType B
Page 21 of 687

H19
10. Check if the charging cable con-nection indicator of the high volt-
age battery in the instrument
cluster is turned ON. Charging does not occur when the
indicator is OFF. When the charg-
ing connector is not connected
properly, reconnect the charging
cable to charge.
✽ ✽
NOTICE
• The charging is in progress only
with the shift lever is in P (Park).
Charging the battery with the
Engine Start/Stop button in the
ACC position is possible. However,
it may discharge the 12-V battery.
Thus, if possible, charge the bat-
tery with the Engine Start/Stop
button in the OFF position.
• Moving the shift lever from P (Park) to R (Reverse)/N(Neutral)/D
(Drive) stops the charging process.
To restart the charging process,
move the shift lever to P (Park),
press the Engine Start/Stop button
to the OFF position, and discon-
nect the charging cable. Then,
connect the charging cable and
restart the vehicle again.
11. After charging has started, the
estimated charging time is dis-
played on the instrument cluster
for about 1 minute. It is also dis-
played, when the driver’s door is
opened with charging in progress.
When scheduled charging is set,
the estimated charging time is dis-
played as "--".
ODEPQ019027
ODEPQ019125
\bType A
\bType BODEPQ017028L
Page 29 of 687

H27
Action to be taken when
charging stops abruptly
When the high voltage battery does
not charge, check the followings:
1. Check the charging setting for thevehicle.
(e.g. When scheduled charging is
set, charging is not initiated imme-
diately when the AC charger or
portable charger (ICCB: In-Cable
Control Box) is connected.)
2. Check the operation status of AC charger, portable charger.
(Charging Status Indicator Lamp
for Portable Charger, refer to
“Checking Charging Status” for
trickle charge in this chapter.)
❈ Actual method for indicating the
charging status may vary in accor-
dance with the charger manufac-
turer.
3. When the vehicle does not charge and a warning message appears
on the cluster, check the corre-
sponding message. Refer to “LCD
Display Messages”, in this chap-
ter. 4. If the vehicle is properly charged
when charged with another nor-
mally working charger, contact the
charger manufacturer.
5. If the vehicle does not charge when charged with another nor-
mally working charger, we recom-
mend that you contact an author-
ized Kia dealer.
Page 62 of 687

Your vehicle at a glance
42
INTERIOR OVERVIEW
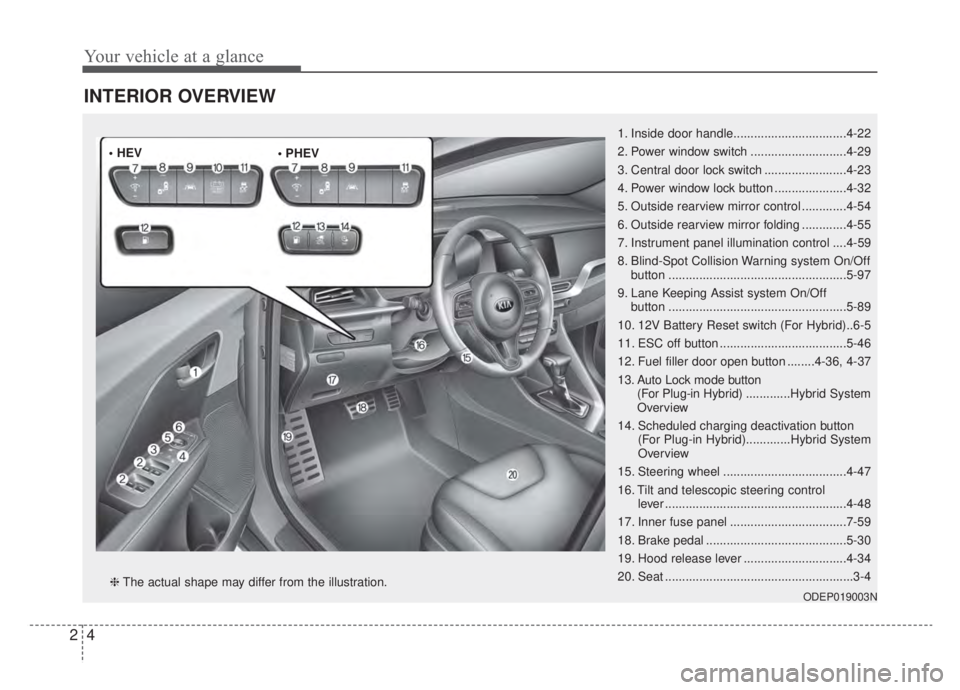
1. Inside door handle.................................4-22
2. Power window switch ............................4-29
3. Central door lock switch ........................4-23
4. Power window lock button .....................4-32
5. Outside rearview mirror control .............4-54
6. Outside rearview mirror folding .............4-55
7. Instrument panel illumination control ....4-59
8. Blind-Spot Collision Warning system On/Offbutton ....................................................5-97
9. Lane Keeping Assist system On/Off button ....................................................5-89
10. 12V Battery Reset switch (For Hybrid)..6-5
11. ESC off button .....................................5-46
12. Fuel filler door open button ........4-36, 4-37
13. Auto Lock mode button (For Plug-in Hybrid) .............Hybrid System
Overview
14. Scheduled charging deactivation button (For Plug-in Hybrid).............Hybrid System
Overview
15. Steering wheel ....................................4-47
16. Tilt and telescopic steering control lever .....................................................4-48
17. Inner fuse panel ..................................7-59
18. Brake pedal .........................................5-30
19. Hood release lever ..............................4-34
20. Seat .......................................................3-4
ODEP019003N❈ The actual shape may differ from the illustration.
• HEV
Page 67 of 687

33
Safety features of your vehicle
ONLY use your mobile devicewhen allowed by laws and when
conditions permit safe use. NEVER
text or email while driving. Most
states have laws prohibiting drivers
from texting. Some states and
cities also prohibit drivers from
using handheld phones.
NEVER let the use of a mobile device distract you from driving.
You have a responsibility to your
passengers and others on the road
to always drive safely, with your
hands on the wheel as well as your
eyes and attention on the road.Control your speed
Excessive speed is a major factor in
crash injuries and deaths. Generally,
the higher the speed, the greater the
risk, but serious injuries can also
occur at lower speeds. Never drive
faster than is safe for current condi-
tions, regardless of the maximum
speed posted.
Keep your vehicle in safe con-
dition
Having a tire blowout or a mechani-
cal failure can be extremely haz-
ardous. To reduce the possibility of
such problems, check your tire pres-
sures and condition frequently, and
perform all regularly scheduled
maintenance.
Page 281 of 687

Features of your vehicle
144
4
Climate control air filter
(if equipped)
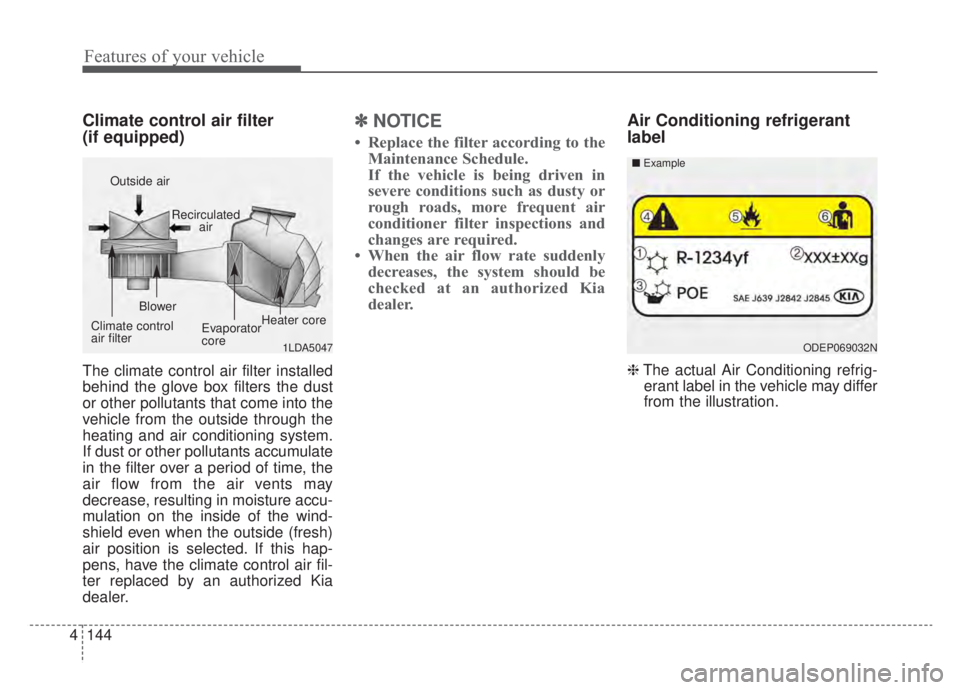
The climate control air filter installed
behind the glove box filters the dust
or other pollutants that come into the
vehicle from the outside through the
heating and air conditioning system.
If dust or other pollutants accumulate
in the filter over a period of time, the
air flow from the air vents may
decrease, resulting in moisture accu-
mulation on the inside of the wind-
shield even when the outside (fresh)
air position is selected. If this hap-
pens, have the climate control air fil-
ter replaced by an authorized Kia
dealer.
✽ ✽
NOTICE
• Replace the filter according to the
Maintenance Schedule.
If the vehicle is being driven in
severe conditions such as dusty or
rough roads, more frequent air
conditioner filter inspections and
changes are required.
• When the air flow rate suddenly decreases, the system should be
checked at an authorized Kia
dealer.
Air Conditioning refrigerant
label
❈ The actual Air Conditioning refrig-
erant label in the vehicle may differ
from the illustration.
1LDA5047
Outside air
Recirculatedair
Climate control
air filter Blower
Evaporator
coreHeater core
ODEP069032N
■
Example
Page 477 of 687

5167
Driving your vehicle
Your vehicle's fuel economy depends
mainly on your style of driving, where
you drive and when you drive.
Each of these factors affects how
many miles (kilometers) you can get
from a gallon (liter) of fuel. To operate
your vehicle as economically as pos-
sible, use the following driving sug-
gestions to help save money in both
fuel and repairs:
Drive smoothly. Accelerate at amoderate rate. Don't make "jack-
rabbit" starts or full-throttle shifts
and maintain a steady cruising
speed. Don't race between stop-
lights. Try to adjust your speed to
the traffic so you don't have to
change speeds unnecessarily.
Avoid heavy traffic whenever pos- sible. Always maintain a safe dis-
tance from other vehicles so you
can avoid unnecessary braking.
This also reduces brake wear.
Drive at a moderate speed. The faster you drive, the more fuel your
vehicle uses. Driving at a moderate
speed, especially on the highway,
is one of the most effective ways to
reduce fuel consumption. Don't "ride" the brake pedal. This
can increase fuel consumption and
also increase wear on these com-
ponents. In addition, driving with
your foot resting on the brake pedal
may cause the brakes to overheat,
which reduces their effectiveness
and may lead to more serious con-
sequences.
Take care of your tires. Keep them inflated to the recommended pres-
sure. Incorrect inflation, either too
much or too little, results in unnec-
essary tire wear. Check the tire
pressures at least once a month.
Be sure that the wheels are aligned correctly. Improper align-
ment can result from hitting curbs
or driving too fast over irregular
surfaces. Poor alignment causes
faster tire wear and may also result
in other problems as well as
greater fuel consumption. Keep your vehicle in good condi-
tion. For better fuel economy and
reduced maintenance costs, main-
tain your vehicle in accordance
with the maintenance schedule in
chapter 8. If you drive your vehicle
in severe conditions, more frequent
maintenance is required (see
chapter 8 for details).
Keep your vehicle clean. For maxi- mum service, your vehicle should
be kept clean and free of corrosive
materials. It is especially important
that mud, dirt, ice, etc. not be
allowed to accumulate on the
underside of the vehicle. This extra
weight can result in increased fuel
consumption and also contribute to
corrosion.
Travel lightly. Don't carry unneces- sary weight in your vehicle. Weight
reduces fuel economy.
Don't let the engine idle longer than necessary. If you are waiting
(and not in traffic), turn off your
engine and restart only when
you're ready to go.
ECONOMICAL OPERATION
Page 478 of 687

Driving your vehicle
168
5
Remember, your vehicle does not
require extended warm-up. After
the engine has started, allow the
engine to run for 10 to 20 seconds
prior to placing the vehicle in gear.
In very cold weather, however, give
your engine a slightly longer warm-
up period.
Don't "lug" or "over-rev" the engine. Lugging is driving too slowly in a
very high gear resulting in engine
bucking. If this happens, shift to a
lower gear. Over-revving is racing
the engine beyond its safe limit.
This can be avoided by shifting at
the recommended speed. Use your air conditioning sparingly.
The air conditioning system is
operated by engine power so your
fuel economy is reduced when you
use it.
Opening windows at high speeds can reduce fuel economy.
Fuel economy is less in crosswinds and headwinds. To help offset
some of this loss, slow down when
driving in these conditions.
Keeping a vehicle in good operating
condition is important both for econ-
omy and safety. Therefore, have an
authorized Kia dealer perform
scheduled inspections and mainte-
nance.
WARNING - Engine off during motion
Never turn the engine off to
coast down hills or anytime the
vehicle is in motion. The power
steering and power brakes will
not function properly without
the engine running.
In addition, turning off the
engine start/stop button while
driving could engage the steer-
ing wheel lock, resulting in loss
of vehicle steering. Keep the
engine on and downshift to an
appropriate gear for an engine
braking effect.