reset KIA NIRO PHEV 2020 Quick Start Guide Base Audio
[x] Cancel search | Manufacturer: KIA, Model Year: 2020, Model line: NIRO PHEV, Model: KIA NIRO PHEV 2020Pages: 134, PDF Size: 4.4 MB
Page 8 of 134
6
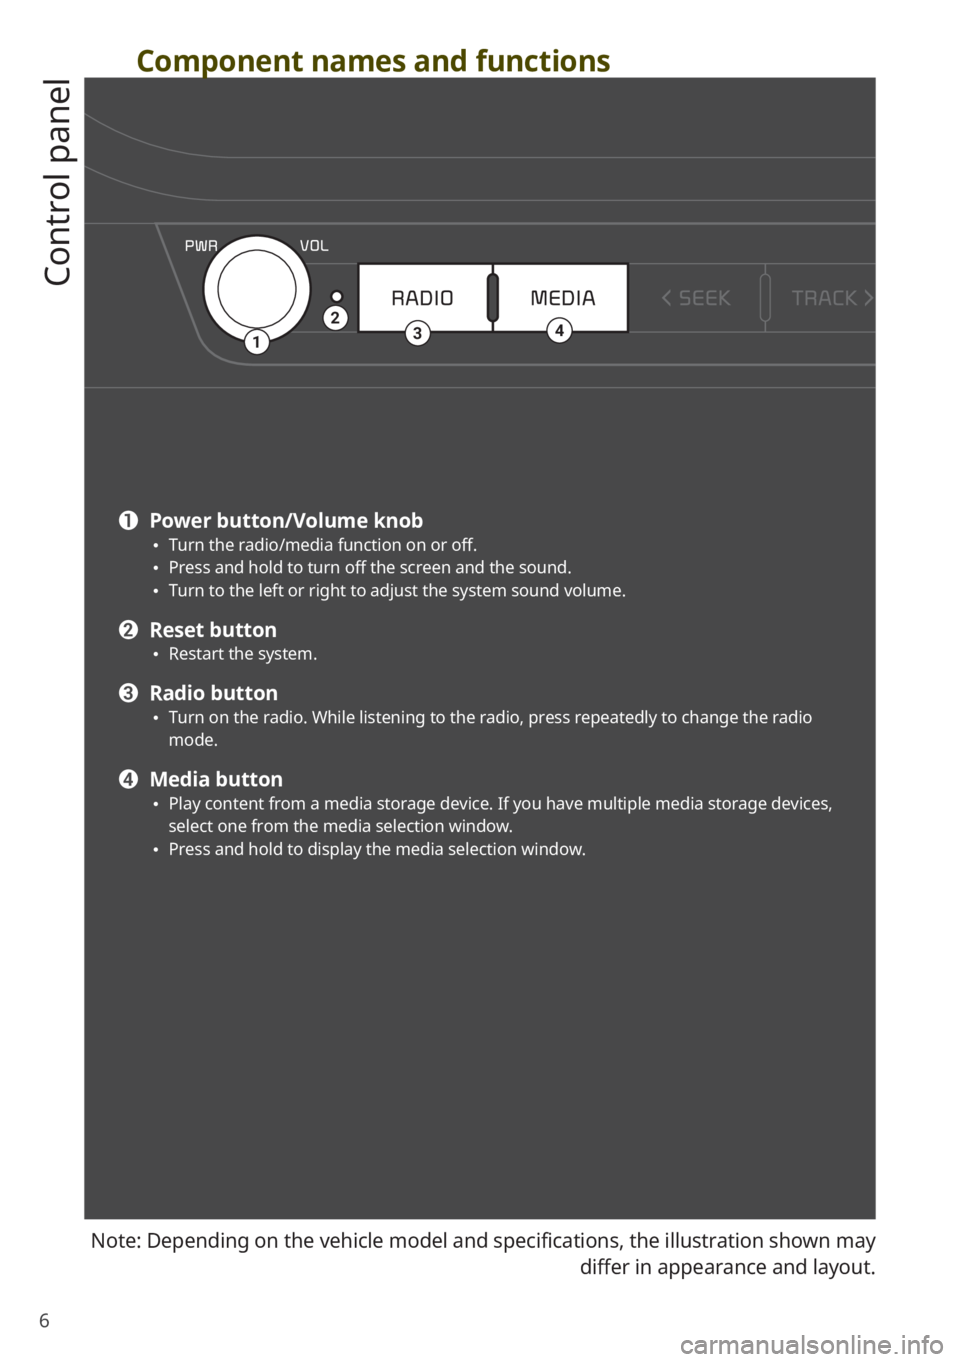
Component names and functions
Control panel
Note: Depending on the vehicle model and specifications, the illustration shown may
differ in appearance and layout.
1342
a Power button/Volume knob 0024Turn the radio/media function on or off. 0024Press and hold to turn off the screen and the sound. 0024Turn to the left or right to adjust the system sound volume.
b Reset button 0024Restart the system.
c Radio button 0024Turn on the radio. While listening to the radio, press repeatedly to change the radio mode.
d Media button 0024Play content from a media storage device. If you have multiple media storage devices, select one from the media selection window. 0024Press and hold to display the media selection window.
Page 18 of 134
4
1 System overview
Component names and functions 1-2
Control panel 1-2
Steering wheel remote control 1-4
Turning the system on or off 1-5
Turning on the system 1-5
Turning off the system 1-6
Using the touch screen 1-6
Getting to know the Home screen 1-8
Getting familiar with the Home screen
layout 1-8
Changing the Home screen widgets 1-9
Changing the Home screen menu
icons 1-9
Getting to know the All Menus
screen 1-10
Getting familiar with the All Menus
screen layout 1-10
Rearranging the All Menus screen 1-11
2 Useful functions
Using phone projection 2-2
Connecting your Android smartphone
via Android Auto 2-3
Connecting your iPhone via Apple
CarPlay 2-5
Getting to know the driving
assistance screen 2-7
Rear view screen 2-7
Using the climate control system (if
equipped) 2-8
Viewing driving information (if
equipped) 2-9
Viewing UVO notices (if equipped) 2-10
Using the Hybrid menu (hybrid
electric vehicles only) 2-10
Starting the Hybrid menu 2-10
Viewing fuel economy information 2-11
Viewing the energy flow 2-11
Using the Plug-in Hybrid menu (plug-
in hybrid electric vehicles only) 2-14
Starting the Plug-in Hybrid menu 2-14
Viewing energy information 2-14
Using the charging management
features 2-15
Viewing eco-driving information 2-17
Viewing the energy flow 2-18
3 Radio
Listening to the radio 3-2
Turning on the radio 3-2
Changing the radio mode 3-3
Scanning for available radio stations 3-4
Searching for radio stations 3-4
Saving radio stations 3-5
Listening to saved radio stations 3-5
Rearranging the preset list 3-5
Deleting saved radio stations 3-5
Changing the number of radio stations
on the preset list 3-6
Listening to HD Radio™ (if equipped) 3-6
Listening to SiriusXM™ radio (if
equipped) 3-7
Starting SiriusXM radio 3-7
Searching for SiriusXM radio channels 3-9
Selecting radio channels by using
channel numbers 3-9
Viewing the program schedule 3-10
Listening to Featured Favorites
channels 3-10
Contents
Page 20 of 134
6
Configuring the sound settings 8-9
Advanced 8-9
Position 8-10
Volume 8-11
Tone 8-11
Priority 8-11
Reset 8-12
Touch sound (Beep) 8-12
Configuring the display settings 8-12
Mode 8-12
Illumination 8-13
Blue Light Filter 8-14
Reset 8-14
Configuring the UVO settings (if
equipped) 8-15
Activate UVO 8-15
911 Connect 8-15
Modem Information 8-15
Modem Status 8-15
9 Appendix
Troubleshooting 9-2
Sound and display 9-2
USB playback 9-3
Bluetooth connection 9-4
Phone projection 9-5
System operation 9-6
System status icons 9-7
FAQ 9-8
Product specifications 9-12
Important information 9-16
Index 9-17
Trademarks 9-21
Open Source Information 9-21
Page 22 of 134
1-2
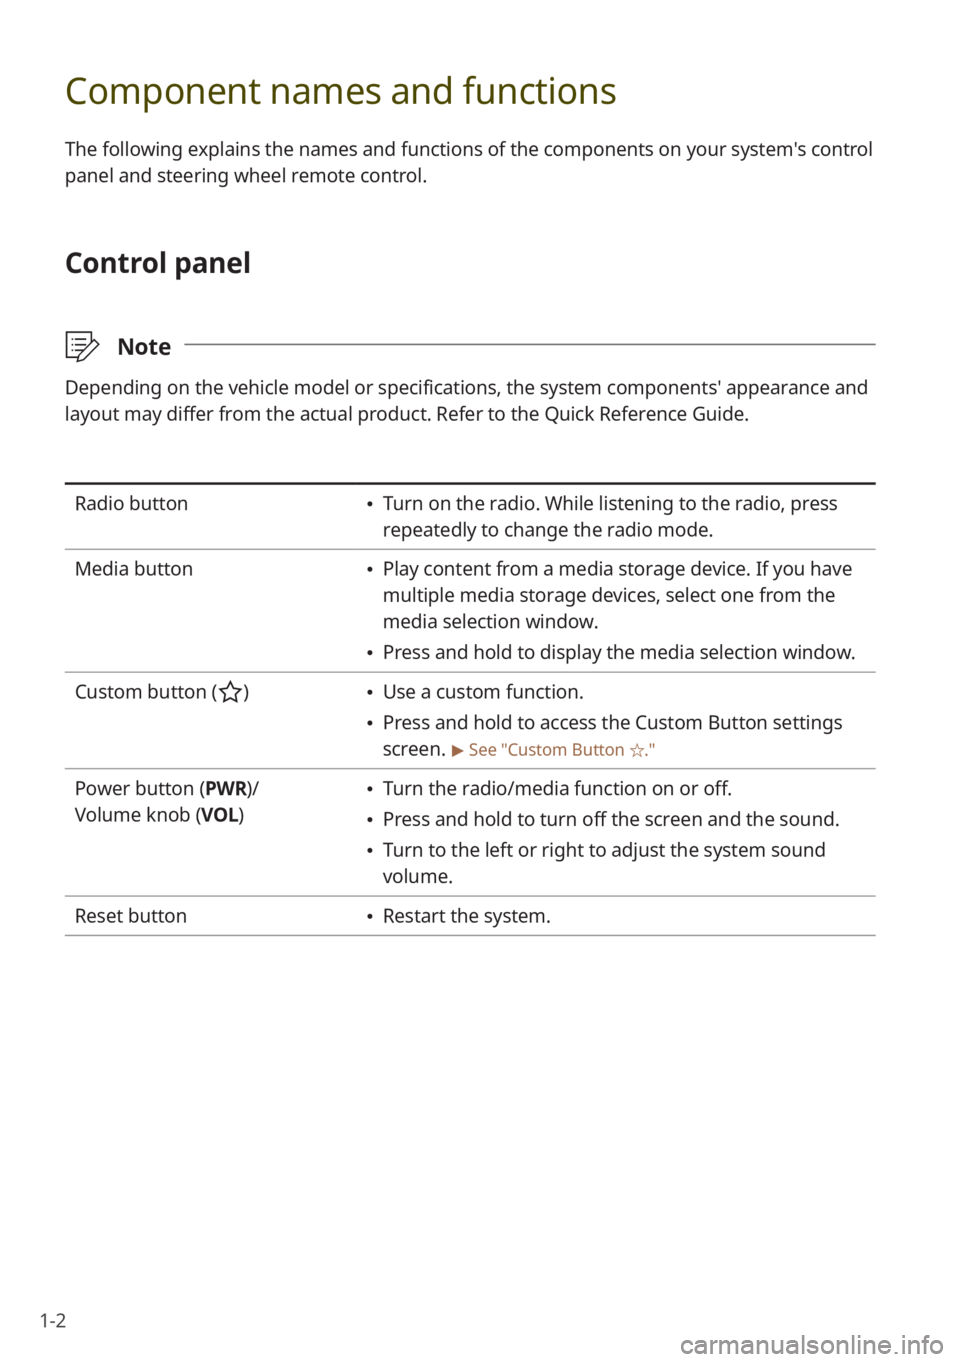
Component names and functions
The following explains the names and functions of the components on your system's control
panel and steering wheel remote control.
Control panel
\333Note
Depending on the vehicle model or specifications, the system components'\
appearance and
layout may differ from the actual product. Refer to the Quick Reference Guide.
Radio button Turn on the radio. While listening to the radio, press
repeatedly to change the radio mode.
Media button
Play content from a media storage device. If you have
multiple media storage devices, select one from the
media selection window.
Press and hold to display the media selection window.
Custom button (
) Use a custom function.
Press and hold to access the Custom Button settings
screen.
> See ″Custom Button ☆.″
Power button (PWR)/
Volume knob (VOL ) Turn the radio/media function on or off.
Press and hold to turn off the screen and the sound.
Turn to the left or right to adjust the system sound
volume.
Reset button
Restart the system.
Page 29 of 134
1-9
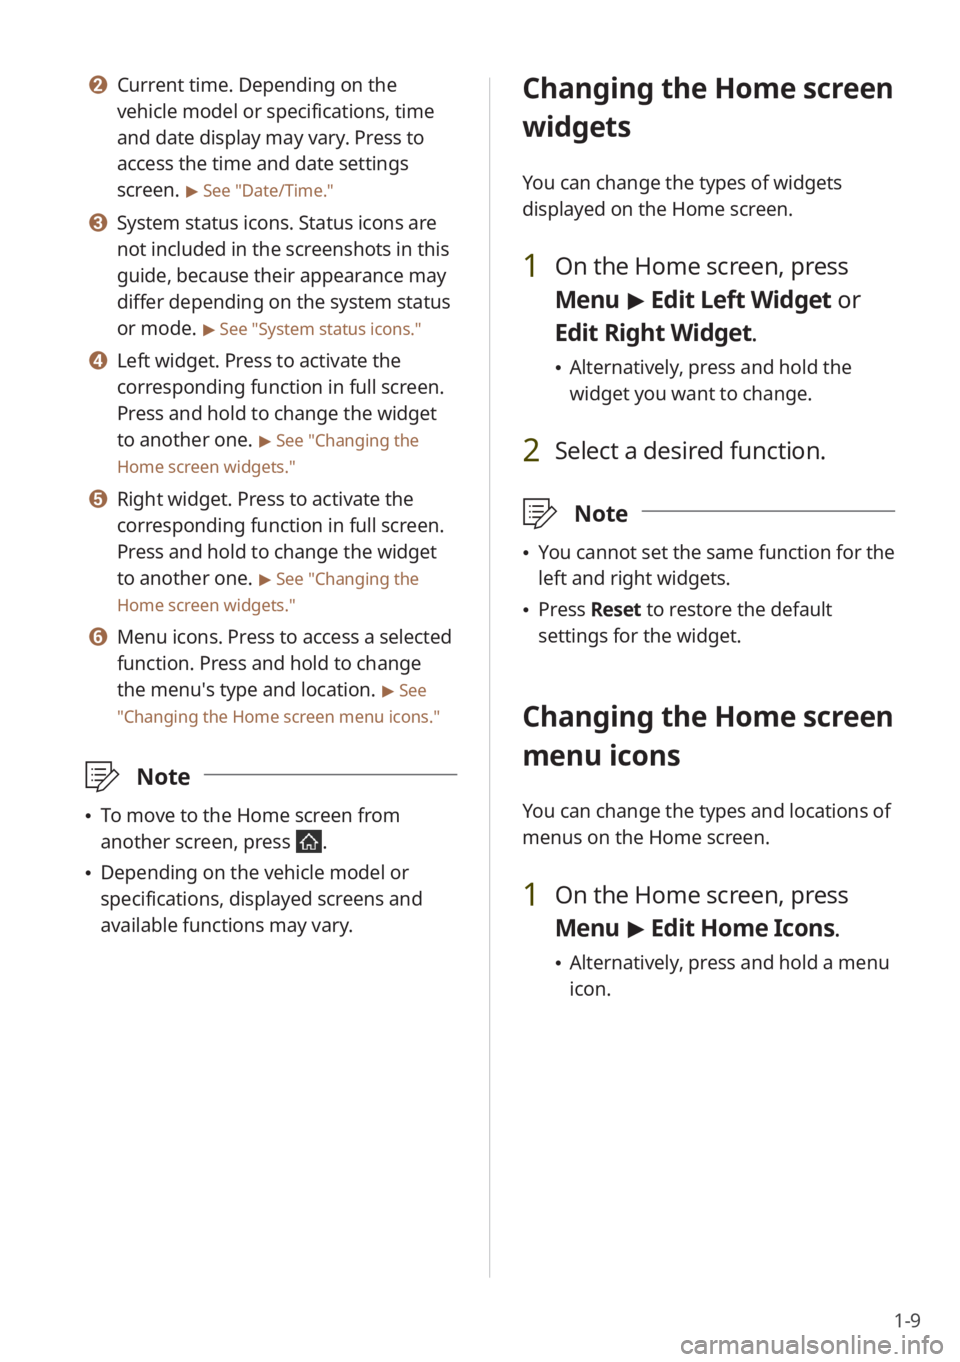
b Current time. Depending on the
vehicle model or specifications, time
and date display may vary. Press to
access the time and date settings
screen.
> See ″Date/Time.″
c System status icons. Status icons are
not included in the screenshots in this
guide, because their appearance may
differ depending on the system status
or mode.
> See ″System status icons.″
d Left widget. Press to activate the
corresponding function in full screen.
Press and hold to change the widget
to another one.
> See ″Changing the
Home screen widgets.″
e Right widget. Press to activate the
corresponding function in full screen.
Press and hold to change the widget
to another one.
> See ″Changing the
Home screen widgets.″
f Menu icons. Press to access a selected
function. Press and hold to change
the menu′s type and location.
> See
″ Changing the Home screen menu icons.″
\333 Note
To move to the Home screen from
another screen, press
.
Depending on the vehicle model or
specifications, displayed screens and
available functions may vary.
Changing the Home screen
widgets
You can change the types of widgets
displayed on the Home screen.
1 On the Home screen, press
Menu > Edit Left Widget or
Edit Right Widget.
Alternatively, press and hold the
widget you want to change.
2 Select a desired function.
\333 Note
You cannot set the same function for the
left and right widgets.
Press Reset to restore the default
settings for the widget.
Changing the Home screen
menu icons
You can change the types and locations of
menus on the Home screen.
1 On the Home screen, press
Menu > Edit Home Icons.
Alternatively, press and hold a menu
icon.
Page 30 of 134
1-10
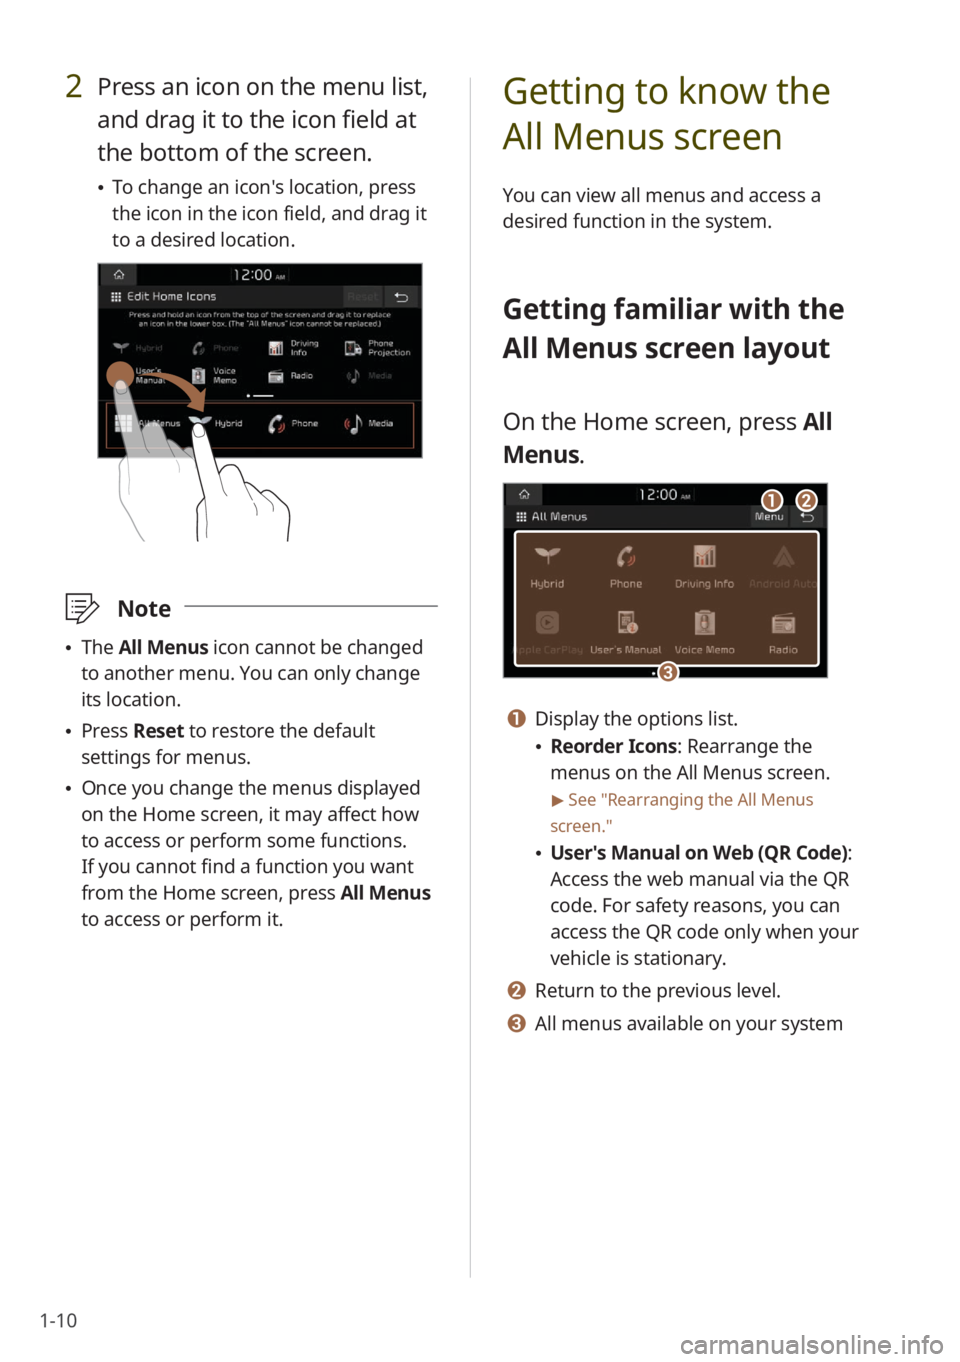
2 Press an icon on the menu list,
and drag it to the icon field at
the bottom of the screen.
To change an icon′s location, press
the icon in the icon field, and drag it
to a desired location.
\333 Note
The All Menus icon cannot be changed
to another menu. You can only change
its location.
Press Reset to restore the default
settings for menus.
Once you change the menus displayed
on the Home screen, it may affect how
to access or perform some functions.
If you cannot find a function you want
from the Home screen, press All Menus
to access or perform it.
Getting to know the
All Menus screen
You can view all menus and access a
desired function in the system.
Getting familiar with the
All Menus screen layout
On the Home screen, press All
Menus.
ab
c
a Display the options list.
Reorder Icons: Rearrange the
menus on the All Menus screen.
> See ″Rearranging the All Menus
screen.″
User′s Manual on Web (QR Code) :
Access the web manual via the QR
code. For safety reasons, you can
access the QR code only when your
vehicle is stationary.
b Return to the previous level.
c All menus available on your system
Page 31 of 134
1-11
Rearranging the All Menus
screen
Rearrange the menus on the All Menus
screen.
1 On the Home screen, press All
Menus.
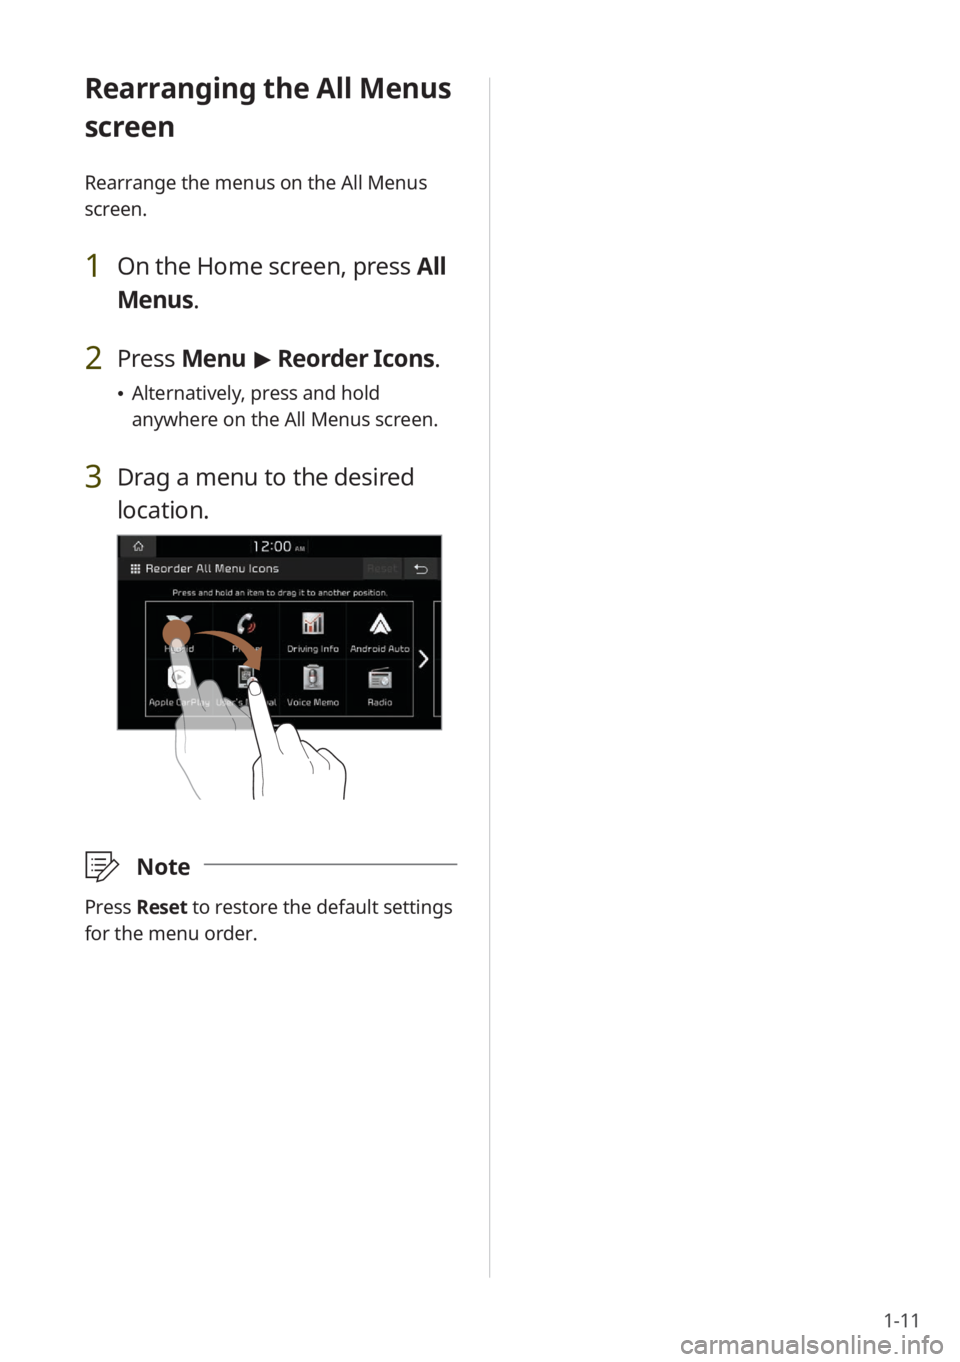
2 Press Menu > Reorder Icons.
Alternatively, press and hold
anywhere on the All Menus screen.
3 Drag a menu to the desired
location.
\333 Note
Press Reset to restore the default settings
for the menu order.
Page 43 of 134
2-11
\333Note
The fuel efficiency graphs will be
updated every two and a half minutes.
When the engine is stopped, the
fuel efficiency graphs will be reset
automatically. However, the average
fuel efficiency value will not be reset.
Viewing the energy flow
You can view the energy flow between the
engine, the electric motor, and the battery
according to your vehicle′s driving status.
1 On the Home screen, press
All Menus > Hybrid > Energy
Flow.
2 View the current energy flow
according to the vehicle′s
driving status.
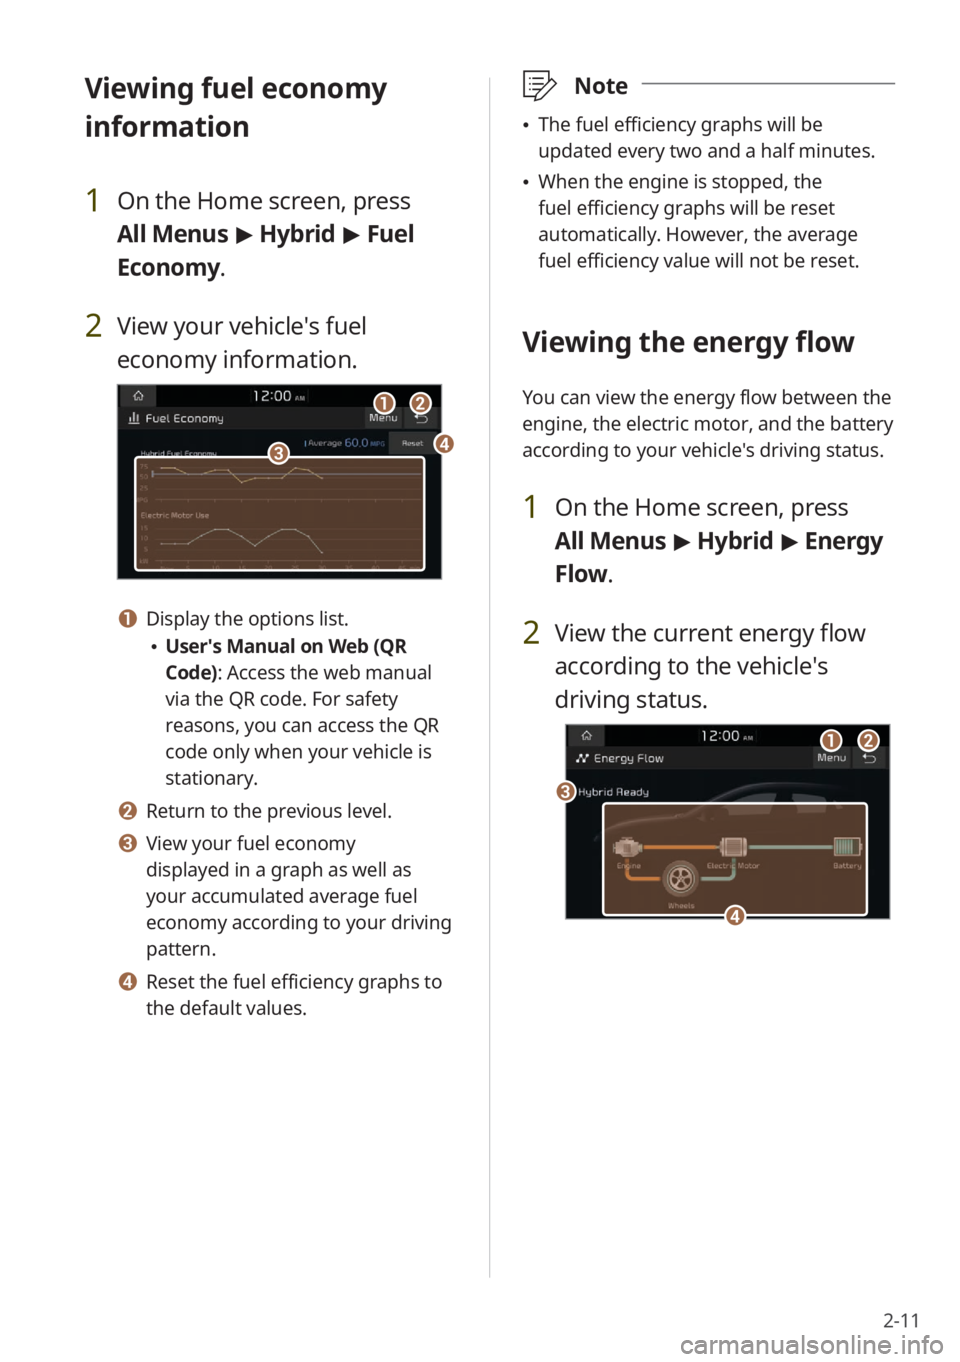
c
ab
d
Viewing fuel economy
information
1 On the Home screen, press
All Menus > Hybrid > Fuel
Economy.
2 View your vehicle′s fuel
economy information.
a
cd
b
a Display the options list.
User′s Manual on Web (QR
Code): Access the web manual
via the QR code. For safety
reasons, you can access the QR
code only when your vehicle is
stationary.
b Return to the previous level.
c View your fuel economy
displayed in a graph as well as
your accumulated average fuel
economy according to your driving
pattern.
d Reset the fuel efficiency graphs to
the default values.
Page 47 of 134
2-15
a Display the options list.
User′s Manual on Web (QR
Code): Access the web manual
via the QR code. For safety
reasons, you can access the QR
code only when your vehicle is
stationary.
b Return to the previous level.
c View the current battery status and
drivable distance.
d View the estimated time until
your vehicle is fully charged by AC
charging.
\333 Note
The drivable distance is an estimate based
on the real-time fuel efficiency. If your
driving pattern changes, the estimated
drivable distance will change accordingly.
Using the charging
management features
You can schedule battery charges
according to a preset departure time.
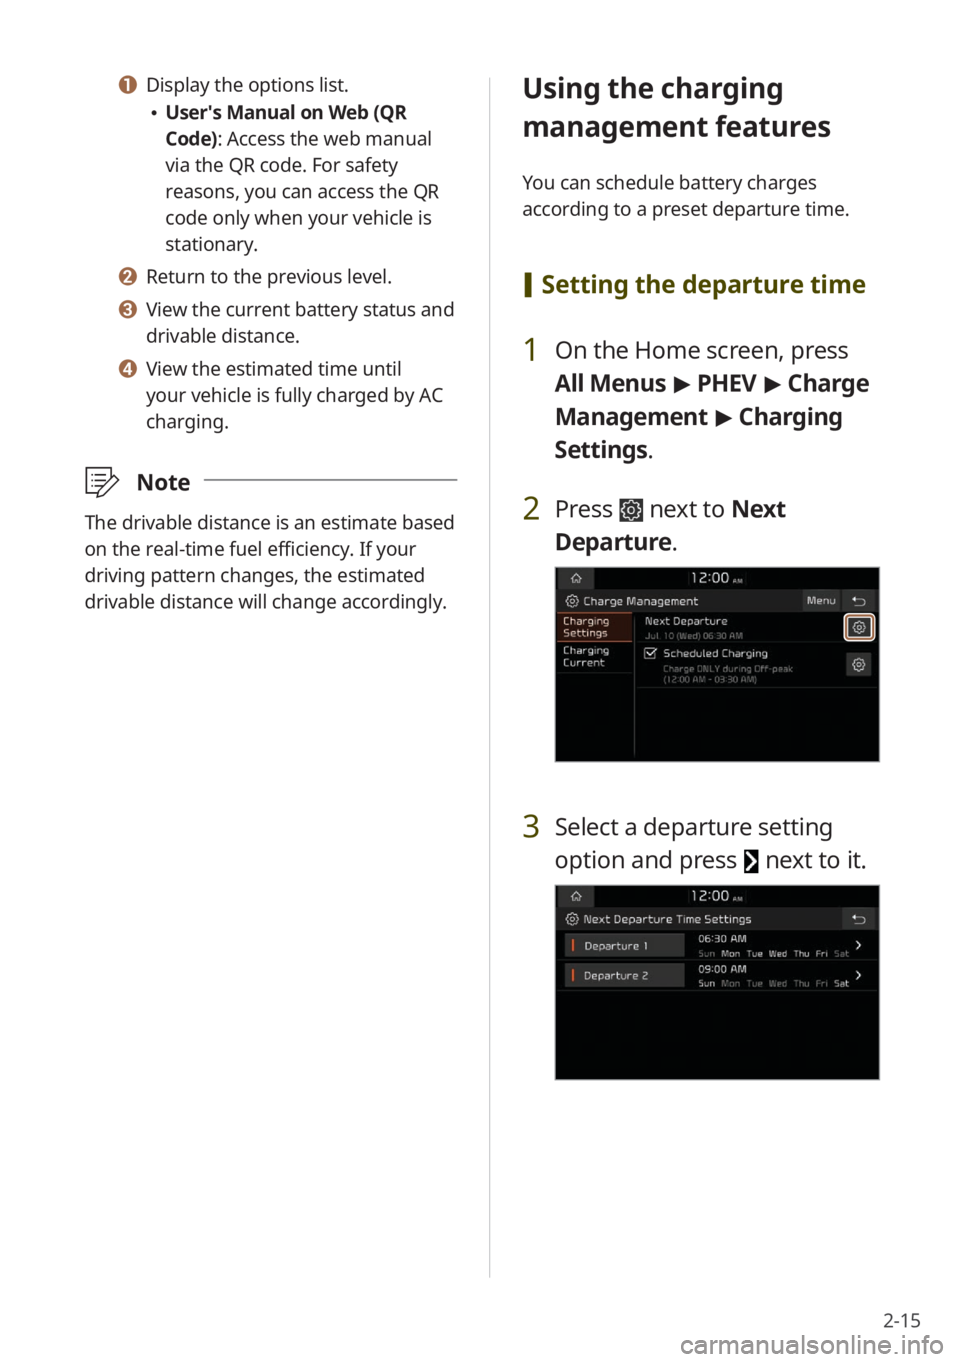
[Setting the departure time
1 On the Home screen, press
All Menus > PHEV > Charge
Management > Charging
Settings.
2 Press next to Next
Departure.
3 Select a departure setting
option and press
next to it.
Page 48 of 134
2-16
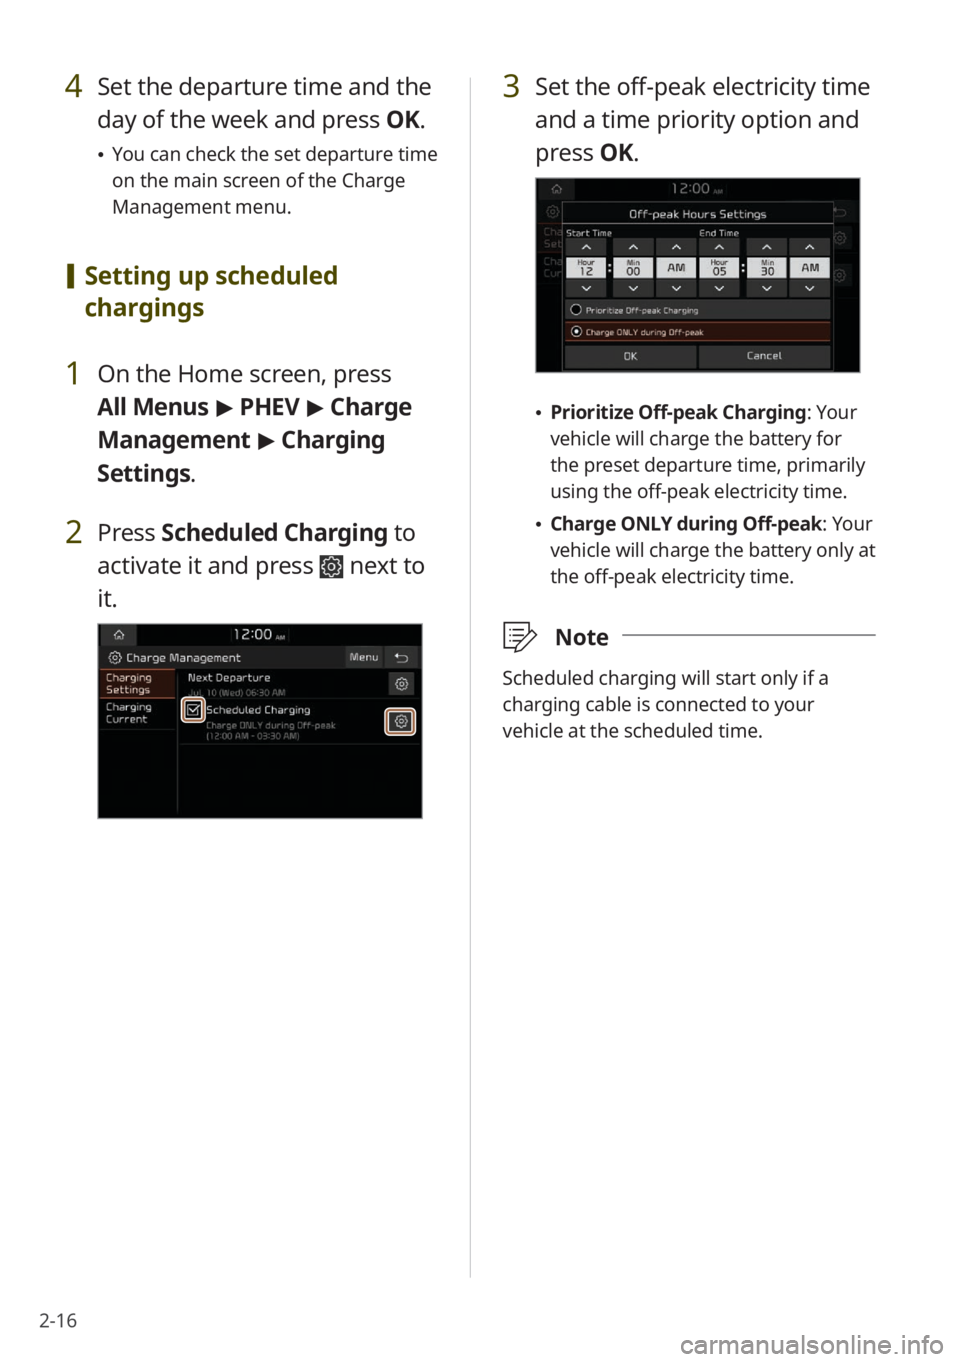
4 Set the departure time and the
day of the week and press OK.
You can check the set departure time
on the main screen of the Charge
Management menu.
[Setting up scheduled
chargings
1 On the Home screen, press
All Menus > PHEV > Charge
Management > Charging
Settings.
2 Press Scheduled Charging to
activate it and press
next to
it.
3 Set the off-peak electricity time
and a time priority option and
press OK.
Prioritize Off-peak Charging: Your
vehicle will charge the battery for
the preset departure time, primarily
using the off-peak electricity time.
Charge ONLY during Off-peak: Your
vehicle will charge the battery only at
the off-peak electricity time.
\333 Note
Scheduled charging will start only if a
charging cable is connected to your
vehicle at the scheduled time.