service reset KIA NIRO PHEV 2021 Features and Functions Guide
[x] Cancel search | Manufacturer: KIA, Model Year: 2021, Model line: NIRO PHEV, Model: KIA NIRO PHEV 2021Pages: 66, PDF Size: 5.77 MB
Page 10 of 66
*IF EQUIPPED8NIRO HYBRID / PLUG-IN HYBRID FEATURES & FUNCTIONS GUIDE
Trip Modes / Trip Computer
The Trip Computer is a driver information system that
displays information related to driving. It appears on the
display when the Engine Start /Stop button is in the ON
position.
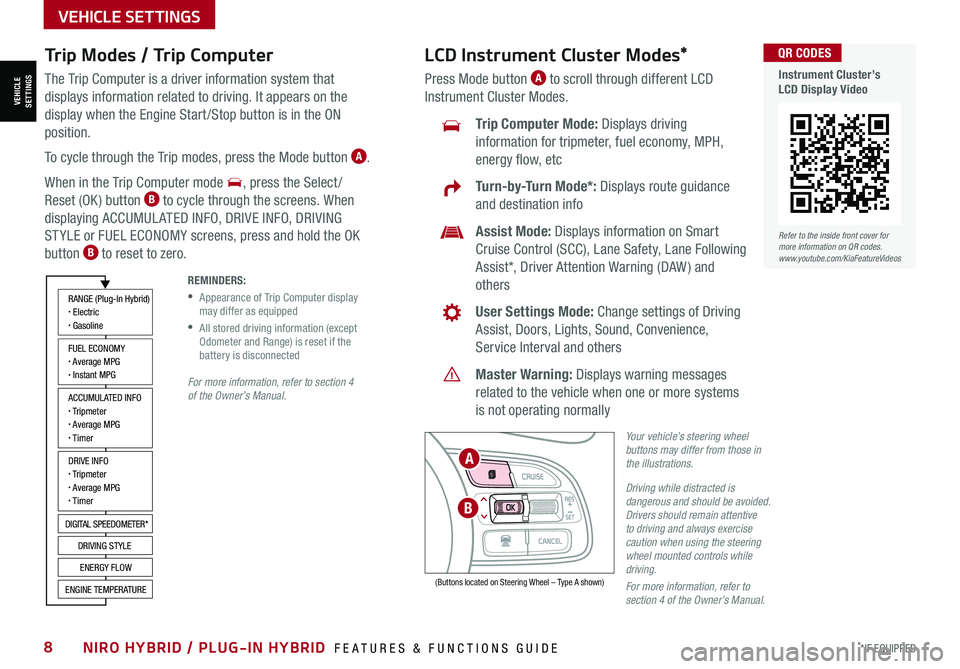
To cycle through the Trip modes, press the Mode button A.
When in the Trip Computer mode , press the Select /
Reset (OK ) button B to cycle through the screens. When
displaying ACCUMUL ATED INFO, DRIVE INFO, DRIVING
ST YLE or FUEL ECONOMY screens, press and hold the OK
button B to reset to zero.
For more information, refer to section 4 of the Owner’s Manual.
REMINDERS:
•
Appearance of Trip Computer display may differ as equipped
•
All stored driving information (except Odometer and Range) is reset if the battery is disconnected
Refer to the inside front cover for more information on QR codes.www.youtube.com/KiaFeatureVideos
QR CODES
Instrument Cluster’s LCD Display Video
ACCUMULATED INFO• Tripmeter• Average MPG• T imer
RANGE (Plug-In Hybrid)• Electric• Gasoline
FUEL ECONOMY• Average MPG• Instant MPG
DRIVE INFO• Tripmeter• Average MPG• T imer
DIGITAL SPEEDOMETER*
DRIVING STYLE
ENERGY FLOW
ENGINE TEMPERATURE
LCD Instrument Cluster Modes*
Press Mode button A to scroll through different LCD
Instrument Cluster Modes.
Trip Computer Mode: Displays driving
information for tripmeter, fuel economy, MPH,
energy flow, etc
Turn-by-Turn Mode*: Displays route guidance
and destination info
Assist Mode: Displays information on Smart
Cruise Control (SCC), Lane Safety, Lane Following
Assist*, Driver Attention Warning (DAW ) and
others
User Settings Mode: Change settings of Driving
Assist, Doors, Lights, Sound, Convenience,
Service Interval and others
Master Warning: Displays warning messages
related to the vehicle when one or more systems
is not operating normally
Your vehicle’s steering wheel buttons may differ from those in the illustrations.
Driving while distracted is dangerous and should be avoided. Drivers should remain attentive to driving and always exercise caution when using the steering wheel mounted controls while driving.
For more information, refer to section 4 of the Owner’s Manual.
(Buttons located on Steering Wheel – Type A shown)
MODE
RES
CRUISE
CAN CELOKSET
MODE
RES
CRUISE
CAN CELOKSET
MODE
B
A
VEHICLESETTINGS
VEHICLE SETTINGS
Page 11 of 66
ALWAYS CHECK THE OWNER’S MANUAL FOR COMPLETE OPER ATING INFORMATION AND SAFET Y WARNINGS. *IF EQUIPPED9
User Settings - Instrument Cluster
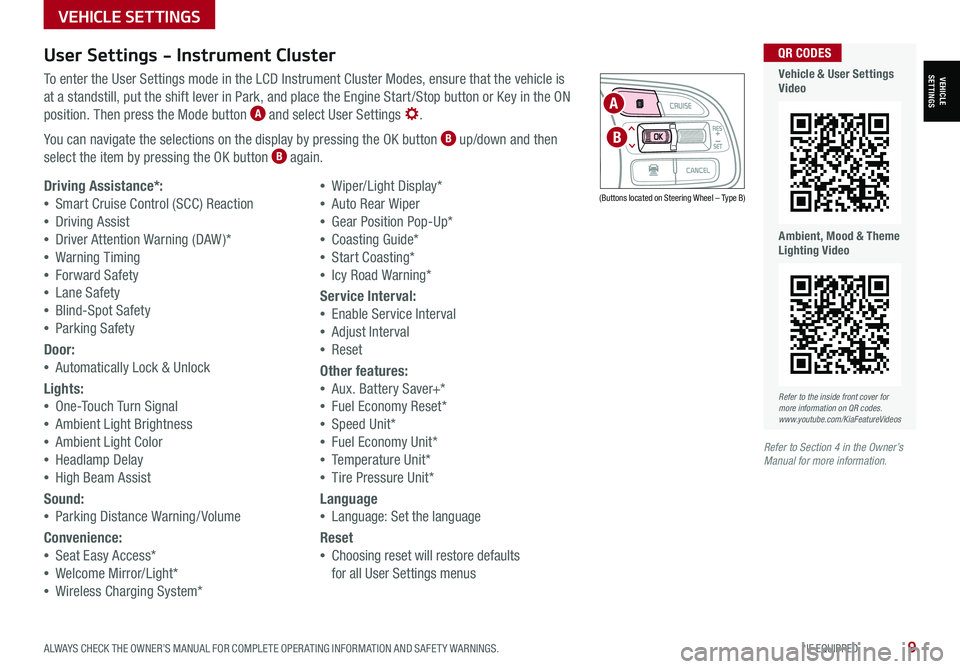
To enter the User Settings mode in the LCD Instrument Cluster Modes, ensure that the vehicle is
at a standstill, put the shift lever in Park, and place the Engine Start /Stop button or Key in the ON
position. Then press the Mode button A and select User Settings .
You can navigate the selections on the display by pressing the OK button B up/down and then
select the item by pressing the OK button B again.
Driving Assistance*:
•Smart Cruise Control (SCC) Reaction
•Driving Assist
•Driver Attention Warning (DAW )*
•Warning Timing
•Forward Safety
•Lane Safety
•Blind-Spot Safety
•Parking Safety
Door:
•Automatically Lock & Unlock
Lights:
•One-Touch Turn Signal
•Ambient Light Brightness
•Ambient Light Color
•Headlamp Delay
•High Beam Assist
Sound:
•Parking Distance Warning/ Volume
Convenience:
•Seat Easy Access*
•Welcome Mirror/Light*
•Wireless Charging System*
•Wiper/Light Display*
•Auto Rear Wiper
•Gear Position Pop-Up*
•Coasting Guide*
•Start Coasting*
•Icy Road Warning*
Service Interval:
•Enable Service Interval
•Adjust Interval
•Reset
Other features:
•Aux. Battery Saver+*
•Fuel Economy Reset*
•Speed Unit*
•Fuel Economy Unit*
•Temperature Unit*
•Tire Pressure Unit*
Language
•Language: Set the language
Reset
•Choosing reset will restore defaults
for all User Settings menus
(Buttons located on Steering Wheel – Type B)
MODE
RES
CRUISE
CAN CELOKSET
MODE
RES
CRUISE
CAN CELOKSET
MODE
A
B
Refer to the inside front cover for more information on QR codes.www.youtube.com/KiaFeatureVideos
QR CODES
Vehicle & User Settings Video
Ambient, Mood & Theme Lighting Video
Refer to Section 4 in the Owner’s Manual for more information.
VEHICLE SETTINGS
VEHICLESETTINGS
Page 12 of 66
*IF EQUIPPED10NIRO HYBRID / PLUG-IN HYBRID FEATURES & FUNCTIONS GUIDE
Vehicle Settings* - Audio Head Unit
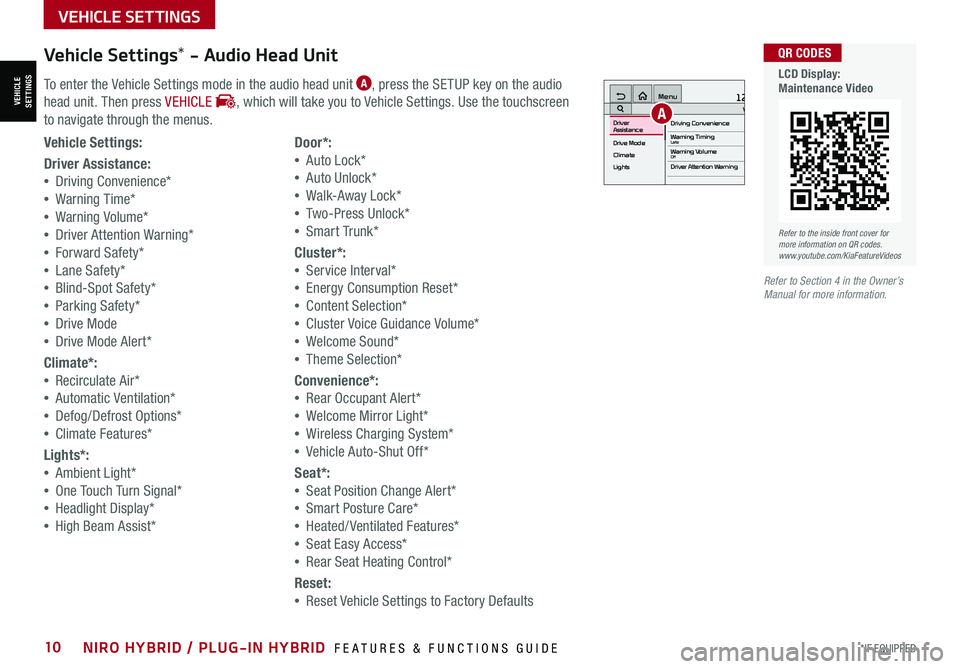
To enter the Vehicle Settings mode in the audio head unit A, press the SETUP key on the audio
head unit. Then press VEHICLE , which will take you to Vehicle Settings. Use the touchscreen
to navigate through the menus.
12:00 AM Jan. 1MenuVehicle SettingsDriving Convenience
Drive Mode
Climate
LightsDriver
AssistanceWarning TimingLateWarning VolumeOffDriver Attention Warning
A
Vehicle Settings:
Driver Assistance:
•Driving Convenience*
•Warning Time*
•Warning Volume*
•Driver Attention Warning*
•Forward Safety*
•Lane Safety*
•Blind-Spot Safety*
•Parking Safety*
•Drive Mode
•Drive Mode Alert*
Climate*:
•Recirculate Air*
•Automatic Ventilation*
•Defog/Defrost Options*
•Climate Features*
Lights*:
•Ambient Light*
•One Touch Turn Signal*
•Headlight Display*
•High Beam Assist*
Door*:
•Auto Lock*
•Auto Unlock*
•Walk-Away Lock*
•Two-Press Unlock*
•Smart Trunk*
Cluster*:
•Service Interval*
•Energy Consumption Reset*
•Content Selection*
•Cluster Voice Guidance Volume*
•Welcome Sound*
•Theme Selection*
Convenience*:
•Rear Occupant Alert*
•Welcome Mirror Light*
•Wireless Charging System*
•Vehicle Auto-Shut Off*
Seat*:
•Seat Position Change Alert*
•Smart Posture Care*
•Heated/ Ventilated Features*
•Seat Easy Access*
•Rear Seat Heating Control*
Reset:
•Reset Vehicle Settings to Factory Defaults
Refer to the inside front cover for more information on QR codes.www.youtube.com/KiaFeatureVideos
QR CODES
LCD Display: Maintenance Video
Refer to Section 4 in the Owner’s Manual for more information.
VEHICLESETTINGS
VEHICLE SETTINGS
Page 13 of 66
ALWAYS CHECK THE OWNER’S MANUAL FOR COMPLETE OPER ATING INFORMATION AND SAFET Y WARNINGS. *IF EQUIPPED11
Service Interval Mode
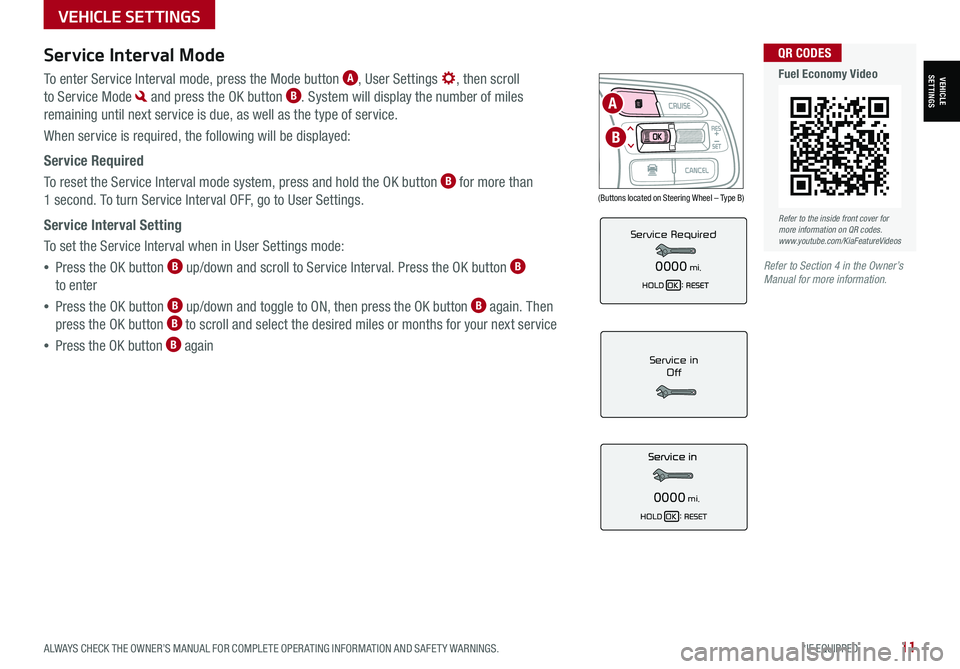
To enter Service Interval mode, press the Mode button A, User Settings , then scroll
to Service Mode and press the OK button B. System will display the number of miles
remaining until next service is due, as well as the type of service.
When service is required, the following will be displayed:
Service Required
To reset the Service Interval mode system, press and hold the OK button B for more than
1 second. To turn Service Interval OFF, go to User Settings.
Service Interval Setting
To set the Service Interval when in User Settings mode:
•Press the OK button B up/down and scroll to Service Interval. Press the OK button B
to enter
•Press the OK button B up/down and toggle to ON, then press the OK button B again. Then
press the OK button B to scroll and select the desired miles or months for your next service
•Press the OK button B againService in
Off
0000mi.
Service Required
0000mi.
(Buttons located on Steering Wheel – Type B)
MODE
RES
CRUISE
CAN CELOKSET
MODE
RES
CRUISE
CAN CELOKSET
MODE
A
B
Refer to the inside front cover for more information on QR codes.www.youtube.com/KiaFeatureVideos
QR CODES
Fuel Economy Video
Refer to Section 4 in the Owner’s Manual for more information.
VEHICLESETTINGS
VEHICLE SETTINGS
Page 17 of 66
ALWAYS CHECK THE OWNER’S MANUAL FOR COMPLETE OPER ATING INFORMATION AND SAFET Y WARNINGS. *IF EQUIPPED15
HYBRID / PLUG-IN HYBRID SYSTEM
HYBRID / PLUG-INHYBRID SYSTEM
Emergency Starting* (Hybrid only)
Before Jump-Starting:
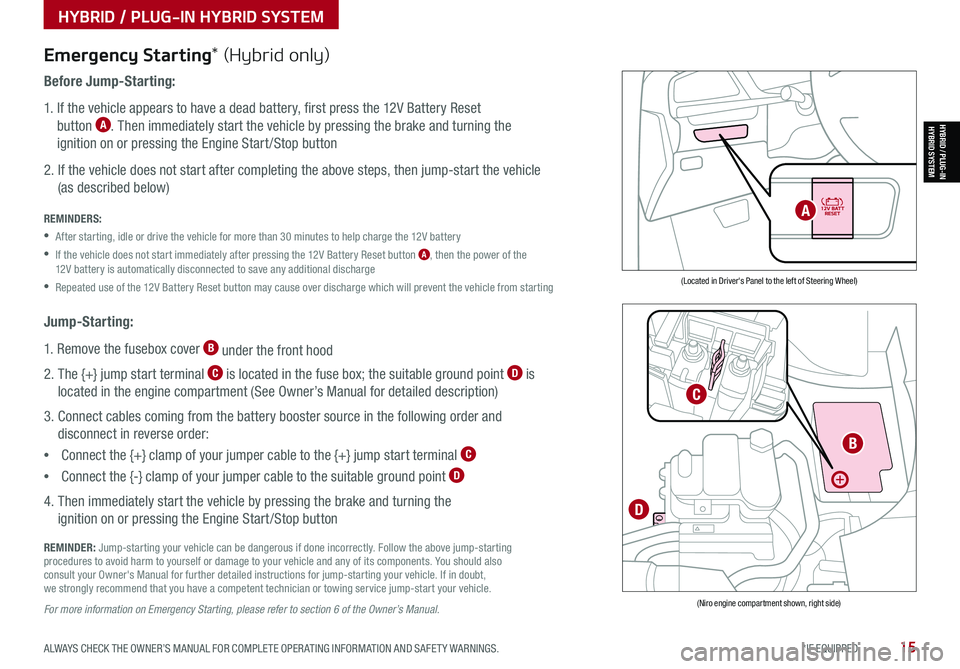
1. If the vehicle appears to have a dead battery, first press the 12V Battery Reset
button A. Then immediately start the vehicle by pressing the brake and turning the
ignition on or pressing the Engine Start /Stop button
2. If the vehicle does not start after completing the above steps, then jump-start the vehicle
(as described below)
REMINDERS:
•After starting, idle or drive the vehicle for more than 30 minutes to help charge the 12V battery
•
If the vehicle does not start immediately after pressing the 12V Battery Reset button A, then the power of the 12V battery is automatically disconnected to save any additional discharge
•Repeated use of the 12V Battery Reset button may cause over discharge which will prevent the vehicle from starting
Jump-Starting:
1. Remove the fusebox cover B under the front hood
2. The {+} jump start terminal C is located in the fuse box; the suitable ground point D is
located in the engine compartment (See Owner’s Manual for detailed description)
3. Connect cables coming from the battery booster source in the following order and
disconnect in reverse order:
•Connect the {+} clamp of your jumper cable to the {+} jump start terminal C
•Connect the {-} clamp of your jumper cable to the suitable ground point D
4. Then immediately start the vehicle by pressing the brake and turning the
ignition on or pressing the Engine Start /Stop button
REMINDER: Jump-starting your vehicle can be dangerous if done incorrectly. Follow the above jump-starting procedures to avoid harm to yourself or damage to your vehicle and any of its components. You should also consult your Owner's Manual for further detailed instructions for jump-starting your vehicle. If in doubt, we strongly recommend that you have a competent technician or towing service jump-start your vehicle.
For more information on Emergency Starting, please refer to section 6 of the Owner’s Manual.
(Located in Driver's Panel to the left of Steering Wheel)
(Niro engine compartment shown, right side)
B
C
D
A