headlamp KIA NIRO PHEV 2021 User Guide
[x] Cancel search | Manufacturer: KIA, Model Year: 2021, Model line: NIRO PHEV, Model: KIA NIRO PHEV 2021Pages: 710, PDF Size: 14.77 MB
Page 404 of 710
581
Driving your vehicle
When the front view camera
(including lens) or front radar is
damaged.
If not using headlamp or using
weak light in the night or in a tun-
nel.
Backlight is shining in the driving
direction of the vehicle. (Including
oncoming vehicle headlights.)
When the rear part of the front
vehicle is small or low.
When a trailer or other vehicle is
towing the front vehicle.
When the ground clearance of the
front vehicle is high.
When a front vehicle makes sud-
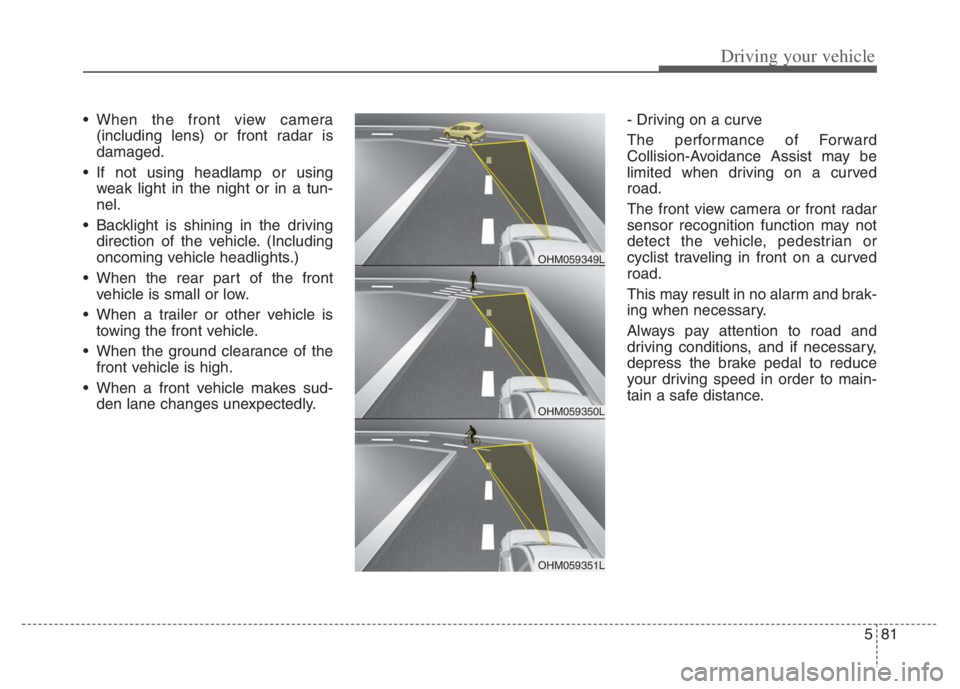
den lane changes unexpectedly.- Driving on a curve
The performance of Forward
Collision-Avoidance Assist may be
limited when driving on a curved
road.
The front view camera or front radar
sensor recognition function may not
detect the vehicle, pedestrian or
cyclist traveling in front on a curved
road.
This may result in no alarm and brak-
ing when necessary.
Always pay attention to road and
driving conditions, and if necessary,
depress the brake pedal to reduce
your driving speed in order to main-
tain a safe distance.
OHM059350L
OHM059349L
OHM059351L
Page 417 of 710
Driving your vehicle
94 5
DRIVER’S ATTENTION
The driver must be cautious in the
below situations as the function may
not work properly when recognition
of the lane marker is poor or limited
:
When lane and road condition is
poor
• It is difficult to distinguish the lane
marker from road when the lane
marker is covered with dust or
sand.
• It is difficult to distinguish the
color of the lane marker from
road.
• There is something looks like a
lane marker.
• The lane marker is indistinct or
damaged.
• The number of lanes increases/
decreases or the lane lines are
crossing (Driving through a toll
plaza/toll gate, merged/divided
lane).
• There are more than two lane
markers.
• The lane marker is very thick or
thin.
(Continued)(Continued)
• The lane marker is not visible due
to snow, rain, stain, a puddle or
other factors.
• A shadow is on the lane marker
because of a median strip,
guardrail, noise barriers and oth-
ers.
• When the lane markers are com-
plicated or a structure substitutes
for the lines such as a construc-
tion area.
• There are crosswalk signs or other
symbols on the road.
• The lane suddenly disappears
such as at the intersection.
• The lane marker in a tunnel is cov-
ered with dirt or oil and etc.
• The lane is very wide or narrow.
When external condition is inter-
vened
• The brightness of outside changes
suddenly when entering/existing a
tunnel or passing under a bridge.
• The headlamps are not on at night
or in a tunnel, or light level is low.
(Continued)(Continued)
• There is a boundary structure in
the roadway.
• The light of street, sun, or oncom-
ing vehicle reflects from the water
on the road.
• When light shines brightly in the
reverse direction you drive.
• Road surface is not even.
• The distance from the vehicle
ahead is very short or the vehicle
ahead drives hiding the lane line.
• You drive on a steep grade or a
sharp curve.
• The vehicle vibrates heavily.
• The temperature near inside mir-
ror is very high due to direct sun
light and etc.
when front visibility is poor
• The lens or windshield is covered
by strange materials.
• The sensor cannot detect the lane
because of fog, heavy rain or snow.
• The windshield is fogged by
humid air in the vehicle.
• Putting something on the crash
pad and etc.
Page 566 of 710

• Tire terminology and definitions . . . . . . . . . . . . . . . . 7-51
• All season tires . . . . . . . . . . . . . . . . . . . . . . . . . . . . . . 7-54
• Summer tires . . . . . . . . . . . . . . . . . . . . . . . . . . . . . . . . 7-54
• Snow tires . . . . . . . . . . . . . . . . . . . . . . . . . . . . . . . . . . . 7-55
• Tire chains . . . . . . . . . . . . . . . . . . . . . . . . . . . . . . . . . . 7-55
• Radial-ply tires . . . . . . . . . . . . . . . . . . . . . . . . . . . . . . 7-55
• Low aspect ratio tire . . . . . . . . . . . . . . . . . . . . . . . . . . 7-56
Fuses . . . . . . . . . . . . . . . . . . . . . . . . . . . . . . . . . . . . 7-58
• Inner panel fuse replacement . . . . . . . . . . . . . . . . . . . 7-59
• Engine compartment fuse replacement. . . . . . . . . . . 7-61
• Fuse/relay panel description. . . . . . . . . . . . . . . . . . . . 7-64
Light bulbs . . . . . . . . . . . . . . . . . . . . . . . . . . . . . . . 7-86
• Bulb replacement precaution . . . . . . . . . . . . . . . . . . 7-86
• Light bulb position (Front). . . . . . . . . . . . . . . . . . . . . 7-87
• Light bulb position (Rear) . . . . . . . . . . . . . . . . . . . . . 7-88
• Light bulb position (Side) . . . . . . . . . . . . . . . . . . . . . . 7-89
• Headlamp (High/Low beam) (Bulb type) bulb
replacement (Headlamp type A) . . . . . . . . . . . . . . . 7-90
• Front turn signal lamp (Bulb type) bulb
replacement (Headlamp type A) . . . . . . . . . . . . . . . 7-91
• Front side marker (Bulb type) bulb replacement
(Headlamp type A) . . . . . . . . . . . . . . . . . . . . . . . . . . 7-92
• Headlamp (High/Low beam) (LED type) bulb
replacement (Headlamp type B) . . . . . . . . . . . . . . . 7-92• Front turn signal (LED type) bulb replacement
(Headlamp type B) . . . . . . . . . . . . . . . . . . . . . . . . . . 7-93
• Front side marker (LED type) bulb replacement
(Headlamp type B) . . . . . . . . . . . . . . . . . . . . . . . . . . 7-93
• Daytime running lamp/Position lamp (LED type)
bulb replacement . . . . . . . . . . . . . . . . . . . . . . . . . . . . 7-93
• Front fog lamp (Bulb/LED type) bulb
replacement . . . . . . . . . . . . . . . . . . . . . . . . . . . . . . . . 7-94
• Stop and tail lamp, Rear turn signal lamp
(Bulb type) bulb replacement . . . . . . . . . . . . . . . . . 7-94
• Tail lamp (inside) (Bulb type) bulb replacement . . . 7-95
• Rear side marker (Bulb type) bulb replacement . . . 7-96
• Stop and tail lamp (LED type) bulb replacement . . 7-98
• Rear side marker (LED type) bulb replacement . . . 7-98
• Back-up lamp (Bulb type) bulb replacement . . . . . . 7-98
• License plate lamp (Bulb type) bulb replacement . . 7-99
• High mounted stop lamp (LED type) bulb
replacement . . . . . . . . . . . . . . . . . . . . . . . . . . . . . . . . 7-99
• Side repeater lamp (LED type) bulb replacement. . 7-100
• Map lamp (Bulb type) bulb replacement . . . . . . . . 7-100
• Map lamp (LED type) bulb replacement . . . . . . . . 7-101
• Vanity mirror lamp (Bulb type) bulb replacement. . 7-101
• Room lamp (Bulb type) bulb replacement . . . . . . . 7-102
• Room lamp (LED type) bulb replacement . . . . . . . 7-102
• Liftgate room lamp (Bulb type) bulb replacement . . 7-103
7
Page 604 of 710
Maintenance
40 7
✽
✽
NOTICE
If you connect unauthorized elec-
tronic devices to the battery, the bat-
tery may be discharged. Never use
unauthorized devices.
Recharging the battery
Your vehicle has a maintenance-free,
calcium-based battery.
If the battery becomes discharged
in a short time (because, for exam-
ple, the headlamps or interior
lamps were left on while the vehi-
cle was not in use), recharge it by
slow charging (trickle) for 10 hours.
If the battery gradually discharges
because of high electric load while
the vehicle is being used, recharge
it at 20-30A for two hours.WARNING- Risk of elec-
trocution
Never touch the electrical igni-
tion system while the vehicle is
running. This system works
with high voltage which can
shock you.
WARNING- Recharging
Battery
Never attempt to recharge the
battery when the battery cables
are connected.
WARNING- Battery lead
compound
Battery posts, terminals, and
related accessories contain
lead and lead compounds.
Wash hands after handling.
Page 624 of 710

Maintenance
60 7
3. Pull the suspected fuse straight
out. Use the removal tool provided
on the engine compartment fuse
panel cover.
4. Check the removed fuse; replace it
if it is blown.
Spare fuses are provided in the
engine compartment fuse panel.
5. Push in a new fuse of the same
rating, and make sure it fits tightly
in the clips.
If it fits loosely, consult an authorized
Kia dealer.
If you do not have a spare, use a
fuse of the same rating from a circuit
you may not need for operating the
vehicle, such as the power outlet
fuse.
If the head lamp, turn signal lamp,
stop signal lamp, fog lamp, DRL, tail
lamp, HMSL do not work and the
fuses are OK, check the fuse panel
in the engine compartment. If a fuse
is blown, it must be replaced.
✽ ✽
NOTICE
If the headlamp, fog lamp, turn sig-
nal lamp, or tail lamp malfunction
even without any problem to the
lamps, have the vehicle checked by
an authorized Kia dealer for assis-
tance.
ODEP079020
CAUTION
Do not input any other objects
except fuses or relays into
fuse/relay terminals, such as a
driver or wiring. It may cause
contact failure and system
malfunction.
Do not plug in screwdrivers or
aftermarket wiring into the ter-
minal originally designed for
fuse and relays only. The elec-
trical system and wiring of the
vehicle interior may be dam-
aged or burned due to contact
failure.
If you directly connect the
wire on the taillight or replace
the bulb which is over the reg-
ulated capacity to install trail-
ers, etc., the inner junction
block can get burned.
Page 650 of 710
Maintenance
86 7
LIGHT BULBS
Bulb replacement precaution
Please keep extra bulbs on hand
with appropriate wattage ratings in
case of emergencies.
Refer to “Bulb Wattage” in chapter 8.
When changing lamps, first turn off
the engine at a safe place, firmly
apply the parking brake and detach
the battery’s negative (-) terminal.
Use only bulbs of the specified
wattage.✽ ✽
NOTICE
• If the light bulb or lamp connector
is removed while the lamp is still
on, the fuse box's electronic sys-
tem may log it as a malfunction.
Therefore, a lamp malfunction
incident may be recorded as a
Diagnostic Trouble Code (DTC) in
the fuse box.
• It is normal for an operating lamp
to flicker momentarily. This is due
to a stabilization function of the
vehicle’s electronic control device.
If the lamp lights up normally
after momentarily blinking, then
it is functioning as normal.
However, if the lamp continues to
flicker several times or turns off
completely, there may be an error
in the vehicle’s electronic control
device. Please have the vehicle
checked by an authorized Kia
dealer immediately.
✽ ✽
NOTICE
We recommend that the headlight
aiming be adjusted by an authorized
Kia dealer after an accident or after
the headlight assembly is reinstalled.
WARNING- Working on
the lights
Prior to working on the light,
firmly apply the parking brake,
ensure that the engine
start/stop button is in OFF posi-
tion and turn off the lights to
avoid sudden movement of the
vehicle and burning your fingers
or receiving an electric shock.
CAUTION -Light replace-
ment
Be sure to replace the burned-
out bulb with one of the same
wattage rating. Otherwise, it
may cause damage to the fuse
or electric wiring system.
CAUTION -Headlamp
Lens
To prevent damage, do not
clean the headlamp lens with
chemical solvents or strong
detergents.
Page 651 of 710
787
Maintenance
✽ ✽
NOTICE
You can find moisture inside the lens
of lamps after a car wash or driving
in the rain. It is a natural event
caused by the temperature differ-
ence between the inside and the out-
side of the lamp and does not mean a
problem with its functions. The
moisture inside the lamp would dis-
appear if you drive the vehicle with
the headlamp turned on, however,
the level at which the moisture is
removed may differ depending on
the size/location/condition of the
lamp. If the moisture continues to
stay inside the lamp, we recommend
that you have the vehicle checked by
an authorized Kia dealer.
If you don’t have the necessary tools,
the correct bulbs and the expertise,
consult an authorized Kia dealer. In
many cases, it is difficult to replace
vehicle light bulbs because other
parts of the vehicle must be removed
before you can get to the bulb. This is
especially true if you have to remove
the headlamp assembly to get to the
bulb(s).
Removing/installing the headlamp
assembly can result in damage to
the vehicle.
If non-genuine parts or substandard
bulbs are used, it may lead to blow-
ing a fuse or other wiring damages.
Do not install extra lamps or LEDs to
the vehicle. If additional lights are
installed, it may lead to lamp mal-
functions and flickering. Additionally,
the fuse box and other writing may
be damaged.Light bulb position (Front)
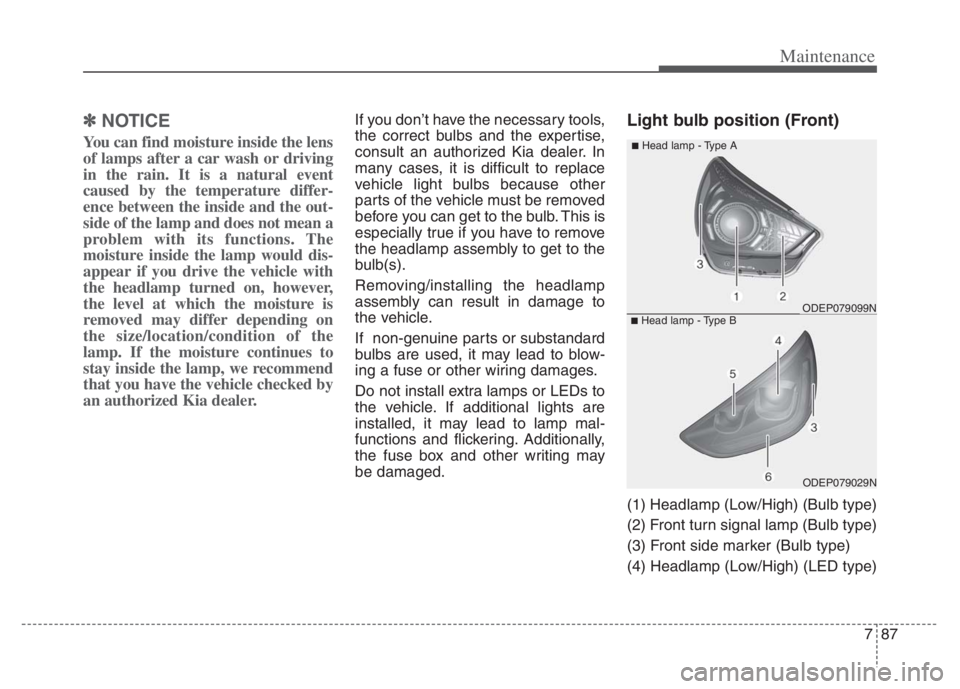
(1) Headlamp (Low/High) (Bulb type)
(2) Front turn signal lamp (Bulb type)
(3) Front side marker (Bulb type)
(4) Headlamp (Low/High) (LED type)
ODEP079029N
ODEP079099N
■Head lamp - Type A
■Head lamp - Type B
Page 652 of 710
Maintenance
88 7
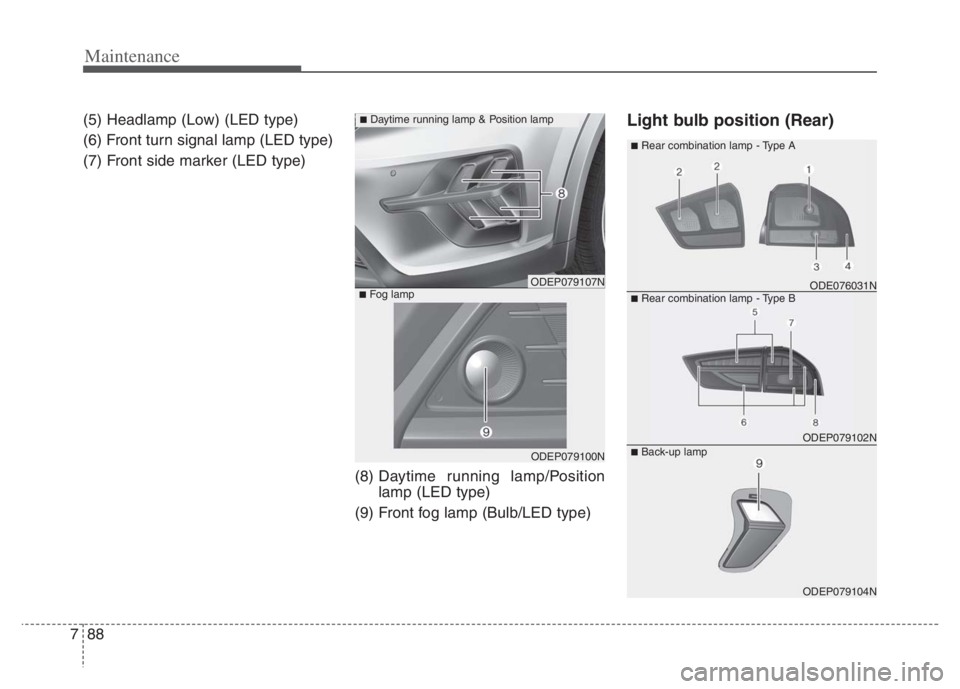
(5) Headlamp (Low) (LED type)
(6) Front turn signal lamp (LED type)
(7) Front side marker (LED type)
(8) Daytime running lamp/Position
lamp (LED type)
(9) Front fog lamp (Bulb/LED type)Light bulb position (Rear)
ODEP079100N
ODEP079107N
■Daytime running lamp & Position lamp
■Fog lamp
ODEP079102N
ODE076031N
ODEP079104N
■Rear combination lamp - Type A
■Rear combination lamp - Type B
■Back-up lamp
Page 654 of 710
Maintenance
90 7
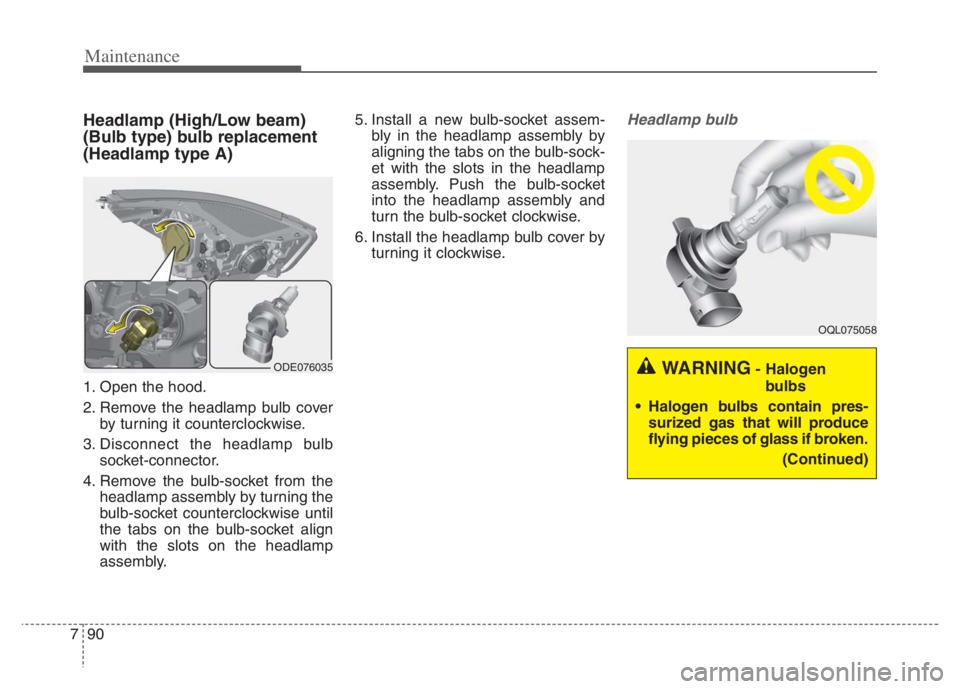
Headlamp (High/Low beam)
(Bulb type) bulb replacement
(Headlamp type A)
1. Open the hood.
2. Remove the headlamp bulb cover
by turning it counterclockwise.
3. Disconnect the headlamp bulb
socket-connector.
4. Remove the bulb-socket from the
headlamp assembly by turning the
bulb-socket counterclockwise until
the tabs on the bulb-socket align
with the slots on the headlamp
assembly.5. Install a new bulb-socket assem-
bly in the headlamp assembly by
aligning the tabs on the bulb-sock-
et with the slots in the headlamp
assembly. Push the bulb-socket
into the headlamp assembly and
turn the bulb-socket clockwise.
6. Install the headlamp bulb cover by
turning it clockwise.
Headlamp bulb
ODE076035
OQL075058
WARNING- Halogen
bulbs
Halogen bulbs contain pres-
surized gas that will produce
flying pieces of glass if broken.
(Continued)
Page 655 of 710
791
Maintenance
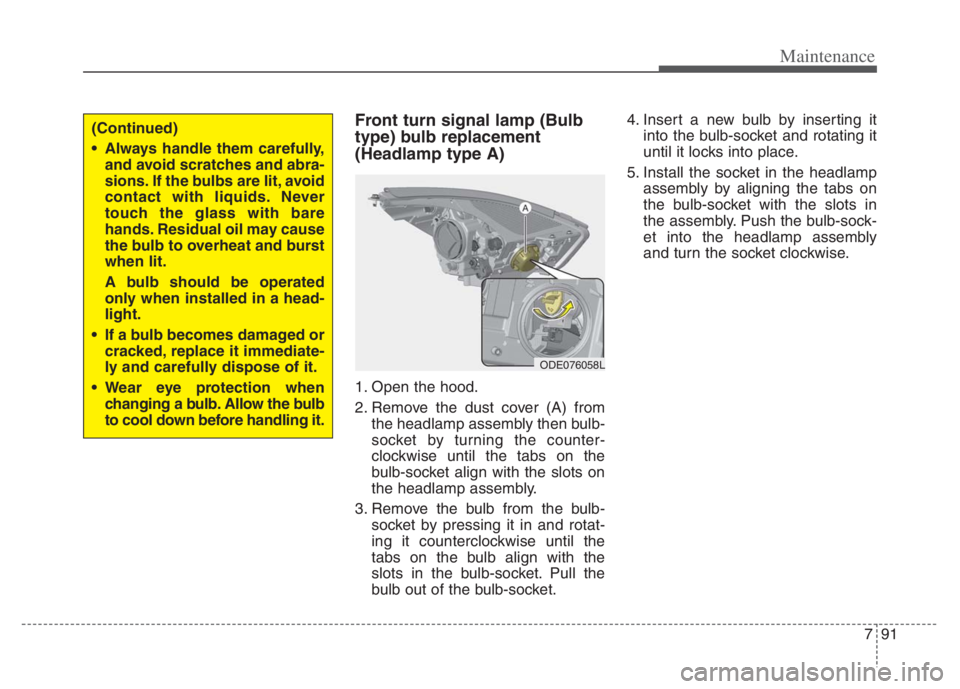
Front turn signal lamp (Bulb
type) bulb replacement
(Headlamp type A)
1. Open the hood.
2. Remove the dust cover (A) from
the headlamp assembly then bulb-
socket by turning the counter-
clockwise until the tabs on the
bulb-socket align with the slots on
the headlamp assembly.
3. Remove the bulb from the bulb-
socket by pressing it in and rotat-
ing it counterclockwise until the
tabs on the bulb align with the
slots in the bulb-socket. Pull the
bulb out of the bulb-socket.4. Insert a new bulb by inserting it
into the bulb-socket and rotating it
until it locks into place.
5. Install the socket in the headlamp
assembly by aligning the tabs on
the bulb-socket with the slots in
the assembly. Push the bulb-sock-
et into the headlamp assembly
and turn the socket clockwise.
(Continued)
Always handle them carefully,
and avoid scratches and abra-
sions. If the bulbs are lit, avoid
contact with liquids. Never
touch the glass with bare
hands. Residual oil may cause
the bulb to overheat and burst
when lit.
A bulb should be operated
only when installed in a head-
light.
If a bulb becomes damaged or
cracked, replace it immediate-
ly and carefully dispose of it.
Wear eye protection when
changing a bulb. Allow the bulb
to cool down before handling it.
ODE076058L