battery KIA NIRO PHEV 2022 Features and Functions Guide
[x] Cancel search | Manufacturer: KIA, Model Year: 2022, Model line: NIRO PHEV, Model: KIA NIRO PHEV 2022Pages: 66, PDF Size: 3.69 MB
Page 5 of 66
3 *IF EQUIPPEDALWAYS CHECK THE OWNER ’S MANUAL FOR COMPLETE OPER ATING INFORMATION AND SAFET Y WARNINGS
F
H
CHARGE POWER
ECO
EEPB
120miles
L
AUTO
mph
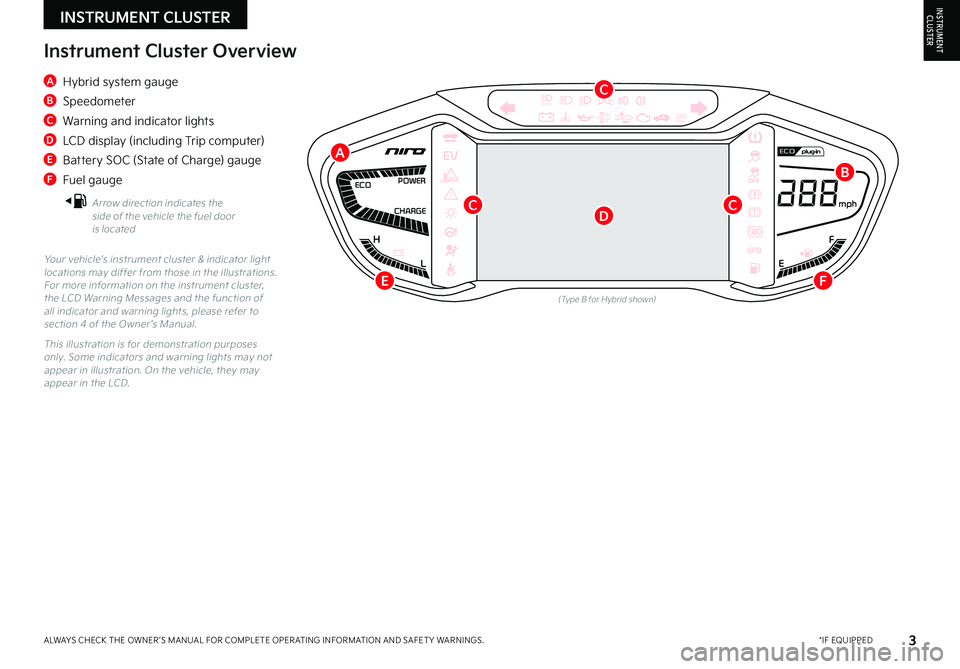
A Hybrid system gauge
B Speedometer
C Warning and indicator lights
D LCD display (including Trip computer)
E Battery SOC (State of Charge) gauge
F Fuel gauge
Arrow direction indicates the side of the vehicle the fuel door is located
Instrument Cluster Overview
Your vehicle’s instrument cluster & indicator light locations may differ from those in the illustrations For more information on the instrument cluster, the LCD Warning Messages and the function of all indicator and warning lights, please refer to section 4 of the Owner ’s Manual
This illustration is for demonstration purposes only Some indicators and warning lights may not appear in illustration On the vehicle, they may appear in the LCD
C
B
C
INSTRUMENT CLUSTERINSTRUMENTCLUSTER
(Type B for Hybrid shown)
A
C
D
EF
Page 8 of 66
6*IF EQUIPPEDNIRO HYBRID / PLUG-IN HYBRID FEATURES & FUNCTIONS GUIDE
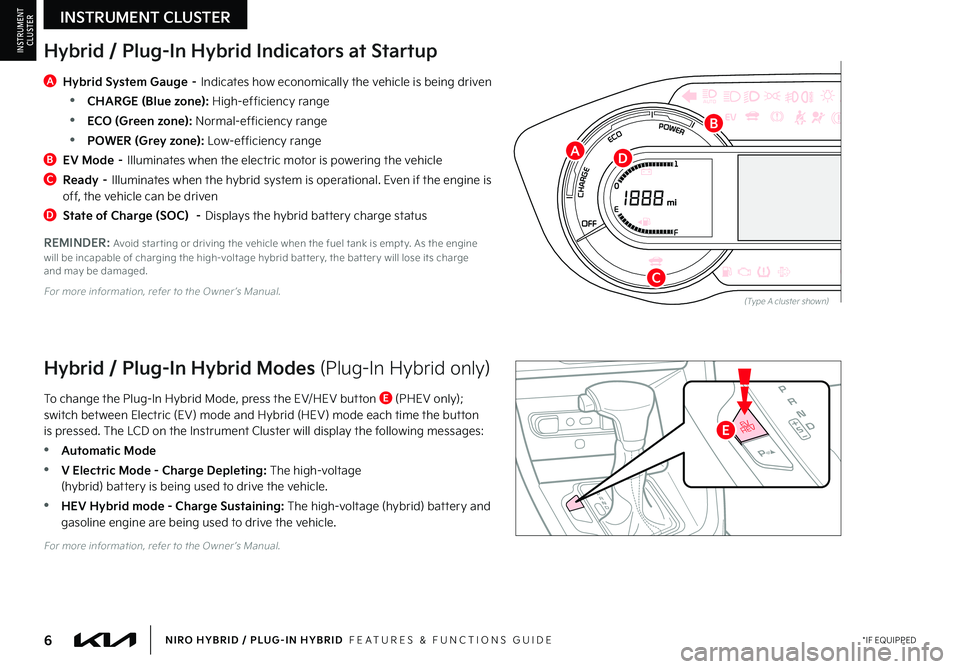
Hybrid / Plug-In Hybrid Indicators at Startup
220200
20
20 12 0
1 40
40
10 0
60
80180
40 160
60 140
80 120
100
E
F
AUTO120miles
A
Hybrid System Gauge – Indicates how economically the vehicle is being driven
•CHARGE (Blue zone): High-efficiency range
•ECO (Green zone): Normal-efficiency range
•POWER (Grey zone): Low-efficiency range
B EV Mode – Illuminates when the electric motor is powering the vehicle
C
Ready – Illuminates when the hybrid system is operational Even if the engine is off, the vehicle can be driven
D State of Charge (SOC) – Displays the hybrid battery charge status
To change the Plug-In Hybrid Mode, press the EV/HEV button E (PHEV only); switch between Electric (EV) mode and Hybrid (HEV) mode each time the button is pressed The LCD on the Instrument Cluster will display the following messages:
•Automatic Mode
•V Electric Mode - Charge Depleting: The high-voltage (hybrid) battery is being used to drive the vehicle
•HEV Hybrid mode - Charge Sustaining: The high-voltage (hybrid) battery and gasoline engine are being used to drive the vehicle
REMINDER: Avoid star ting or driving the vehicle when the fuel tank is empt y As the engine will be incapable of charging the high-voltage hybrid bat ter y, the bat ter y will lose its charge and may be damaged
EV
HEV
(Type A cluster shown)For more information, refer to the Owner ’s Manual
For more information, refer to the Owner ’s Manual
Hybrid / Plug-In Hybrid Modes (Plug-In Hybrid only)
INSTRUMENT CLUSTER
INSTRUMENTCLUSTER
B
A
C
D
E
Page 11 of 66
9*IF EQUIPPEDALWAYS CHECK THE OWNER ’S MANUAL FOR COMPLETE OPER ATING INFORMATION AND SAFET Y WARNINGS
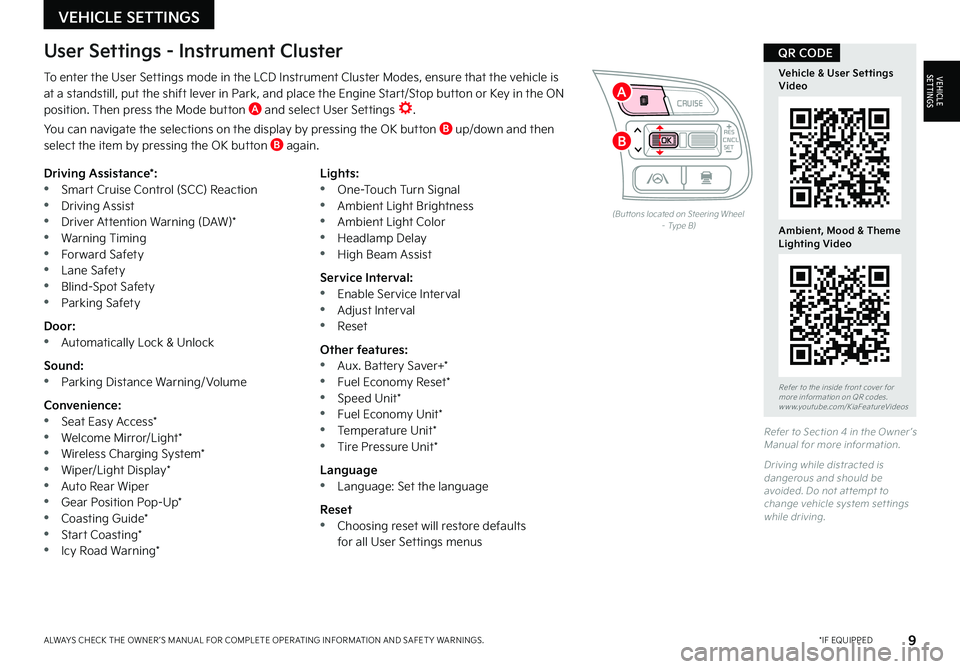
To enter the User Settings mode in the LCD Instrument Cluster Modes, ensure that the vehicle is at a standstill, put the shift lever in Park, and place the Engine Start/Stop button or Key in the ON position Then press the Mode button A and select User Settings
You can navigate the selections on the display by pressing the OK button B up/down and then select the item by pressing the OK button B again
Driving Assistance*: •Smart Cruise Control (SCC) Reaction •Driving Assist •Driver Attention Warning (DAW)* •Warning Timing •Forward Safety •Lane Safety •Blind-Spot Safety •Parking Safety
Door: •Automatically Lock & Unlock
Sound: •Parking Distance Warning/ Volume
Convenience: •Seat Easy Access* •Welcome Mirror/Light* •Wireless Charging System* •Wiper/Light Display* •Auto Rear Wiper •Gear Position Pop-Up* •Coasting Guide* •Start Coasting* •Icy Road Warning*
Lights: •One-Touch Turn Signal •Ambient Light Brightness •Ambient Light Color •Headlamp Delay •High Beam Assist
Service Interval: •Enable Service Interval •Adjust Interval •Reset
Other features: •Aux Battery Saver+* •Fuel Economy Reset* •Speed Unit* •Fuel Economy Unit* •Temperature Unit* •Tire Pressure Unit*
Language •Language: Set the language
Reset •Choosing reset will restore defaults for all User Settings menus
(But tons located on Steering Wheel – Type B)
Refer to Section 4 in the Owner ’s Manual for more information
Driving while distracted is dangerous and should be avoided Do not at tempt to change vehicle system set tings while driving
Refer to the inside front cover for more information on QR codes www youtube com/KiaFeatureVideos
Vehicle & User Settings Video
Ambient, Mood & Theme Lighting Video
QR CODEUser Settings - Instrument Cluster
CNCLRES
CRUISE
SETCNCLRES
CRUISE
SET
VEHICLE SETTINGS
VEHICLESETTINGS
B
A
Page 14 of 66
12*IF EQUIPPEDNIRO HYBRID / PLUG-IN HYBRID FEATURES & FUNCTIONS GUIDE
A
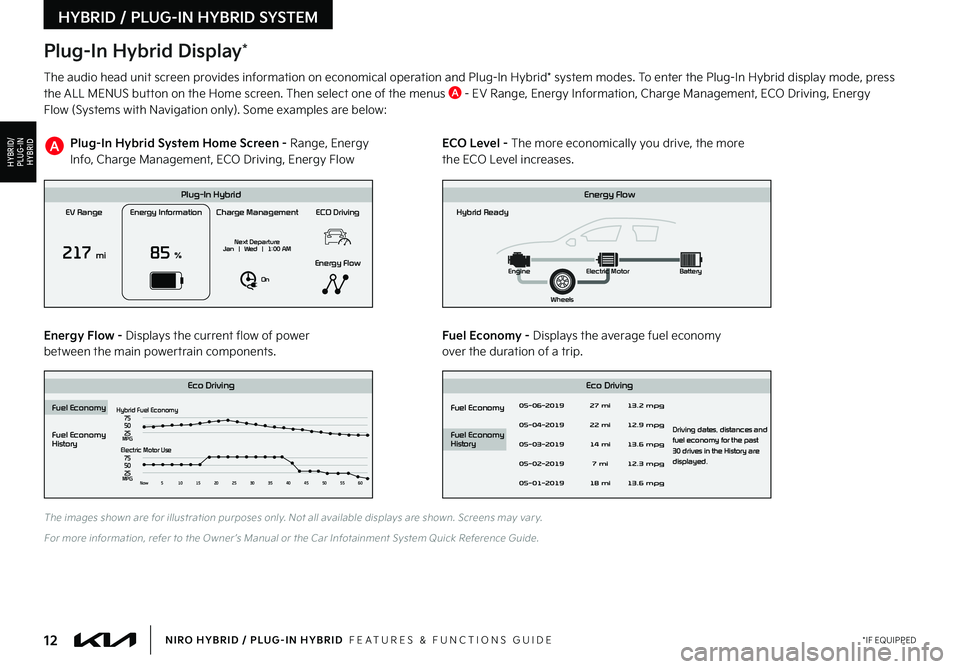
The audio head unit screen provides information on economical operation and Plug-In Hybrid* system modes To enter the Plug-In Hybrid display mode, press the ALL MENUS button on the Home screen Then select one of the menus A - EV Range, Energy Information, Charge Management, ECO Driving, Energy Flow (Systems with Navigation only) Some examples are below:
Energy Flow - Displays the current flow of power between the main powertrain components
ECO Level - The more economically you drive, the more the ECO Level increases Plug-In Hybrid System Home Screen - Range, Energy Info, Charge Management, ECO Driving, Energy Flow
Fuel Economy - Displays the average fuel economy over the duration of a trip
EV Range
217 mi
Energy Information
85 %
Charge Management
Next Departure
Jan | Wed | 1:00 AM
On
ECO Driving
Energy Flow
Plug-In Hybrid
Hybrid Ready
Energy Flow
Wheels
Engine
Electric Motor Battery
Fuel Economy
History
Eco Driving Eco Driving
Fuel Economy
Fuel Economy
History
Fuel EconomyHybrid Fuel Economy05-06-2019
05-04-2019
05-03-2019
05-02-2019
05-01-2019 27 mi
13.2 mpg
12.9 mpg
13.6 mpg
Driving dates, distances and
fuel economy for the past
30 drives in the History are
displayed.
12.3 mpg
13.6 mpg
22 mi
14 mi 7 mi
18 mi
75
50
25
MPGElectric Motor Use
75
50
25
MPGNow 510 15202530354045505560
EV Range
217 mi
Energy Information
85 %
Charge Management
Next Departure
Jan | Wed | 1:00 AM
On
ECO Driving
Energy Flow
Plug-In Hybrid
Hybrid Ready
Energy Flow
Wheels
Engine
Electric Motor Battery
Fuel Economy
History
Eco DrivingEco Driving
Fuel Economy
Fuel Economy
History
Fuel Economy
Hybrid Fuel Economy05-06-2019
05-04-2019
05-03-2019
05-02-2019
05-01-2019 27 mi
13.2 mpg
12.9 mpg
13.6 mpg
Driving dates, distances and
fuel economy for the past
30 drives in the History are
displayed.
12.3 mpg
13.6 mpg
22 mi
14 mi 7 mi
18 mi
75
50
25
MPGElectric Motor Use
75
50
25
MPGNow 510 15202530354045505560
EV Range
217 mi
Energy Information
85 %
Charge Management
Next Departure
Jan | Wed | 1:00 AM
On
ECO Driving
Energy Flow
Plug-In Hybrid
Hybrid Ready
Energy Flow
Wheels
Engine
Electric Motor Battery
Fuel Economy
History
Eco Driving Eco Driving
Fuel Economy
Fuel Economy
History
Fuel EconomyHybrid Fuel Economy05-06-2019
05-04-2019
05-03-2019
05-02-2019
05-01-2019 27 mi
13.2 mpg
12.9 mpg
13.6 mpg
Driving dates, distances and
fuel economy for the past
30 drives in the History are
displayed.
12.3 mpg
13.6 mpg
22 mi
14 mi 7 mi
18 mi
75
50
25
MPGElectric Motor Use
75
50
25
MPGNow 510 15202530354045505560
EV Range
217 mi
Energy Information
85 %
Charge Management
Next Departure
Jan | Wed | 1:00 AM
On
ECO Driving
Energy Flow
Plug-In Hybrid
Hybrid Ready
Energy Flow
Wheels
Engine
Electric Motor Battery
Fuel Economy
History
Eco DrivingEco Driving
Fuel Economy
Fuel Economy
History
Fuel Economy
Hybrid Fuel Economy05-06-2019
05-04-2019
05-03-2019
05-02-2019
05-01-2019 27 mi
13.2 mpg
12.9 mpg
13.6 mpg
Driving dates, distances and
fuel economy for the past
30 drives in the History are
displayed.
12.3 mpg
13.6 mpg
22 mi
14 mi 7 mi
18 mi
75
50
25
MPGElectric Motor Use
75
50
25
MPGNow 510 15202530354045505560
The images shown are for illustration purposes only Not all available displays are shown Screens may var y
For more information, refer to the Owner ’s Manual or the Car Infotainment System Quick Reference Guide
Plug-In Hybrid Display*
HYBRID / PLUG-IN HYBRID SYSTEM
HYBRID/PLUG-IN
HYBRID
Page 15 of 66
13*IF EQUIPPEDALWAYS CHECK THE OWNER ’S MANUAL FOR COMPLETE OPER ATING INFORMATION AND SAFET Y WARNINGS
Plug-In Hybrid displays shown The images shown are for illustration purposes only Not all available displays are shown Screens may var y
For more information, refer to the Owner ’s Manual
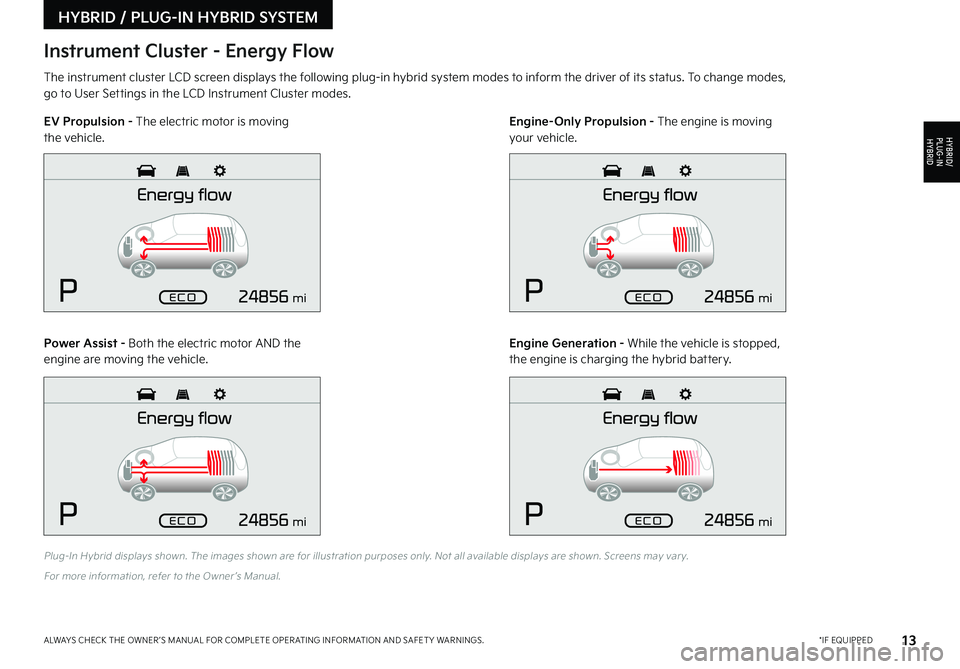
The instrument cluster LCD screen displays the following plug-in hybrid system modes to inform the driver of its status To change modes, go to User Settings in the LCD Instrument Cluster modes
EV Propulsion - The electric motor is moving the vehicle Engine-Only Propulsion - The engine is moving your vehicle
Power Assist - Both the electric motor AND the engine are moving the vehicle Engine Generation - While the vehicle is stopped, the engine is charging the hybrid battery
Instrument Cluster - Energy Flow
HYBRID / PLUG-IN HYBRID SYSTEM
HYBRID/PLUG-IN
HYBRID
mi
mi
mi
mi
Page 16 of 66
14*IF EQUIPPEDNIRO HYBRID / PLUG-IN HYBRID FEATURES & FUNCTIONS GUIDE
Plug-In Hybrid displays shown The images shown are for illustration purposes only Not all available displays are shown Screens may var y
For more information, refer to the Owner ’s Manual
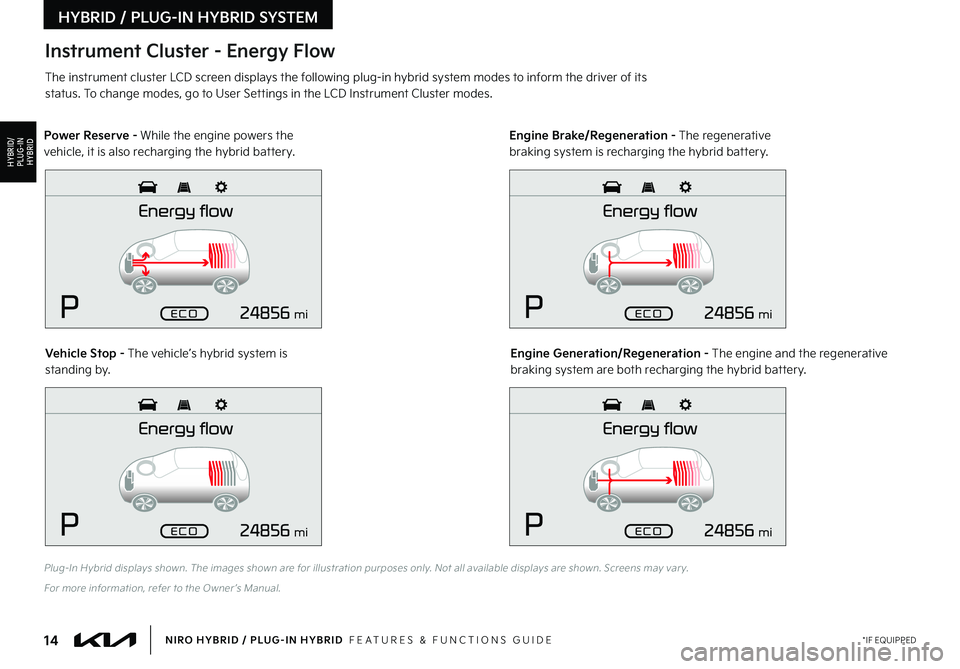
The instrument cluster LCD screen displays the following plug-in hybrid system modes to inform the driver of its status To change modes, go to User Settings in the LCD Instrument Cluster modes
Vehicle Stop - The vehicle’s hybrid system is standing by Engine Generation/Regeneration - The engine and the regenerative braking system are both recharging the hybrid battery
Power Reserve - While the engine powers the vehicle, it is also recharging the hybrid battery Engine Brake/Regeneration - The regenerative braking system is recharging the hybrid battery
Instrument Cluster - Energy Flow
HYBRID / PLUG-IN HYBRID SYSTEM
HYBRID/PLUG-IN
HYBRID
mi
mi
mi
mi
Page 17 of 66
15*IF EQUIPPEDALWAYS CHECK THE OWNER ’S MANUAL FOR COMPLETE OPER ATING INFORMATION AND SAFET Y WARNINGS
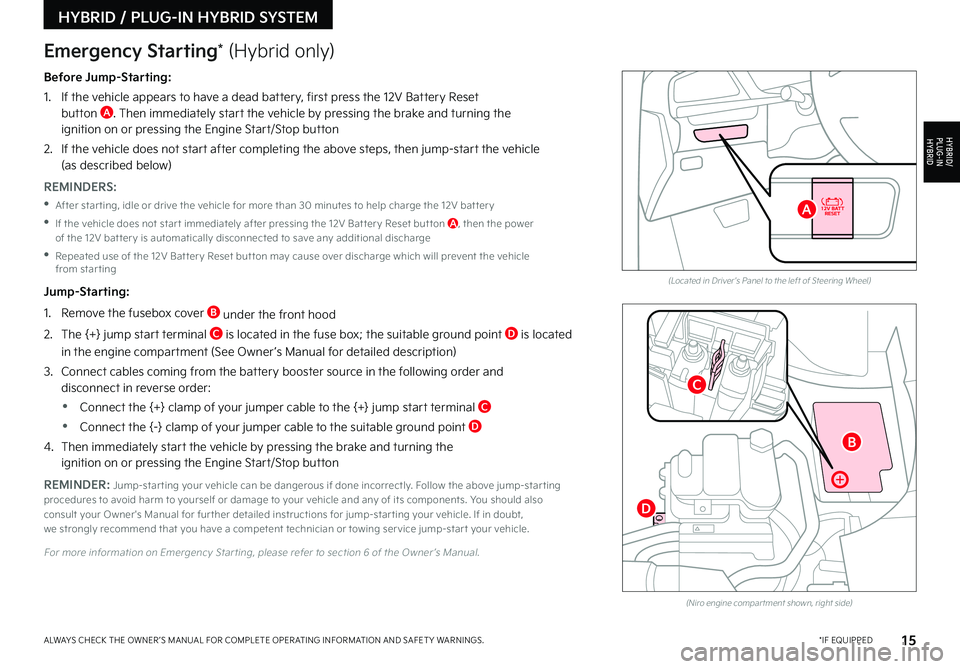
Before Jump-Starting:
1
If the vehicle appears to have a dead battery, first press the 12V Battery Reset button A Then immediately start the vehicle by pressing the brake and turning the ignition on or pressing the Engine Start/Stop button
2
If the vehicle does not start after completing the above steps, then jump-start the vehicle (as described below)
REMINDERS:
•After star ting, idle or drive the vehicle for more than 30 minutes to help charge the 12V bat ter y
•
If the vehicle does not star t immediately after pressing the 12V Bat ter y Reset but ton A, then the power of the 12V bat ter y is automatically disconnected to save any additional discharge
•
Repeated use of the 12V Bat ter y Reset but ton may cause over discharge which will prevent the vehicle from star ting
Jump-Starting:
1 Remove the fusebox cover B under the front hood
2 The {+} jump start terminal C is located in the fuse box; the suitable ground point D is located
in the engine compartment (See Owner ’s Manual for detailed description)
3
Connect cables coming from the battery booster source in the following order and disconnect in reverse order:
•Connect the {+} clamp of your jumper cable to the {+} jump start terminal C
•Connect the {-} clamp of your jumper cable to the suitable ground point D
4
Then immediately start the vehicle by pressing the brake and turning the ignition on or pressing the Engine Start/Stop button
REMINDER: Jump-star ting your vehicle can be dangerous if done incorrectly Follow the above jump-star ting procedures to avoid harm to yourself or damage to your vehicle and any of its components You should also consult your Owner's Manual for fur ther detailed instructions for jump-star ting your vehicle If in doubt, we strongly recommend that you have a competent technician or towing ser vice jump-star t your vehicle
For more information on Emergency Star ting, please refer to section 6 of the Owner ’s Manual
(Located in Driver's Panel to the left of Steering Wheel)
(Niro engine compar tment shown, right side)
Emergency Starting* (Hybrid only)
HYBRID / PLUG-IN HYBRID SYSTEM
HYBRID/PLUG-IN
HYBRID
B
A
C
D
Page 49 of 66
•Defrost mode activates A /C and opens Fresh Air Vent to help dehumidify the air and improve Defroster per formance
•During Auto Operation, the A /C indicator will NOT illuminate The fan speed, air intake, air flow and air conditioning may automatically be engaged at any time to reach desired temperature and reduce humidit y
•Keep inside glass as clean as possible to reduce window fogging
QUICK TIPS
Your Automatic Climate Control system may differ from those in the illustration
Refer to section 4 in the Owner ’s Manual for more information
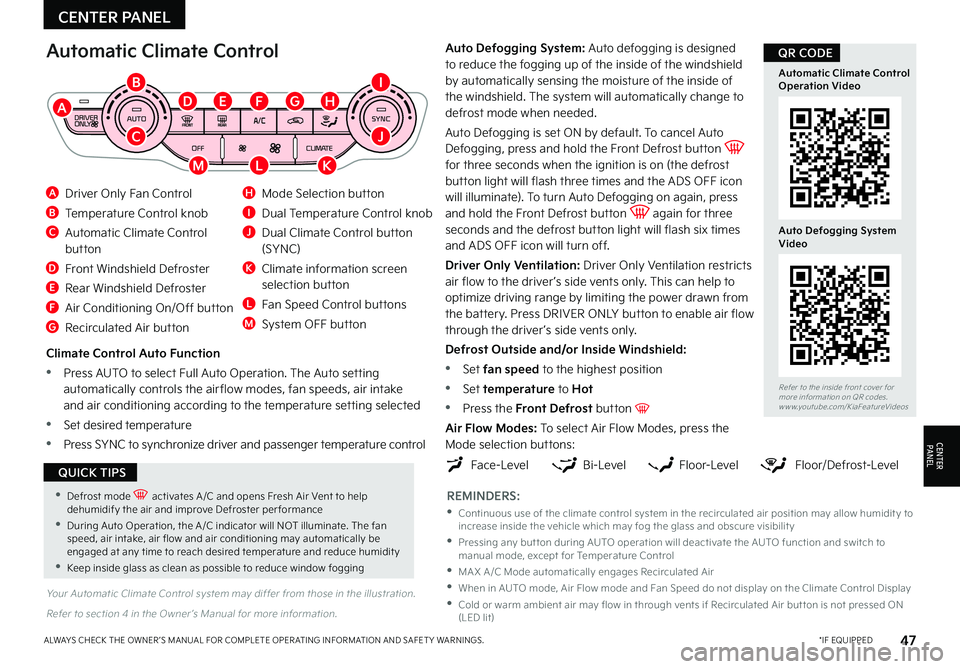
Automatic Climate Control
A Driver Only Fan Control
B Temperature Control knob
C Automatic Climate Control button
D Front Windshield Defroster
E Rear Windshield Defroster
F Air Conditioning On/Off button
G Recirculated Air button
H Mode Selection button
I Dual Temperature Control knob
J Dual Climate Control button (SYNC)
K Climate information screen selection button
L Fan Speed Control buttons
M System OFF button
Climate Control Auto Function
•Press AUTO to select Full Auto Operation The Auto setting automatically controls the air flow modes, fan speeds, air intake and air conditioning according to the temperature setting selected
•Set desired temperature
•Press SYNC to synchronize driver and passenger temperature control
REMINDERS:
•
Continuous use of the climate control system in the recirculated air position may allow humidit y to increase inside the vehicle which may fog the glass and obscure visibilit y
•
Pressing any but ton during AUTO operation will deactivate the AUTO function and switch to manual mode, except for Temperature Control
•
MA X A /C Mode automatically engages Recirculated Air
•
When in AUTO mode, Air Flow mode and Fan Speed do not display on the Climate Control Display
•
Cold or warm ambient air may flow in through vents if Recirculated Air but ton is not pressed ON (LED lit)
Auto Defogging System: Auto defogging is designed to reduce the fogging up of the inside of the windshield by automatically sensing the moisture of the inside of the windshield The system will automatically change to defrost mode when needed
Auto Defogging is set ON by default To cancel Auto Defogging, press and hold the Front Defrost button for three seconds when the ignition is on (the defrost button light will flash three times and the ADS OFF icon will illuminate) To turn Auto Defogging on again, press and hold the Front Defrost button again for three seconds and the defrost button light will flash six times and ADS OFF icon will turn off
Driver Only Ventilation: Driver Only Ventilation restricts air flow to the driver ’s side vents only This can help to optimize driving range by limiting the power drawn from the battery Press DRIVER ONLY button to enable air flow through the driver ’s side vents only
Defrost Outside and/or Inside Windshield:
•Set fan speed to the highest position
•Set temperature to Hot
•Press the Front Defrost button
Air Flow Modes: To select Air Flow Modes, press the Mode selection buttons:
47*IF EQUIPPEDALWAYS CHECK THE OWNER ’S MANUAL FOR COMPLETE OPER ATING INFORMATION AND SAFET Y WARNINGS
Refer to the inside front cover for more information on QR codes www youtube com/KiaFeatureVideos
Automatic Climate Control Operation Video
Auto Defogging System Video
QR CODE
E
MLK
FGH
Face-LevelFloor/Defrost-LevelFloor-LevelBi-Level
CENTER PANEL
CENTERPA N EL
B
A
C
D
I
J
Page 60 of 66

58NIRO HYBRID / PLUG-IN HYBRID FEATURES & FUNCTIONS GUIDE†LEGAL DISCL AIMERS ON BACK INSIDE COVER | *IF EQUIPPED
High Voltage Battery Air Intake
REMINDER: Never clean the battery vent with a WET cloth or spill liquid over the air intake. This could cause an electric shock, which could cause serious damage, injury or death
Liftgate Release Button*†2 0
Button is located on the bottom of the Liftgate lid With doors unlocked, press the Liftgate Release button A and pull the Liftgate up by the handle to open
Refer to section 4 in the Owner ’s Manual for more information
•The Liftgate must be unlocked before it can be opened by the Liftgate Release But ton
•The Liftgate unlocks automatically and then can be opened manually when the Smar t Key* is within close proximit y to the vehicle’s hatch
QUICK TIPS
Clean the air intake for the hybrid bat ter y regularly with a dr y cloth
QUICK TIPS
A
The Hybrid Battery Air Intake, located on the side underneath the left rear seat, is used to cool down the hybrid battery For safety reasons, this vent should never be blocked Doing so may cause the battery to overheat
OTHER KEY FEATURES
OTHER KEY F E AT U R E S
Page 65 of 66
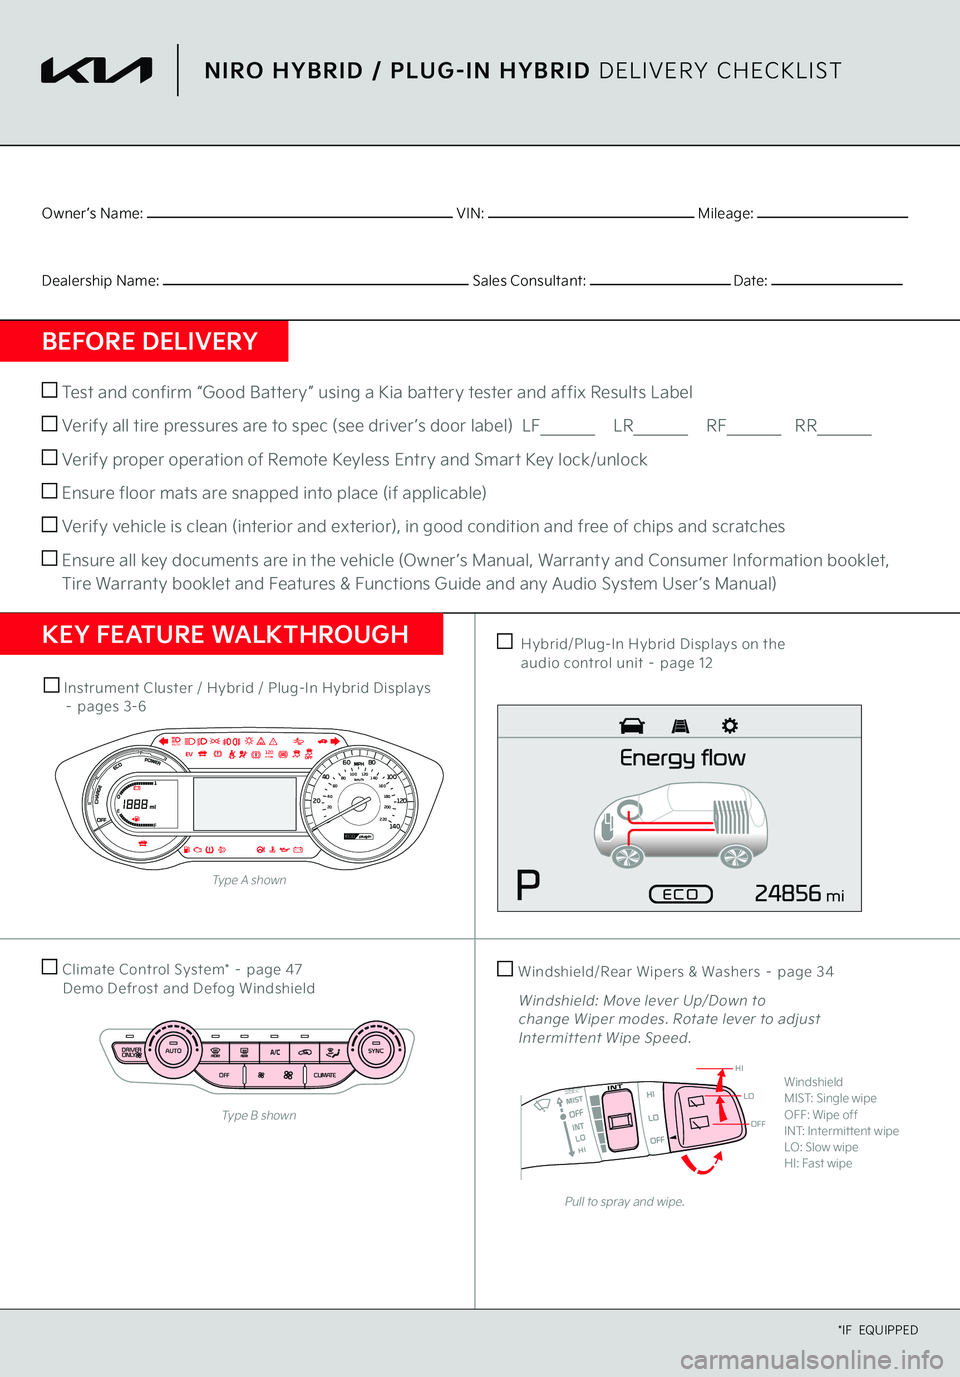
OFF
LO
HI
Climate Control System* – page 47
Demo Defrost and Defog Windshield
Hybrid/Plug-In Hybrid Displays on the
audio control unit – page 12
Instrument Cluster / Hybrid / Plug-In Hybrid Displays
– pages 3-6
Windshield/Rear Wipers & Washers – page 34 Windshield: Move lever Up/Down to change Wiper modes. Rotate lever to adjust Intermit tent Wipe Speed.
Pull to spray and wipe.
WindshieldMIST: Single wipeOFF: Wipe offINT: Intermittent wipeLO: Slow wipeHI: Fast wipe
220200
20
20 12 0
1 40
40
10 0
60
80
180
40 160
60 140
80 120
100
E
FAUTO
120miles
Type B shownType A shown
mi
Owner ’s Name:
VIN:
Mileage:
Dealership Name:
Sales Consultant:
Date:
BEFORE DELIVERY Test and confirm “Good Battery” using a Kia battery tester and affix Results Label Verify all tire pressures are to spec (see driver ’s door label) LF
LR
RF
RR
Verify proper operation of Remote Keyless Entry and Smart Key lock/unlock Ensure floor mats are snapped into place (if applicable) Verify vehicle is clean (interior and exterior), in good condition and free of chips and scratches Ensure all key documents are in the vehicle (Owner ’s Manual, Warranty and Consumer Information booklet, Tire Warranty booklet and Features & Functions Guide and any Audio System User ’s Manual)KEY FEATURE WALKTHROUGH
NIRO HYBRID / PLUG-IN HYBRID
DELIVERY CHECKLIST
*IF EQUIPPED