fuse box KIA NIRO PHEV 2022 Owners Manual
[x] Cancel search | Manufacturer: KIA, Model Year: 2022, Model line: NIRO PHEV, Model: KIA NIRO PHEV 2022Pages: 710, PDF Size: 10.35 MB
Page 67 of 710

Your vehicle at a glance
62
ENGINE COMPARTMENT
ODEP079115
■ ■(Gasoline) 1.6 GDi
❈ The actual engine room in the vehicle may differ from the illustration. 1. Engine coolant reservoir ...................7-22
2. Engine oil filler cap ...........................7-19
3. Engine oil dipstick .............................7-19
4. Brake fluid reservoir ..........................7-27
5. Inverter coolant reservoir ..................7-23
6. Fuse box ...........................................7-62
7. Engine clutch actuator reservoir tank
.7-29
8. Air cleaner.........................................7-33
9. Windshield washer fluid reservoir .....7-31
Page 567 of 710

Maintenance
47
ENGINE COMPARTMENT
ODEP079115
■ ■(Gasoline) 1.6 GDi
❈ The actual engine room in the vehicle may differ from the illustration. 1. Engine coolant reservoir
2. Engine oil filler cap
3. Engine oil dipstick
4. Brake fluid reservoir
5. Inverter coolant reservoir
6. Fuse box
7. Engine clutch actuator reservoir tank
8. Air cleaner
9. Windshield washer fluid reservoir
Page 625 of 710

Maintenance
62
7
Fuse switch
Always set the fuse switch to the ON
position before using the vehicle.
If you move the switch to the OFF
position, some items such as audio
and digital clock must be reset and
transmitter (or smart key) may not
work properly. When the switch is
Off, the caution indicator will be dis-
played on the instrument cluster.
Always place the fuse switch in the
ON position while driving the vehicle.
If the switch is located in the “OFF”
position, a caution indicator will be
displayed in the cluster.
Engine compartment fuse
replacement
1. Turn the engine start/stop button
to the OFF position and all other
switches off.
2. Remove the fuse panel cover by pressing the tab and pulling the
cover up. When the blade type
fuse is disconnected, remove it by
using the clip designed for chang-
ing fuses located in the engine
compartment fuse box. Upon
removal, securely insert reserve
fuse of the same rating.
ODEP071018L
ODEP079021
CAUTION - Fuse Panel
Covers
Set all switches to ON beforedriving.
If the vehicle is going to be unused for over 1 month, setall switches to OFF to preventthe batteries from draining.
The contact points of the switches may wear out withexcessive use. Please refrainfrom excessive use of theswitches (except for long-termparking for over 1 month).
Page 627 of 710
Maintenance
64
7
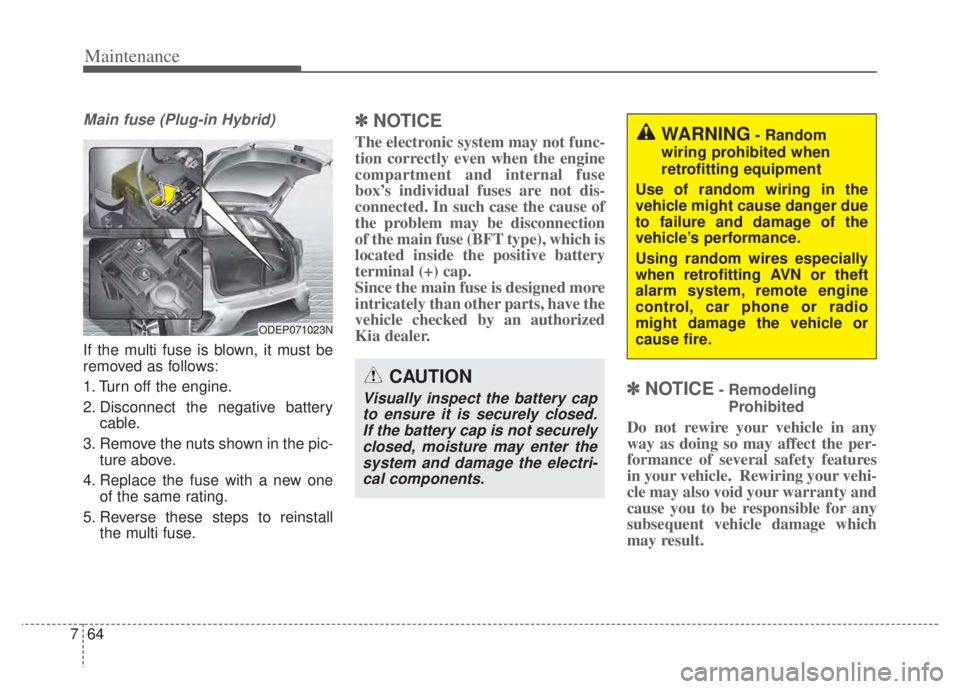
Main fuse (Plug-in Hybrid)
If the multi fuse is blown, it must be
removed as follows:
1. Turn off the engine.
2. Disconnect the negative battery
cable.
3. Remove the nuts shown in the pic- ture above.
4. Replace the fuse with a new one of the same rating.
5. Reverse these steps to reinstall the multi fuse.
✽ ✽NOTICE
The electronic system may not func-
tion correctly even when the engine
compartment and internal fuse
box’s individual fuses are not dis-
connected. In such case the cause of
the problem may be disconnection
of the main fuse (BFT type), which is
located inside the positive battery
terminal (+) cap.
Since the main fuse is designed more
intricately than other parts, have the
vehicle checked by an authorized
Kia dealer.
✽ ✽NOTICE- Remodeling
Prohibited
Do not rewire your vehicle in any
way as doing so may affect the per-
formance of several safety features
in your vehicle. Rewiring your vehi-
cle may also void your warranty and
cause you to be responsible for any
subsequent vehicle damage which
may result.
CAUTION
Visually inspect the battery capto ensure it is securely closed.If the battery cap is not securelyclosed, moisture may enter thesystem and damage the electri-cal components.
WARNING- Random
wiring prohibited when
retrofitting equipment
Use of random wiring in the
vehicle might cause danger due
to failure and damage of the
vehicle’s performance.
Using random wires especially
when retrofitting AVN or theft
alarm system, remote engine
control, car phone or radio
might damage the vehicle or
cause fire.
ODEP071023N
Page 631 of 710
Maintenance
68
7
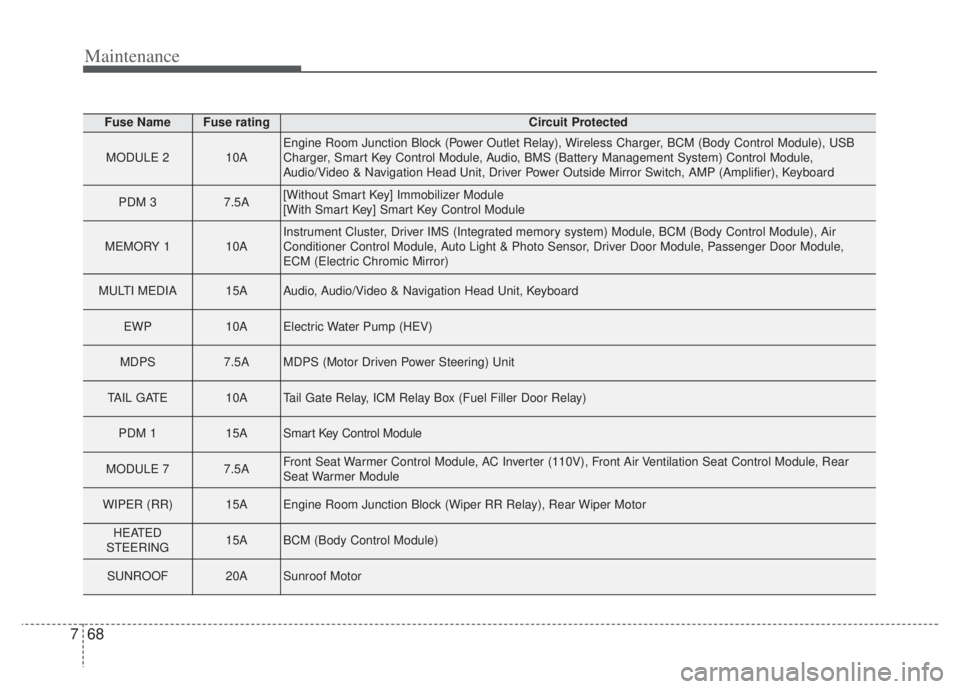
Fuse NameFuse ratingCircuit Protected
MODULE 210AEngine Room Junction Block (Power Outlet Relay), Wireless Charger, BCM (Body Control Module), USB
Charger, Smart Key Control Module, Audio, BMS (Battery Management System) Control Module,
Audio/Video & Navigation Head Unit, Driver Power Outside Mirror Switch, AMP (Amplifier), Keyboard
PDM 37.5A[Without Smart Key] Immobilizer Module
[With Smart Key] Smart Key Control Module
MEMORY 110AInstrument Cluster, Driver IMS (Integrated memory system) Module, BCM (Body Control Module), Air
Conditioner Control Module, Auto Light & Photo Sensor, Driver Door Module, Passenger Door Module,
ECM (Electric Chromic Mirror)
MULTI MEDIA15AAudio, Audio/Video & Navigation Head Unit, Keyboard
EWP10AElectric Water Pump (HEV)
MDPS7.5AMDPS (Motor Driven Power Steering) Unit
TAIL GATE10ATail Gate Relay, ICM Relay Box (Fuel Filler Door Relay)
PDM 115ASmart Key Control Module
MODULE 77.5AFront Seat Warmer Control Module, AC Inverter (110V), Front Air Ventilation Seat Control Module, Rear
Seat Warmer Module
WIPER (RR)15AEngine Room Junction Block (Wiper RR Relay), Rear Wiper Motor
HEATED
STEERING15ABCM (Body Control Module)
SUNROOF20ASunroof Motor
Page 633 of 710

Maintenance
70
7
Fuse NameFuse ratingCircuit Protected
DOOR LOCK20ADoor Lock/Unlock Relay, ICM Relay Box (Two Turn Unlock Relay)
WIPER 2 (FRT)10AWiper Motor, Engine Room Junction Block (Front Wiper (Low) Relay), ECM (Engine Control Module),
BCM (Body Control Module)
MODULE 67.5ABCM (Body Control Module), Smart Key Control Module
S/HEATER
(REAR)25ARear Seat Warmer Control Module
HEATED
MIRROR10ADriver Power Outside Mirror, Passenger Power Outside Mirror, Air Conditioner Control Module
WIPER1 (FRT)30AWiper Motor, Engine Room Junction Block (Front Wiper (Low) Relay)
Page 635 of 710
Maintenance
72
7
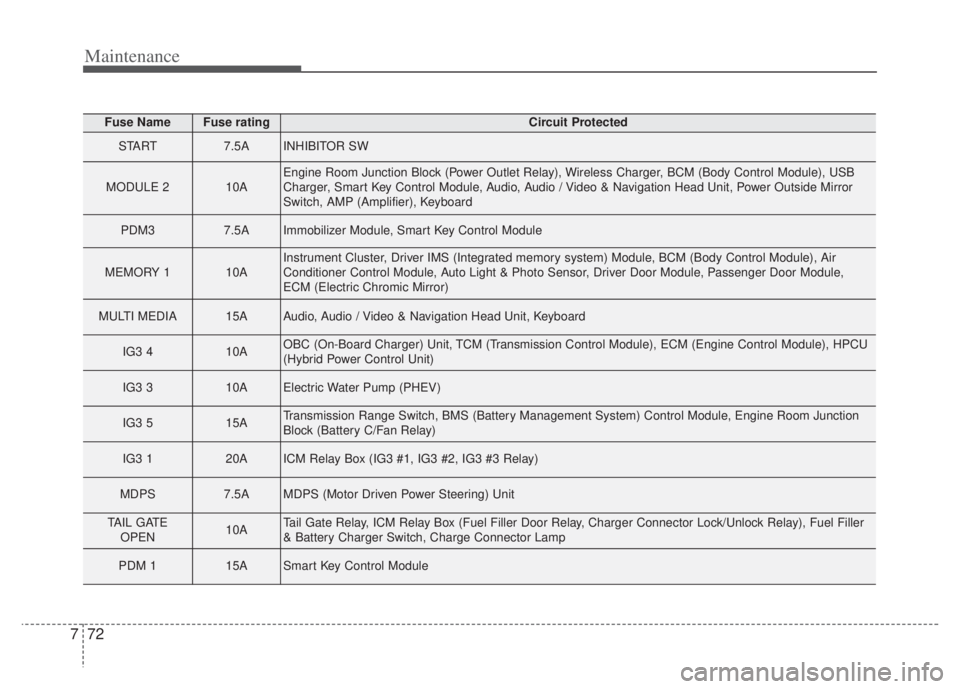
Fuse NameFuse ratingCircuit Protected
START7.5AINHIBITOR SW
MODULE 210AEngine Room Junction Block (Power Outlet Relay), Wireless Charger, BCM (Body Control Module), USB
Charger, Smart Key Control Module, Audio, Audio / Video & Navigation Head Unit, Power Outside Mirror
Switch, AMP (Amplifier), Keyboard
PDM37.5AImmobilizer Module, Smart Key Control Module
MEMORY 110AInstrument Cluster, Driver IMS (Integrated memory system) Module, BCM (Body Control Module), Air
Conditioner Control Module, Auto Light & Photo Sensor, Driver Door Module, Passenger Door Module,
ECM (Electric Chromic Mirror)
MULTI MEDIA15AAudio, Audio / Video & Navigation Head Unit, Keyboard
IG3 410AOBC (On-Board Charger) Unit, TCM (Transmission Control Module), ECM (Engine Control Module), HPCU
(Hybrid Power Control Unit)
IG3 310AElectric Water Pump (PHEV)
IG3 515ATransmission Range Switch, BMS (Battery Management System) Control Module, Engine Room Junction
Block (Battery C/Fan Relay)
IG3 120AICM Relay Box (IG3 #1, IG3 #2, IG3 #3 Relay)
MDPS7.5AMDPS (Motor Driven Power Steering) Unit
TAIL GATE
OPEN10ATail Gate Relay, ICM Relay Box (Fuel Filler Door Relay, Charger Connector Lock/Unlock Relay), Fuel Filler
& Battery Charger Switch, Charge Connector Lamp
PDM 115ASmart Key Control Module
Page 637 of 710

Maintenance
74
7
Fuse NameFuse ratingCircuit Protected
BATTERY
MANAGEMENT10ABMS (Battery Management System) Control Module
P/SEAT (DRV)30ADriver Seat Manual Switch, Driver IMS (Integrated memory system) Module
AMP30AAMP (Amplifier)
AMS10ABattery Sensor
MODULE 110AData Link Connector, Front View Camera, Hazard Switch, Driver/Passenger Door Module, Driver/Passenger
Smart Key Outside Handle, Outside Mirror Folding/Unfolding Relay, Mood Lamp, Outside Mirror Switch,
Key inter lock
DOOR LOCK20ADoor Lock/Unlock Relay, ICM Relay Box (Two Turn Unlock Relay)
WIPER2 (FRT)10AWiper Motor, Engine Room Junction Block (Front Wiper (Low) Relay), ECM (Engine Control Module), BCM
(Body Control Module)
MODULE 67.5ABCM (Body Control Module), Smart Key Control Module
S/HEATER (REAR)25ARear Seat Warmer Control Module
HEATED
MIRROR10ADriver Power Outside Mirror, Passenger Power Outside Mirror, Air Conditioner Control Module
WIPER 1 (FRT)30AWiper Motor, Engine Room Junction Block (Front Wiper (Low) Relay)
P/SEAT (PASS)25APassenger Seat Module
Page 650 of 710
787
Maintenance
LIGHT BULBS
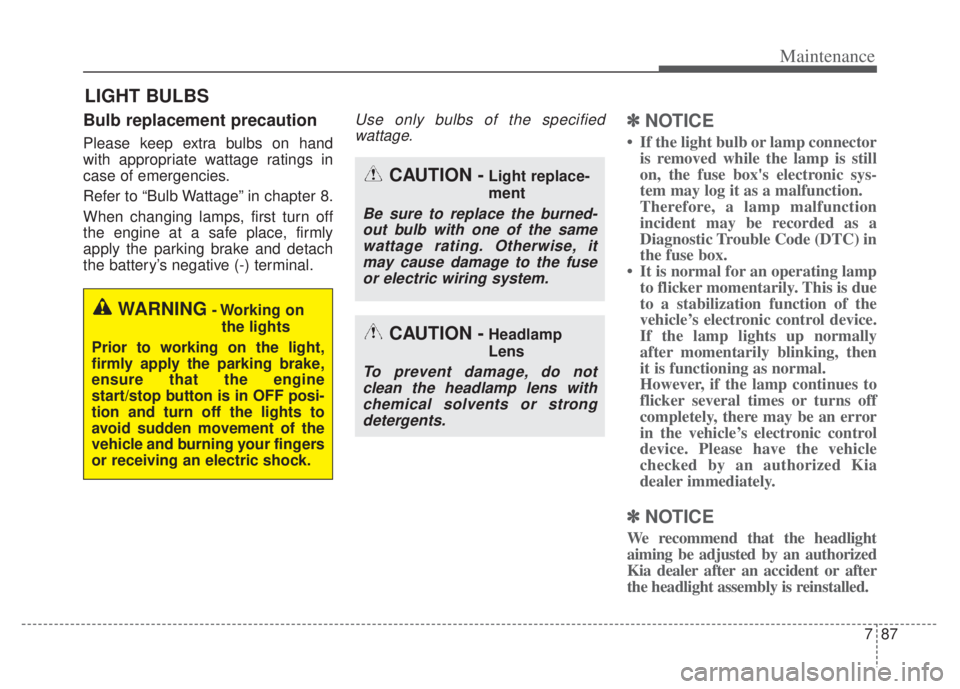
Bulb replacement precaution
Please keep extra bulbs on hand
with appropriate wattage ratings in
case of emergencies.
Refer to “Bulb Wattage” in chapter 8.
When changing lamps, first turn off
the engine at a safe place, firmly
apply the parking brake and detach
the battery’s negative (-) terminal.
Use only bulbs of the specifiedwattage.✽ ✽ NOTICE
• If the light bulb or lamp connector
is removed while the lamp is still
on, the fuse box's electronic sys-
tem may log it as a malfunction.
Therefore, a lamp malfunction
incident may be recorded as a
Diagnostic Trouble Code (DTC) in
the fuse box.
• It is normal for an operating lamp to flicker momentarily. This is due
to a stabilization function of the
vehicle’s electronic control device.
If the lamp lights up normally
after momentarily blinking, then
it is functioning as normal.
However, if the lamp continues to
flicker several times or turns off
completely, there may be an error
in the vehicle’s electronic control
device. Please have the vehicle
checked by an authorized Kia
dealer immediately.
✽ ✽ NOTICE
We recommend that the headlight
aiming be adjusted by an authorized
Kia dealer after an accident or after
the headlight assembly is reinstalled.
WARNING- Working on
the lights
Prior to working on the light,
firmly apply the parking brake,
ensure that the engine
start/stop button is in OFF posi-
tion and turn off the lights to
avoid sudden movement of the
vehicle and burning your fingers
or receiving an electric shock.
CAUTION -Light replace-
ment
Be sure to replace the burned- out bulb with one of the samewattage rating. Otherwise, itmay cause damage to the fuseor electric wiring system.
CAUTION -Headlamp
Lens
To prevent damage, do notclean the headlamp lens withchemical solvents or strongdetergents.
Page 651 of 710
Maintenance
88
7
✽ ✽
NOTICE
You can find moisture inside the lens
of lamps after a car wash or driving
in the rain. It is a natural event
caused by the temperature differ-
ence between the inside and the out-
side of the lamp and does not mean a
problem with its functions. The
moisture inside the lamp would dis-
appear if you drive the vehicle with
the headlamp turned on, however,
the level at which the moisture is
removed may differ depending on
the size/location/condition of the
lamp. If the moisture continues to
stay inside the lamp, we recommend
that you have the vehicle checked by
an authorized Kia dealer.
If you don’t have the necessary tools,
the correct bulbs and the expertise,
consult an authorized Kia dealer. In
many cases, it is difficult to replace
vehicle light bulbs because other
parts of the vehicle must be removed
before you can get to the bulb. This is
especially true if you have to remove
the headlamp assembly to get to the
bulb(s).
Removing/installing the headlamp
assembly can result in damage to
the vehicle.
If non-genuine parts or substandard
bulbs are used, it may lead to blow-
ing a fuse or other wiring damages.
Do not install extra lamps or LEDs to
the vehicle. If additional lights are
installed, it may lead to lamp mal-
functions and flickering. Additionally,
the fuse box and other writing may
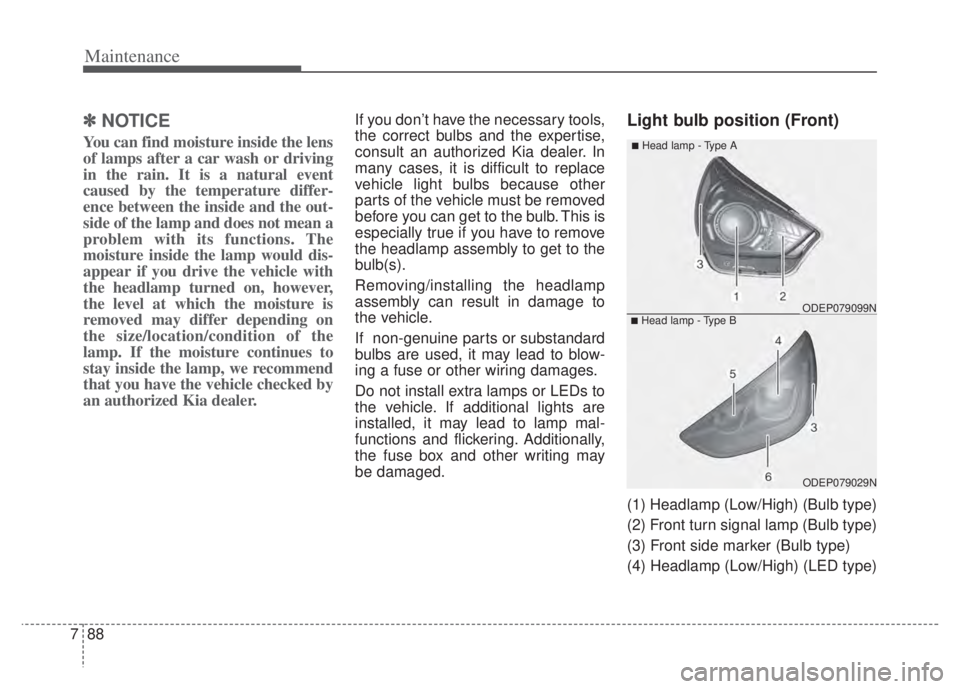
be damaged.Light bulb position (Front)
(1) Headlamp (Low/High) (Bulb type)
(2) Front turn signal lamp (Bulb type)
(3) Front side marker (Bulb type)
(4) Headlamp (Low/High) (LED type)
ODEP079029N
ODEP079099N
■Head lamp - Type A
■Head lamp - Type B