height KIA Opirus 2007 1.G Owner's Manual
[x] Cancel search | Manufacturer: KIA, Model Year: 2007, Model line: Opirus, Model: KIA Opirus 2007 1.GPages: 283, PDF Size: 18.42 MB
Page 27 of 283
317
Knowing your vehicle
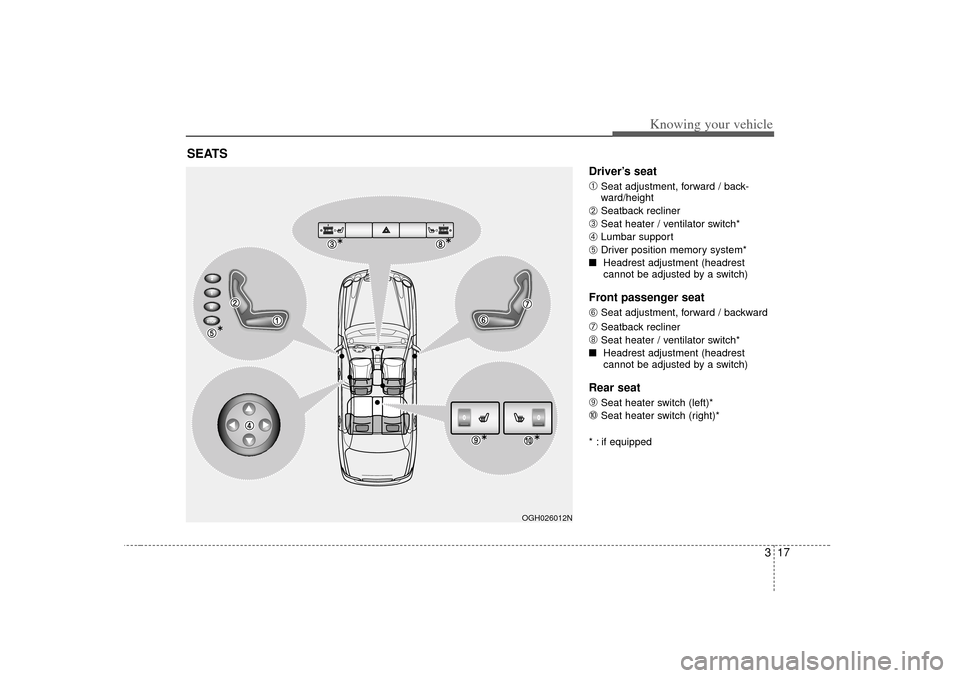
Driver’s seat
➀
Seat adjustment, forward / back-
ward/height
➁
Seatback recliner
➂
Seat heater / ventilator switch*
➃
Lumbar support
➄
Driver position memory system*
Headrest adjustment (headrest
cannot be adjusted by a switch)
Front passenger seat
\b
Seat adjustment, forward / backward
➆
Seatback recliner
➇
Seat heater / ventilator switch*
Headrest adjustment (headrest
cannot be adjusted by a switch)
Rear seat
\f
Seat heater switch (left)*
➉
Seat heater switch (right)*
* : if equipped
SEATS
STOPSTOP
OGH026012N
Page 29 of 283
319
Knowing your vehicle
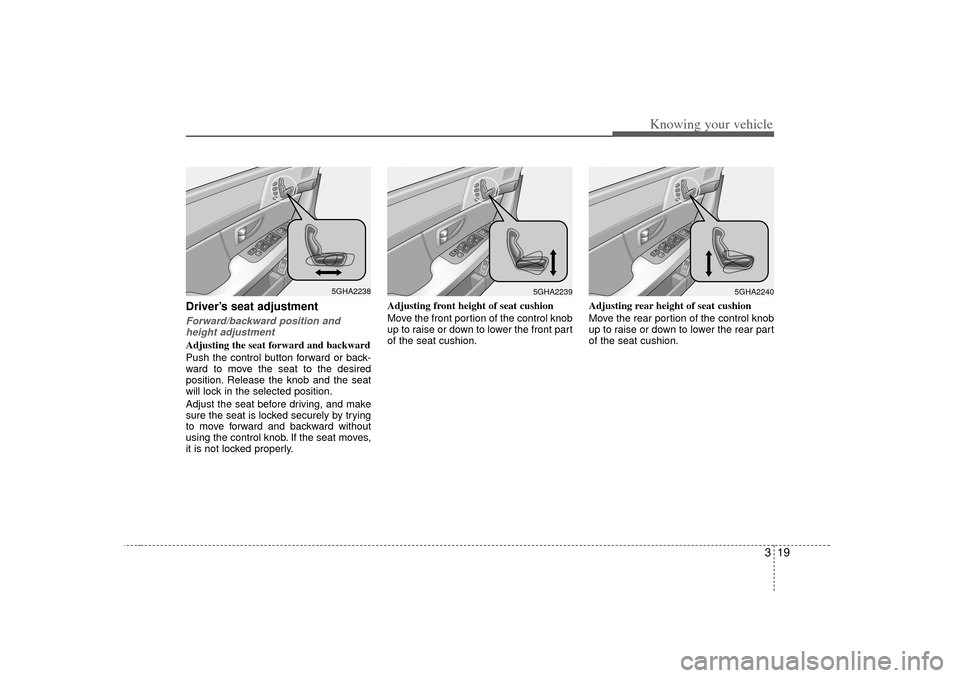
Driver’s seat adjustmentForward/backward position andheight adjustmentAdjusting the seat forward and backward
Push the control button forward or back-
ward to move the seat to the desired
position. Release the knob and the seat
will lock in the selected position.
Adjust the seat before driving, and make
sure the seat is locked securely by trying
to move forward and backward without
using the control knob. If the seat moves,
it is not locked properly. Adjusting front height of seat cushion
Move the front portion of the control knob
up to raise or down to lower the front part
of the seat cushion.
Adjusting rear height of seat cushion
Move the rear portion of the control knob
up to raise or down to lower the rear part
of the seat cushion.
5GHA2238
5GHA2239
5GHA2240
Page 30 of 283
Knowing your vehicle20
3
WARNING
Driving or riding in a vehicle with a
front seatback reclined could lead
to serious or fatal injury in an acci-
dent. If a front seat is reclined dur-
ing an accident, the occupant’s hips
may slide under the lap portion of
the safety belt applying great force
to the unprotected abdomen or
neck or a passenger may be ejected
in a rollover. Serious or fatal inter-
nal injuries could result. Keep the
seatbacks in a comfortably upright
position whenever the vehicle is in
motion.
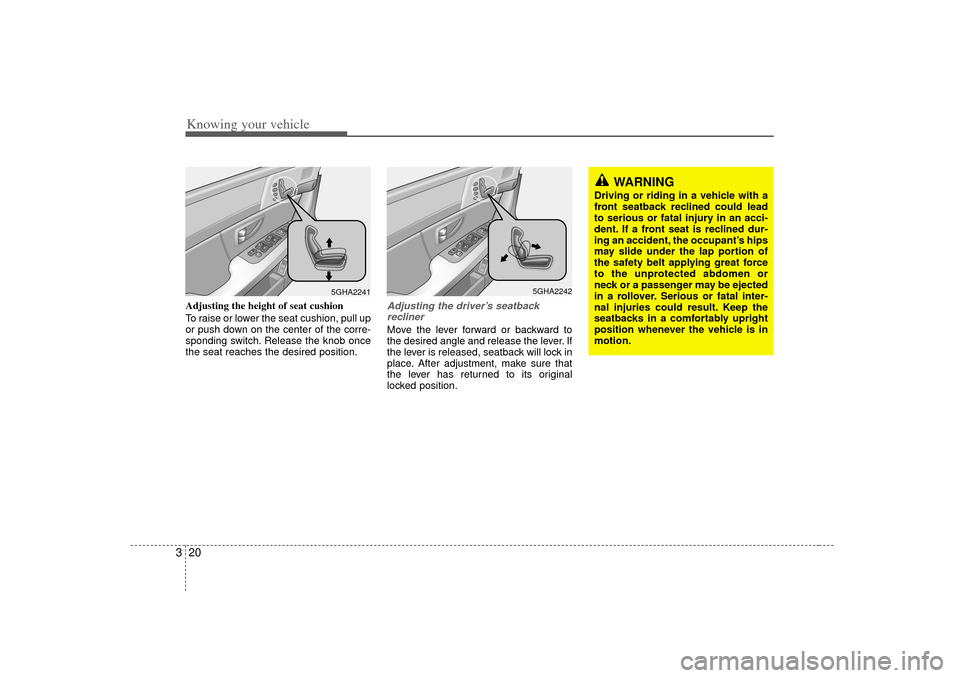
Adjusting the height of seat cushion
To raise or lower the seat cushion, pull up
or push down on the center of the corre-
sponding switch. Release the knob once
the seat reaches the desired position.
Adjusting the driver’s seatback
reclinerMove the lever forward or backward to
the desired angle and release the lever. If
the lever is released, seatback will lock in
place. After adjustment, make sure that
the lever has returned to its original
locked position.
5GHA2241
5GHA2242
Page 34 of 283
Knowing your vehicle24
3
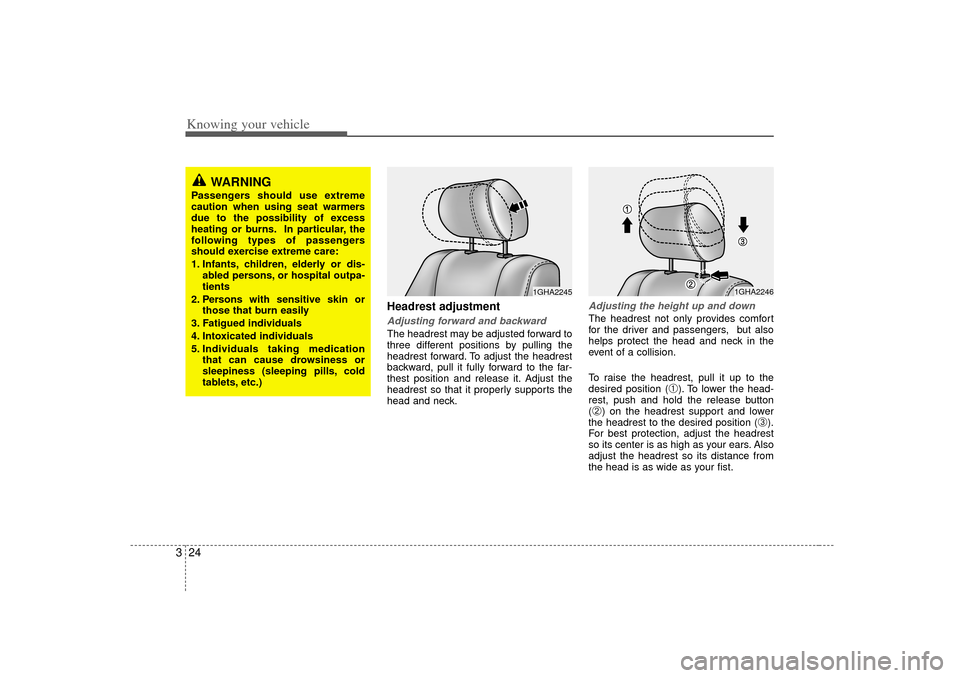
Headrest adjustmentAdjusting forward and backwardThe headrest may be adjusted forward to
three different positions by pulling the
headrest forward. To adjust the headrest
backward, pull it fully forward to the far-
thest position and release it. Adjust the
headrest so that it properly supports the
head and neck.
Adjusting the height up and downThe headrest not only provides comfort
for the driver and passengers, but also
helps protect the head and neck in the
event of a collision.
To raise the headrest, pull it up to the
desired position (
➀). To lower the head-
rest, push and hold the release button
(
➁) on the headrest support and lower
the headrest to the desired position (
➂).
For best protection, adjust the headrest
so its center is as high as your ears. Also
adjust the headrest so its distance from
the head is as wide as your fist.
1GHA2245
WARNING
Passengers should use extreme
caution when using seat warmers
due to the possibility of excess
heating or burns. In particular, the
following types of passengers
should exercise extreme care:
1. Infants, children, elderly or dis- abled persons, or hospital outpa-
tients
2. Persons with sensitive skin or those that burn easily
3. Fatigued individuals
4. Intoxicated individuals
5. Individuals taking medication that can cause drowsiness or
sleepiness (sleeping pills, cold
tablets, etc.)
1GHA2246
Page 36 of 283
Knowing your vehicle26
3
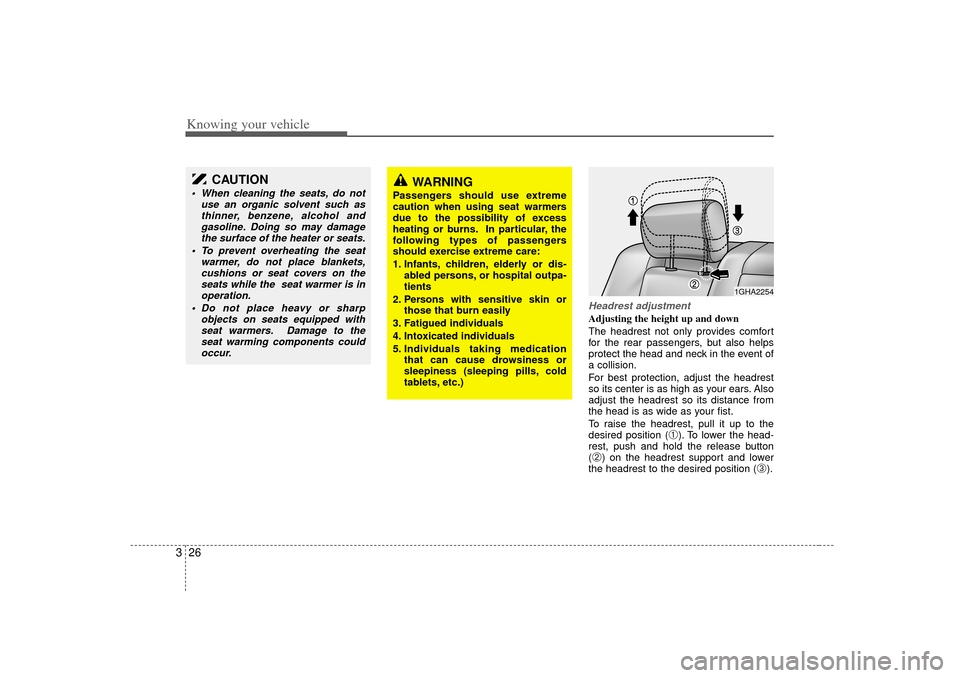
Headrest adjustmentAdjusting the height up and down
The headrest not only provides comfort
for the rear passengers, but also helps
protect the head and neck in the event of
a collision.
For best protection, adjust the headrest
so its center is as high as your ears. Also
adjust the headrest so its distance from
the head is as wide as your fist.
To raise the headrest, pull it up to the
desired position (
➀). To lower the head-
rest, push and hold the release button
(
➁) on the headrest support and lower
the headrest to the desired position (
➂).
WARNING
Passengers should use extreme
caution when using seat warmers
due to the possibility of excess
heating or burns. In particular, the
following types of passengers
should exercise extreme care:
1. Infants, children, elderly or dis- abled persons, or hospital outpa-
tients
2. Persons with sensitive skin or those that burn easily
3. Fatigued individuals
4. Intoxicated individuals
5. Individuals taking medication that can cause drowsiness or
sleepiness (sleeping pills, cold
tablets, etc.)
1GHA2254
CAUTION
When cleaning the seats, do not use an organic solvent such asthinner, benzene, alcohol andgasoline. Doing so may damagethe surface of the heater or seats.
To prevent overheating the seat warmer, do not place blankets,cushions or seat covers on the seats while the seat warmer is inoperation.
Do not place heavy or sharp objects on seats equipped withseat warmers. Damage to theseat warming components couldoccur.
Page 47 of 283
337
Knowing your vehicle
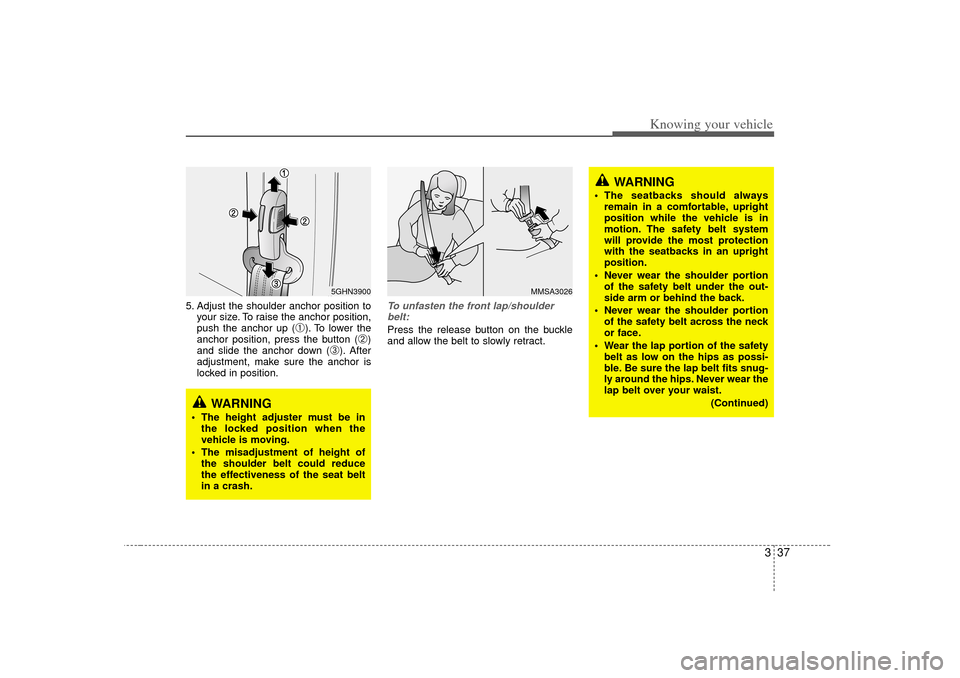
5. Adjust the shoulder anchor position toyour size. To raise the anchor position,
push the anchor up (
➀). To lower the
anchor position, press the button (
➁)
and slide the anchor down (
➂). After
adjustment, make sure the anchor is
locked in position.
To unfasten the front lap/shoulder belt:Press the release button on the buckle
and allow the belt to slowly retract.
MMSA3026
5GHN3900
WARNING
The height adjuster must be in the locked position when the
vehicle is moving.
The misadjustment of height of the shoulder belt could reduce
the effectiveness of the seat belt
in a crash.
WARNING
The seatbacks should alwaysremain in a comfortable, upright
position while the vehicle is in
motion. The safety belt system
will provide the most protection
with the seatbacks in an upright
position.
Never wear the shoulder portion of the safety belt under the out-
side arm or behind the back.
Never wear the shoulder portion of the safety belt across the neck
or face.
Wear the lap portion of the safety belt as low on the hips as possi-
ble. Be sure the lap belt fits snug-
ly around the hips. Never wear the
lap belt over your waist.
(Continued)
Page 54 of 283
Knowing your vehicle44
3(Continued)
Since a safety belt or child
restraint system can become very
hot if it is left in a closed vehicle,
be sure to check the seat cover
and buckles before placing a
child there.
When the child restraint system is not in use, store it in the trunk
or fasten it with a safety belt or
LATCH system so that it will not
be thrown forward in the case of a
sudden stop or an accident.
Children who are too large to be in a child restraint should sit in
the rear seat and be restrained
with the available lap/shoulder
belts. Never allow children to ride
in the front passenger seat.
(Continued)
(Continued)
Always make sure that the shoul-der belt portion of the lap/shoul-
der belt is positioned midway
over the shoulder, never across
the neck or behind the back. The
lap belt portion of the lap/shoul-
der belt must always be posi-
tioned as low as possible on the
child's hips and as snug as pos-
sible.
If the seat belt will not properly fit the child, an approved booster
seat in the rear seat must be used
in order to raise the child's seat-
ing height so that the seat belt
will properly fit the child.
(Continued)
(Continued)
Never allow a child to stand up orkneel on the seat.
Never use an infant carrier or child safety seat that "hooks"
over a seatback; it may not pro-
vide adequate security in an acci-
dent.
Never allow a child to be held in a person's arms while they are in a
moving vehicle, as this could
result in serious injury to the
child in the event of an accident
or a sudden stop. Holding a child
in a moving vehicle does not pro-
vide the child with any means of
protection during an accident,
even if the person holding the
child is wearing a seat belt.
Page 264 of 283
729
Maintenance
Wheel replacement
When replacing the metal wheels for
any reason, make sure the new
wheels are equivalent to the original
factory units in diameter, rim width
and offset.
WARNING
- Replacing tires
Driving on worn-out tires is very hazardous and will
reduce braking effectiveness,
steering accuracy, and trac-
tion.
Your vehicle is equipped with tires designed to provide for
safe ride and handling capa-
bility. Do not use a size and
type of tire and wheel that is
different from the one that is
originally installed on your
vehicle. It can affect the safety
and performance of your vehi-
cle, which could lead to han-
dling failure or rollover and
serious injury. When replacing
the tires, be sure to equip all
four tires with the tire and
wheel of the same size, type,
tread, brand and load-carrying
capacity.
(Continued)
(Continued)If you nevertheless decide to
equip your vehicle with any
tire/wheel combination not
recommended by Kia for off
road driving, you should not
use these tires for highway
driving.
The use of any other tire size or type may seriously affect
ride, handling, ground clear-
ance, stopping distance, body
to tire clearance, snow tire
clearance, and speedometer
reliability.
It is best to replace all four tires at the same time. If that is
not possible, or necessary,
then replace the two front or
two rear tires as a pair.
Replacing just one tire can
seriously affect your vehicle’s
handling.
WARNING
A wheel that is not the correct
size may adversely affect wheel
and bearing life, braking and
stopping abilities, handling
characteristics, ground clear-
ance, body-to-tire clearance,
snow chain clearance,
speedometer calibration, head-
light aim and bumper height.
Page 265 of 283
Maintenance30
7Tire maintenance
In addition to proper inflation, correct
wheel alignment helps to decrease
tire wear. If you find a tire is worn
unevenly, have your dealer check the
wheel alignement.
When you have new tires installed,
make sure they are balanced. This
will increase vehicle ride comfort and
tire life. Additionally, a tire should
always be rebalanced if it is removed
from the wheel.
Tire traction
Tire traction can be reduced if you
drive on worn tires, tires that are
improperly inflated or on slippery
road surfaces. Tires should be
replaced when tread wear indicators
appear. To reduce the possiblity of
losing control, slow down whenever
there is rain, snow or ice on the road. Tire sidewall labeling
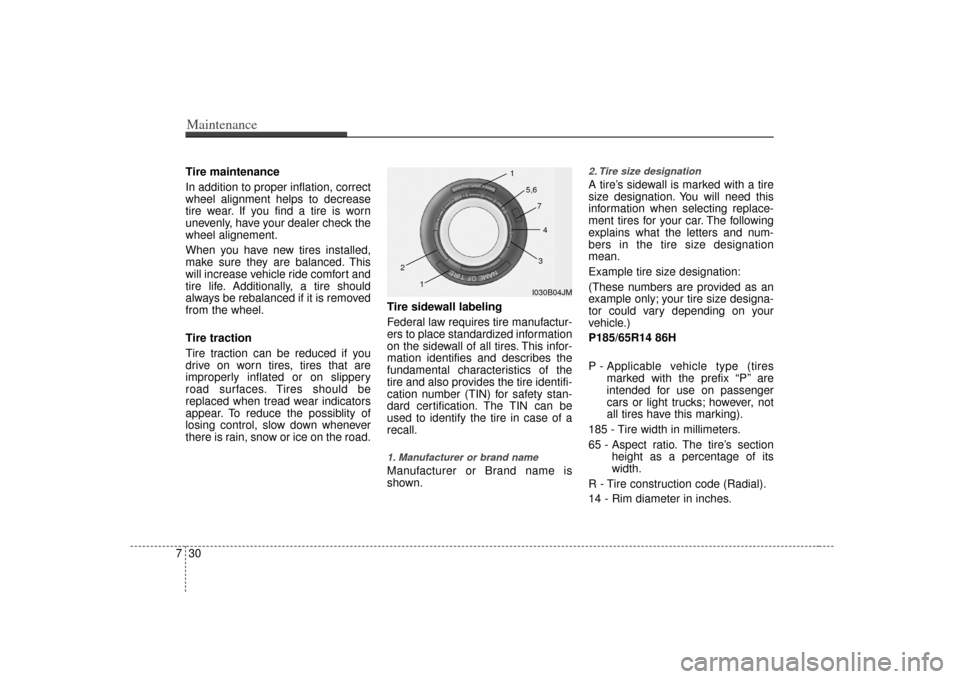
Federal law requires tire manufactur-
ers to place standardized information
on the sidewall of all tires. This infor-
mation identifies and describes the
fundamental characteristics of the
tire and also provides the tire identifi-
cation number (TIN) for safety stan-
dard certification. The TIN can be
used to identify the tire in case of a
recall.
1. Manufacturer or brand nameManufacturer or Brand name is
shown.
2. Tire size designation A tire’s sidewall is marked with a tire
size designation. You will need this
information when selecting replace-
ment tires for your car. The following
explains what the letters and num-
bers in the tire size designation
mean.
Example tire size designation:
(These numbers are provided as an
example only; your tire size designa-
tor could vary depending on your
vehicle.)
P185/65R14 86H
P - Applicable vehicle type (tires
marked with the prefix “P’’ are
intended for use on passenger
cars or light trucks; however, not
all tires have this marking).
185 - Tire width in millimeters.
65 - Aspect ratio. The tire’s section height as a percentage of its
width.
R - Tire construction code (Radial).
14 - Rim diameter in inches.
I030B04JM
1
1
2
34
5,6
7
Page 268 of 283
733
Maintenance
Traction - AA, A, B & C
The traction grades, from highest to
lowest, are AA, A, B and C. The
grades represent the tires ability to
stop on wet pavement as measured
under controlled conditions on spec-
ified government test surfaces of
asphalt and concrete. A tire marked
C may have poor traction perform-
ance.
Temperature -A, B & C
The temperature grades are A (the
highest), B and C. The grades repre-
sent the tire’s resistance to the gen-
eration of heat and its ability to dissi-
pate heat when tested under con-
trolled conditions on a specified
indoor laboratory test wheel.
Sustained high temperature can
cause the material of the tires to
degenerate and reduce tires life, and
excessive temperature can lead to
sudden tires failure. Grades A and B
represent higher levels of perform-
ance on the laboratory test wheel than
the minimum required by the law.Tire terminology and definitions
Air Pressure: The amount of air
inside the tire pressing outward on
the tire. Air pressure is expressed in
kilopascal (kPa) or pounds per
square inch (psi).
Accessory Weight
: This means the
combined weight of optional acces-
sories. Some examples of optional
accessories are, automatic transmis-
sion, power seats, and air condition-
ing.
Aspect Ratio : The relationship of a
tire's height to its width.
Belt: A rubber coated layer of cords
that is located between the plies and
the tread. Cords may be made from
steel or other reinforcing materials.
Bead: The tire bead contains steel
wires wrapped by steel cords that
hold the tire onto the rim.
Bias Ply Tire : A pneumatic tire in
which the plies are laid at alternate
angles less than 90 degrees to the
centerline of the tread.
WARNING
- Tire temperature
The temperature grade for this
tire is established for a tire that
is properly inflated and not
overloaded. Excessive speed,
underinflation, or excessive
loading, either separately or in
combination, can cause heat
build-up and possible sudden
tire failure. This can cause loss
of vehicle control and serious
injury or death.