heater KIA Optima 2006 2.G Owner's Manual
[x] Cancel search | Manufacturer: KIA, Model Year: 2006, Model line: Optima, Model: KIA Optima 2006 2.GPages: 225, PDF Size: 3.77 MB
Page 28 of 225
3-19
HEATING THE FRONT
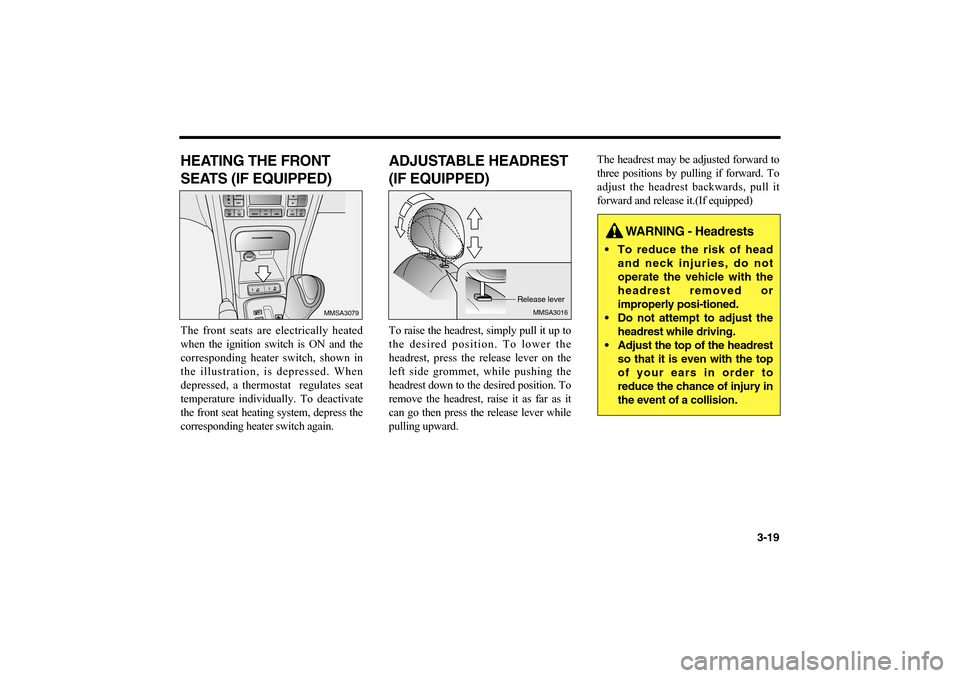
SEATS (IF EQUIPPED)The front seats are electrically heated
when the ignition switch is ON and the
corresponding heater switch, shown in
the illustration, is depressed. When
depressed, a thermostat regulates seat
temperature individually. To deactivate
the front seat heating system, depress the
corresponding heater switch again.
ADJUSTABLE HEADREST
(IF EQUIPPED)To raise the headrest, simply pull it up to
the desired position. To lower the
headrest, press the release lever on the
left side grommet, while pushing the
headrest down to the desired position. To
remove the headrest, raise it as far as it
can go then press the release lever while
pulling upward.The headrest may be adjusted forward to
three positions by pulling if forward. To
adjust the headrest backwards, pull it
forward and release it.(If equipped)
MMSA3079
MMSA3016
Release lever
WARNING - Headrests
To reduce the risk of head
and neck injuries, do not
operate the vehicle with the
headrest removed or
improperly posi-tioned.
Do not attempt to adjust the
headrest while driving.
Adjust the top of the headrest
so that it is even with the top
of your ears in order to
reduce the chance of injury in
the event of a collision.
MS-CNA-Eng 3.QXD 7/25/2005 5:17 PM Page 19
Page 69 of 225
OUTSIDE REARVIEW
MIRROR HEATER
(IF EQUIPPED)The outside rearview mirror heater is
actuated in conjunction with the rear
window defroster. To heat the outside
rearview mirror glass, push the switch
for the rear window defroster.
The rearview mirror glass will be heated
for defrosting or defogging and will give
you improved rear vision in inclement
weather conditions. Push the switch
again to turn the heater off.
The outside rearview mirror heater
automatically turns itself off after 20
minutes.
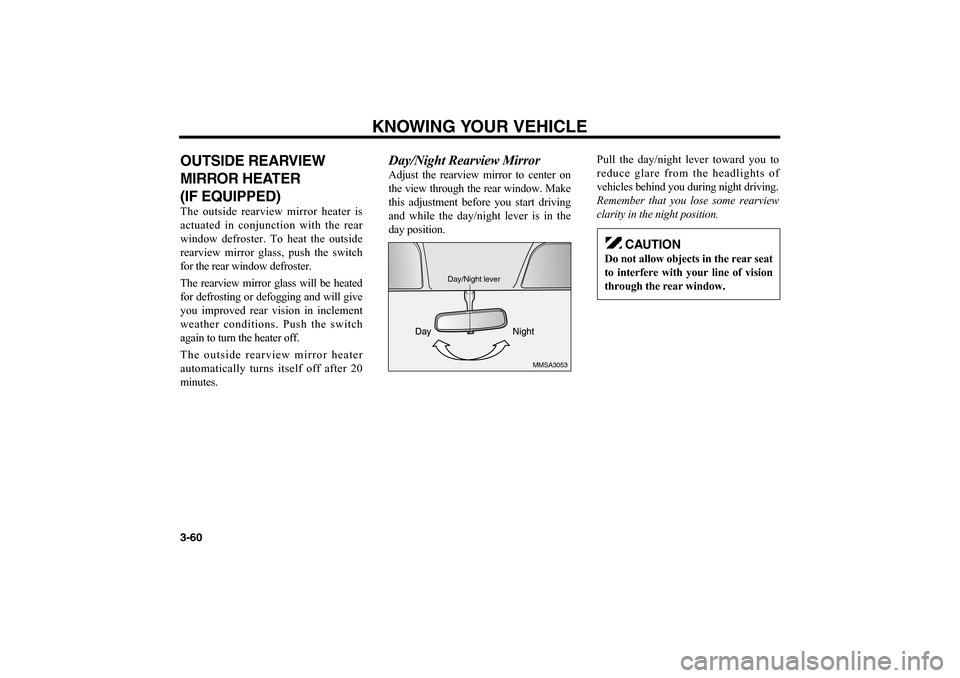
Day/Night Rearview MirrorAdjust the rearview mirror to center on
the view through the rear window. Make
this adjustment before you start driving
and while the day/night lever is in the
day position.Pull the day/night lever toward you to
reduce glare from the headlights of
vehicles behind you during night driving.
Remember that you lose some rearview
clarity in the night position.
KNOWING YOUR VEHICLE
3-60
MMSA3053
Day/Night lever
CAUTION
Do not allow objects in the rear seat
to interfere with your line of vision
through the rear window.
MS-CNA-Eng 3.QXD 7/25/2005 5:17 PM Page 60
Page 112 of 225
4-33
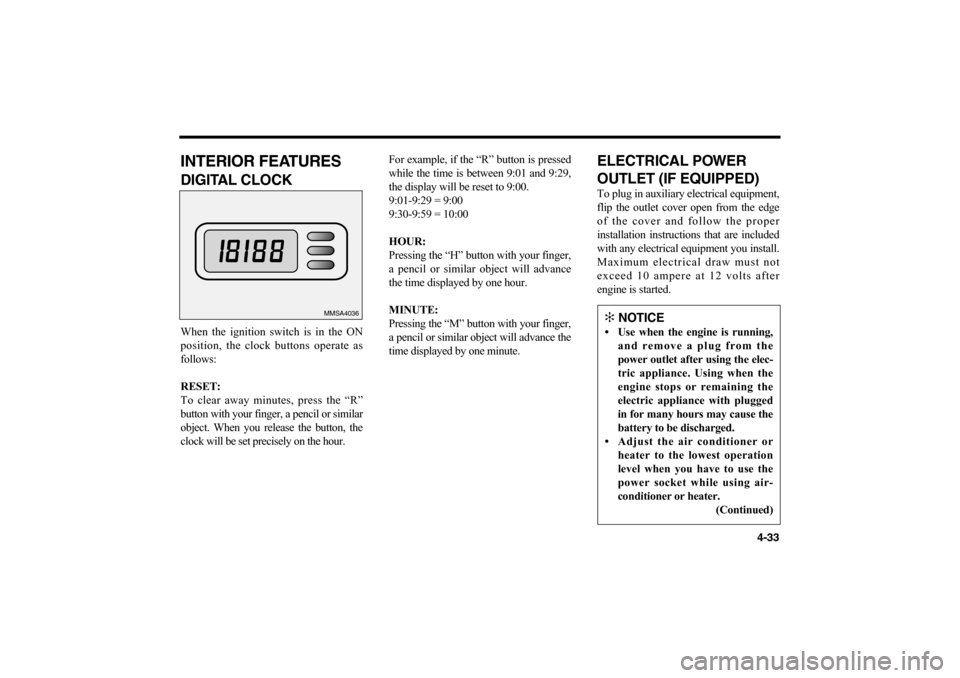
INTERIOR FEATURESDIGITAL CLOCK When the ignition switch is in the ON
position, the clock buttons operate as
follows:
RESET:
To clear away minutes, press the “R”
button with your finger, a pencil or similar
object. When you release the button, the
clock will be set precisely on the hour.For example, if the “R” button is pressed
while the time is between 9:01 and 9:29,
the display will be reset to 9:00.
9:01-9:29 = 9:00
9:30-9:59 = 10:00
HOUR:
Pressing the “H” button with your finger,
a pencil or similar object will advance
the time displayed by one hour.
MINUTE:
Pressing the “M” button with your finger,
a pencil or similar object will advance the
time displayed by one minute.
ELECTRICAL POWER
OUTLET (IF EQUIPPED)To plug in auxiliary electrical equipment,
flip the outlet cover open from the edge
of the cover and follow the proper
installation instructions that are included
with any electrical equipment you install.
Maximum electrical draw must not
exceed 10 ampere at 12 volts after
engine is started.
MMSA4036
✻
NOTICE
• Use when the engine is running,
and remove a plug from the
power outlet after using the elec-
tric appliance. Using when the
engine stops or remaining the
electric appliance with plugged
in for many hours may cause the
battery to be discharged.
• Adjust the air conditioner or
heater to the lowest operation
level when you have to use the
power socket while using air-
conditioner or heater.
(Continued)
MS-CNA-Eng 4(~39).QXD 7/25/2005 5:16 PM Page 33
Page 132 of 225

4-53
REAR HEATER DUCT
(IF EQUIPPED)Whenever the ventilation controls are in
the face-floor or floor position, air is
directed to the rear seat passenger floor
area.AIR QUALITY CONTROL
SYSTEM (IF EQUIPPED)The air inflow from the outside of the
vehicle can be automatically controlled.
Press the button to activate the “Air
Quality Control System”. To deactivate
the system, press the button or air
intake control button or set modes
selection knob to position.
When using AQS mode, AQS(Air
Quality Control System) automatically
senses outdoor air pollutants and
minimizes them from entering the
vehicle, however, unpleasant or foul
odors that might be present may still be
noticeable within the vehicle.
CAUTION
Prolonged driving with “Air
Quality Control System” ON
will cause frosting inside the
vehicle.
To defrost the vehicle, set the
mode selection knob to Defrost
( ) position or the air intake
button to the outside position.
The air quality control sensor is
located at the side of the radia-
tor. Be careful to avoid damag-
ing the sensor.
MS-CNA-Eng 4(40~).QXD 7/25/2005 5:15 PM Page 53
Page 133 of 225
WINDSHIELD
DEFROSTING AND
DEFOGGING (MANUAL
TYPE)TO DEFOG INSIDE WIND-
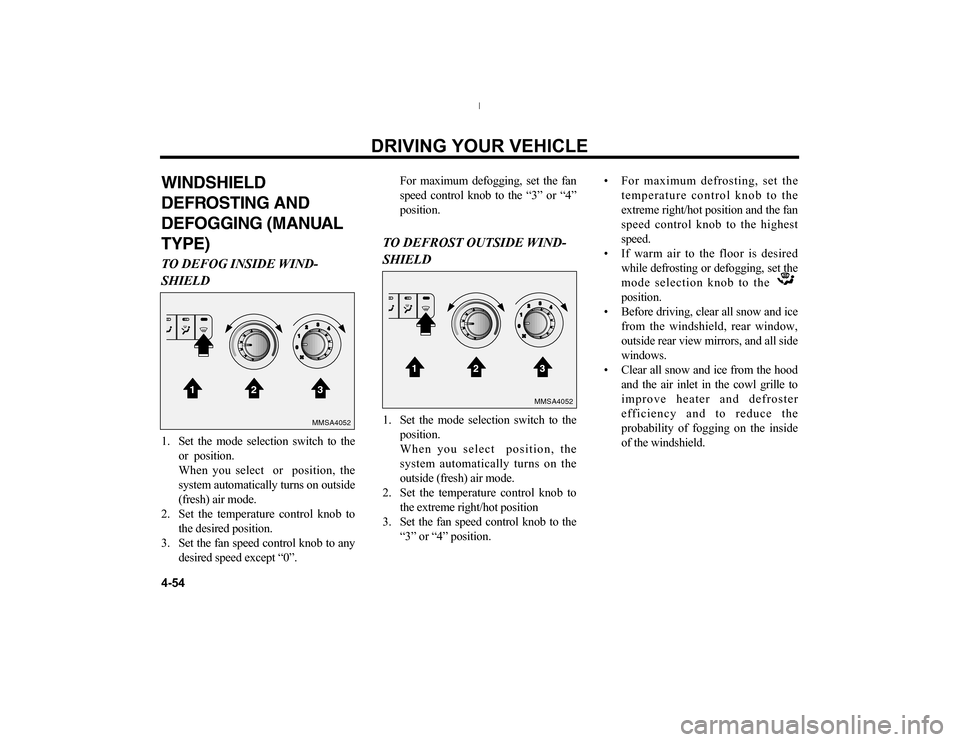
SHIELD1. Set the mode selection switch to the
or position.
When you select or position, the
system automatically turns on outside
(fresh) air mode.
2. Set the temperature control knob to
the desired position.
3. Set the fan speed control knob to any
desired speed except “0”.For maximum defogging, set the fan
speed control knob to the “3” or “4”
position.
TO DEFROST OUTSIDE WIND-
SHIELD1. Set the mode selection switch to the
position.
When you select position, the
system automatically turns on the
outside (fresh) air mode.
2. Set the temperature control knob to
the extreme right/hot position
3. Set the fan speed control knob to the
“3” or “4” position.• For maximum defrosting, set the
temperature control knob to the
extreme right/hot position and the fan
speed control knob to the highest
speed.
• If warm air to the floor is desired
while defrosting or defogging, set the
mode selection knob to the
position.
• Before driving, clear all snow and ice
from the windshield, rear window,
outside rear view mirrors, and all side
windows.
• Clear all snow and ice from the hood
and the air inlet in the cowl grille to
improve heater and defroster
efficiency and to reduce the
probability of fogging on the inside
of the windshield.DRIVING YOUR VEHICLE
4-54
123
4
0
2
3
1
MMSA4052
123
4
0
2
3
1
MMSA4052
MS-CNA-Eng 4(40~).QXD 7/25/2005 5:15 PM Page 54
Page 135 of 225

If you don’t want the outside (fresh) air
position when operating in either of these
modes, you can turn off the system
operation by performing the following:
1. Make sure the engine is running or
the ignition switch is in the ON
position.
2. Turn the fan speed control knob to
the “0” position.
3. Turn the mode selection knob to the
defrost ( ) position.
4. Push the air intake control button
( ) at least 5 times within 3
seconds.
5. Then the indicator light on the air
intake control button ( ) will blink
3 times with 0.5 second intervals
between blinks.
If you want to return to the outside
(fresh) air position, repeat the procedure
above.
WINDSHIELD DEFROST-
ING AND DEFOGGING
(AUTOMATIC TYPE)TO DEFOG INSIDE WINDSHIELD1. Select any fan speed except OFF
( ) position.
2. Select desired temperature.
3. Press the defrost button ( ).
4. The air conditioning will be turned
on according to the detected ambient
temperature and outside (fresh) air
position will be selected.
If you don’t want the air conditioning or
outside (fresh) air position press the
corresponding button to cancel the
operation.
TO DEFROST OUTSIDE
WINDSHIELD 1. Set temperature to the extreme hot
(25°C~32°C) position.
2. Set the fan speed to the or
position.
3. Press the defrost button ( ).
4. The air conditioning will be turned
on according to the detected ambient
temperature and outside (fresh) air
position will be selected.
If you don’t want the air conditioning or
outside (fresh) air position press the
corresponding button to cancel the
operation.
• Before driving, clear all snow and ice
from the windshield, rear window,
outside rear view mirrors, and all side
windows.
• Clear all snow and ice from the hood
and the air inlet in the cowl grille to
improve heater and defroster
efficiency and to reduce the
probability of fogging on the inside
of the windshield.
DRIVING YOUR VEHICLE
4-56
A/C
1
2
34
MMSA4055
MS-CNA-Eng 4(40~).QXD 7/25/2005 5:15 PM Page 56
Page 154 of 225
assistance. If coolant is not boiling
out, allow the engine to idle and open
the hood to permit the engine to cool
gradually. If the temperature does not
go down with the engine idling, stop
the engine and allow sufficient time
for it to cool.
4. The coolant level should then be
checked. If the level in the reservoir
is low, look for leaks at the radiator
hoses and connections, heater hoses
and connections, radiator, and water
pump. If you find a major leak or
another problem that may have
caused the engine to overheat, do not
operate the engine until the problem
has been corrected. Call an
Authorized Kia Dealer for assistance.
If you do not find a leak or other
problem, carefully add coolant to the
reservoir.If the engine frequently overheats, have
the cooling system checked and repaired.
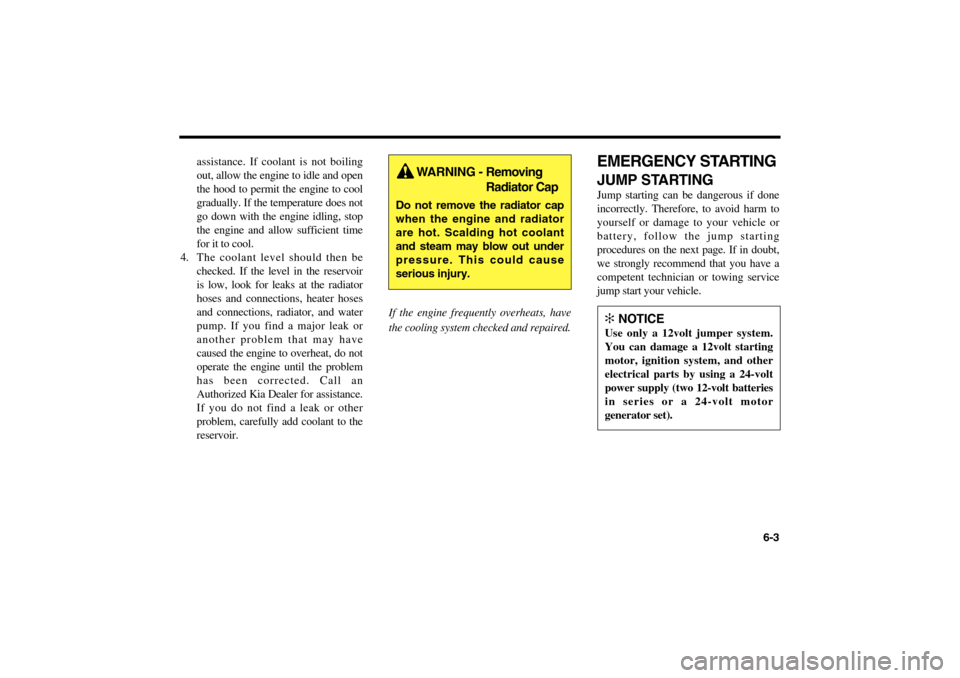
EMERGENCY STARTINGJUMP STARTINGJump starting can be dangerous if done
incorrectly. Therefore, to avoid harm to
yourself or damage to your vehicle or
battery, follow the jump starting
procedures on the next page. If in doubt,
we strongly recommend that you have a
competent technician or towing service
jump start your vehicle.
6-3
WARNING - Removing
Radiator Cap
Do not remove the radiator cap
when the engine and radiator
are hot. Scalding hot coolant
and steam may blow out under
pressure. This could cause
serious injury.
✻
NOTICE
Use only a 12volt jumper system.
You can damage a 12volt starting
motor, ignition system, and other
electrical parts by using a 24-volt
power supply (two 12-volt batteries
in series or a 24-volt motor
generator set).
MS-CNA-Eng 6.QXD 7/25/2005 5:13 PM Page 3
Page 161 of 225
IN CASE OF EMERGENCY
6-10
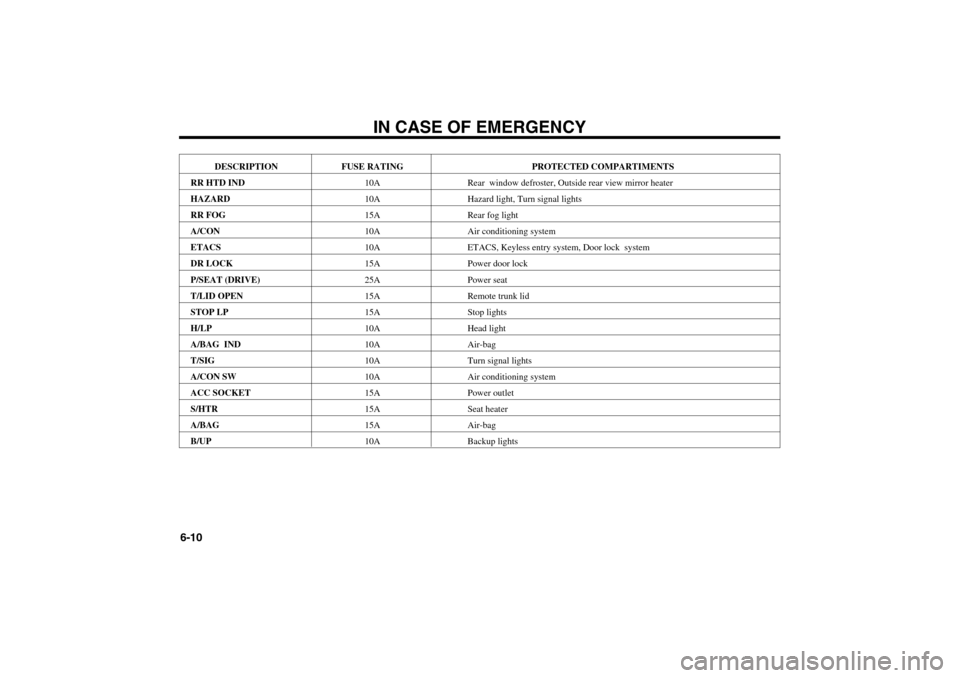
DESCRIPTION FUSE RATING PROTECTED COMPARTIMENTS
RR HTD IND10A Rear window defroster, Outside rear view mirror heater
HAZARD10A Hazard light, Turn signal lights
RR FOG15A Rear fog light
A/CON10A Air conditioning system
ETACS10A ETACS, Keyless entry system, Door lock system
DR LOCK15A Power door lock
P/SEAT (DRIVE)25A Power seat
T/LID OPEN15A Remote trunk lid
STOP LP15A Stop lights
H/LP10A Head light
A/BAG IND10A Air-bag
T/SIG10A Turn signal lights
A/CON SW10A Air conditioning system
ACC SOCKET15A Power outlet
S/HTR15A Seat heater
A/BAG15A Air-bag
B/UP10A Backup lights
MS-CNA-Eng 6.QXD 7/25/2005 5:13 PM Page 10
Page 191 of 225
7-15
Check the condition and connections of
all cooling system hoses and heater
hoses. Replace any swollen or
deteriorated hoses.
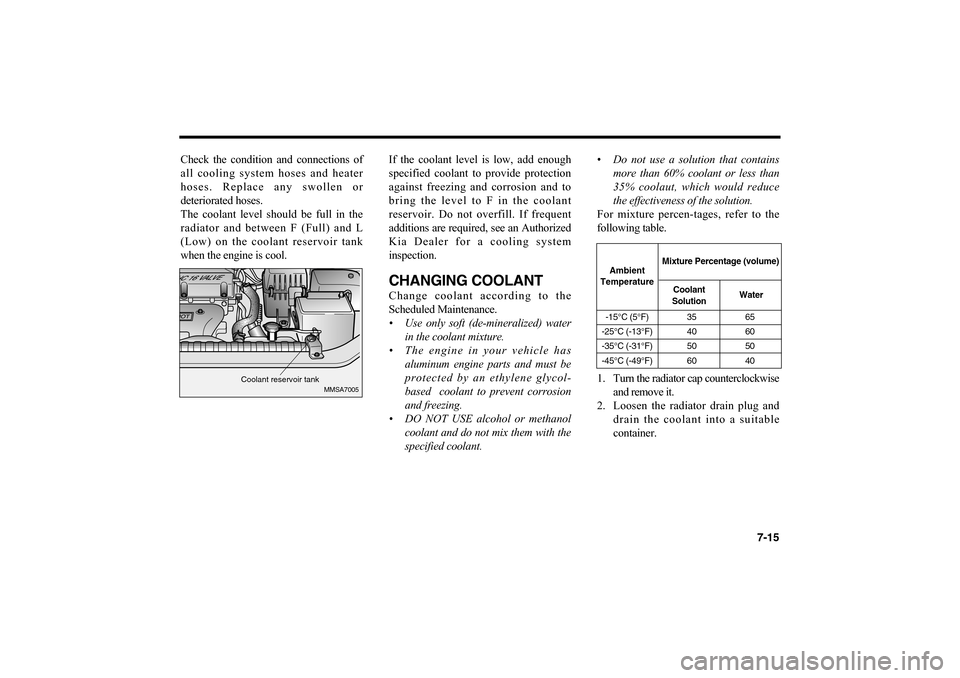
The coolant level should be full in the
radiator and between F (Full) and L
(Low) on the coolant reservoir tank
when the engine is cool.If the coolant level is low, add enough
specified coolant to provide protection
against freezing and corrosion and to
bring the level to F in the coolant
reservoir. Do not overfill. If frequent
additions are required, see an Authorized
Kia Dealer for a cooling system
inspection.
CHANGING COOLANTChange coolant according to the
Scheduled Maintenance.
• Use only soft (de-mineralized) water
in the coolant mixture.
• The engine in your vehicle has
aluminum engine parts and must be
protected by an ethylene glycol-
based coolant to prevent corrosion
and freezing.
• DO NOT USE alcohol or methanol
coolant and do not mix them with the
specified coolant.•Do not use a solution that contains
more than 60% coolant or less than
35% coolaut, which would reduce
the effectiveness of the solution.
For mixture percen-tages, refer to the
following table.
1. Turn the radiator cap counterclockwise
and remove it.
2. Loosen the radiator drain plug and
drain the coolant into a suitable
container.
MMSA7005
Coolant reservoir tank
-15°C (5°F) 35 65
-25°C (-13°F) 40 60
-35°C (-31°F) 50 50
-45°C (-49°F) 60 40Ambient
TemperatureMixture Percentage (volume)
Coolant
SolutionWater
MS-CNA-Eng 7.QXD 7/25/2005 5:09 PM Page 15