radio KIA Optima 2008 2.G Owner's Manual
[x] Cancel search | Manufacturer: KIA, Model Year: 2008, Model line: Optima, Model: KIA Optima 2008 2.GPages: 289, PDF Size: 4.78 MB
Page 13 of 289
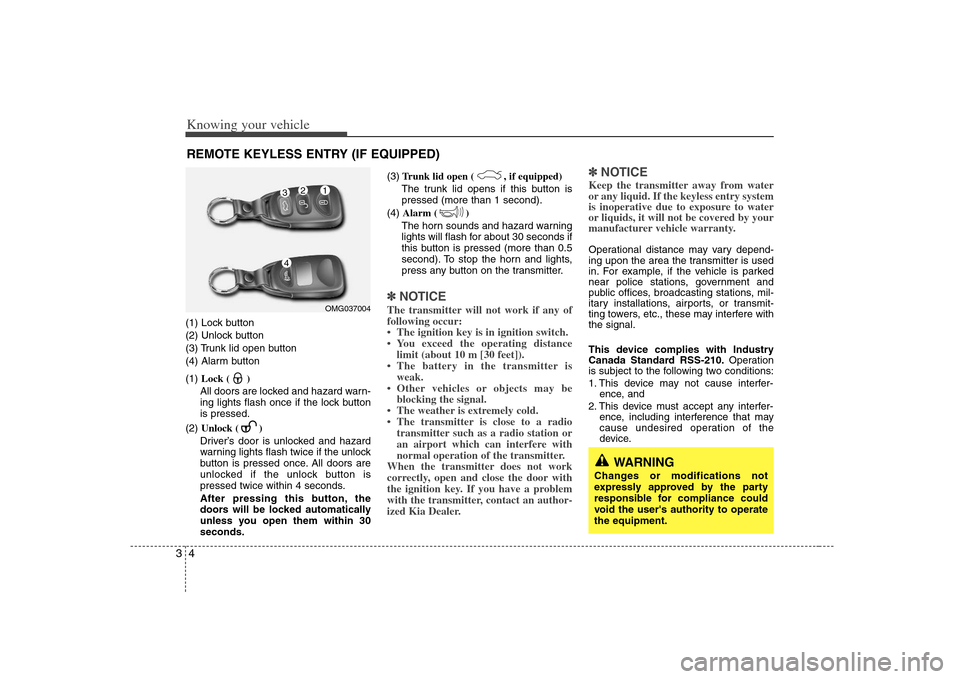
Knowing your vehicle4 3(1) Lock button
(2) Unlock button
(3) Trunk lid open button
(4) Alarm button
(1) Lock ( )
All doors are locked and hazard warn-
ing lights flash once if the lock button
is pressed.
(2) Unlock ( )
Driver’s door is unlocked and hazard
warning lights flash twice if the unlock
button is pressed once. All doors are
unlocked if the unlock button is
pressed twice within 4 seconds.
After pressing this button, the
doors will be locked automatically
unless you open them within 30
seconds.(3)Trunk lid open ( , if equipped)
The trunk lid opens if this button is
pressed (more than 1 second).
(4)Alarm ( )
The horn sounds and hazard warning
lights will flash for about 30 seconds if
this button is pressed (more than 0.5
second). To stop the horn and lights,
press any button on the transmitter.
✽ ✽
NOTICEThe transmitter will not work if any of
following occur:
• The ignition key is in ignition switch.
• You exceed the operating distance
limit (about 10 m [30 feet]).
• The battery in the transmitter is
weak.
• Other vehicles or objects may be
blocking the signal.
• The weather is extremely cold.
• The transmitter is close to a radio
transmitter such as a radio station or
an airport which can interfere with
normal operation of the transmitter.
When the transmitter does not work
correctly, open and close the door with
the ignition key. If you have a problem
with the transmitter, contact an author-
ized Kia Dealer.
✽ ✽
NOTICEKeep the transmitter away from water
or any liquid. If the keyless entry system
is inoperative due to exposure to water
or liquids, it will not be covered by your
manufacturer vehicle warranty. Operational distance may vary depend-
ing upon the area the transmitter is used
in. For example, if the vehicle is parked
near police stations, government and
public offices, broadcasting stations, mil-
itary installations, airports, or transmit-
ting towers, etc., these may interfere with
the signal.
This device complies with Industry
Canada Standard RSS-210.Operation
is subject to the following two conditions:
1. This device may not cause interfer-
ence, and
2. This device must accept any interfer-
ence, including interference that may
cause undesired operation of the
device.
REMOTE KEYLESS ENTRY (IF EQUIPPED)
OMG0370041
2
34
WARNING
Changes or modifications not
expressly approved by the party
responsible for compliance could
void the user's authority to operate
the equipment.
Page 88 of 289
379
Knowing your vehicle
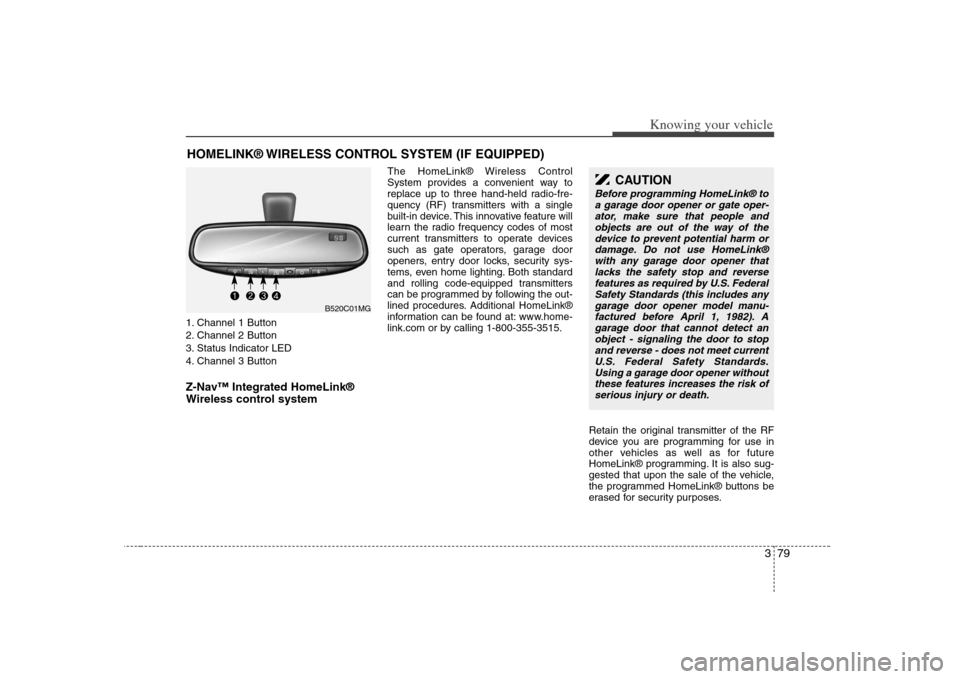
1. Channel 1 Button
2. Channel 2 Button
3. Status Indicator LED
4. Channel 3 ButtonZ-Nav™ Integrated HomeLink®
Wireless control system
The HomeLink® Wireless Control
System provides a convenient way to
replace up to three hand-held radio-fre-
quency (RF) transmitters with a single
built-in device. This innovative feature will
learn the radio frequency codes of most
current transmitters to operate devices
such as gate operators, garage door
openers, entry door locks, security sys-
tems, even home lighting. Both standard
and rolling code-equipped transmitters
can be programmed by following the out-
lined procedures. Additional HomeLink®
information can be found at: www.home-
link.com or by calling 1-800-355-3515.
Retain the original transmitter of the RF
device you are programming for use in
other vehicles as well as for future
HomeLink® programming. It is also sug-
gested that upon the sale of the vehicle,
the programmed HomeLink® buttons be
erased for security purposes.
HOMELINK® WIRELESS CONTROL SYSTEM (IF EQUIPPED)
CAUTION
Before programming HomeLink® to
a garage door opener or gate oper-
ator, make sure that people and
objects are out of the way of the
device to prevent potential harm or
damage. Do not use HomeLink®
with any garage door opener that
lacks the safety stop and reverse
features as required by U.S. Federal
Safety Standards (this includes any
garage door opener model manu-
factured before April 1, 1982). A
garage door that cannot detect an
object - signaling the door to stop
and reverse - does not meet current
U.S. Federal Safety Standards.
Using a garage door opener without
these features increases the risk of
serious injury or death.
B520C01MG
Page 89 of 289
Knowing your vehicle80 3Programming HomeLink® When programming a garage door
opener, it is advised to park the
vehicle outside of the garage.
It is recommended that a new bat-
tery be placed in the hand-held
transmitter of the device being pro-
grammed to HomeLink® for quicker
training and accurate transmission
of the radio-frequency signal.
Some vehicles may require the igni-
tion switch to be turned to the sec-
ond (or "accessories") position for
programming and/or operation of
HomeLink.
In the event that there are still pro-
gramming difficulties or questions
after following the programming
steps listed below, contact
HomeLink® at: www.homelink.com
or 1-800-355-3515.
Standard programmingTo train most devices, follow these
instructions:
1. For first-time programming, press and
hold the two outside buttons,
HomeLink® Channel 1 and Channel 3
Buttons, until the indicator light begins
to flash (after 20 seconds). Release
both buttons. Do not hold the buttons
for longer than 30 seconds.
2. Position the end of your hand-held
transmitter 5-14 cm (1-3 inches) away
from the HomeLink® buttons while
keeping the indicator light in view.
3. Simultaneously press and hold both
the HomeLink® and hand-held trans-
mitter button. DO NOT release the but-
tons until step 4 has been completed.
4. While continuing to hold the buttons
the red Indicator Status LED will flash
slowly and then rapidly after
HomeLink® successfully trains to the
frequency signal from the hand-held
transmitter. Release both buttons.5. Press and hold the just-trained
HomeLink® button and observe the
red Status Indicator LED. If the indica-
tor light stays on constantly, program-
ming is complete and your device
should activate when the HomeLink®
button is pressed and released.
6. To program the remaining two
HomeLink® buttons, follow steps 2
through 5.
Page 102 of 289
393
Knowing your vehicle
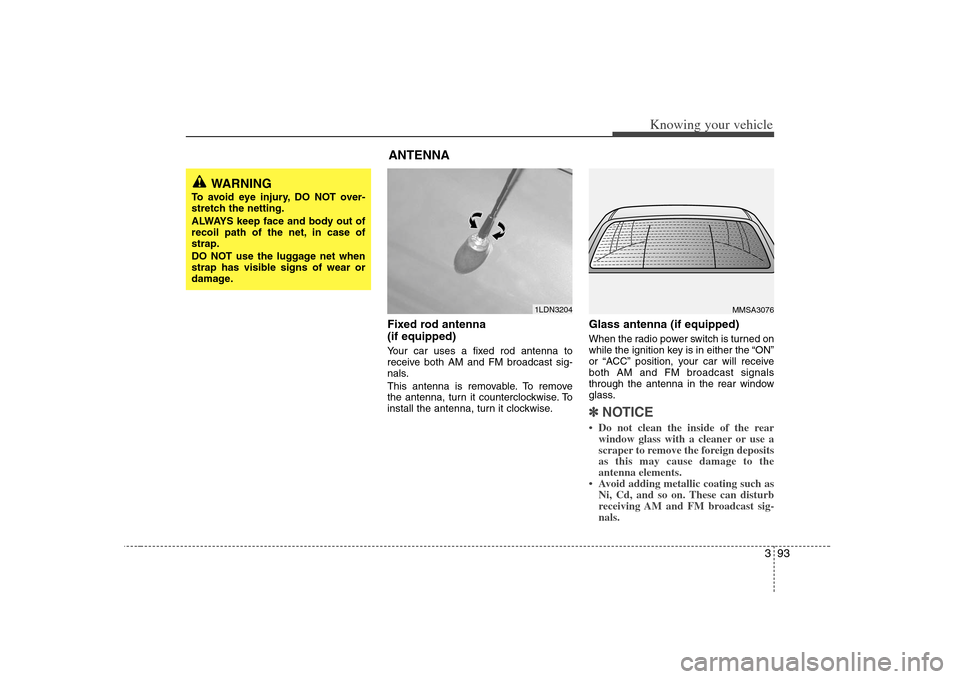
Fixed rod antenna
(if equipped)Your car uses a fixed rod antenna to
receive both AM and FM broadcast sig-
nals.
This antenna is removable. To remove
the antenna, turn it counterclockwise. To
install the antenna, turn it clockwise.
Glass antenna (if equipped)When the radio power switch is turned on
while the ignition key is in either the “ON”
or “ACC” position, your car will receive
both AM and FM broadcast signals
through the antenna in the rear window
glass.✽ ✽
NOTICE• Do not clean the inside of the rear
window glass with a cleaner or use a
scraper to remove the foreign deposits
as this may cause damage to the
antenna elements.
• Avoid adding metallic coating such as
Ni, Cd, and so on. These can disturb
receiving AM and FM broadcast sig-
nals.
MMSA3076
1LDN3204
WARNING
To avoid eye injury, DO NOT over-
stretch the netting.
ALWAYS keep face and body out of
recoil path of the net, in case of
strap.
DO NOT use the luggage net when
strap has visible signs of wear or
damage.
ANTENNA
Page 103 of 289
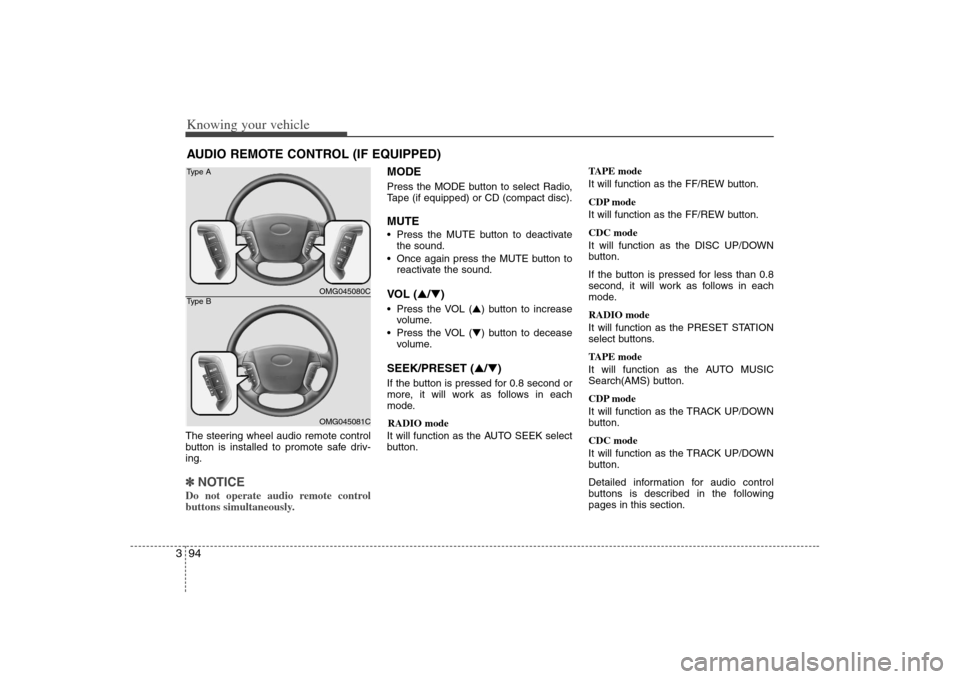
Knowing your vehicle94 3The steering wheel audio remote control
button is installed to promote safe driv-
ing.✽ ✽
NOTICEDo not operate audio remote control
buttons simultaneously.
MODEPress the MODE button to select Radio,
Tape (if equipped) or CD (compact disc).MUTE Press the MUTE button to deactivate
the sound.
Once again press the MUTE button to
reactivate the sound.VOL (▲/▼) Press the VOL (▲) button to increase
volume.
Press the VOL (▼) button to decease
volume.SEEK/PRESET (▲/▼) If the button is pressed for 0.8 second or
more, it will work as follows in each
mode.
RADIO mode
It will function as the AUTO SEEK select
button.TAPE mode
It will function as the FF/REW button.
CDP mode
It will function as the FF/REW button.
CDC mode
It will function as the DISC UP/DOWN
button.
If the button is pressed for less than 0.8
second, it will work as follows in each
mode.
RADIO mode
It will function as the PRESET STATION
select buttons.
TAPE mode
It will function as the AUTO MUSIC
Search(AMS) button.
CDP mode
It will function as the TRACK UP/DOWN
button.
CDC mode
It will function as the TRACK UP/DOWN
button.
Detailed information for audio control
buttons is described in the following
pages in this section.
AUDIO REMOTE CONTROL (IF EQUIPPED)
OMG045080COMG045081C Type A
Type B
Page 104 of 289
395
Knowing your vehicle
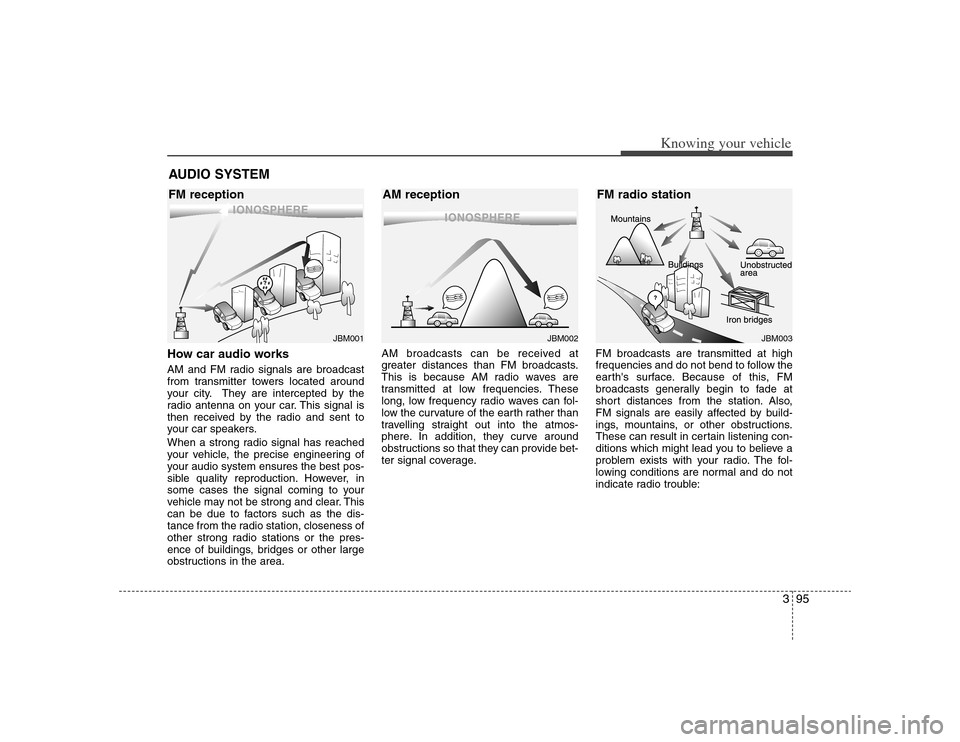
How car audio worksAM and FM radio signals are broadcast
from transmitter towers located around
your city. They are intercepted by the
radio antenna on your car. This signal is
then received by the radio and sent to
your car speakers.
When a strong radio signal has reached
your vehicle, the precise engineering of
your audio system ensures the best pos-
sible quality reproduction. However, in
some cases the signal coming to your
vehicle may not be strong and clear. This
can be due to factors such as the dis-
tance from the radio station, closeness of
other strong radio stations or the pres-
ence of buildings, bridges or other large
obstructions in the area.AM broadcasts can be received at
greater distances than FM broadcasts.
This is because AM radio waves are
transmitted at low frequencies. These
long, low frequency radio waves can fol-
low the curvature of the earth rather than
travelling straight out into the atmos-
phere. In addition, they curve around
obstructions so that they can provide bet-
ter signal coverage.FM broadcasts are transmitted at high
frequencies and do not bend to follow the
earth's surface. Because of this, FM
broadcasts generally begin to fade at
short distances from the station. Also,
FM signals are easily affected by build-
ings, mountains, or other obstructions.
These can result in certain listening con-
ditions which might lead you to believe a
problem exists with your radio. The fol-
lowing conditions are normal and do not
indicate radio trouble:AUDIO SYSTEM
¢¢¢
JBM001
¢¢¢
¢¢¢JBM002
JBM003
FM reception AM reception FM radio station
Page 105 of 289
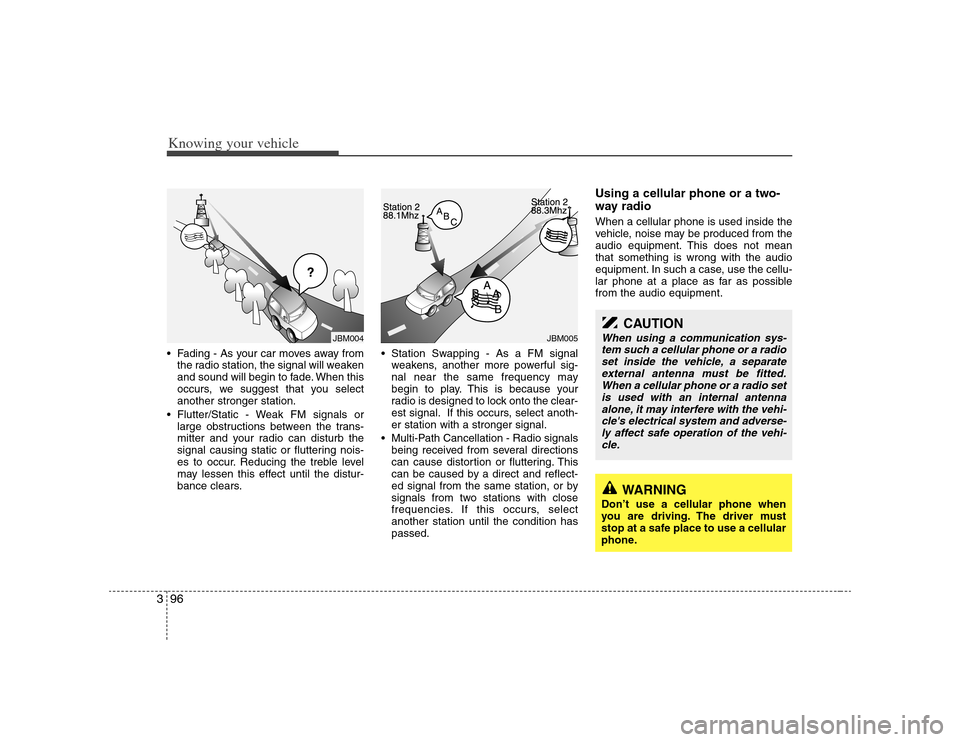
Knowing your vehicle96 3• Fading - As your car moves away from
the radio station, the signal will weaken
and sound will begin to fade. When this
occurs, we suggest that you select
another stronger station.
Flutter/Static - Weak FM signals or
large obstructions between the trans-
mitter and your radio can disturb the
signal causing static or fluttering nois-
es to occur. Reducing the treble level
may lessen this effect until the distur-
bance clears. Station Swapping - As a FM signal
weakens, another more powerful sig-
nal near the same frequency may
begin to play. This is because your
radio is designed to lock onto the clear-
est signal. If this occurs, select anoth-
er station with a stronger signal.
Multi-Path Cancellation - Radio signals
being received from several directions
can cause distortion or fluttering. This
can be caused by a direct and reflect-
ed signal from the same station, or by
signals from two stations with close
frequencies. If this occurs, select
another station until the condition has
passed.
Using a cellular phone or a two-
way radio When a cellular phone is used inside the
vehicle, noise may be produced from the
audio equipment. This does not mean
that something is wrong with the audio
equipment. In such a case, use the cellu-
lar phone at a place as far as possible
from the audio equipment.
¢¢¢
JBM004
JBM005
CAUTION
When using a communication sys-
tem such a cellular phone or a radio
set inside the vehicle, a separate
external antenna must be fitted.
When a cellular phone or a radio set
is used with an internal antenna
alone, it may interfere with the vehi-
cle's electrical system and adverse-
ly affect safe operation of the vehi-
cle.
WARNING
Don’t use a cellular phone when
you are driving. The driver must
stop at a safe place to use a cellular
phone.
Page 107 of 289
Knowing your vehicle98 3
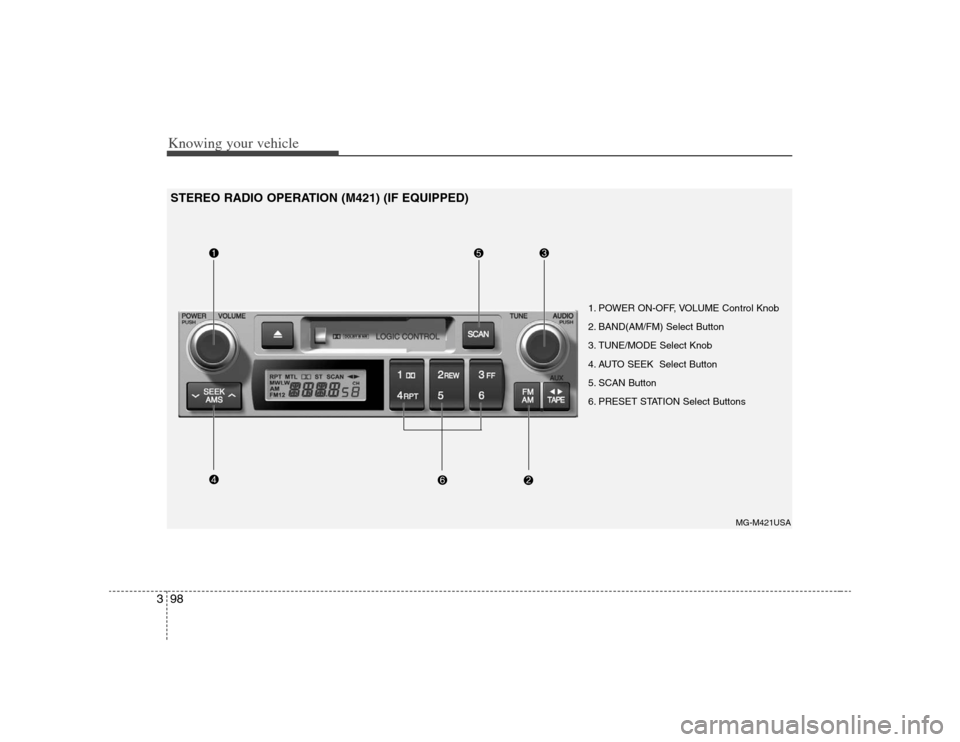
1. POWER ON-OFF, VOLUME Control Knob
2. BAND(AM/FM) Select Button
3. TUNE/MODE Select Knob
4. AUTO SEEK Select Button
5. SCAN Button
6. PRESET STATION Select Buttons
MG-M421USA
STEREO RADIO OPERATION (M421) (IF EQUIPPED)
Page 108 of 289
399
Knowing your vehicle
1. POWER ON-OFF Control KnobThe radio unit may be operated when the
ignition key is in the “ACC” or “ON” posi-
tion. Press the knob to switch the power
on. The LCD shows the radio frequency
in the radio mode, the tape direction indi-
cator in the tape mode. To switch the
power off, press the knob again.VOLUME ControlRotate the knob clockwise to increase
the volume and turn the knob counter-
clockwise to reduce the volume.2. BAND SelectorBAND Selection Button Pressing the
FM/AMbutton changes the
AM, FM1 and FM2 bands.
3. TUNE/MODE Select KnobRotate the knob clockwise to increase
the frequency and turn the knob counter-
clockwise to reduce the frequency.Mode Select KnobPressing the MODE knob changes the
BASS, MID-RANGE, TREBLE, FADER
and BALANCE mode.
The mode selected is shown on the dis-
play.
After selecting each mode, rotate the
mode select knob clockwise or counter-
clockwise.BASS ControlTo increase the BASS, rotate the knob
clockwise, while to decrease the BASS,
rotate the knob counterclockwise.MID-RANGE ControlTo increase the MID-RANGE, rotate the
knob clockwise, while to decrease the
MID, rotate the knob counterclockwise.TREBLE ControlTo increase the TREBLE, rotate the knob
clockwise, while to decrease the TRE-
BLE, rotate the knob counterclockwise.
FADER ControlRotate the control knob clockwise to
emphasize rear speaker sound (front
speaker sound will be attenuated). When
the control knob is turned counterclock-
wise, front speaker sound will be empha-
sized (rear speaker sound will be attenu-
ated).BALANCE ControlRotate the knob clockwise to emphasize
right speaker sound (left speaker sound
will be attenuated). When the control
knob is turned counterclockwise, left
speaker sound will be emphasized (right
speaker sound will be attenuated).
Page 109 of 289
Knowing your vehicle100 34. AUTO SEEK Select Button
(Automatic Channel Selection)Press the AUTO SEEK select button.
When the side is pressed, the unit
will automatically tune to the next higher
frequency and when the side is
pressed, it will automatically tune to the
next lower frequency.5. SCAN ButtonWhen you Press the button, frequency is
changed and the next channel is
received automatically.
To stay on a station, press the SCAN
button again.6. PRESET STATION Select
ButtonsSix stations for AM, FM1 and FM2
respectively can be preset in the elec-
tronic memory circuit.
HOW TO PRESET STATIONSSix AM and twelve FM stations may be
programmed into the memory of the
radio. Then, by simply pressing the AM /
FM select button and/or one of the six
station select buttons, you may recall any
of these stations instantly. To program the
stations, follow these steps:
Press AM/FM selector to set the band
for AM, FM1 and FM2.
Select the desired station to be stored
by seek or manual tuning.
Determine the preset station select
button you wish to use to access that
station. Press and hold the station select button
for more than 0.8 seconds. A select but-
ton indicator will show in the display
indicating which select button you have
depressed. The frequency display will
flash after it has been stored into the
memory. You should then release the
button, and proceed to program the next
desired station. A total of 18 stations
can be programmed by selecting one
AM and two FM stations per button.
When completed, any preset station
may be recalled by selecting AM, FM1
or FM2 band and the appropriate sta-
tion button.
✽ ✽
NOTICE• Do not place beverages close to the
audio system. The audio system mech-
anism may be damaged if you spill
them.
• Do not strike or allow anything to
impact the audio system, damage to
the system mechanisms could occur.