rear view mirror KIA Optima 2016 4.G User Guide
[x] Cancel search | Manufacturer: KIA, Model Year: 2016, Model line: Optima, Model: KIA Optima 2016 4.GPages: 623, PDF Size: 15.4 MB
Page 187 of 623
4101
Features of your vehicle
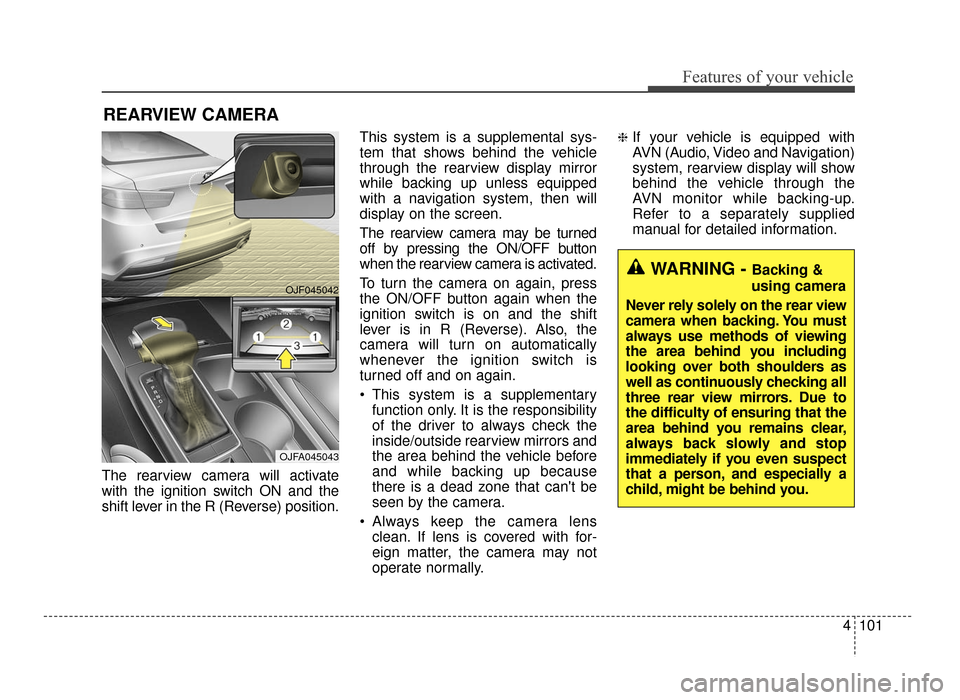
The rearview camera will activate
with the ignition switch ON and the
shift lever in the R (Reverse) position.This system is a supplemental sys-
tem that shows behind the vehicle
through the rearview display mirror
while backing up unless equipped
with a navigation system, then will
display on the screen.
The rearview camera may be turned
off by pressing the ON/OFF button
when the rearview camera is activated.
To turn the camera on again, press
the ON/OFF button again when the
ignition switch is on and the shift
lever is in R (Reverse). Also, the
camera will turn on automatically
whenever the ignition switch is
turned off and on again.
This system is a supplementary
function only. It is the responsibility
of the driver to always check the
inside/outside rearview mirrors and
the area behind the vehicle before
and while backing up because
there is a dead zone that can't be
seen by the camera.
Always keep the camera lens clean. If lens is covered with for-
eign matter, the camera may not
operate normally.
❈If your vehicle is equipped with
AVN (Audio, Video and Navigation)
system, rearview display will show
behind the vehicle through the
AVN monitor while backing-up.
Refer to a separately supplied
manual for detailed information.
REARVIEW CAMERA
WARNING - Backing &
using camera
Never rely solely on the rear view
camera when backing. You must
always use methods of viewing
the area behind you including
looking over both shoulders as
well as continuously checking all
three rear view mirrors. Due to
the difficulty of ensuring that the
area behind you remains clear,
always back slowly and stop
immediately if you even suspect
that a person, and especially a
child, might be behind you.
OJF045042
OJFA045043
JF CAN (ENG) 4.qxp 11/5/2015 3:51 PM Page 101
Page 203 of 623
4117
Features of your vehicle
If you want to defrost and defog the
front windshield, refer to “Windshield
defrosting and defogging” in this sec-
tion.
Rear window defroster
The defroster heats the window to
remove frost, fog and thin ice from
the rear window, while the engine is
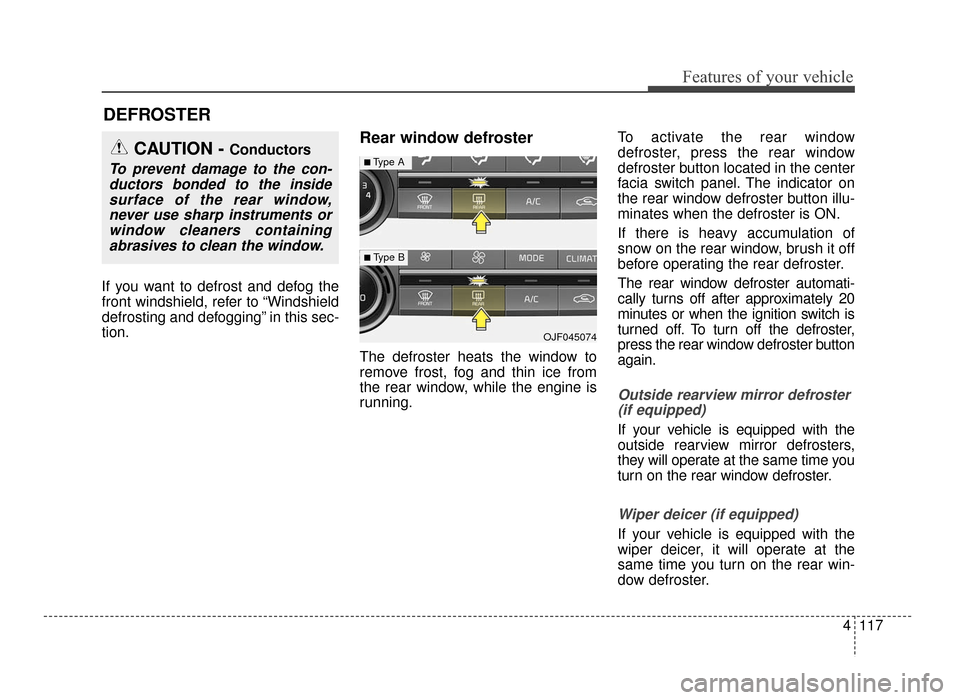
running.To activate the rear window
defroster, press the rear window
defroster button located in the center
facia switch panel. The indicator on
the rear window defroster button illu-
minates when the defroster is ON.
If there is heavy accumulation of
snow on the rear window, brush it off
before operating the rear defroster.
The rear window defroster automati-
cally turns off after approximately 20
minutes or when the ignition switch is
turned off. To turn off the defroster,
press the rear window defroster button
again.
Outside rearview mirror defroster
(if equipped)
If your vehicle is equipped with the
outside rearview mirror defrosters,
they will operate at the same time you
turn on the rear window defroster.
Wiper deicer (if equipped)
If your vehicle is equipped with the
wiper deicer, it will operate at the
same time you turn on the rear win-
dow defroster.
DEFROSTER
CAUTION - Conductors
To prevent damage to the con-ductors bonded to the insidesurface of the rear window,never use sharp instruments orwindow cleaners containingabrasives to clean the window.
OJF045074
■Type A
■ Type B
JF CAN (ENG) 4.qxp 11/5/2015 3:51 PM Page 117
Page 226 of 623
Features of your vehicle
140
4
For maximum defrosting, set the
temperature control to the extreme
right/hot position and the fan speed
control to the highest speed.
If warm air to the floor is desired while defrosting or defogging, set
the mode to the floor-defrost posi-
tion.
Before driving, clear all snow and ice from the windshield, rear win-
dow, outside rear view mirrors, and
all side windows.
Clear all snow and ice from the hood and air inlet in the cowl grill to
improve heater and defroster effi-
ciency and to reduce the probabili-
ty of fogging up the inside of the
windshield.Manual climate control system
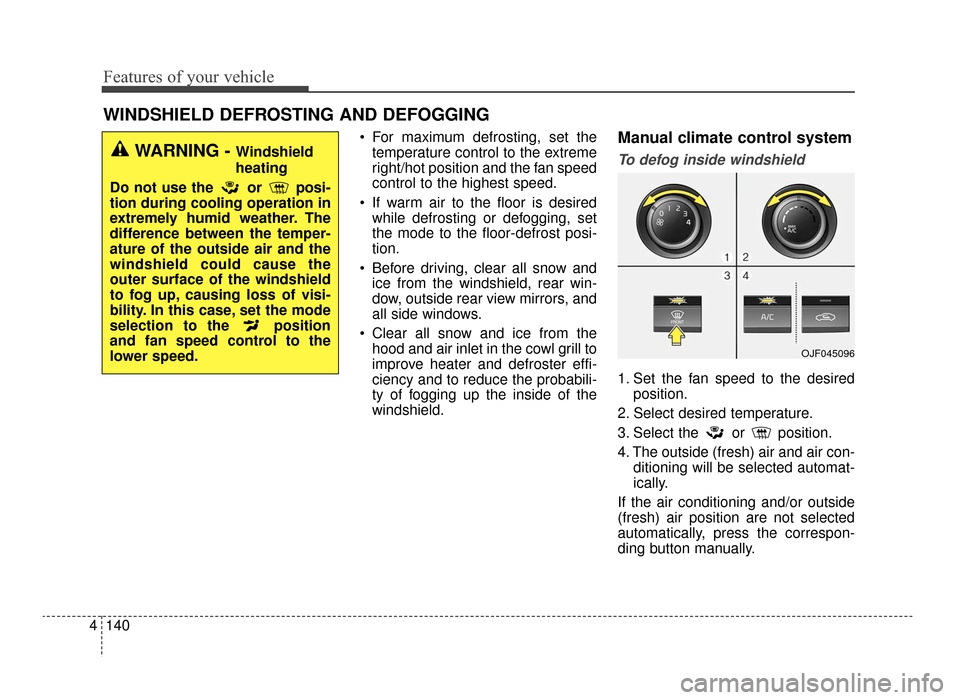
To defog inside windshield
1. Set the fan speed to the desired position.
2. Select desired temperature.
3. Select the or position.
4. The outside (fresh) air and air con- ditioning will be selected automat-
ically.
If the air conditioning and/or outside
(fresh) air position are not selected
automatically, press the correspon-
ding button manually.
WINDSHIELD DEFROSTING AND DEFOGGING
WARNING - Windshield
heating
Do not use the or posi-
tion during cooling operation in
extremely humid weather. The
difference between the temper-
ature of the outside air and the
windshield could cause the
outer surface of the windshield
to fog up, causing loss of visi-
bility. In this case, set the mode
selection to the position
and fan speed control to the
lower speed.
OJF045096
JF CAN (ENG) 4.qxp 11/5/2015 3:51 PM Page 140
Page 360 of 623
Driving your vehicle
46
Before entering vehicle
• Be sure that all windows, outsidemirror(s), and outside lights are
clean.
Check the condition of the tires.
Check under the vehicle for any sign of leaks.
Be sure there are no obstacles behind you if you intend to back up.
Necessary inspections
Fluid levels, such as engine oil,
engine coolant, brake fluid, and
washer fluid should be checked on a
regular basis, at the exact interval
depending on the fluid. Further
details are provided in chapter 8,
“Maintenance”.
Before starting
Close and lock all doors.
Position the seat so that all con-trols are easily reached.
Buckle your seat belt.
Adjust the inside and outside rearview mirrors.
Be sure that all lights work.
Check all gauges.
Check the operation of warning lights when the ignition switch is
turned to the ON position.
Release the parking brake and make sure the brake warning light
goes out.
For safe operation, be sure you are
familiar with your vehicle and its
equipment.
BEFORE DRIVING
WARNING - Distracted driving
Focus on the road while driving.
The driver's primary responsi-
bility is in the safe and legal
operation of the vehicle. Use of
any handled devices, other
equipment or vehicle systems
that distract the drive should
not be used during vehicle
operation.
JF CAN (ENG) 6.qxp 11/5/2015 6:38 PM Page 4
Page 442 of 623
Driving your vehicle
86
6
BSD (Blind Spot Detection) /
LCA (Lane Change Assist)
Operating conditions
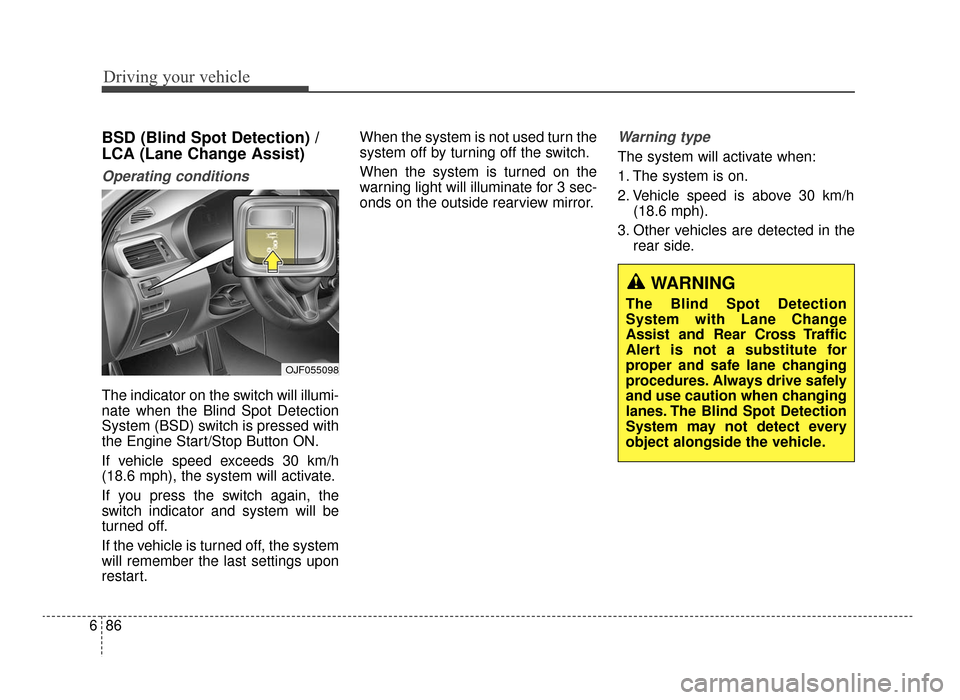
The indicator on the switch will illumi-
nate when the Blind Spot Detection
System (BSD) switch is pressed with
the Engine Start/Stop Button ON.
If vehicle speed exceeds 30 km/h
(18.6 mph), the system will activate.
If you press the switch again, the
switch indicator and system will be
turned off.
If the vehicle is turned off, the system
will remember the last settings upon
restart. When the system is not used turn the
system off by turning off the switch.
When the system is turned on the
warning light will illuminate for 3 sec-
onds on the outside rearview mirror.
Warning type
The system will activate when:
1. The system is on.
2. Vehicle speed is above 30 km/h
(18.6 mph).
3. Other vehicles are detected in the rear side.
WARNING
The Blind Spot Detection
System with Lane Change
Assist and Rear Cross Traffic
Alert is not a substitute for
proper and safe lane changing
procedures. Always drive safely
and use caution when changing
lanes. The Blind Spot Detection
System may not detect every
object alongside the vehicle.
OJF055098
JF CAN (ENG) 6.qxp 11/5/2015 6:39 PM Page 86
Page 443 of 623
687
Driving your vehicle
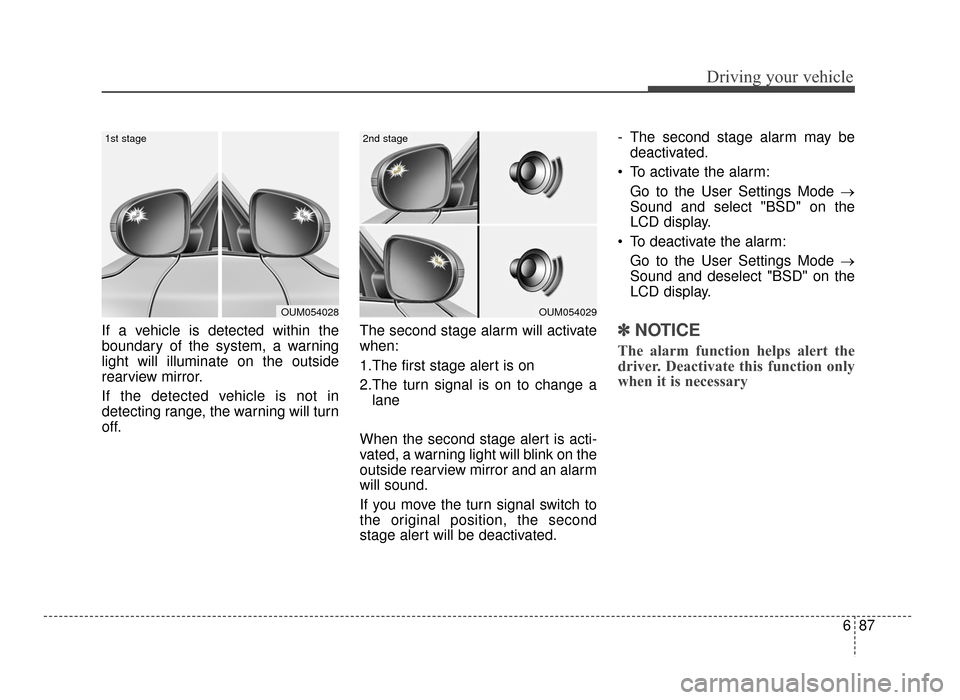
If a vehicle is detected within the
boundary of the system, a warning
light will illuminate on the outside
rearview mirror.
If the detected vehicle is not in
detecting range, the warning will turn
off.The second stage alarm will activate
when:
1.The first stage alert is on
2.The turn signal is on to change a
lane
When the second stage alert is acti-
vated, a warning light will blink on the
outside rearview mirror and an alarm
will sound.
If you move the turn signal switch to
the original position, the second
stage alert will be deactivated. - The second stage alarm may be
deactivated.
To activate the alarm: Go to the User Settings Mode →
Sound and select "BSD" on the
LCD display.
To deactivate the alarm: Go to the User Settings Mode →
Sound and deselect "BSD" on the
LCD display.✽ ✽
NOTICE
The alarm function helps alert the
driver. Deactivate this function only
when it is necessary
OUM054029
2nd stage
OUM054028
1st stage
JF CAN (ENG) 6.qxp 11/5/2015 6:39 PM Page 87
Page 446 of 623
Driving your vehicle
90
6
The system operates when the
vehicle speed is below 10 km/h
(6.2 mph) with the shift lever in R
(Reverse).
The RCTA (Rear Cross Traffic Alert) detecting range is 1.6 feet ~
65 feet based on the side direction.
If the approaching vehicle speed is
4 km/h (2.5 mph) ~ 36 km/h (22
mph) within sensing range, it is
detected. However, the system
sensing range can vary based on
conditions. Always pay attention to
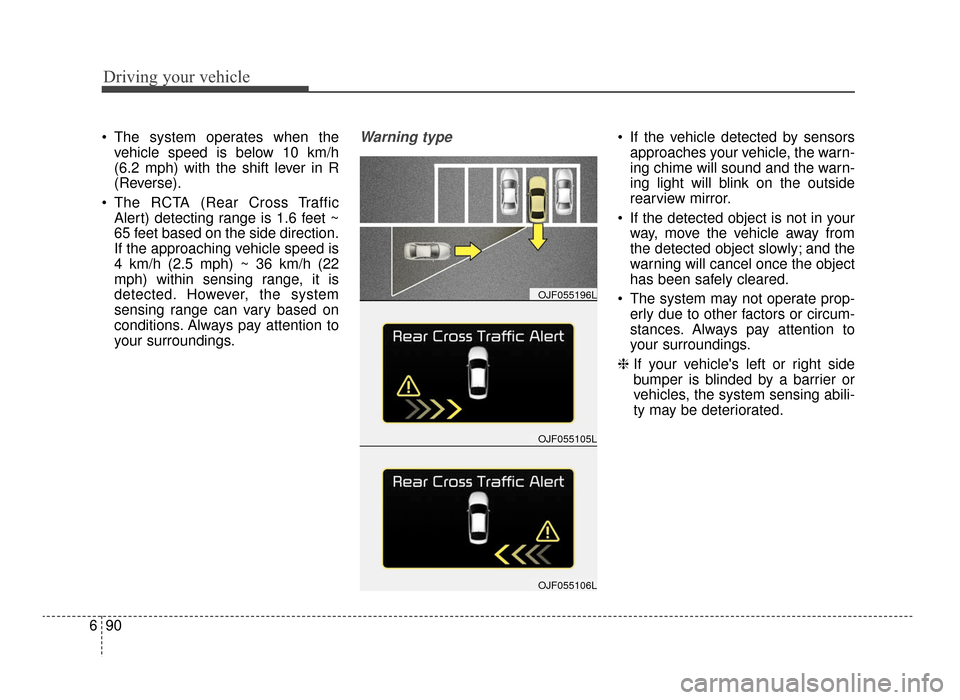
your surroundings.Warning type If the vehicle detected by sensorsapproaches your vehicle, the warn-
ing chime will sound and the warn-
ing light will blink on the outside
rearview mirror.
If the detected object is not in your way, move the vehicle away from
the detected object slowly; and the
warning will cancel once the object
has been safely cleared.
The system may not operate prop- erly due to other factors or circum-
stances. Always pay attention to
your surroundings.
\b If your vehicle's left or right side
bumper is blinded by a barrier or
vehicles, the system sensing abili-
ty may be deteriorated.
OJF055105L
OJF055196L
OJF055106L
JF CAN (ENG) 6.qxp 11/5/2015 6:39 PM Page 90
Page 448 of 623
Driving your vehicle
92
6
- When the temperature of rear
bumper is high.
- When bike racks, etc. cover the sensor.
- When reversing from a parking space with pillars or metal struc-
tures.
- When you are reversing and if the detected vehicle is simultaneously
reversing.
- If there are small objects like shop- ping carts and baby carriages.
- If there is a vehicle with decreased ride height (lowered).
- When the vehicle is close to anoth- er vehicle.Outside rearview mirror may not
alert the driver when:
- The outside rearview mirror hous- ing is very dirty.
- The window is very dirty.
- The windows are tinted very dark.
- When driving through a narrow road with many trees or bushes. This device complies with
Industry Canada licence-exempt
RSS standard(s).
Operation is subject to the following
two conditions:
(1) This device may not cause inter-
ference, and
(2) This device must accept any interference, including interfer-
ence that may cause undesired
operation of the device.
JF CAN (ENG) 6.qxp 11/5/2015 6:39 PM Page 92
Page 452 of 623
Driving your vehicle
96
6
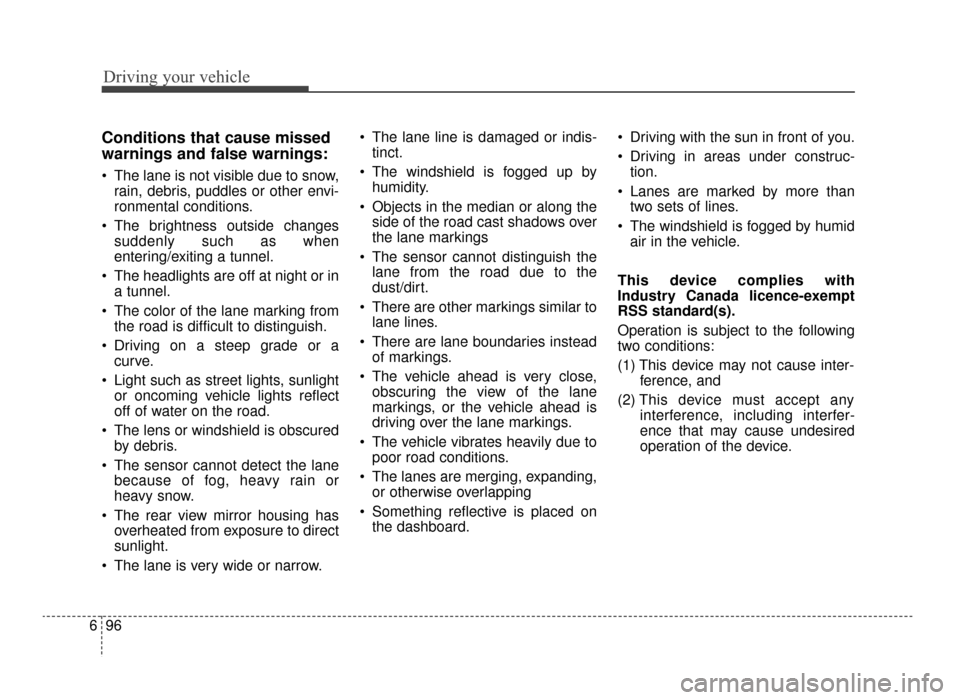
Conditions that cause missed
warnings and false warnings:
The lane is not visible due to snow,
rain, debris, puddles or other envi-
ronmental conditions.
The brightness outside changes suddenly such as when
entering/exiting a tunnel.
The headlights are off at night or in a tunnel.
The color of the lane marking from the road is difficult to distinguish.
Driving on a steep grade or a curve.
Light such as street lights, sunlight or oncoming vehicle lights reflect
off of water on the road.
The lens or windshield is obscured by debris.
The sensor cannot detect the lane because of fog, heavy rain or
heavy snow.
The rear view mirror housing has overheated from exposure to direct
sunlight.
The lane is very wide or narrow. The lane line is damaged or indis-
tinct.
The windshield is fogged up by humidity.
Objects in the median or along the side of the road cast shadows over
the lane markings
The sensor cannot distinguish the lane from the road due to the
dust/dirt.
There are other markings similar to lane lines.
There are lane boundaries instead of markings.
The vehicle ahead is very close, obscuring the view of the lane
markings, or the vehicle ahead is
driving over the lane markings.
The vehicle vibrates heavily due to poor road conditions.
The lanes are merging, expanding, or otherwise overlapping
Something reflective is placed on the dashboard. Driving with the sun in front of you.
Driving in areas under construc-
tion.
Lanes are marked by more than two sets of lines.
The windshield is fogged by humid air in the vehicle.
This device complies with
Industry Canada licence-exempt
RSS standard(s).
Operation is subject to the following
two conditions:
(1) This device may not cause inter- ference, and
(2) This device must accept any interference, including interfer-
ence that may cause undesired
operation of the device.
JF CAN (ENG) 6.qxp 11/5/2015 6:39 PM Page 96
Page 567 of 623
Maintenance
68
8
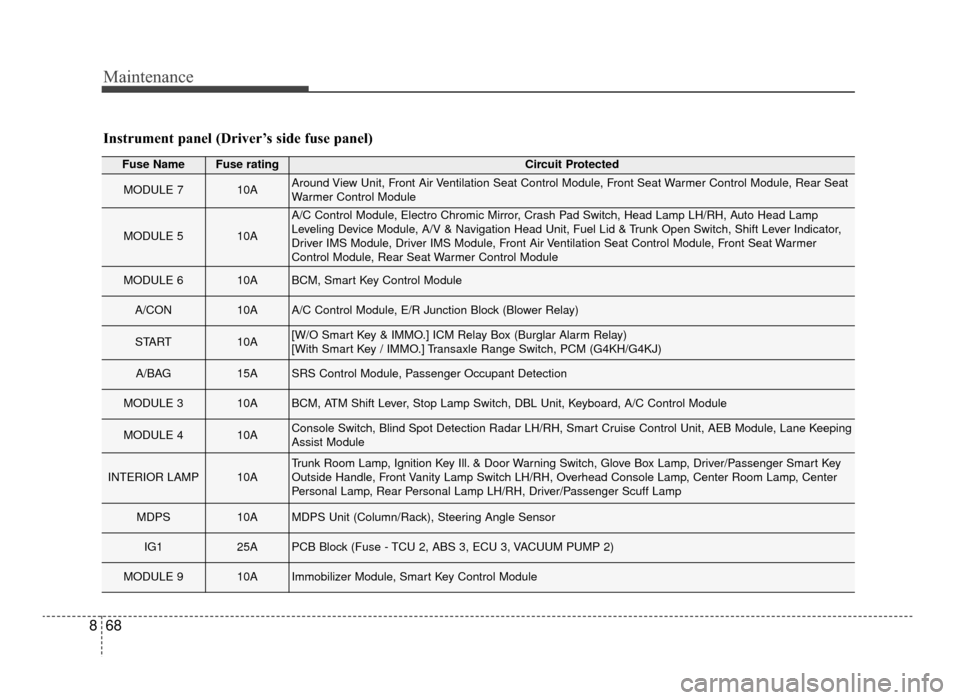
Fuse NameFuse ratingCircuit Protected
MODULE 710AAround View Unit, Front Air Ventilation Seat Control Module, Front Seat Warmer Control Module, Rear Seat
Warmer Control Module
MODULE 510A
A/C Control Module, Electro Chromic Mirror, Crash Pad Switch, Head Lamp LH/RH, Auto Head Lamp
Leveling Device Module, A/V & Navigation Head Unit, Fuel Lid & Trunk Open Switch, Shift Lever Indicator,
Driver IMS Module, Driver IMS Module, Front Air Ventilation Seat Control Module, Front Seat Warmer
Control Module, Rear Seat Warmer Control Module
MODULE 610ABCM, Smart Key Control Module
A/CON10AA/C Control Module, E/R Junction Block (Blower Relay)
START10A[W/O Smart Key & IMMO.] ICM Relay Box (Burglar Alarm Relay)
[With Smart Key / IMMO.] Transaxle Range Switch, PCM (G4KH/G4KJ)
A/BAG15ASRS Control Module, Passenger Occupant Detection
MODULE 310ABCM, ATM Shift Lever, Stop Lamp Switch, DBL Unit, Keyboard, A/C Control Module
MODULE 410AConsole Switch, Blind Spot Detection Radar LH/RH, Smart Cruise Control Unit, AEB Module, Lane Keeping
Assist Module
INTERIOR LAMP10ATrunk Room Lamp, Ignition Key Ill. & Door Warning Switch, Glove Box Lamp, Driver/Passenger Smart Key
Outside Handle, Front Vanity Lamp Switch LH/RH, Overhead Console Lamp, Center Room Lamp, Center
Personal Lamp, Rear Personal Lamp LH/RH, Driver/Passenger Scuff Lamp
MDPS10AMDPS Unit (Column/Rack), Steering Angle Sensor
IG125APCB Block (Fuse - TCU 2, ABS 3, ECU 3, VACUUM PUMP 2)
MODULE 910AImmobilizer Module, Smart Key Control Module
Instrument panel (Driver’s side fuse panel)
JF CAN (ENG) 8.qxp 11/5/2015 6:40 PM Page 68