instrument cluster KIA OPTIMA 2016 Features and Functions Guide
[x] Cancel search | Manufacturer: KIA, Model Year: 2016, Model line: OPTIMA, Model: KIA OPTIMA 2016Pages: 50, PDF Size: 4.34 MB
Page 16 of 50

14
A Pull/Press to operate Driver’s and Front Passenger’s Windows
Auto-Up/Down*
B Press to Unlock /Lock All Doors
C Press to disable Rear Passenger Windows
REMINDER: When pressed C, window controls for the Rear Passenger Windows are disabled .
Power Windows, Window Lock
& Central Door Lock*
Power Folding Outside Mirrors*
Toggle D left or right to select mirror . Then press arrows E to adjust
mirror position .
To both fold and unfold the outside rearview mirror, press the folding
mirror button F as pictured .
REMINDER: To lock position of mirrors, toggle switch to the neutral (center) position .
Power/Heated Outside Mirrors*
Mirror heaters controlled with Rear Defroster .
Automatic Door Lock/Unlock*
Auto Door Lock /Unlock will engage when the gear shift is moved in to
or out of the P (Park) position . Refer to the User Settings in the LCD
Instrument Cluster modes on how to turn Auto Door Lock /Unlock ON/OFF .
To automatically fold mirrors when exiting vehicle, press the LOCK button once on the key fob or Smart Key* .
QUICK TIP
A
B
C
D
F
E
OPTIMA FEATURES & FUNCTIONS GUIDE
*IF EQUIPPED
DRIVER'S PANEL
Page 17 of 50

15
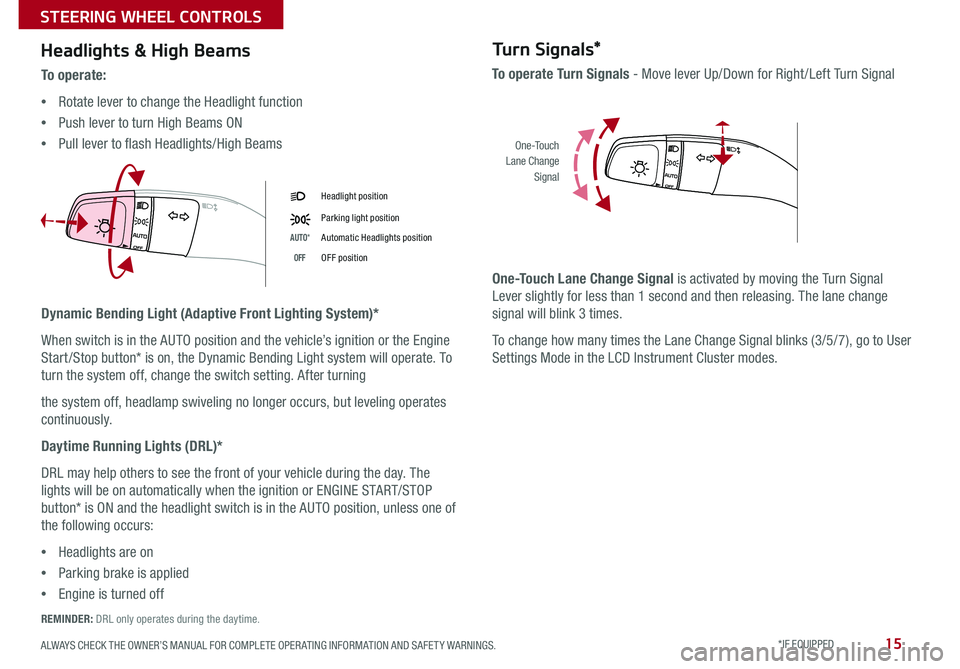
Headlights & High Beams
Dynamic Bending Light (Adaptive Front Lighting System)*
When switch is in the AUTO position and the vehicle’s ignition or the Engine
Start /Stop button* is on, the Dynamic Bending Light system will operate . To
turn the system off, change the switch setting . After turning
the system off, headlamp swiveling no longer occurs, but leveling operates
continuously .
Daytime Running Lights (DRL)*
DRL may help others to see the front of your vehicle during the day . The
lights will be on automatically when the ignition or ENGINE START/STOP
button* is ON and the headlight switch is in the AUTO position, unless one of
the following occurs:
•Headlights are on
•Parking brake is applied
•Engine is turned off
To o p e r a t e :
•Rotate lever to change the Headlight function
•Push lever to turn High Beams ON
•Pull lever to flash Headlights/High Beams
Turn Signals*
To operate Turn Signals - Move lever Up/Down for Right /Left Turn Signal
One-Touch Lane Change Signal is activated by moving the Turn Signal
Lever slightly for less than 1 second and then releasing . The lane change
signal will blink 3 times .
To change how many times the Lane Change Signal blinks (3/5/7), go to User
Settings Mode in the LCD Instrument Cluster modes .
Headlight position
Parking light position
AUTO*Automatic Headlights position
OFFOFF position
O ne -To u chLane ChangeSignal
REMINDER: DRL only operates during the daytime .
ALWAYS CHECK THE OWNER’S MANUAL FOR COMPLETE OPER ATING INFORMATION AND SAFET Y WARNINGS . *IF EQUIPPED
STEERING WHEEL CONTROLS
Page 22 of 50

20
To change the Cruise Control mode from ASCC to standard Cruise Control, press and hold button A . Repeat to switch modes again ( The ASCC system must not be activated to change modes) .
For the ASCC System to operate: •When no vehicle is in front, you must be travelling at a minimum speed of 19 mph •When following a vehicle, there is no minimum speed requirement
When following a vehicle, the system will automatically adjust your cruise speed based on the vehicle in front . It will even bring the vehicle to a complete stop if necessary .
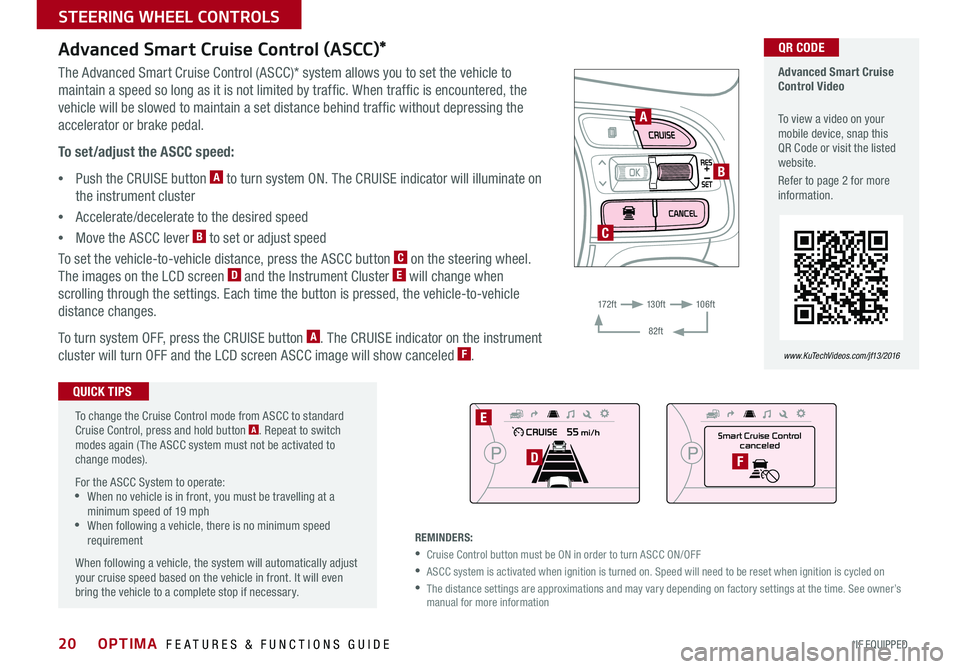
Advanced Smart Cruise Control (ASCC)*
The Advanced Smart Cruise Control (ASCC)* system allows you to set the vehicle to
maintain a speed so long as it is not limited by traffic . When traffic is encountered, the
vehicle will be slowed to maintain a set distance behind traffic without depressing the
accelerator or brake pedal .
To set/adjust the ASCC speed:
•Push the CRUISE button A to turn system ON . The CRUISE indicator will illuminate on
the instrument cluster
•Accelerate/decelerate to the desired speed
•Move the ASCC lever B to set or adjust speed
To set the vehicle-to-vehicle distance, press the ASCC button C on the steering wheel .
The images on the LCD screen D and the Instrument Cluster E will change when
scrolling through the settings . Each time the button is pressed, the vehicle-to-vehicle
distance changes .
To turn system OFF, press the CRUISE button A . The CRUISE indicator on the instrument
cluster will turn OFF and the LCD screen ASCC image will show canceled F .
Advanced Smart Cruise Control Video
To view a video on your mobile device, snap this QR Code or visit the listed website .
Refer to page 2 for more information .
www.KuTechVideos.com/jf13/2016
QR CODE
QUICK TIPS
REMINDERS:
•Cruise Control button must be ON in order to turn ASCC ON/OFF
•ASCC system is activated when ignition is turned on . Speed will need to be reset when ignition is cycled on
• The distance settings are approximations and may vary depending on factory settings at the time . See owner’s manual for more information
A
B
C
Smart Cruise Control
canceled
E
DF
17 2 f t13 0 f t
82ft
10 6 f t
OPTIMA FEATURES & FUNCTIONS GUIDE
*IF EQUIPPED
STEERING WHEEL CONTROLS
Page 30 of 50

28
•When leaving your keys with parking lot attendants or valet, make sure to inform them how to operate the EPB •If parked on a steep incline, pull up the EPB switch for more than 3 seconds for a firmer EPB application •Pull up and hold EPB switch a second time to increase brake pressure if parked on a decline or incline
Electric Parking Brake (EPB)* Electric Parking Break (EPB)/AUTO HOLD Video
To view a video on your mobile device, snap this QR Code or visit the listed website .
Refer to page 2 for more information .
www.KuTechVideos.com/jf13/2016
QR CODE
The Electric Parking Brake (EPB) system utilizes
an electric motor to engage the parking brake .
Applying the Parking Brake
Depress the brake pedal and pull up the
EPB switch . Ensure that the indicator light is
illuminated on the instrument cluster .
Releasing the Parking Brake
The EPB will automatically release when the
shifter is placed in Reverse or Drive .
To release EPB manually, depress the brake pedal, then press the EPB
switch A, with the ignition switch in the ON position . Ensure that the
indicator light is OFF .
REMINDERS:
• As a bulb check, the EPB malfunction indicator will illuminate for approximately 3 seconds when the ignition switch is turned ON
• If the warning light does not illuminate temporarily, or continues to remain lit, take your vehicle to an authorized Kia dealer and have the system checked
•The EPB should not be operated while the vehicle is moving
• A click or electric brake motor sound may be heard while operating or releasing the EPB, but these conditions are normal and indicates that the EPB is functioning properly
QUICK TIPS
Auto Hold*
Auto Hold temporarily maintains the vehicle
at a standstill even if the brake pedal is
released . Auto Hold can be turned On/Off
using the AUTO HOLD switch B on the
center panel below gear shift . Before Auto
Hold will operate, the driver’s door, engine
hood and trunk must be closed, and the
driver’s seat belt must be fastened .
The Auto Hold indicator on the
Instrument Cluster has four states:
White: Standby - With vehicle at a
standstill, and AUTO HOLD switch B is
pressed On, the indicator will illuminate
white . While driving the vehicle (vehicle is
not at a standstill), the Auto Hold indicator
will remain white .
Green: Engaged - When coming to a complete stop by depressing the
brake pedal, the Auto Hold indicator changes from white to green .
Off (not illuminated) - The indicator will turn Off when the AUTO HOLD
switch B is manually pressed Off or when the EPB is manually turned On .
Yellow: Malfunction - When the indicator is illuminated yellow, there may
be a system malfunction . Take your vehicle to a local Kia dealer .
Refer to page 4 for location of Instrument Cluster indicators.
A
B
(Located below gear shift)
OPTIMA FEATURES & FUNCTIONS GUIDE
*IF EQUIPPED
CENTER PANEL
Page 32 of 50

30
Front Seat Headrest Adjustment
SET
1
2
Optima Driver's Seat Memory Video To view a video on your mobile device, snap this QR Code or visit the listed website .
Refer to page 2 for more information .
www.KuTechVideos.com/jf13/2016 B
C
QR CODE
A
Driver Position Memory System*
To raise headrest: Pull headrest up .
To lower headrest: Press lock A, then press the headrest down .
To store a seating position into memory, first place
the shifter into P (Park) while the ignition switch is
ON . Then:
1 . Adjust the driver’s seat
2 . Press the SET button B on the control panel .
System will beep once
3 . Press one of the memory buttons C within
5 seconds . The system will beep twice when
memory has been stored
4 . “Driver (1 or 2) set is memorized” will appear on
the instrument cluster LCD screen
OPTIMA FEATURES & FUNCTIONS GUIDE
*IF EQUIPPED
SEATING
Page 39 of 50

37
(Buttons located on Driver's Panel left of Steering Wheel)
Fuel Door and Trunk Release
Located underneath the Trunk lid . With Trunk unlocked, press the Trunk
Release button C and pull the Trunk lid up by the handle to open .
Trunk Release Button (Exterior)
AB
•The Trunk must be unlocked before it can be opened by the Trunk Release Button •Smart Key* - The Trunk unlocks automatically, and can then be opened manually, when the Smart Key fob* is within close proximity to the vehicle
QUICK TIPS
C
Press the button A to release the fuel door .
Pull the button B to open the trunk .
Smart Trunk*
When the Smart Key fob is on your person and you are near the back of the
vehicle, within close proximity, the hazard warning lights will blink and a
chime will sound for about 3 seconds as an alert that the Smart Trunk* is
about to open .
Then the alert system will blink and chime two additional times before
opening the Smart Trunk* .
The Smart Trunk* feature is OFF by default . To enable the Smart Trunk*, go
to User Settings in the LCD Instrument Cluster modes .
During the Smart trunk alert, the Smart Trunk can be deactivated with the Smart Key by pressing any button on the key fob .
QUICK TIPS
REMINDERS:
• All doors are closed and locked after about 15 seconds
• The Smart Trunk feature will not operate when the doors are recently closed and locked, and the Smart Key is still detected after 15 seconds near the vehicle or within 60 inches of the door handles, a door is not locked or closed or the Smart Key is in the vehicle
For more information on the Smart trunk operation, please refer to the Owner's Manual.
ALWAYS CHECK THE OWNER’S MANUAL FOR COMPLETE OPER ATING INFORMATION AND SAFET Y WARNINGS . *IF EQUIPPED
OTHER KEY FEATURES