check engine light KIA OPTIMA 2016 Features and Functions Guide
[x] Cancel search | Manufacturer: KIA, Model Year: 2016, Model line: OPTIMA, Model: KIA OPTIMA 2016Pages: 50, PDF Size: 4.34 MB
Page 3 of 50
ESSENTIAL FEATURES
OPTIMA FE ATURES & FUNCTIONS GUIDE
Air Conditioning / Climate Control . . . . . . . . . . . .26
Active ECO System . . . . . . . . . . . . . . . . . . . . 09
Audio System – Standard Audio System ( Type B)* . . . . 22
Audio System – UVO eServices Premium with Navigation* .23
Aux/USB/iPod®* Port* & Power Outlets . . . . . . . . . 25
Bluetooth® Wireless Technology . . . . . . . . . . . . .18
Cruise Control . . . . . . . . . . . . . . . . . . . . . . 21
Digital Clock . . . . . . . . . . . . . . . . . . . . . . . 25
Passenger Airbag Off Indicator . . . . . . . . . . . . . . 40
Tire Mobility Kit* . . . . . . . . . . . . . . . . . . . . .39
Tire Pressure Monitoring System (TPMS) . . . . . . . . 05
Windshield Wipers & Washers . . . . . . . . . . . . . .16
*IF EQUIPPED
Driving while distracted can result in a loss of vehicle control that may lead to an accident, severe personal injury and death. The driver’s primary responsibility is in the safe and legal operation of a vehicle, and use of any handheld devices, other equipment or vehicle systems which take the driver’s eyes, attention and focus away from the safe operation of a vehicle or that are not permissible by law should never be used during operation of the vehicle.
VIDEOS & QR CODES . . . . . . . . . . . . . . . . . . 02
INSTRUMENT CLUSTERInstrument Cluster Overview . . . . . . . . . . . . . . . . 03Indicators & Warning Lights . . . . . . . . . . . . . . . . 04Tire Pressure Monitoring System (TPMS) . . . . . . . . . 05LCD Instrument Cluster Modes . . . . . . . . . . . . . . . 06Trip Computer / Tripmeter . . . . . . . . . . . . . . . . . 06Instant Fuel Consumption Mode* . . . . . . . . . . . . . . 07Fuel Economy . . . . . . . . . . . . . . . . . . . . . . . . 07User Settings . . . . . . . . . . . . . . . . . . . . . . . . 08Service Mode . . . . . . . . . . . . . . . . . . . . . . . . 08Drive Mode Integrated Control System* . . . . . . . . . . 09Active ECO System . . . . . . . . . . . . . . . . . . . . . 09
DRIVER’S PANELBlind Spot Detection System* . . . . . . . . . . . . . . . 10Instrument Panel Dimmer* . . . . . . . . . . . . . . . . . 11Electronic Stability Control (ESC) . . . . . . . . . . . . . . 11Hill-Start Assist Control (HAC) . . . . . . . . . . . . . . . 11Lane Departure Warning System (LDWS)* . . . . . . . . . 12Engine Start/Stop Button* . . . . . . . . . . . . . . . . . 13Power Windows, Window Lock & Central Door Lock* . . . 14Automatic Door Lock /Unlock . . . . . . . . . . . . . . . . 14Power/Heated Outside Mirrors* . . . . . . . . . . . . . . 14Power Folding Mirrors* . . . . . . . . . . . . . . . . . . . 14
STEERING WHEEL CONTROLSHeadlights & High Beams . . . . . . . . . . . . . . . . . . 15Turn Signals . . . . . . . . . . . . . . . . . . . . . . . . 15Windshield Wipers & Washers . . . . . . . . . . . . . . . 16Heated Steering Wheel Button* . . . . . . . . . . . . . . . 16Tilt/ Telescoping Steering Wheel* . . . . . . . . . . . . . . 17Paddle Shifters* . . . . . . . . . . . . . . . . . . . . . . 17Bluetooth® Wireless Technology . . . . . . . . . . . . . . 18Advanced Smart Cruise Control (ASCC)* . . . . . . . . . 20Audio Controls* . . . . . . . . . . . . . . . . . . . . . . 21Cruise Control . . . . . . . . . . . . . . . . . . . . . . . 21
AUDIO SYSTEMSStandard Audio System ( Type B)* . . . . . . . . . . . . . 22UVO eServices with Premium Navigation* . . . . . . . . . 23
CENTER PANELSurround View Monitoring (SVM) System* . . . . . . . . . 24 Digital Clock . . . . . . . . . . . . . . . . . . . . . . . . 25Aux/USB/iPod® Port & Power Outlets . . . . . . . . . . . 25USB Charger* . . . . . . . . . . . . . . . . . . . . . . . . 25Wireless Smartphone Charging System* . . . . . . . . . . 25Automatic Climate Control* . . . . . . . . . . . . . . . . 26Manual Climate Control* . . . . . . . . . . . . . . . . . . 27Electric Parking Brake (EPB)* . . . . . . . . . . . . . . . 28Auto Hold* . . . . . . . . . . . . . . . . . . . . . . . . . 28Automatic Gear Shift with Sportmatic® Shifting . . . . . . 29
S E AT I N GFront Seat Headrest Adjustment . . . . . . . . . . . . . . 30Driver Position Memory System* . . . . . . . . . . . . . . 30Power Adjustable Driver’s Seat* . . . . . . . . . . . . . . 316-Way Manual Adjustable Driver’s Seat* . . . . . . . . . . 32Seat Warmers / Ventilated Seats* . . . . . . . . . . . . . 32
OTHER KEY FEATURESSmart Key* . . . . . . . . . . . . . . . . . . . . . . . . . 33Remote Keyless Entry (Folding Key)* . . . . . . . . . . . . 34Double-Turn Lock /Unlock All . . . . . . . . . . . . . . . . 34Fuel Cap / Malfunction Indicator (Check Engine Light) . . . 34Sunvisor . . . . . . . . . . . . . . . . . . . . . . . . . . 34HomeLink® with Auto-Dimming Rearview Mirror* . . . . . 35Map/Room Lamps . . . . . . . . . . . . . . . . . . . . . 36Panoramic Sunroof Operation* . . . . . . . . . . . . . . . 36Fuel Door and Trunk Release . . . . . . . . . . . . . . . . 37Trunk Release Button (Exterior) . . . . . . . . . . . . . . 37Smart Trunk* . . . . . . . . . . . . . . . . . . . . . . . . 37Hood Release Lever and Latch . . . . . . . . . . . . . . . 38Child Safety Locks . . . . . . . . . . . . . . . . . . . . . 38Back-Up Warning System (Rear Parking Assist System)* . 38Rear-Camera Display* . . . . . . . . . . . . . . . . . . . 39Tire Mobility Kit . . . . . . . . . . . . . . . . . . . . . . . 39
SAFETY FEATURESOccupant Detection System (ODS) /Passenger Airbag Off Indicator . . . . . . . . . . . . . . . 40Seat Belts . . . . . . . . . . . . . . . . . . . . . . . . . . 40Seat Belt Retractor Locks . . . . . . . . . . . . . . . . . 40
NORMAL MAINTENANCE SCHEDULE . . . . . 41LEGAL DISCLAIMERS (See Back Inside Cover Page)
Page 5 of 50
3
0
1 2
3
4
5
6
7
8
20 40
60
80
100
120
140
160
0
MPH
km/h
0
20
40 60
80
100
120
140
160
180
200
220
240
260
x1000rpm AUTO
HOLD
ECO
SPORT
AUTO
EPBC HE F
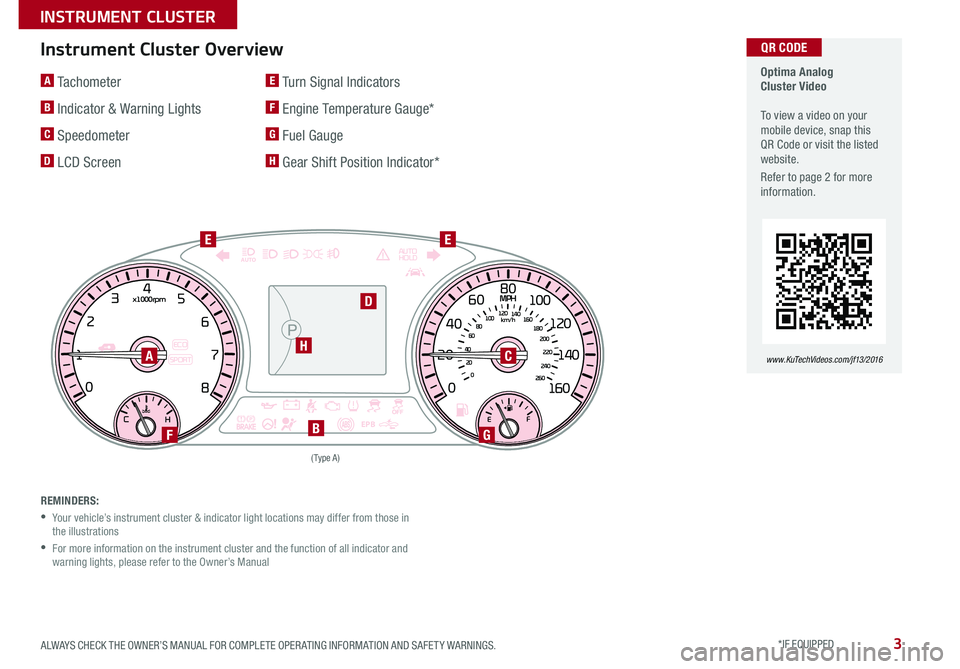
A Tachometer
B Indicator & Warning Lights
C Speedometer
D LCD Screen
E Turn Signal Indicators
F Engine Temperature Gauge*
G Fuel Gauge
H Gear Shift Position Indicator*
Instrument Cluster Overview
( Type A )
Optima Analog Cluster Video To view a video on your mobile device, snap this QR Code or visit the listed website
.
Refer to page 2 for more information .
www.KuTechVideos.com/jf13/2016 A
G
H
FB
EE
D
C
QR CODE
REMINDERS:
• Your vehicle’s instrument cluster & indicator light locations may differ from those in the illustrations
• For more information on the instrument cluster and the function of all indicator and warning lights, please refer to the Owner’s Manual
ALWAYS CHECK THE OWNER’S MANUAL FOR COMPLETE OPER ATING INFORMATION AND SAFET Y WARNINGS . *IF EQUIPPED
INSTRUMENT CLUSTER
Page 9 of 50
7
Fuel Economy Video To view a video on your mobile device, snap this QR Code or visit the listed website .
Refer to page 2 for more information .
www.KuTechVideos.com/jf13/2016
QR CODE
There are several factors that contribute
to your vehicle’s fuel economy, including
maintenance of your vehicle, driving style,
environmental conditions, vehicle weight and
vehicle aerodynamics . Below are tips on how
to help improve fuel economy:
•Keep your vehicle in good condition with
regular maintenance
•Don’t let the engine idle longer than
necessary
•Drive at a moderate speed, accelerating
smoothly and at a moderate rate
•Keep tires inflated to the recommended
pressure
•Travel lightly, without carrying
unnecessary weight in your vehicle
•Avoid placing large or heavy items on roof racks
•Avoid hilly, winding or poorly maintained roads
REMINDER: Driving range can vary depending on your vehicle’s fuel tank size, e .g ., 12-gal . vs . 24-gal ., even though the MPG may be the same
Fuel Economy
For more information on Fuel Economy, you can snap the QR Code above to view a video or refer to the brochure “GETTING MORE OUT OF EVERY GALLON, FUEL-SAVING TIPS TO DRIVE BY” available at your local dealership.
Instant Fuel Consumption Mode*
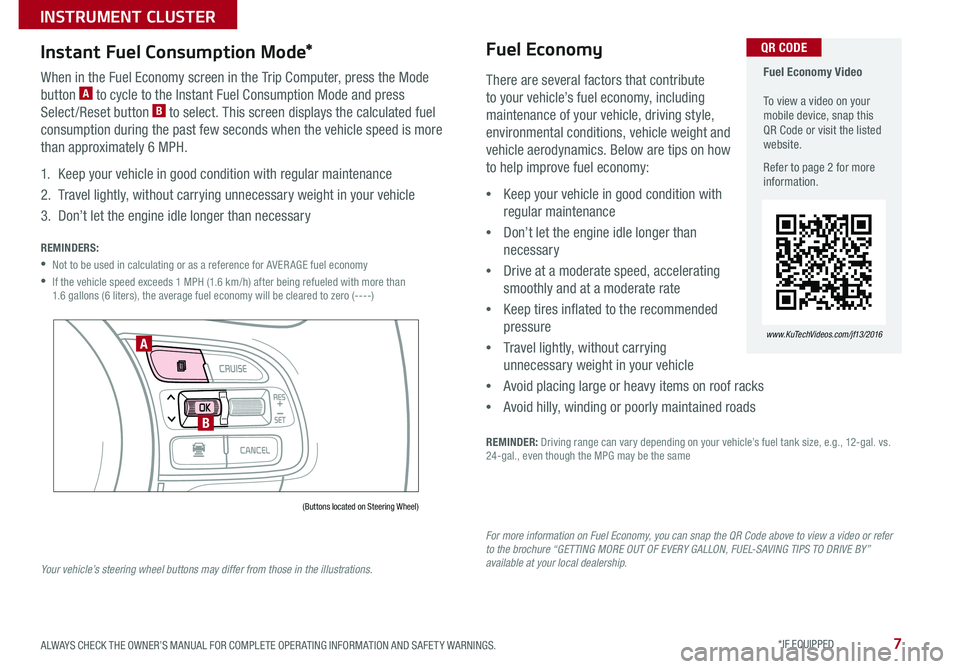
When in the Fuel Economy screen in the Trip Computer, press the Mode
button A to cycle to the Instant Fuel Consumption Mode and press
Select /Reset button B to select . This screen displays the calculated fuel
consumption during the past few seconds when the vehicle speed is more
than approximately 6 MPH .
1 . Keep your vehicle in good condition with regular maintenance
2 . Travel lightly, without carrying unnecessary weight in your vehicle
3 . Don’t let the engine idle longer than necessary
REMINDERS:
•Not to be used in calculating or as a reference for AVER AGE fuel economy
• If the vehicle speed exceeds 1 MPH (1 .6 km/h) after being refueled with more than 1 .6 gallons (6 liters), the average fuel economy will be cleared to zero (----)
(Buttons located on Steering Wheel)
A
B
Your vehicle’s steering wheel buttons may differ from those in the illustrations.
ALWAYS CHECK THE OWNER’S MANUAL FOR COMPLETE OPER ATING INFORMATION AND SAFET Y WARNINGS . *IF EQUIPPED
INSTRUMENT CLUSTER
Page 11 of 50
9
Optima Active ECO System Video
To view a video on your mobile device, snap this QR Code or visit the listed website .
Refer to page 2 for more information .
www.KuTechVideos.com/jf13/2016
Active ECO System*
The Active ECO system helps improve fuel economy by
controlling several vehicle components . When activated,
it optimizes drivetrain operations such as engine power
and transmission to help improve fuel economy .
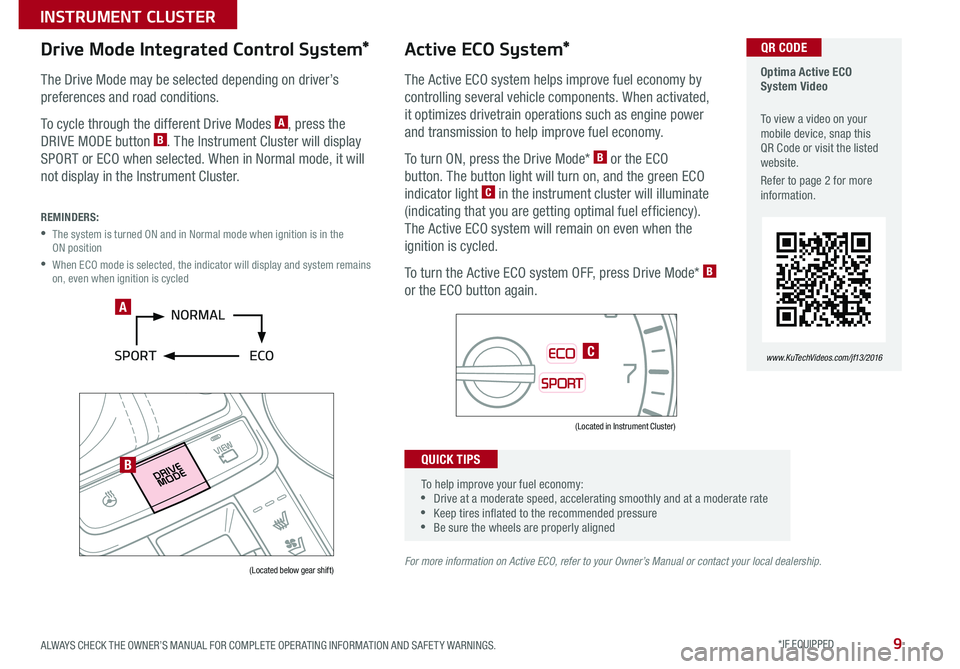
To turn ON, press the Drive Mode* B or the ECO
button . The button light will turn on, and the green ECO
indicator light C in the instrument cluster will illuminate
(indicating that you are getting optimal fuel efficiency) .
The Active ECO system will remain on even when the
ignition is cycled .
To turn the Active ECO system OFF, press Drive Mode* B
or the ECO button again .
For more information on Active ECO, refer to your Owner’s Manual or contact your local dealership.
0
1 2
3
4
5
6
7
8
2040
60
80
100
120
140
160
0
MPH
km/h
0
20
40 60
80
100
120
140
160
180
200
220
240
260
x1000rpm
ECO
SPORT
AUTO
EPBC HE F
Drive Mode Integrated Control System*
The Drive Mode may be selected depending on driver’s
preferences and road conditions
.
To cycle through the different Drive Modes A, press the
DRIVE MODE button B . The Instrument Cluster will display
SPORT or ECO when selected . When in Normal mode, it will
not display in the Instrument Cluster .
REMINDERS:
• The system is turned ON and in Normal mode when ignition is in the ON position
• When ECO mode is selected, the indicator will display and system remains on, even when ignition is cycled
(Located below gear shift)
(Located in Instrument Cluster)
To help improve your fuel economy: •Drive at a moderate speed, accelerating smoothly and at a moderate rate •Keep tires inflated to the recommended pressure •Be sure the wheels are properly aligned
QUICK TIPS
A
B
C
QR CODE
ALWAYS CHECK THE OWNER’S MANUAL FOR COMPLETE OPER ATING INFORMATION AND SAFET Y WARNINGS . *IF EQUIPPED
INSTRUMENT CLUSTER
Page 15 of 50
13
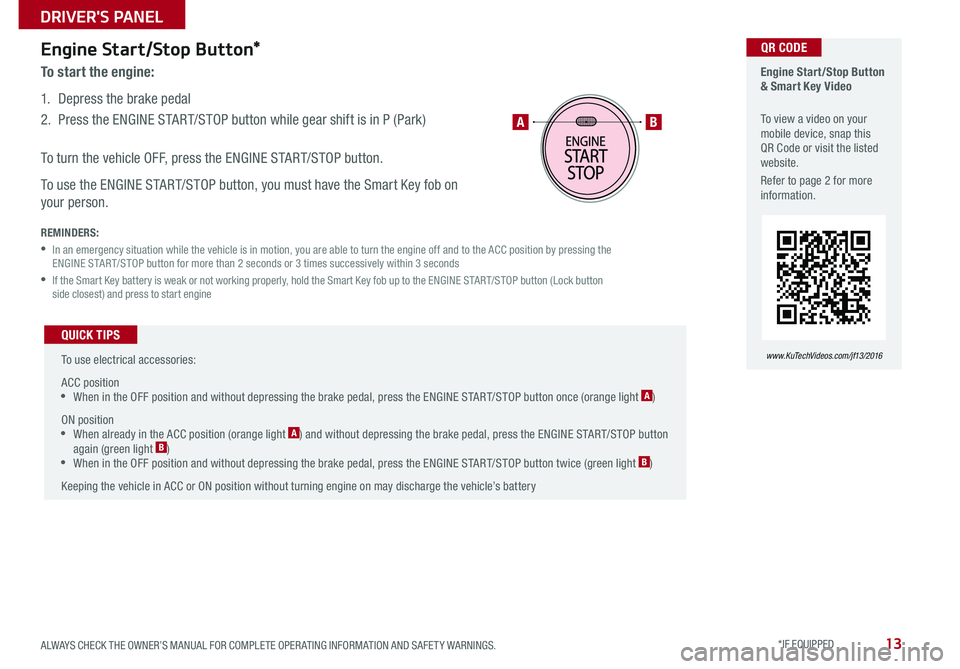
Engine Start/Stop Button*
To start the engine:
1 . Depress the brake pedal
2 . Press the ENGINE START/STOP button while gear shift is in P (Park)
To turn the vehicle OFF, press the ENGINE START/STOP button .
To use the ENGINE START/STOP button, you must have the Smart Key fob on
your person .
REMINDERS:
• In an emergency situation while the vehicle is in motion, you are able to turn the engine off and to the ACC position by pressing the ENGINE START/STOP button for more than 2 seconds or 3 times successively within 3 seconds
• If the Smart Key battery is weak or not working properly, hold the Smart Key fob up to the ENGINE START/STOP button (Lock button side closest) and press to start engine
To use electrical accessories:
ACC position •When in the OFF position and without depressing the brake pedal, press the ENGINE START/STOP button once (orange light A)
ON position •When already in the ACC position (orange light A) and without depressing the brake pedal, press the ENGINE START/STOP button again (green light B) • When in the OFF position and without depressing the brake pedal, press the ENGINE START/STOP button twice (green light B)
Keeping the vehicle in ACC or ON position without turning engine on may discharge the vehicle’s battery
QUICK TIPS
Engine Start/Stop Button & Smart Key Video
To view a video on your mobile device, snap this QR Code or visit the listed website .
Refer to page 2 for more information .
www.KuTechVideos.com/jf13/2016
AB
QR CODE
ALWAYS CHECK THE OWNER’S MANUAL FOR COMPLETE OPER ATING INFORMATION AND SAFET Y WARNINGS . *IF EQUIPPED
DRIVER'S PANEL
Page 17 of 50
15
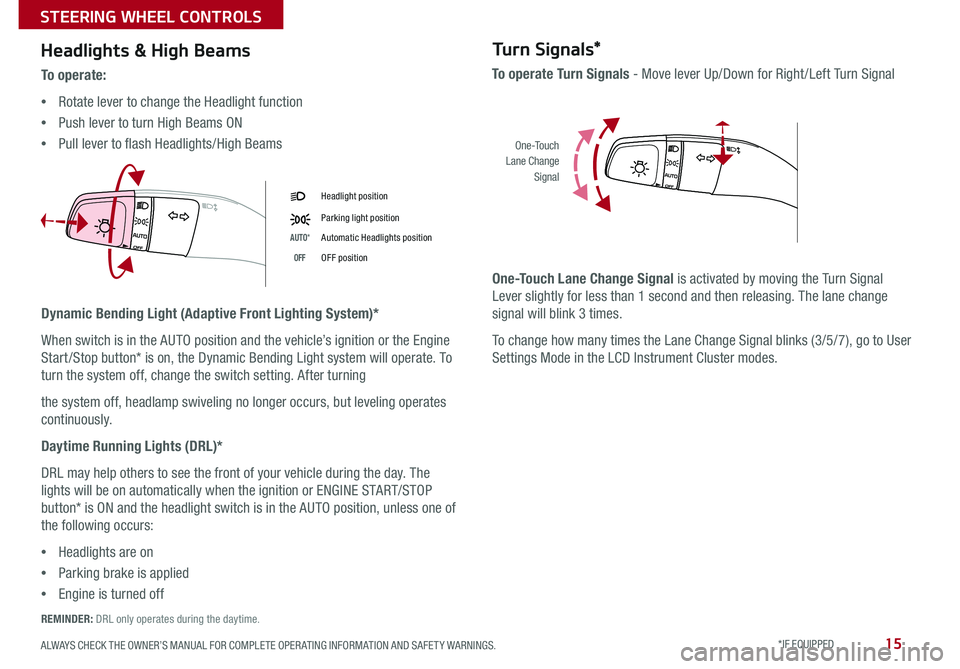
Headlights & High Beams
Dynamic Bending Light (Adaptive Front Lighting System)*
When switch is in the AUTO position and the vehicle’s ignition or the Engine
Start /Stop button* is on, the Dynamic Bending Light system will operate . To
turn the system off, change the switch setting . After turning
the system off, headlamp swiveling no longer occurs, but leveling operates
continuously .
Daytime Running Lights (DRL)*
DRL may help others to see the front of your vehicle during the day . The
lights will be on automatically when the ignition or ENGINE START/STOP
button* is ON and the headlight switch is in the AUTO position, unless one of
the following occurs:
•Headlights are on
•Parking brake is applied
•Engine is turned off
To o p e r a t e :
•Rotate lever to change the Headlight function
•Push lever to turn High Beams ON
•Pull lever to flash Headlights/High Beams
Turn Signals*
To operate Turn Signals - Move lever Up/Down for Right /Left Turn Signal
One-Touch Lane Change Signal is activated by moving the Turn Signal
Lever slightly for less than 1 second and then releasing . The lane change
signal will blink 3 times .
To change how many times the Lane Change Signal blinks (3/5/7), go to User
Settings Mode in the LCD Instrument Cluster modes .
Headlight position
Parking light position
AUTO*Automatic Headlights position
OFFOFF position
O ne -To u chLane ChangeSignal
REMINDER: DRL only operates during the daytime .
ALWAYS CHECK THE OWNER’S MANUAL FOR COMPLETE OPER ATING INFORMATION AND SAFET Y WARNINGS . *IF EQUIPPED
STEERING WHEEL CONTROLS
Page 27 of 50
25
The power outlets are inactive when ignition is in the OFF position .
Wireless Charging Video To view a video on your mobile device, snap this QR Code or visit the listed website .
Refer to page 2 for more information .
www.KuTechVideos.com/jf13/2016
Standard Audio System Clock Setup:
Press the CLOCK key to display the Clock setting screen . Then use the
on-screen buttons to navigate through setup and return to exit .
UVO eServices with Navigation* Clock Setup:
Press the SETUP key, then the CLOCK button to display the Clock setting
screen . Then use the on-screen buttons to navigate through setup and
return to exit .
QR CODEDigital Clock*
12V 12V180W
AUX USB180W
12V180W
AAux/USB/iPod® Port & Power Outlets
QUICK TIP
REMINDER: Using the power outlet (accessory plug) for prolonged periods of time with the engine off could cause the battery to discharge .
For more information on the Aux/USB/iPod® Port & Power Outlets, refer to the Owner's Manual.
USB Charger*
The USB charger is located inside
the Center Console and on rear of
the Center Console .
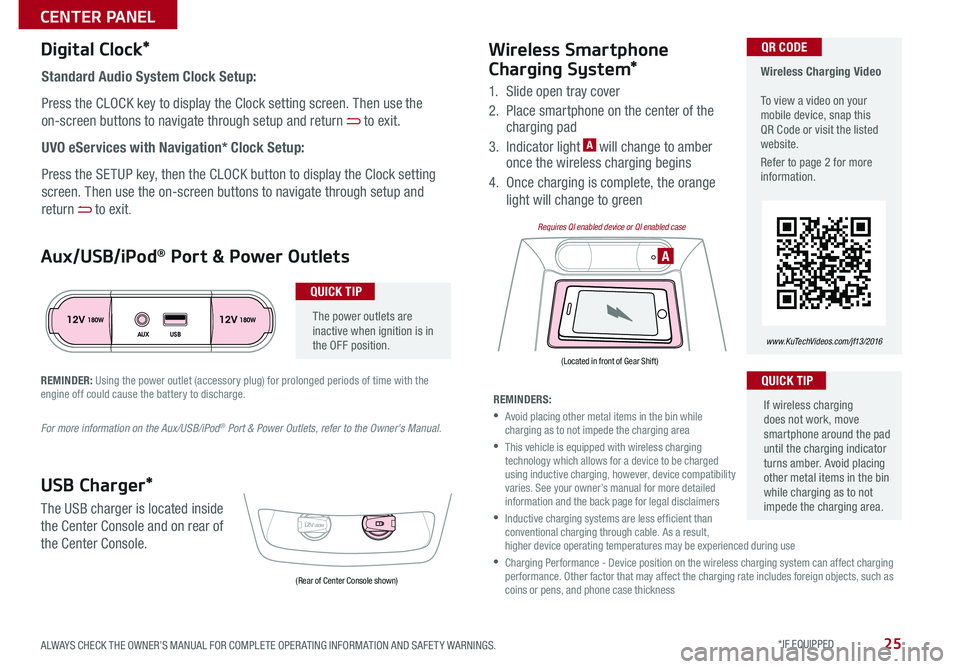
Wireless Smartphone
Charging System*
1 . Slide open tray cover
2 . Place smartphone on the center of the charging pad
3 . Indicator light A will change to amber once the wireless charging begins
4 . Once charging is complete, the orange
light will change to green
If wireless charging does not work, move smartphone around the pad until the charging indicator turns amber . Avoid placing other metal items in the bin while charging as to not impede the charging area .
QUICK TIP
REMINDERS:
• Avoid placing other metal items in the bin while charging as to not impede the charging area
• This vehicle is equipped with wireless charging technology which allows for a device to be charged using inductive charging, however, device compatibility varies . See your owner’s manual for more detailed information and the back page for legal disclaimers
• Inductive charging systems are less ef ficient than conventional charging through cable . As a result, higher device operating temperatures may be experienced during use
• Charging Performance - Device position on the wireless charging system can affect charging performance . Other factor that may affect the charging rate includes foreign objects, such as coins or pens, and phone case thickness(Rear of Center Console shown)
(Located in front of Gear Shift)
Requires QI enabled device or QI enabled case
ALWAYS CHECK THE OWNER’S MANUAL FOR COMPLETE OPER ATING INFORMATION AND SAFET Y WARNINGS . *IF EQUIPPED
CENTER PANEL
Page 30 of 50

28
•When leaving your keys with parking lot attendants or valet, make sure to inform them how to operate the EPB •If parked on a steep incline, pull up the EPB switch for more than 3 seconds for a firmer EPB application •Pull up and hold EPB switch a second time to increase brake pressure if parked on a decline or incline
Electric Parking Brake (EPB)* Electric Parking Break (EPB)/AUTO HOLD Video
To view a video on your mobile device, snap this QR Code or visit the listed website .
Refer to page 2 for more information .
www.KuTechVideos.com/jf13/2016
QR CODE
The Electric Parking Brake (EPB) system utilizes
an electric motor to engage the parking brake .
Applying the Parking Brake
Depress the brake pedal and pull up the
EPB switch . Ensure that the indicator light is
illuminated on the instrument cluster .
Releasing the Parking Brake
The EPB will automatically release when the
shifter is placed in Reverse or Drive .
To release EPB manually, depress the brake pedal, then press the EPB
switch A, with the ignition switch in the ON position . Ensure that the
indicator light is OFF .
REMINDERS:
• As a bulb check, the EPB malfunction indicator will illuminate for approximately 3 seconds when the ignition switch is turned ON
• If the warning light does not illuminate temporarily, or continues to remain lit, take your vehicle to an authorized Kia dealer and have the system checked
•The EPB should not be operated while the vehicle is moving
• A click or electric brake motor sound may be heard while operating or releasing the EPB, but these conditions are normal and indicates that the EPB is functioning properly
QUICK TIPS
Auto Hold*
Auto Hold temporarily maintains the vehicle
at a standstill even if the brake pedal is
released . Auto Hold can be turned On/Off
using the AUTO HOLD switch B on the
center panel below gear shift . Before Auto
Hold will operate, the driver’s door, engine
hood and trunk must be closed, and the
driver’s seat belt must be fastened .
The Auto Hold indicator on the
Instrument Cluster has four states:
White: Standby - With vehicle at a
standstill, and AUTO HOLD switch B is
pressed On, the indicator will illuminate
white . While driving the vehicle (vehicle is
not at a standstill), the Auto Hold indicator
will remain white .
Green: Engaged - When coming to a complete stop by depressing the
brake pedal, the Auto Hold indicator changes from white to green .
Off (not illuminated) - The indicator will turn Off when the AUTO HOLD
switch B is manually pressed Off or when the EPB is manually turned On .
Yellow: Malfunction - When the indicator is illuminated yellow, there may
be a system malfunction . Take your vehicle to a local Kia dealer .
Refer to page 4 for location of Instrument Cluster indicators.
A
B
(Located below gear shift)
OPTIMA FEATURES & FUNCTIONS GUIDE
*IF EQUIPPED
CENTER PANEL
Page 36 of 50

34
One-Click Fuel Cap Video To view a video on your mobile device, snap this QR Code or visit the listed website .
Refer to page 2 for more information .
www.KuTechVideos.com/jf13/2016
HOLD
A Press to release Folding Key
B Press to lock All Doors
C Press to unlock Driver’s Door .
Press twice in 4 seconds to
unlock All Doors
D Press and hold to unlock Trunk
and manually open
E Press and hold more than 1
second for Panic Alarm . To turn
off Alarm, press any button
Remote button configuration may vary depending on vehicle options.REMINDER: The Fuel Filler Door Release button is located on the lower part of the driver’s door panel .
Remote Keyless Entry (Folding Key)*Fuel Cap/Malfunction Indicator
(Check Engine Light)
Tighten for ONE CLICK to prevent Malfunction
Indicator from illuminating .
LockUnlock
B
A
C
D
E
QR CODE
Double-Turn Lock/Unlock All
•Turn clockwise once to unlock Driver’s Door
•Turn clockwise again within 4 seconds to unlock All Doors
•Turn counterclockwise once to lock All Doors
Sunvisor
Use the Sunvisor to shield direct light through the front or side windows .
Slide the Sunvisor out and adjust as needed .
REMINDERS:
•Sunvisor may not shield all direct light
• Do not operate the vehicle if Sunvisor is impairing your visibility
• Be aware of your seating position when adjusting or swinging Sunvisor around from the front or side windows
OPTIMA FEATURES & FUNCTIONS GUIDE
*IF EQUIPPED
OTHER KEY FEATURES
Page 41 of 50
39
•The Tire Mobility Kit is a temporary fix and is to be used for one tire only; the tire should be inspected as soon as possible •The kit should only be used for sealing/inflating passenger car tires; do not use for inflating any other type of tires •Some damaged tires cannot be sealed completely; do not use the kit if it appears a tire is damaged beyond repair
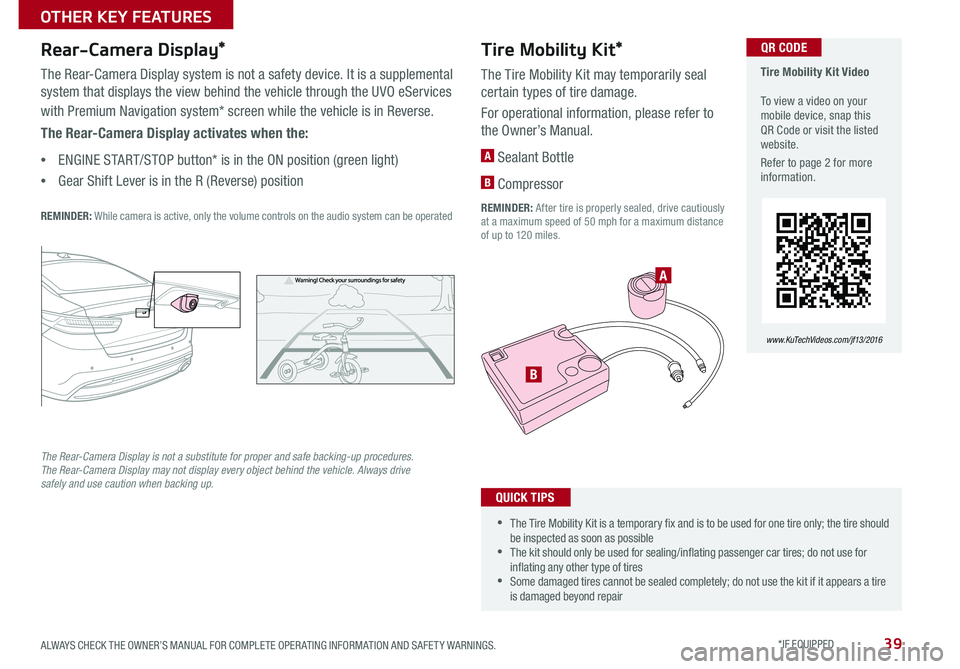
The Rear-Camera Display is not a substitute for proper and safe backing-up procedures. The Rear-Camera Display may not display every object behind the vehicle. Always drive safely and use caution when backing up.
Tire Mobility Kit*
The Tire Mobility Kit may temporarily seal
certain types of tire damage .
For operational information, please refer to
the Owner’s Manual .
A Sealant Bottle
B Compressor
REMINDER: After tire is properly sealed, drive cautiously at a maximum speed of 50 mph for a maximum distance of up to 120 miles .
Rear-Camera Display*
The Rear-Camera Display system is not a safety device . It is a supplemental
system that displays the view behind the vehicle through the UVO eServices
with Premium Navigation system* screen while the vehicle is in Reverse .
The Rear-Camera Display activates when the:
•ENGINE START/STOP button* is in the ON position (green light)
•Gear Shift Lever is in the R (Reverse) position
REMINDER: While camera is active, only the volume controls on the audio system can be operated
Tire Mobility Kit Video To view a video on your mobile device, snap this QR Code or visit the listed website .
Refer to page 2 for more information .
QR CODE
QUICK TIPS
www.KuTechVideos.com/jf13/2016
A
B
ALWAYS CHECK THE OWNER’S MANUAL FOR COMPLETE OPER ATING INFORMATION AND SAFET Y WARNINGS . *IF EQUIPPED
OTHER KEY FEATURES