buttons KIA OPTIMA 2019 Features and Functions Guide
[x] Cancel search | Manufacturer: KIA, Model Year: 2019, Model line: OPTIMA, Model: KIA OPTIMA 2019Pages: 50, PDF Size: 4.87 MB
Page 8 of 50
OPTIMA FEATURES & FUNCTIONS GUIDE6*IF EQUIPPED
Driving while distracted is dangerous and should be avoided. Drivers should remain attentive to driving and always exercise caution when using the steering-wheel-mounted controls while driving.
LCD Instrument Cluster Modes*
( Type B; Buttons located on Steering Wheel)
A
BTrip Computer Mode: Displays driving information for
tripmeter, fuel economy, etc .
Turn-by-Turn Mode*: Displays the state of the navigation
Assist Mode*: Displays the state of the SCC with S&G,
Lane Keeping Assist, TPMS, Driver Attention Warning (DAW )
Master Warning Mode: Informs on low tire pressure
warnings, Blind-Spot Collision Warning (BCW ) system
malfunction and other systems
User Settings Mode: Change settings of the doors, lamps
and other features
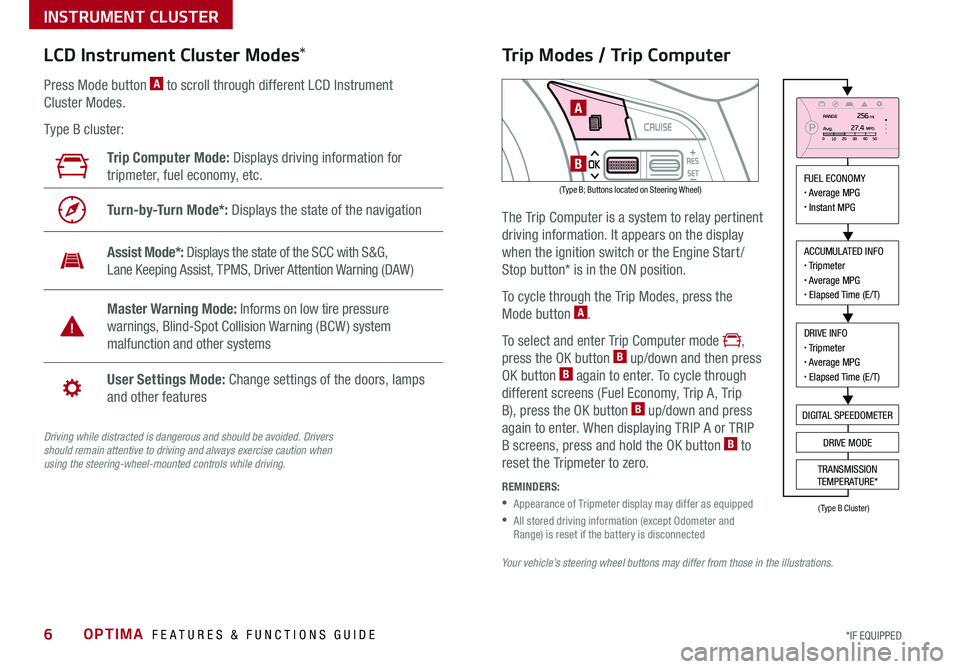
Press Mode button A to scroll through different LCD Instrument
Cluster Modes .
Type B cluster:
Your vehicle’s steering wheel buttons may differ from those in the illustrations.
Trip Modes / Trip Computer
The Trip Computer is a system to relay pertinent
driving information . It appears on the display
when the ignition switch or the Engine Start /
Stop button* is in the ON position .
To cycle through the Trip Modes, press the
Mode button A .
To select and enter Trip Computer mode ,
press the OK button B up/down and then press
OK button B again to enter . To cycle through
different screens (Fuel Economy, Trip A, Trip
B), press the OK button B up/down and press
again to enter . When displaying TRIP A or TRIP
B screens, press and hold the OK button B to
reset the Tripmeter to zero .
REMINDERS:
•
Appearance of Tripmeter display may differ as equipped
•
All stored driving information (except Odometer and Range) is reset if the battery is disconnected
INSTRUMENT CLUSTER
FUEL ECONOMY• Average MPG• Instant MPG
ACCUMULATED INFO• Tripmeter• Average MPG• Elapsed Time (E/T)
DRIVE INFO• Tripmeter• Average MPG• Elapsed Time (E/T)
DIGITAL SPEEDOMETER
DRIVE MODE
TRANSMISSION
TEMPERATURE*
(Type B Cluster)
Page 9 of 50
7ALWAYS CHECK THE OWNER’S MANUAL FOR COMPLETE OPER ATING INFORMATION AND SAFET Y WARNINGS . *IF EQUIPPED
Instant Fuel Consumption Mode
INSTRUMENT CLUSTER
There are several factors that contribute
to your vehicle’s fuel economy, including
maintenance of your vehicle, driving style,
environmental conditions, vehicle weight
and vehicle aerodynamics . Below are tips
on how to help improve fuel economy:
•Keep your vehicle in good condition
with regular maintenance
•Don’t let the engine idle longer than
necessary
•Drive at a moderate speed,
accelerating smoothly and at a
moderate rate
•Keep tires inflated to the
recommended pressure
•Travel lightly, without carrying
unnecessary weight in your vehicle
•Avoid placing large or heavy items on roof racks
•Avoid hilly, winding or poorly maintained roads
For more information on Fuel Economy, you can snap the QR Code above to view a video or refer to the Owner's Manual.
Fuel Economy Video To view a video on your mobile device, snap this QR Code or visit the listed website .
Refer to page 2 for more information .
www.youtube.com/KiaFeatureVideos
QR CODE
( Type A - Buttons located on Steering Wheel)
A
B
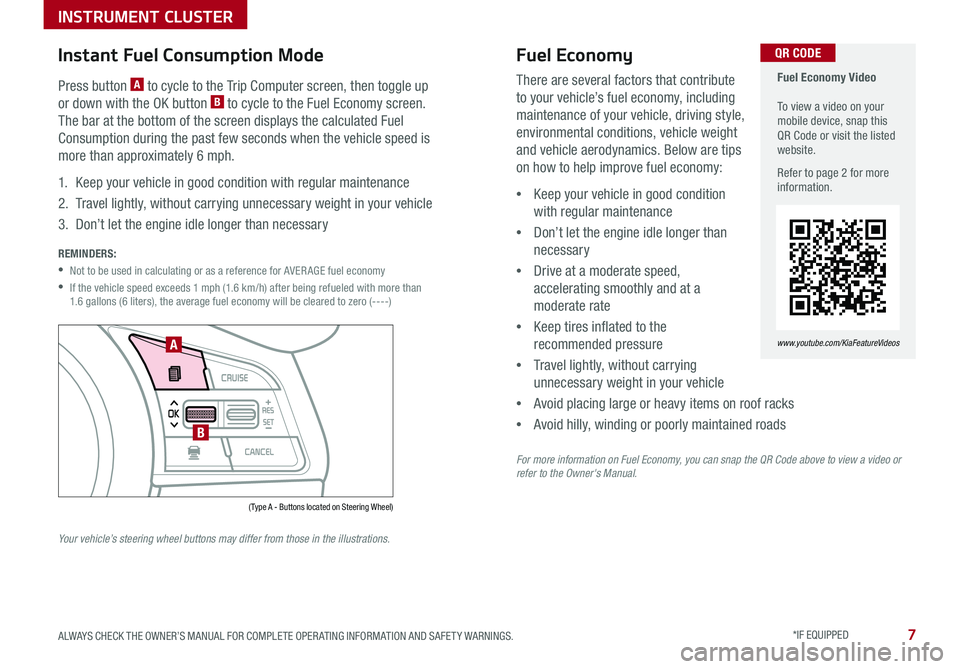
Press button A to cycle to the Trip Computer screen, then toggle up
or down with the OK button B to cycle to the Fuel Economy screen .
The bar at the bottom of the screen displays the calculated Fuel
Consumption during the past few seconds when the vehicle speed is
more than approximately 6 mph .
1 . Keep your vehicle in good condition with regular maintenance
2 . Travel lightly, without carrying unnecessary weight in your vehicle
3 . Don’t let the engine idle longer than necessary
REMINDERS:
•Not to be used in calculating or as a reference for AVER AGE fuel economy
•
If the vehicle speed exceeds 1 mph (1 .6 km/h) after being refueled with more than 1 .6 gallons (6 liters), the average fuel economy will be cleared to zero (----)
Your vehicle’s steering wheel buttons may differ from those in the illustrations.
Fuel Economy
Page 17 of 50
15ALWAYS CHECK THE OWNER’S MANUAL FOR COMPLETE OPER ATING INFORMATION AND SAFET Y WARNINGS *IF EQUIPPED
A
B
C
D
F
E
Power Windows, Window Lock
& Central Door Lock
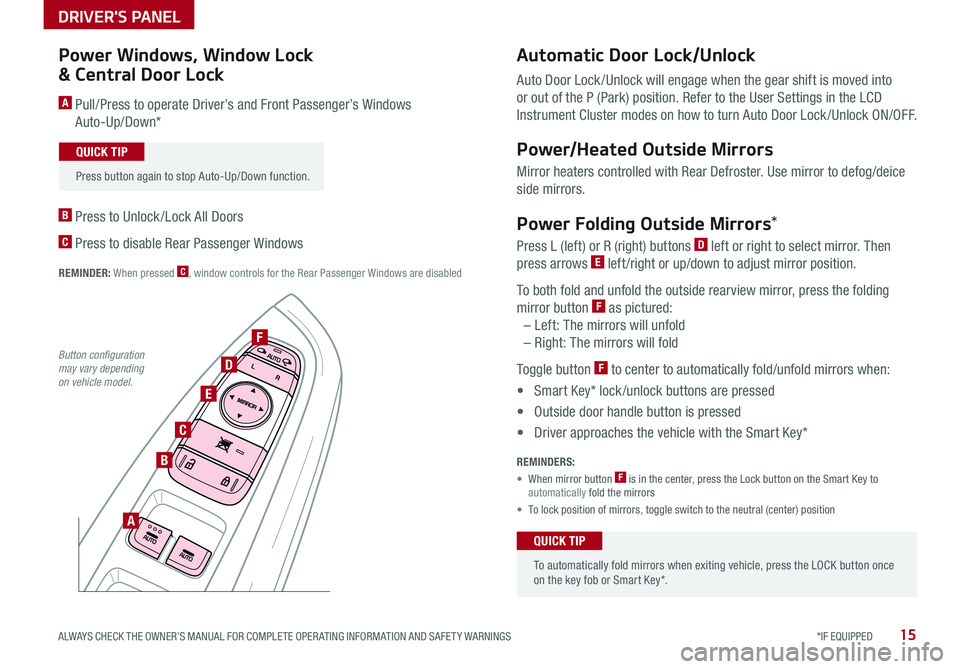
A Pull/Press to operate Driver’s and Front Passenger’s Windows
Auto-Up/Down*
B Press to Unlock /Lock All Doors
C Press to disable Rear Passenger Windows
REMINDER: When pressed C, window controls for the Rear Passenger Windows are disabled
Automatic Door Lock/Unlock
Auto Door Lock /Unlock will engage when the gear shift is moved into
or out of the P (Park) position . Refer to the User Settings in the LCD
Instrument Cluster modes on how to turn Auto Door Lock /Unlock ON/OFF .
Power/Heated Outside Mirrors
Mirror heaters controlled with Rear Defroster . Use mirror to defog/deice
side mirrors .
Power Folding Outside Mirrors*
Press L (left) or R (right) buttons D left or right to select mirror . Then
press arrows E left /right or up/down to adjust mirror position .
To both fold and unfold the outside rearview mirror, press the folding
mirror button F as pictured:
– Left: The mirrors will unfold
– Right: The mirrors will fold
Toggle button F to center to automatically fold/unfold mirrors when:
• Smart Key* lock /unlock buttons are pressed
• Outside door handle button is pressed
• Driver approaches the vehicle with the Smart Key*
REMINDERS:
• When mirror button F is in the center, press the Lock button on the Smart Key to automatically fold the mirrors
• To lock position of mirrors, toggle switch to the neutral (center) position
To automatically fold mirrors when exiting vehicle, press the LOCK button once on the key fob or Smart Key* .
QUICK TIP
Press button again to stop Auto-Up/Down function .
QUICK TIP
Button configuration may vary depending on vehicle model.
DRIVER'S PANEL
Page 20 of 50
OPTIMA FEATURES & FUNCTIONS GUIDE18*IF EQUIPPED †LEGAL DISCL AIMERS ON BACK INSIDE COVER
A
CD
B
(Type B shown)
Bluetooth® Wireless Technology†5,22
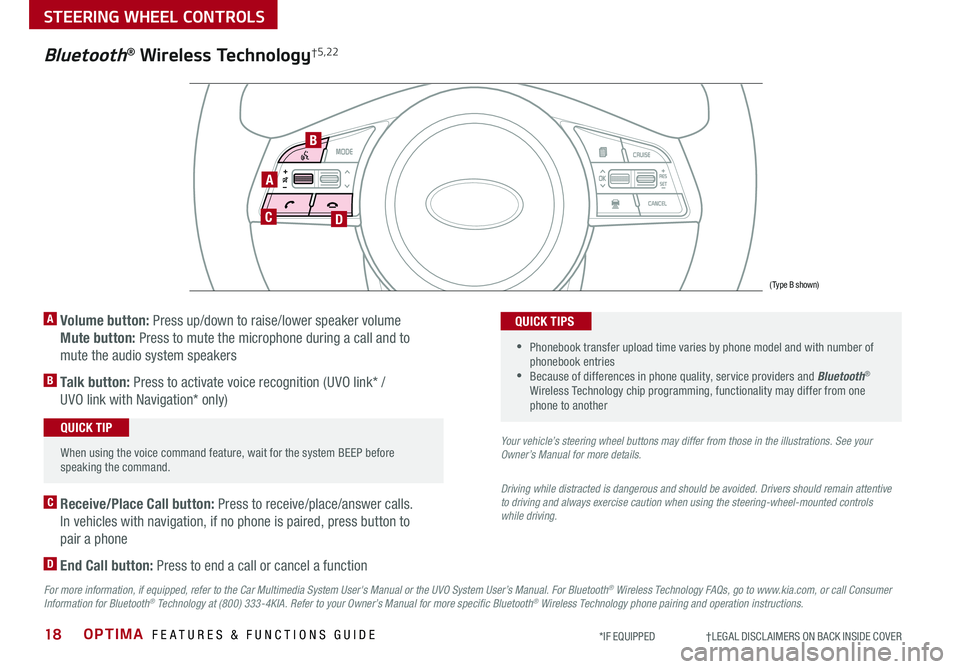
A Volume button: Press up/down to raise/lower speaker volume
Mute button: Press to mute the microphone during a call and to
mute the audio system speakers
B Talk button: Press to activate voice recognition (UVO link* /
UVO link with Navigation* only)
When using the voice command feature, wait for the system BEEP before speaking the command .
QUICK TIP
•
Phonebook transfer upload time varies by phone model and with number of phonebook entries •Because of differences in phone quality, service providers and Bluetooth® Wireless Technology chip programming, functionality may differ from one phone to another
QUICK TIPS
C Receive/Place Call button: Press to receive/place/answer calls .
In vehicles with navigation, if no phone is paired, press button to
pair a phone
D End Call button: Press to end a call or cancel a function
Your vehicle’s steering wheel buttons may differ from those in the illustrations. See your Owner’s Manual for more details.
Driving while distracted is dangerous and should be avoided. Drivers should remain attentive to driving and always exercise caution when using the steering-wheel-mounted controls while driving.
For more information, if equipped, refer to the Car Multimedia System User's Manual or the UVO System User’s Manual. For Bluetooth® Wireless Technology FAQs, go to www.kia.com, or call Consumer Information for Bluetooth® Technology at (800) 333-4KIA. Refer to your Owner’s Manual for more specific Bluetooth® Wireless Technology phone pairing and operation instructions.
STEERING WHEEL CONTROLS
Page 23 of 50
21ALWAYS CHECK THE OWNER’S MANUAL FOR COMPLETE OPER ATING INFORMATION AND SAFET Y WARNINGS *IF EQUIPPED †LEGAL DISCL AIMERS ON BACK INSIDE COVER
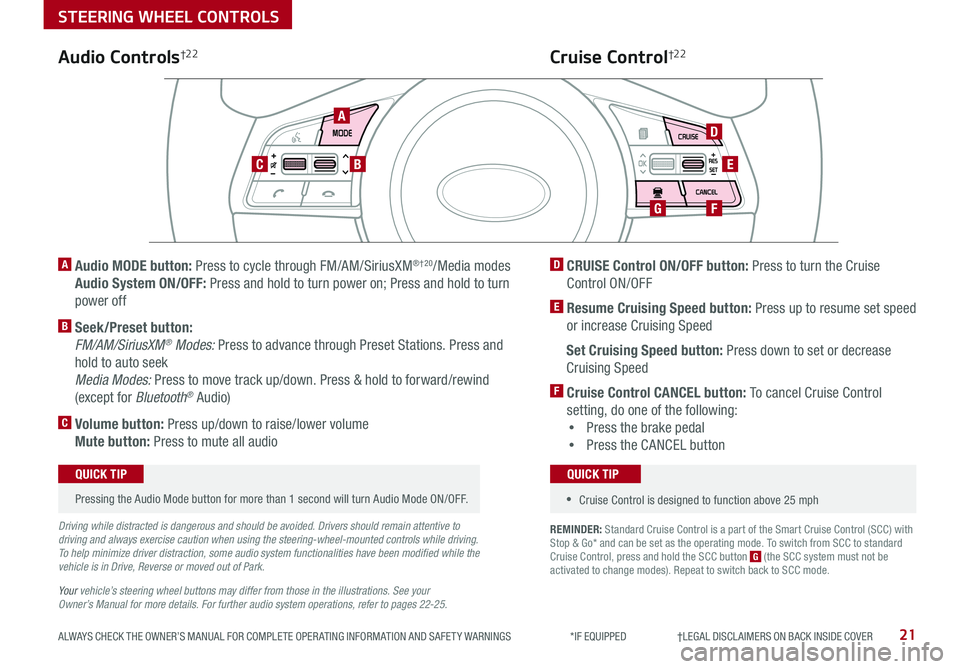
REMINDER: Standard Cruise Control is a part of the Smart Cruise Control (SCC) with Stop & Go* and can be set as the operating mode . To switch from SCC to standard Cruise Control, press and hold the SCC button G (the SCC system must not be activated to change modes) . Repeat to switch back to SCC mode .
AD
E
FG
CB
Audio Controls†2 2Cruise Control†2 2
A
Audio MODE button: Press to cycle through FM/AM/SiriusXM®†20/Media modes
Audio System ON/OFF: Press and hold to turn power on; Press and hold to turn
power off
B Seek/Preset button:
FM/AM/SiriusXM® Modes: Press to advance through Preset Stations . Press and
hold to auto seek
Media Modes: Press to move track up/down . Press & hold to forward/rewind
(except for Bluetooth® Audio)
C Volume button: Press up/down to raise/lower volume
Mute button: Press to mute all audio
D CRUISE Control ON/OFF button: Press to turn the Cruise
Control ON/OFF
E Resume Cruising Speed button: Press up to resume set speed
or increase Cruising Speed
Set Cruising Speed button: Press down to set or decrease
Cruising Speed
F Cruise Control CANCEL button: To cancel Cruise Control
setting, do one of the following:
•Press the brake pedal
•Press the CANCEL button
Pressing the Audio Mode button for more than 1 second will turn Audio Mode ON/OFF .
QUICK TIP
•Cruise Control is designed to function above 25 mph
QUICK TIP
Driving while distracted is dangerous and should be avoided. Drivers should remain attentive to driving and always exercise caution when using the steering-wheel-mounted controls while driving. To help minimize driver distraction, some audio system functionalities have been modified while the vehicle is in Drive, Reverse or moved out of Park.
Your vehicle’s steering wheel buttons may differ from those in the illustrations. See your Owner’s Manual for more details. For further audio system operations, refer to pages 22-25.
STEERING WHEEL CONTROLS
Page 25 of 50
AUDIO SYSTEMS
ALWAYS CHECK THE OWNER’S MANUAL FOR COMPLETE OPER ATING INFORMATION AND SAFET Y WARNINGS *IF EQUIPPED †LEGAL DISCL AIMERS ON BACK INSIDE COVER23
Audio System Setup Options – Press the SETUP key, then using the touchscreen, press the menu item to enter (Display, Sound, Clock / Calendar, Phone, System Info) . Adjust the available settings for each equipped audio system setup option by pressing the on-screen buttons/arrows . Audio system setup options may include the following:
•Display settings – Adjusting the Brightness, Mode Popup, MP3 Information Display
•Sound settings – Sound Settings, Speed Dependent Volume Control, Voice Recognition Volume, Touchscreen Beep
•Clock/Calendar settings – Clock Settings, Time Format, Calendar Settings, Clock Display
•System settings – Memory Information, Prompt Feedback, Language
Custom Key : A programmable key to provide quick access to one of several available system features
To Program the Custom Key: Press the SETUP key, then press the Custom button . Select one of the available features you would like the Custom button to open
Your vehicle’s audio system may differ from that in the illustration. For further audio system operations, refer to pages 22-25 or see your Owner’s Manual.
Sound Settings – To adjust the Standard Audio Systems sound settings:
1 . Press the SETUP key on the audio control unit or the on-screen MENU button, when in MEDIA mode
2 . Select the on-screen SOUND button
3 . Select the menu item (Position, Volume, Priority, Advanced, Default)
4 . Using the touchscreen, press arrows to adjust the settings
Standard Audio System*
FM/AM/Media (USB, iPod®†12, AUX, Bluetooth® Audio, My Music)*
REMINDER: Driving while distracted is dangerous and should be avoided . Drivers should remain attentive to driving and always exercise caution when using the steering-wheel-mounted controls while driving . To help minimize driver distraction, some audio system functionalities have been modified while the vehicle is in Drive, Reverse or moved out of Park .
•When connected to Android Auto™ or Apple CarPlay® on your smartphone, the smartphone’s nevigation system may also be available
•A warning screen may appear periodically to remind users that the audio system should be operated when the engine is running to prevent battery discharge
•Prolonged use of the audio control unit in ACC mode may drain the vehicle’s battery
QUICK TIPS
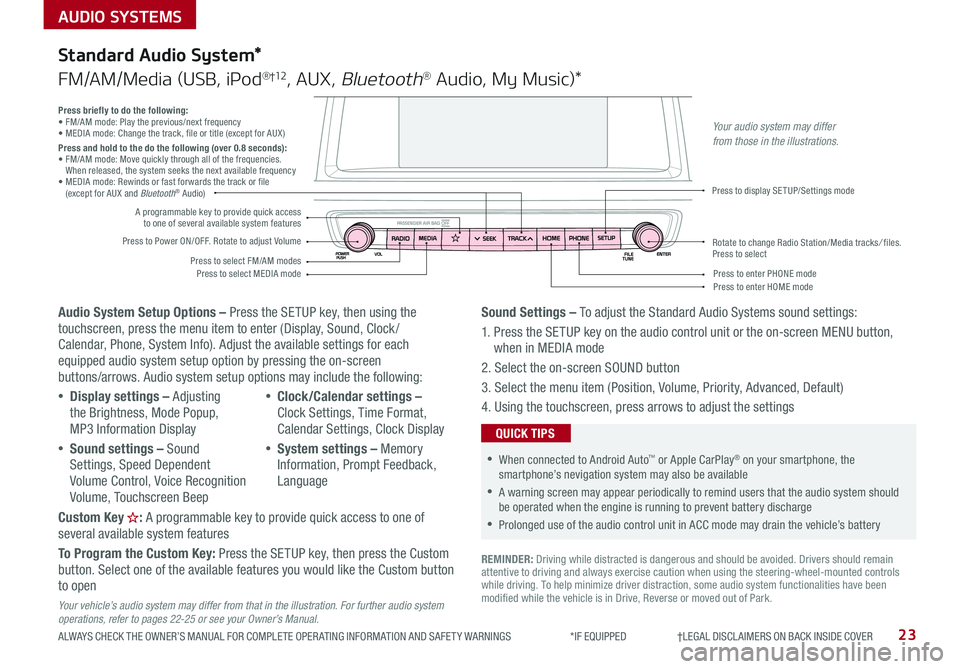
Press briefly to do the following:• FM/AM mode: Play the previous/next frequency• MEDIA mode: Change the track, file or title (except for AUX )Press and hold to the do the following (over 0.8 seconds):• FM/AM mode: Move quickly through all of the frequencies . When released, the system seeks the next available frequency• MEDIA mode: Rewinds or fast forwards the track or file (except for AUX and Bluetooth® Audio)
Press to Power ON/OFF . Rotate to adjust Volume
Press to select FM/AM modesPress to select MEDIA mode
A programmable key to provide quick access to one of several available system features
Press to display SETUP/Settings mode
Press to enter HOME modePress to enter PHONE mode
Rotate to change Radio Station/Media tracks/ files . Press to select
Your audio system may differ from those in the illustrations.
Page 26 of 50
OPTIMA FEATURES & FUNCTIONS GUIDE24
AUDIO SYSTEMS
*IF EQUIPPED †LEGAL DISCL AIMERS ON BACK INSIDE COVER
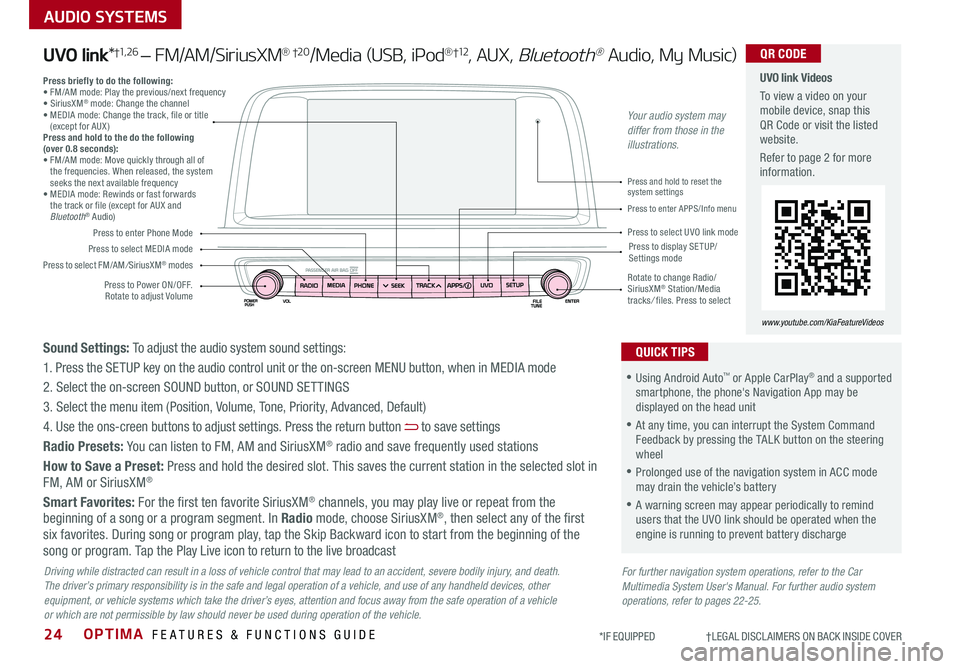
Press to Power ON/OFF . Rotate to adjust Volume
Press to enter Phone Mode
Press to select FM/AM/SiriusXM® modes
Press to select MEDIA modePress to display SE TUP/Settings mode
Press to enter APPS/Info menu
Press and hold to reset the system settings
Press to select UVO link mode
Press briefly to do the following:• FM/AM mode: Play the previous/next frequency• SiriusXM® mode: Change the channel• MEDIA mode: Change the track, file or title (except for AUX )Press and hold to the do the following (over 0.8 seconds):• FM/AM mode: Move quickly through all of the frequencies . When released, the system seeks the next available frequency• MEDIA mode: Rewinds or fast forwards the track or file (except for AUX and Bluetooth® Audio)
Rotate to change Radio/SiriusXM® Station/Media tracks/ files . Press to select
UVO link Videos
To view a video on your mobile device, snap this QR Code or visit the listed website .
Refer to page 2 for more information .
www.youtube.com/KiaFeatureVideos
QR CODE
For further navigation system operations, refer to the Car Multimedia System User's Manual. For further audio system operations, refer to pages 22-25.
Driving while distracted can result in a loss of vehicle control that may lead to an accident, severe bodily injury, and death. The driver’s primary responsibility is in the safe and legal operation of a vehicle, and use of any handheld devices, other equipment, or vehicle systems which take the driver’s eyes, attention and focus away from the safe operation of a vehicle or which are not permissible by law should never be used during operation of the vehicle.
UVO link*†1, 2 6 – FM/AM/SiriusXM® †2 0/Media (USB, iPod®†12, AUX, Bluetooth® Audio, My Music)
•Using Android Auto™ or Apple CarPlay® and a supported smartphone, the phone's Navigation App may be displayed on the head unit
•At any time, you can interrupt the System Command Feedback by pressing the TALK button on the steering wheel
•Prolonged use of the navigation system in ACC mode may drain the vehicle’s battery
•A warning screen may appear periodically to remind users that the UVO link should be operated when the engine is running to prevent battery discharge
QUICK TIPSSound Settings: To adjust the audio system sound settings:
1 . Press the SETUP key on the audio control unit or the on-screen MENU button, when in MEDIA mode
2 . Select the on-screen SOUND button, or SOUND SET TINGS
3 . Select the menu item (Position, Volume, Tone, Priority, Advanced, Default)
4 . Use the ons-creen buttons to adjust settings . Press the return button to save settings
Radio Presets: You can listen to FM, AM and SiriusXM® radio and save frequently used stations
How to Save a Preset: Press and hold the desired slot . This saves the current station in the selected slot in FM, AM or SiriusXM®
Smart Favorites: For the first ten favorite SiriusXM® channels, you may play live or repeat from the beginning of a song or a program segment . In Radio mode, choose SiriusXM®, then select any of the first six favorites . During song or program play, tap the Skip Backward icon to start from the beginning of the song or program . Tap the Play Live icon to return to the live broadcast
Your audio system may differ from those in the illustrations.
Page 27 of 50
25
AUDIO SYSTEMS
ALWAYS CHECK THE OWNER’S MANUAL FOR COMPLETE OPER ATING INFORMATION AND SAFET Y WARNINGS *IF EQUIPPED †LEGAL DISCL AIMERS ON BACK INSIDE COVER
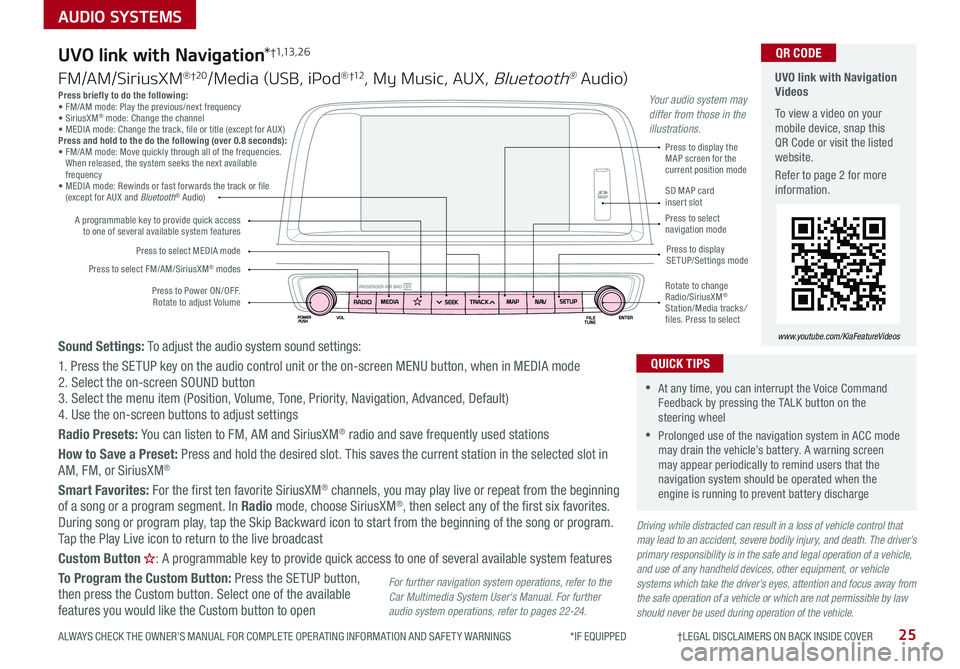
Press briefly to do the following:• FM/AM mode: Play the previous/next frequency• SiriusXM® mode: Change the channel• MEDIA mode: Change the track, file or title (except for AUX )Press and hold to the do the following (over 0.8 seconds):• FM/AM mode: Move quickly through all of the frequencies . When released, the system seeks the next available frequency• MEDIA mode: Rewinds or fast forwards the track or file (except for AUX and Bluetooth® Audio)
Driving while distracted can result in a loss of vehicle control that may lead to an accident, severe bodily injury, and death. The driver’s primary responsibility is in the safe and legal operation of a vehicle, and use of any handheld devices, other equipment, or vehicle systems which take the driver’s eyes, attention and focus away from the safe operation of a vehicle or which are not permissible by law should never be used during operation of the vehicle.
Sound Settings: To adjust the audio system sound settings:
1 . Press the SETUP key on the audio control unit or the on-screen MENU button, when in MEDIA mode2 . Select the on-screen SOUND button 3 . Select the menu item (Position, Volume, Tone, Priority, Navigation, Advanced, Default)4 . Use the on-screen buttons to adjust settings
Radio Presets: You can listen to FM, AM and SiriusXM® radio and save frequently used stations
How to Save a Preset: Press and hold the desired slot . This saves the current station in the selected slot in
AM, FM, or SiriusXM®
Smart Favorites: For the first ten favorite SiriusXM® channels, you may play live or repeat from the beginning of a song or a program segment . In Radio mode, choose SiriusXM®, then select any of the first six favorites . During song or program play, tap the Skip Backward icon to start from the beginning of the song or program . Tap the Play Live icon to return to the live broadcast
Custom Button : A programmable key to provide quick access to one of several available system features
To Program the Custom Button: Press the SETUP button, then press the Custom button . Select one of the available features you would like the Custom button to open
Press to Power ON/OFF . Rotate to adjust Volume
A programmable key to provide quick access to one of several available system features
Press to select FM/AM/SiriusXM® modes
Press to select MEDIA modePress to display SETUP/Settings mode
Press to display the MAP screen for the current position mode
SD MAP card insert slotPress to select navigation mode
Rotate to change Radio/SiriusXM® Station/Media tracks/ files . Press to select
For further navigation system operations, refer to the Car Multimedia System User's Manual. For further audio system operations, refer to pages 22-24.
UVO link with Navigation*†1,13 , 2 6
FM/AM/SiriusXM® †2 0/Media (USB, iPod® †12, My Music, AUX, Bluetooth® Au dio)
UVO link with Navigation Videos
To view a video on your mobile device, snap this QR Code or visit the listed website .
Refer to page 2 for more information .
www.youtube.com/KiaFeatureVideos
QR CODE
•At any time, you can interrupt the Voice Command Feedback by pressing the TALK button on the steering wheel
•Prolonged use of the navigation system in ACC mode may drain the vehicle’s battery . A warning screen may appear periodically to remind users that the navigation system should be operated when the engine is running to prevent battery discharge
QUICK TIPS
Your audio system may differ from those in the illustrations.
Page 29 of 50
27ALWAYS CHECK THE OWNER’S MANUAL FOR COMPLETE OPER ATING INFORMATION AND SAFET Y WARNINGS . *IF EQUIPPED
CENTER PANEL
Wireless Charging Video
To view a video on your mobile device, snap this QR Code or visit the listed website .
Refer to page 2 for more information .
www.youtube.com/KiaFeatureVideos
QR CODE
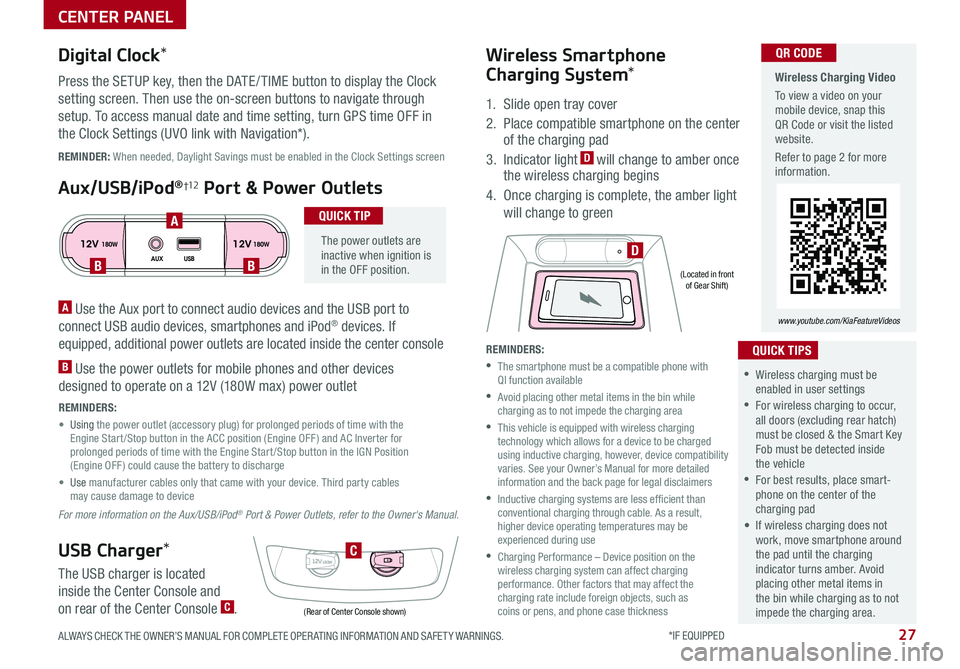
12V 12V180W
AUX USB180W
12V180W
DBB
A
C
(Rear of Center Console shown)
(Located in front of Gear Shift)
REMINDER: When needed, Daylight Savings must be enabled in the Clock Settings screen
A Use the Aux port to connect audio devices and the USB port to
connect USB audio devices, smartphones and iPod® devices . If
equipped, additional power outlets are located inside the center console
B Use the power outlets for mobile phones and other devices
designed to operate on a 12V (180W max) power outlet
REMINDERS:
• Using the power outlet (accessory plug) for prolonged periods of time with the Engine Start /Stop button in the ACC position (Engine OFF ) and AC Inverter for prolonged periods of time with the Engine Start /Stop button in the IGN Position (Engine OFF ) could cause the battery to discharge
• Use manufacturer cables only that came with your device . Third party cables may cause damage to device
For more information on the Aux/USB/iPod® Port & Power Outlets, refer to the Owner's Manual.
Digital Clock*
Press the SETUP key, then the DATE / TIME button to display the Clock
setting screen . Then use the on-screen buttons to navigate through
setup . To access manual date and time setting, turn GPS time OFF in
the Clock Settings (UVO link with Navigation*) .
Aux/USB/iPod®†12 Port & Power Outlets
The power outlets are inactive when ignition is in the OFF position .
QUICK TIP
USB Charger*
The USB charger is located
inside the Center Console and
on rear of the Center Console C .
Wireless Smartphone
Charging System*
1 . Slide open tray cover
2 . Place compatible smartphone on the center of the charging pad
3 . Indicator light D will change to amber once the wireless charging begins
4 . Once charging is complete, the amber light
will change to green
REMINDERS:
•
The smartphone must be a compatible phone with QI function available
•
Avoid placing other metal items in the bin while charging as to not impede the charging area
•
This vehicle is equipped with wireless charging technology which allows for a device to be charged using inductive charging, however, device compatibility varies . See your Owner’s Manual for more detailed information and the back page for legal disclaimers
•
Inductive charging systems are less ef ficient than conventional charging through cable . As a result, higher device operating temperatures may be experienced during use
•
Charging Performance – Device position on the wireless charging system can affect charging performance . Other factors that may affect the charging rate include foreign objects, such as coins or pens, and phone case thickness
•Wireless charging must be enabled in user settings
•For wireless charging to occur, all doors (excluding rear hatch) must be closed & the Smart Key Fob must be detected inside the vehicle
•For best results, place smart-phone on the center of the charging pad
• If wireless charging does not work, move smartphone around the pad until the charging indicator turns amber . Avoid placing other metal items in the bin while charging as to not impede the charging area .
QUICK TIPS
Page 30 of 50
OPTIMA FEATURES & FUNCTIONS GUIDE*IF EQUIPPED 28
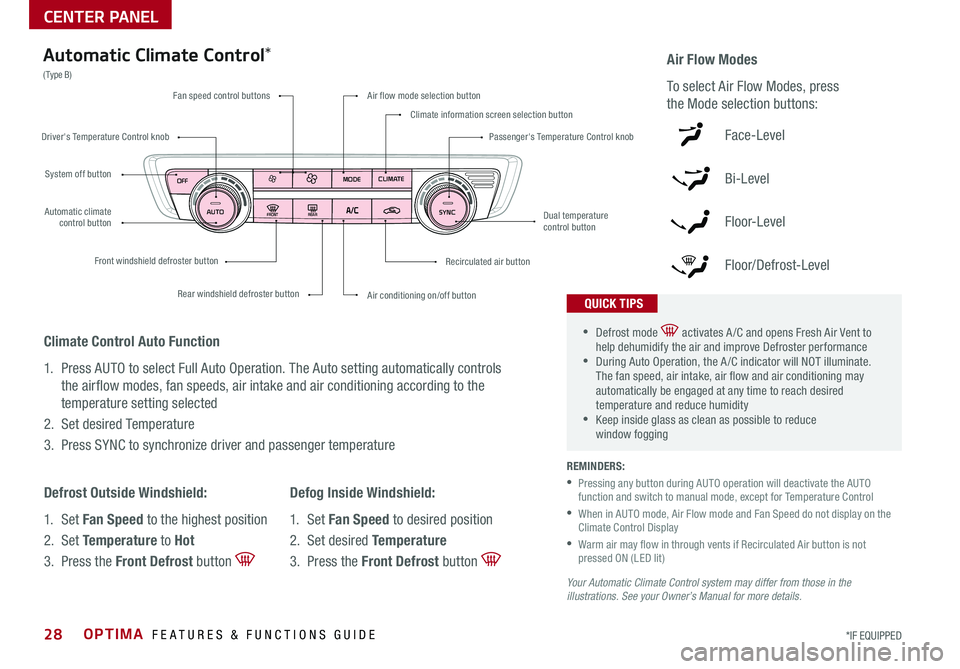
FRONTREAR
MODECLIMATE
OFF
AUTO SYNC
Fan speed control buttons
Rear windshield defroster button
Front windshield defroster button
Air flow mode selection button
Climate information screen selection button
Passenger's Temperature Control knob
Air conditioning on/off button
Recirculated air button
Dual temperature control button
System off button
Driver's Temperature Control knob
Automatic climate control button
Automatic Climate Control*
( Type B)Air Flow Modes
To select Air Flow Modes, press
the Mode selection buttons:
Face-Level
Bi-Level
F lo o r- L evel
Floor/Defrost-Level
REMINDERS:
•
Pressing any button during AUTO operation will deactivate the AUTO function and switch to manual mode, except for Temperature Control
•
When in AUTO mode, Air Flow mode and Fan Speed do not display on the Climate Control Display
•
Warm air may flow in through vents if Recirculated Air button is not pressed ON (LED lit)
Your Automatic Climate Control system may differ from those in the illustrations. See your Owner’s Manual for more details.
•Defrost mode activates A /C and opens Fresh Air Vent to help dehumidify the air and improve Defroster performance •During Auto Operation, the A /C indicator will NOT illuminate . The fan speed, air intake, air flow and air conditioning may automatically be engaged at any time to reach desired temperature and reduce humidity •Keep inside glass as clean as possible to reduce window fogging
QUICK TIPS
Climate Control Auto Function
1 . Press AUTO to select Full Auto Operation . The Auto setting automatically controls
the airflow modes, fan speeds, air intake and air conditioning according to the
temperature setting selected
2 . Set desired Temperature
3 . Press SYNC to synchronize driver and passenger temperature
Defrost Outside Windshield:
1 . Set Fan Speed to the highest position
2 . Set Temperature to Hot
3 . Press the Front Defrost button
Defog Inside Windshield:
1 . Set Fan Speed to desired position
2 . Set desired Temperature
3 . Press the Front Defrost button
CENTER PANEL