height KIA Optima Hybrid 2011 3.G Owner's Manual
[x] Cancel search | Manufacturer: KIA, Model Year: 2011, Model line: Optima Hybrid, Model: KIA Optima Hybrid 2011 3.GPages: 394, PDF Size: 8.63 MB
Page 16 of 394
Safety features of your vehicle
23
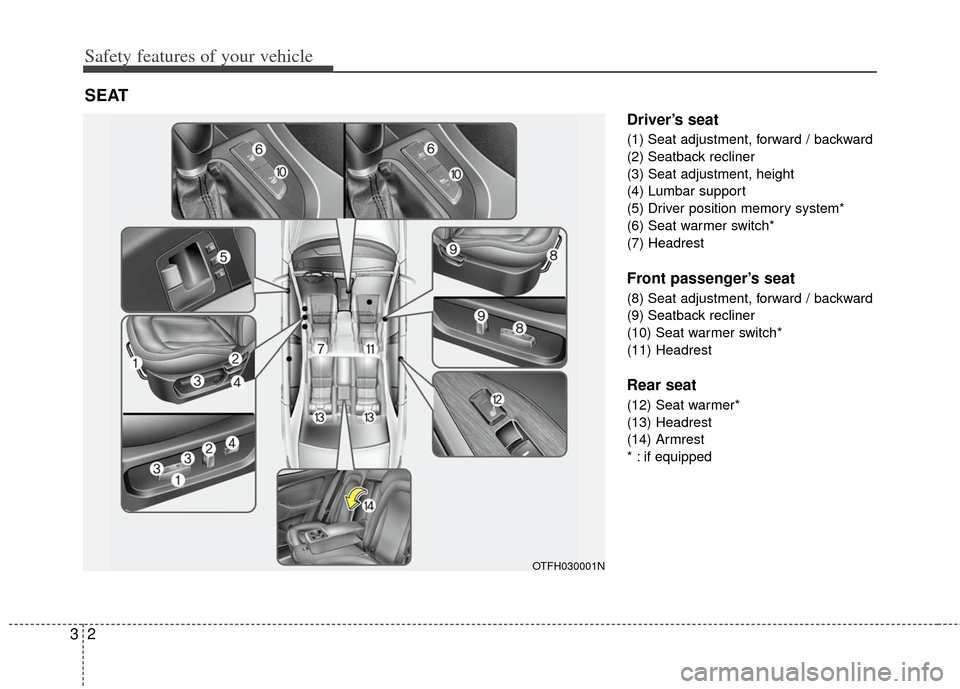
Driver’s seat
(1) Seat adjustment, forward / backward
(2) Seatback recliner
(3) Seat adjustment, height
(4) Lumbar support
(5) Driver position memory system*
(6) Seat warmer switch*
(7) Headrest
Front passenger’s seat
(8) Seat adjustment, forward / backward
(9) Seatback recliner
(10) Seat warmer switch*
(11) Headrest
Rear seat
(12) Seat warmer*
(13) Headrest
(14) Armrest
* : if equipped
SEAT
OTFH030001N
Page 19 of 394
35
Safety features of your vehicle
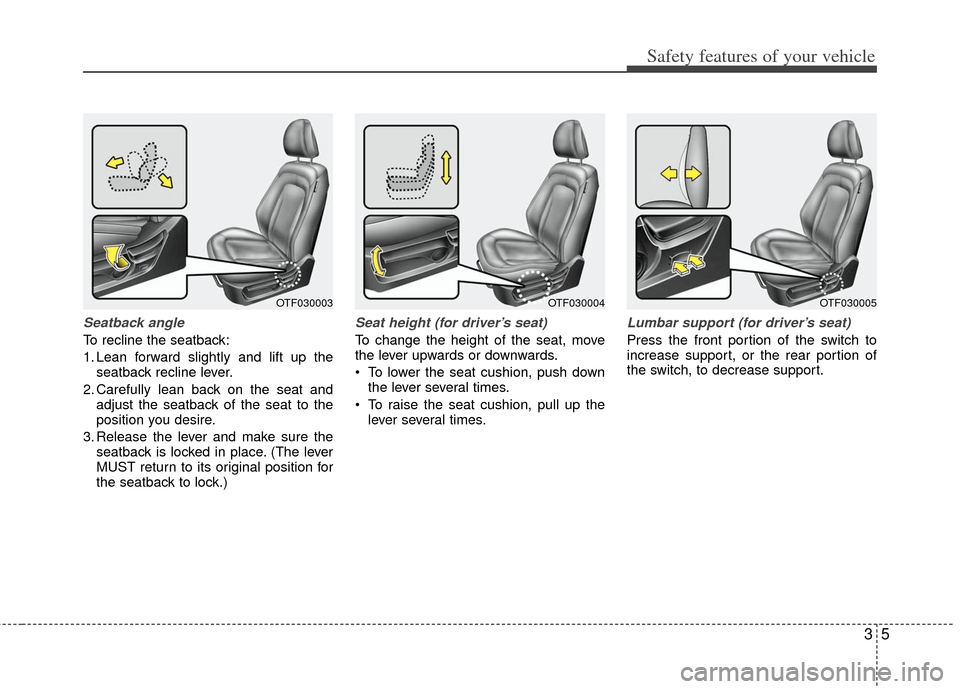
Seatback angle
To recline the seatback:
1. Lean forward slightly and lift up theseatback recline lever.
2. Carefully lean back on the seat and adjust the seatback of the seat to the
position you desire.
3. Release the lever and make sure the seatback is locked in place. (The lever
MUST return to its original position for
the seatback to lock.)
Seat height (for driver’s seat)
To change the height of the seat, move
the lever upwards or downwards.
• To lower the seat cushion, push downthe lever several times.
To raise the seat cushion, pull up the lever several times.
Lumbar support (for driver’s seat)
Press the front portion of the switch to
increase support, or the rear portion of
the switch, to decrease support.
OTF030003OTF030004OTF030005
Page 21 of 394
37
Safety features of your vehicle
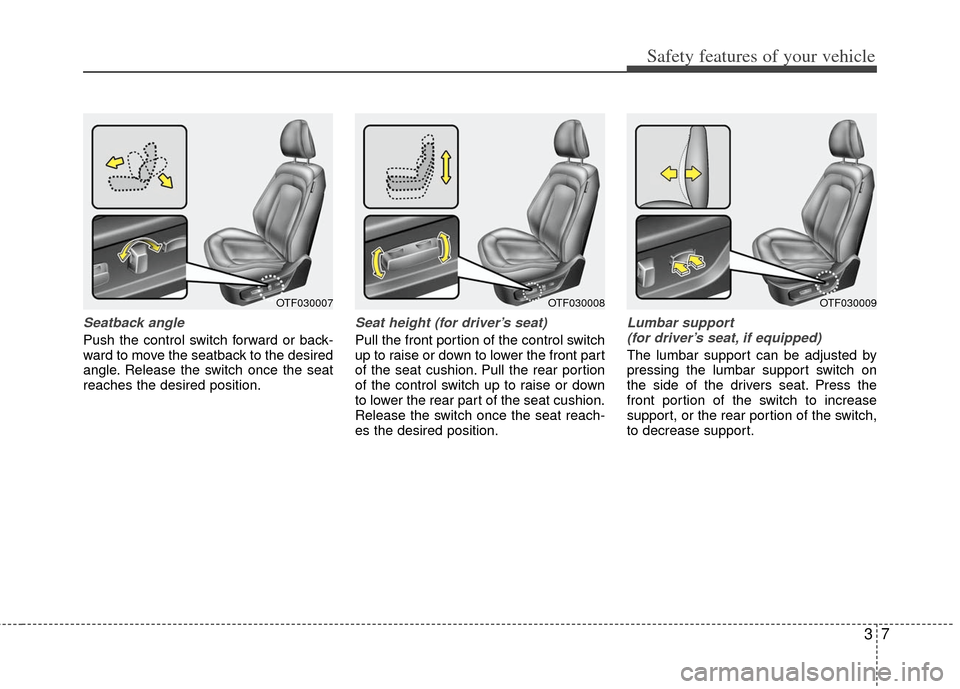
Seatback angle
Push the control switch forward or back-
ward to move the seatback to the desired
angle. Release the switch once the seat
reaches the desired position.
Seat height (for driver’s seat)
Pull the front portion of the control switch
up to raise or down to lower the front part
of the seat cushion. Pull the rear portion
of the control switch up to raise or down
to lower the rear part of the seat cushion.
Release the switch once the seat reach-
es the desired position.
Lumbar support (for driver’s seat, if equipped)
The lumbar support can be adjusted by
pressing the lumbar support switch on
the side of the drivers seat. Press the
front portion of the switch to increase
support, or the rear portion of the switch,
to decrease support.
OTF030007OTF030008OTF030009
Page 22 of 394
Safety features of your vehicle
83
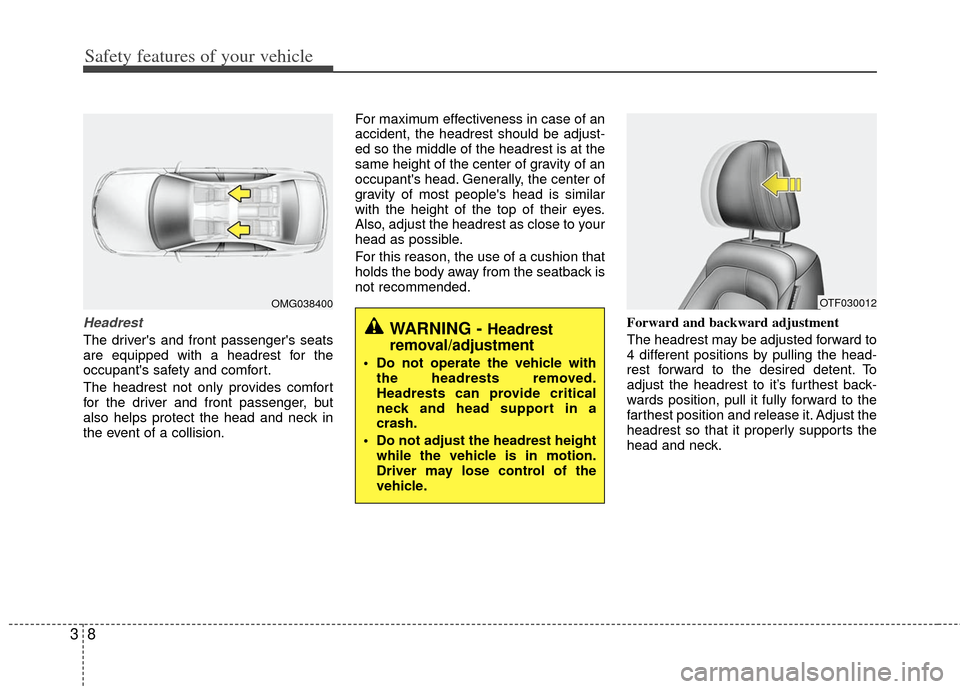
Headrest
The driver's and front passenger's seats
are equipped with a headrest for the
occupant's safety and comfort.
The headrest not only provides comfort
for the driver and front passenger, but
also helps protect the head and neck in
the event of a collision.For maximum effectiveness in case of an
accident, the headrest should be adjust-
ed so the middle of the headrest is at the
same height of the center of gravity of an
occupant's head. Generally, the center of
gravity of most people's head is similar
with the height of the top of their eyes.
Also, adjust the headrest as close to your
head as possible.
For this reason, the use of a cushion that
holds the body away from the seatback is
not recommended.
Forward and backward adjustment
The headrest may be adjusted forward to
4 different positions by pulling the head-
rest forward to the desired detent. To
adjust the headrest to it’s furthest back-
wards position, pull it fully forward to the
farthest position and release it. Adjust the
headrest so that it properly supports the
head and neck.
OMG038400
WARNING - Headrest
removal/adjustment
Do not operate the vehicle with
the headrests removed.
Headrests can provide critical
neck and head support in a
crash.
Do not adjust the headrest height while the vehicle is in motion.
Driver may lose control of the
vehicle.
OTF030012
Page 23 of 394
39
Safety features of your vehicle
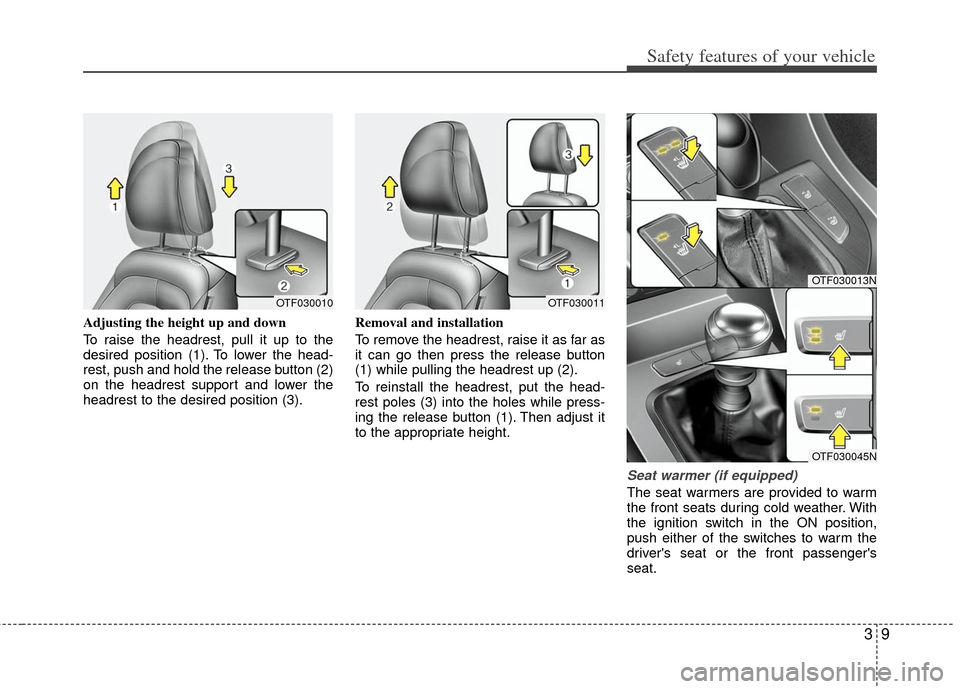
Adjusting the height up and down
To raise the headrest, pull it up to the
desired position (1). To lower the head-
rest, push and hold the release button (2)
on the headrest support and lower the
headrest to the desired position (3).Removal and installation
To remove the headrest, raise it as far as
it can go then press the release button
(1) while pulling the headrest up (2).
To reinstall the headrest, put the head-
rest poles (3) into the holes while press-
ing the release button (1). Then adjust it
to the appropriate height.
Seat warmer (if equipped)
The seat warmers are provided to warm
the front seats during cold weather. With
the ignition switch in the ON position,
push either of the switches to warm the
driver's seat or the front passenger's
seat.
OTF030010OTF030011
OTF030013N
OTF030045N
Page 27 of 394
313
Safety features of your vehicle
Rear seat adjustment
Headrest
The rear seat is equipped with headrests
in all the seating positions for the occu-
pant's safety and comfort.
The headrest not only provides comfort
for passengers, but also helps protect the
head and neck in the event of a collision.
For maximum effectiveness in case of an
accident, the headrest should be adjust-
ed so the middle of the headrest is at the
same height of the center of gravity of an
occupant's head. Generally, the center of
gravity of most people's head is similar
with the height as the top of their eyes.Also adjust the headrest as close to your
head as possible. For this reason, the
use of a cushion that holds the body
away from the seatback is not recom-
mended.
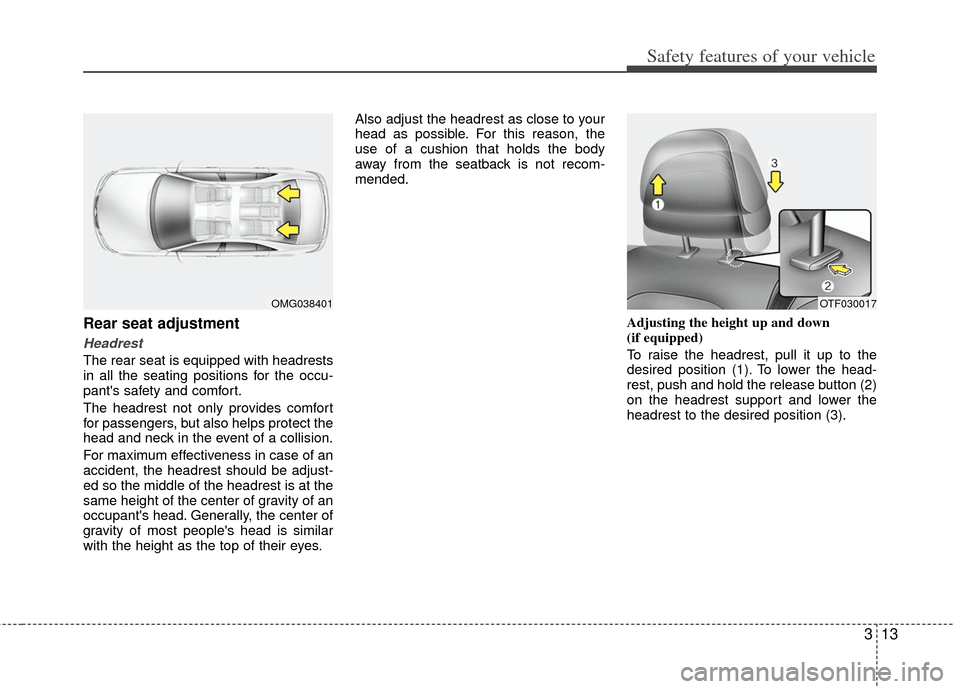
Adjusting the height up and down
(if equipped)
To raise the headrest, pull it up to the
desired position (1). To lower the head-
rest, push and hold the release button (2)
on the headrest support and lower the
headrest to the desired position (3).
OMG038401OTF030017
Page 28 of 394
Safety features of your vehicle
14
3
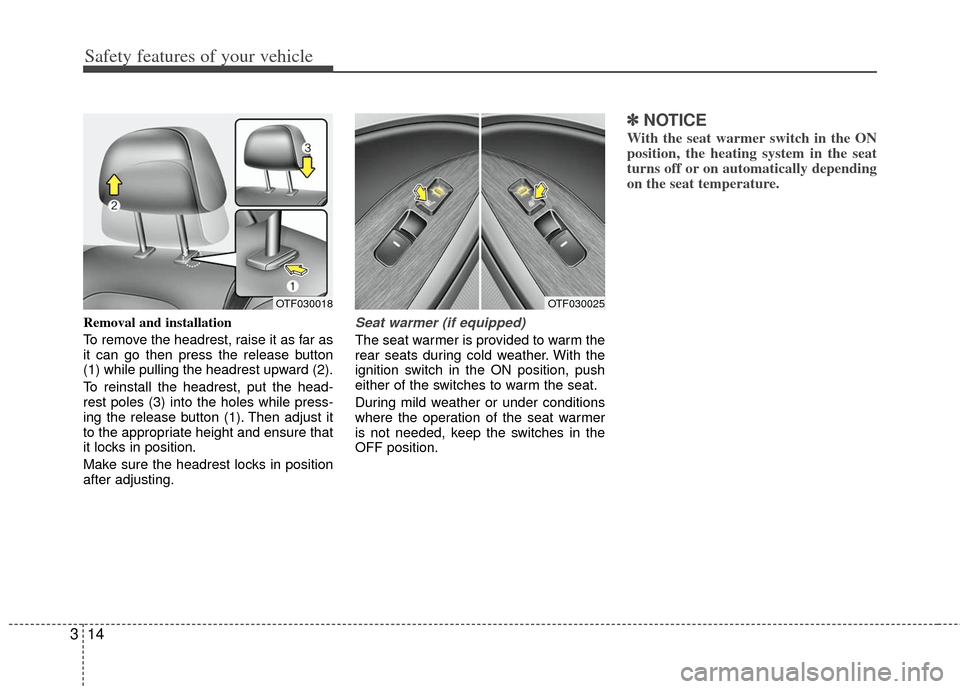
Removal and installation
To remove the headrest, raise it as far as
it can go then press the release button
(1) while pulling the headrest upward (2).
To reinstall the headrest, put the head-
rest poles (3) into the holes while press-
ing the release button (1). Then adjust it
to the appropriate height and ensure that
it locks in position.
Make sure the headrest locks in position
after adjusting.Seat warmer (if equipped)
The seat warmer is provided to warm the
rear seats during cold weather. With the
ignition switch in the ON position, push
either of the switches to warm the seat.
During mild weather or under conditions
where the operation of the seat warmer
is not needed, keep the switches in the
OFF position.
✽ ✽
NOTICE
With the seat warmer switch in the ON
position, the heating system in the seat
turns off or on automatically depending
on the seat temperature.
OTF030018OTF030025
Page 33 of 394
319
Safety features of your vehicle
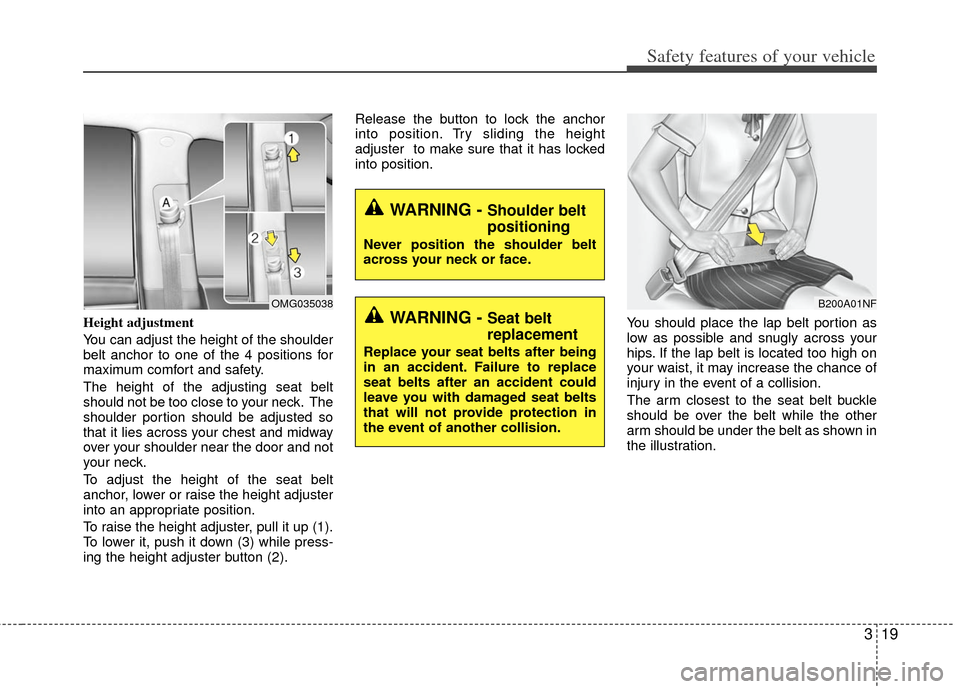
Height adjustment
You can adjust the height of the shoulder
belt anchor to one of the 4 positions for
maximum comfort and safety.
The height of the adjusting seat belt
should not be too close to your neck. The
shoulder portion should be adjusted so
that it lies across your chest and midway
over your shoulder near the door and not
your neck.
To adjust the height of the seat belt
anchor, lower or raise the height adjuster
into an appropriate position.
To raise the height adjuster, pull it up (1).
To lower it, push it down (3) while press-
ing the height adjuster button (2).Release the button to lock the anchor
into position. Try sliding the height
adjuster to make sure that it has locked
into position.
You should place the lap belt portion as
low as possible and snugly across your
hips. If the lap belt is located too high on
your waist, it may increase the chance of
injury in the event of a collision.
The arm closest to the seat belt buckle
should be over the belt while the other
arm should be under the belt as shown in
the illustration.
WARNING - Shoulder belt
positioning
Never position the shoulder belt
across your neck or face.
WARNING - Seat belt
replacement
Replace your seat belts after being
in an accident. Failure to replace
seat belts after an accident could
leave you with damaged seat belts
that will not provide protection in
the event of another collision.
B200A01NFOMG035038
Page 41 of 394
327
Safety features of your vehicle
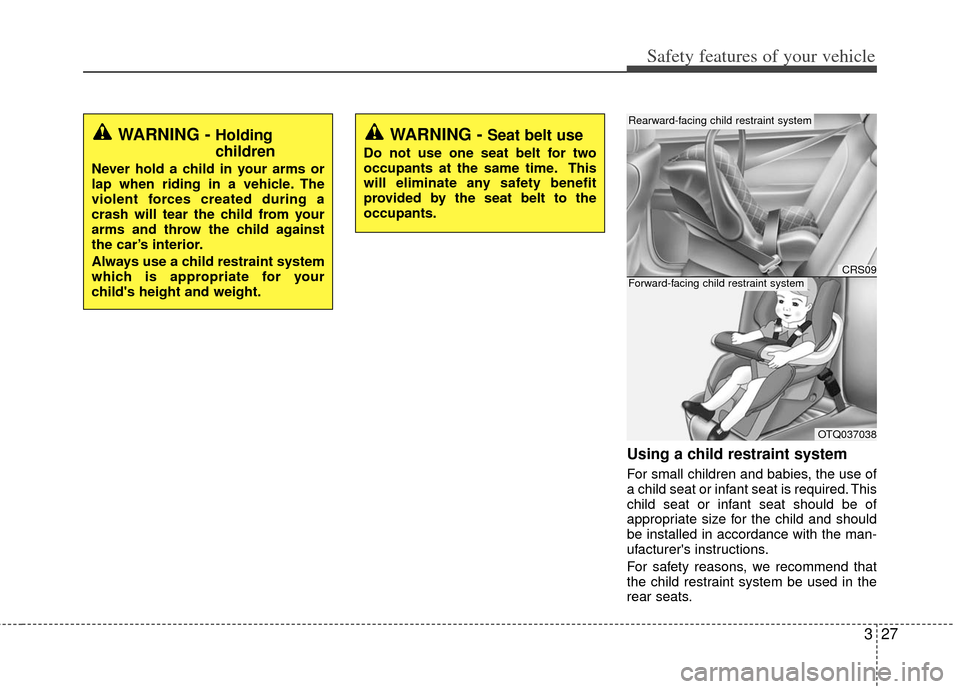
Using a child restraint system
For small children and babies, the use of
a child seat or infant seat is required. This
child seat or infant seat should be of
appropriate size for the child and should
be installed in accordance with the man-
ufacturer's instructions.
For safety reasons, we recommend that
the child restraint system be used in the
rear seats.
WARNING - Holding
children
Never hold a child in your arms or
lap when riding in a vehicle. The
violent forces created during a
crash will tear the child from your
arms and throw the child against
the car’s interior.
Always use a child restraint system
which is appropriate for your
child's height and weight.
WARNING - Seat belt use
Do not use one seat belt for two
occupants at the same time. This
will eliminate any safety benefit
provided by the seat belt to the
occupants.
CRS09
OTQ037038
Rearward-facing child restraint system
Forward-facing child restraint system
Page 70 of 394
Safety features of your vehicle
56
3
SRS Care
The SRS is virtually maintenance-free
and there are no parts you can safely
service by yourself. If the SRS air bag
warning light does not illuminate, or con-
tinuously remains on, have your vehicle
immediately inspected by an authorized
Kia dealer.
Any work on the SRS system, such as
removing, installing, repairing, or any
work on the steering wheel must be per-
formed by an authorized Kia dealer.
Improper handling of the SRS system
may result in serious personal injury.
For cleaning the air bag pad covers, use
only a soft, dry cloth or one which has
been moistened with plain water.
Solvents or cleaners could adversely
affect the air bag covers and proper
deployment of the system. If components of the air bag system must
be discarded, or if the vehicle must be
scrapped, certain safety precautions
must be observed. An authorized Kia
dealer knows these precautions and can
give you the necessary information.
Failure to follow these precautions and
procedures could increase the risk of
personal injury.
Adding equipment to or modify-
ing your air bag-equipped vehicle
If you modify your vehicle by changing
your vehicle's frame, bumper system,
front end or side sheet metal or ride
height, this may affect the operation of
your vehicle's air bag system.
WARNING - Tampering
with SRS
Do not tamper with or disconnect
SRS wiring, or other components of
the SRS system. Doing so could
result in the accidental inflation of
the air bags or by rendering the
SRS inoperative.