warning light KIA Optima Hybrid 2012 3.G Owner's Guide
[x] Cancel search | Manufacturer: KIA, Model Year: 2012, Model line: Optima Hybrid, Model: KIA Optima Hybrid 2012 3.GPages: 394, PDF Size: 8.63 MB
Page 96 of 394
425
Features of your vehicle
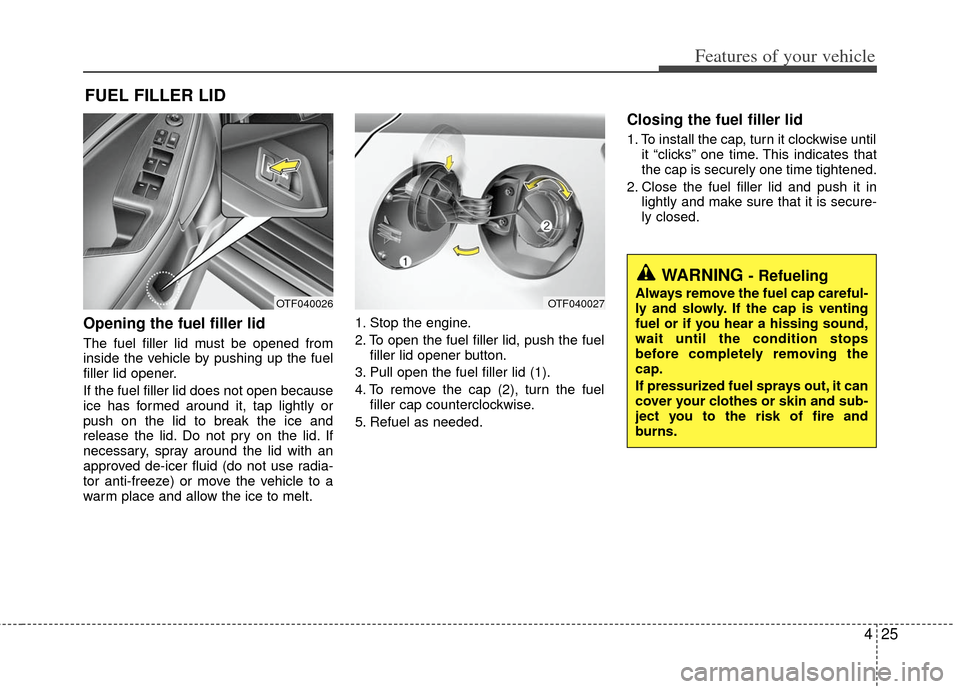
Opening the fuel filler lid
The fuel filler lid must be opened from
inside the vehicle by pushing up the fuel
filler lid opener.
If the fuel filler lid does not open because
ice has formed around it, tap lightly or
push on the lid to break the ice and
release the lid. Do not pry on the lid. If
necessary, spray around the lid with an
approved de-icer fluid (do not use radia-
tor anti-freeze) or move the vehicle to a
warm place and allow the ice to melt.1. Stop the engine.
2. To open the fuel filler lid, push the fuel
filler lid opener button.
3. Pull open the fuel filler lid (1).
4. To remove the cap (2), turn the fuel filler cap counterclockwise.
5. Refuel as needed.
Closing the fuel filler lid
1. To install the cap, turn it clockwise until it “clicks” one time. This indicates that
the cap is securely one time tightened.
2. Close the fuel filler lid and push it in lightly and make sure that it is secure-
ly closed.
FUEL FILLER LID
WARNING - Refueling
Always remove the fuel cap careful-
ly and slowly. If the cap is venting
fuel or if you hear a hissing sound,
wait until the condition stops
before completely removing the
cap.
If pressurized fuel sprays out, it can
cover your clothes or skin and sub-
ject you to the risk of fire and
burns.OTF040026OTF040027
Page 98 of 394
427
Features of your vehicle
Make sure to refuel your vehicle accord-
ing to the "Fuel requirements" suggested
in section 1.
If the fuel filler cap requires replacement,
use only a genuine Kia cap or the equiv-
alent specified for your vehicle. An incor-
rect fuel filler cap can result in a serious
malfunction of the fuel system or emis-
sion control system.
CAUTION- Exterior paint
Do not spill fuel on the exterior sur-faces of the vehicle. Any type of fuelspilled on painted surfaces maydamage the paint.
WARNING - Refueling& Vehicle fires
When refueling, always shut the
engine off. Sparks produced by
electrical components related to
the engine can ignite fuel vapors
causing a fire. Once refueling is
complete, check to make sure the
filler cap and filler door are secure-
ly closed, before starting the
engine.
WARNING - Smoking
DO NOT use matches or a lighter
and DO NOT SMOKE or leave a lit
cigarette in your vehicle while at a
gas station especially during refu-
eling. Automotive fuel is highly
flammable and can, when ignited,
result in fire.
Page 105 of 394
Features of your vehicle
34
4
Electric power steering
Power steering uses the motor to assist
you in steering the vehicle. If the engine
is off or if the power steering system
becomes inoperative, the vehicle may
still be steered, but it will require
increased steering effort.
The motor driven power steering is con-
trolled by the power steering control unit
which senses the steering wheel torque
and vehicle speed to command the
motor.
The steering wheel becomes heavier as
the vehicle’s speed increases and
becomes lighter as the vehicle’s speed
decreases for better control of the steer-
ing wheel.
Should you notice any change in the
effort required to steer during normal
vehicle operation, have the power steer-
ing checked by an authorized Kia dealer.
✽ ✽
NOTICE
The following symptoms may occur dur-
ing normal vehicle operation:
• The steering effort is high immediate-
ly after turning the ignition switch on.
This happens as the system performs
the EPS system diagnostics. When the
diagnostics is completed, the steering
wheel will return to its normal condi-
tion.
• A click noise may be heard from the EPS relay after the ignition switch is
turned to the ON or LOCK position.
• Motor noise may be heard when the vehicle is at a stop or at a low driving
speed.
• The steering effort increases if the steering wheel is rotated continuously
when the vehicle is not in motion.
However, after a few minutes, it will
return to its normal conditions.
• When you operate the steering wheel in low temperature, abnormal noise
could occur. If temperature rises, the
noise will disappear. This is a normal
condition.
If the Electric Power Steering System
does not operate normally, the warning
light will illuminate on the instrument
cluster. The steering wheel may become
difficult to control or operate abnormally.
Take your vehicle to an authorized Kia
dealer and have the vehicle checked as
soon as possible.
STEERING WHEEL
Page 106 of 394
435
Features of your vehicle
Tilt and telescoping (if equipped)
steering
Tilt steering allows you to adjust the
steering wheel before you drive. You can
also raise it to give your legs more room
when you exit and enter the vehicle.
The steering wheel should be positioned
so that it is comfortable for you to drive,
while permitting you to see the instru-
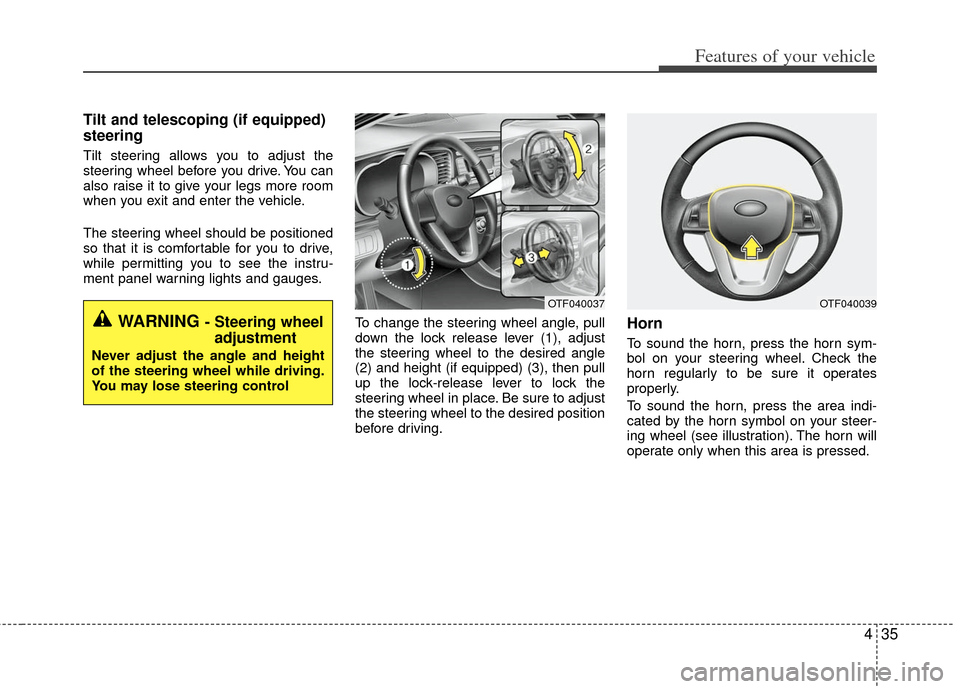
ment panel warning lights and gauges.To change the steering wheel angle, pull
down the lock release lever (1), adjust
the steering wheel to the desired angle
(2) and height (if equipped) (3), then pull
up the lock-release lever to lock the
steering wheel in place. Be sure to adjust
the steering wheel to the desired position
before driving.
Horn
To sound the horn, press the horn sym-
bol on your steering wheel. Check the
horn regularly to be sure it operates
properly.
To sound the horn, press the area indi-
cated by the horn symbol on your steer-
ing wheel (see illustration). The horn will
operate only when this area is pressed.
WARNING - Steering wheeladjustment
Never adjust the angle and height
of the steering wheel while driving.
You may lose steering control
OTF040037OTF040039
Page 108 of 394
437
Features of your vehicle
Inside rearview mirror
Adjust the rearview mirror so that the
center view through the rear window is
seen. Make this adjustment before you
start driving.
Do not place objects in the rear seat
which would interfere with your vision
through the rear window.
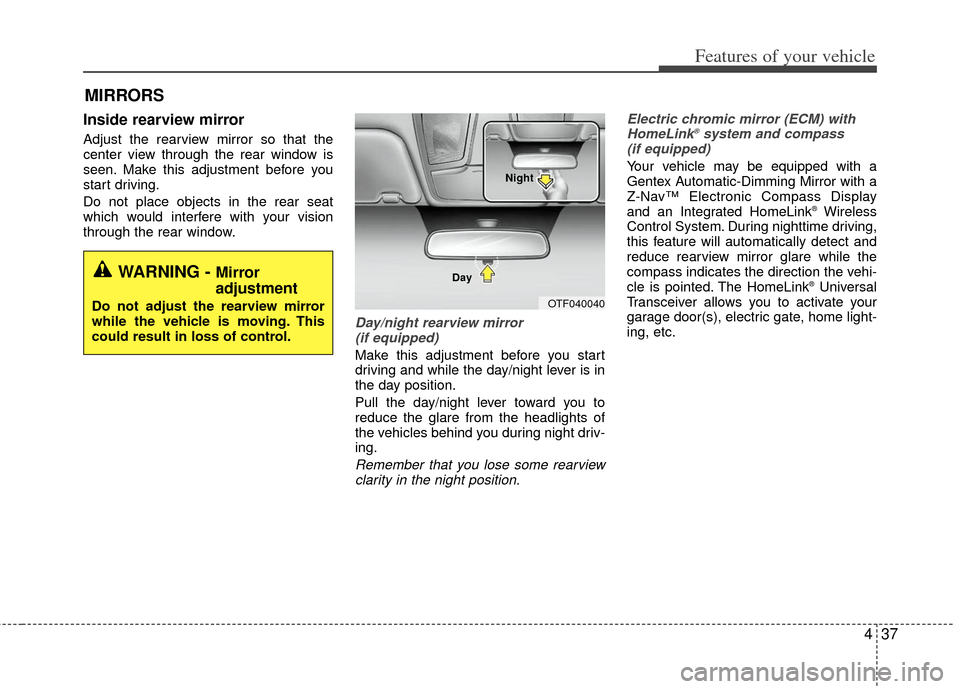
Day/night rearview mirror (if equipped)
Make this adjustment before you start
driving and while the day/night lever is in
the day position.
Pull the day/night lever toward you to
reduce the glare from the headlights of
the vehicles behind you during night driv-
ing.
Remember that you lose some rearviewclarity in the night position. Electric chromic mirror (ECM) with
HomeLink
®system and compass
(if equipped)
Your vehicle may be equipped with a
Gentex Automatic-Dimming Mirror with a
Z-Nav™ Electronic Compass Display
and an Integrated HomeLink
®Wireless
Control System. During nighttime driving,
this feature will automatically detect and
reduce rearview mirror glare while the
compass indicates the direction the vehi-
cle is pointed. The HomeLink
®Universal
Transceiver allows you to activate your
garage door(s), electric gate, home light-
ing, etc.
MIRRORS
WARNING - Mirror
adjustment
Do not adjust the rearview mirror
while the vehicle is moving. This
could result in loss of control.OTF040040
Day Night
Page 114 of 394
443
Features of your vehicle
Reprogramming a single HomeLink®
button
To program a new device to a previously
trained HomeLink
®button, follow these
steps:
1. Press and hold the desired HomeLink
®
button. Do NOT release until step 4
has been completed.
2. When the indicator light begins to flash slowly (after 20 seconds), position the
handheld transmitter 1 to 3 inches
away from the HomeLink
®surface.
3. Press and hold the handheld transmit- ter button. The HomeLink
®indicator
light will flash, first slowly and then rap-
idly.
4. When the indicator light begins to flash rapidly, release both buttons.
5. Press and hold the just-trained HomeLink
®button and observe the red
Status Indicator LED. If the indicator
light stays on constantly, programming
is complete and your new device
should activate. Erasing HomeLink
®buttons
Individual buttons cannot be erased.
However, to erase all three programmed
buttons:
1. Press and hold the two outer HomeLink
®buttons until the indicator
light begins to flash-after 20 seconds.
2. Release both buttons. Do not hold for longer than 30 seconds.
The Integrated HomeLink
®Wireless
Control System is now in the training
(learn) mode and can be programmed at
any time following the appropriate steps
in the Programming sections above. FCC ID: NZLZTVHL3
IC: 4112A-ZTVHL3
This device complies with Industry
Canada Standard RSS-210.
Operation is subject to the following two
conditions:
1. this device may not cause harmful
interference, and
2. This device must accept any interfer- ence received, including interference
that may cause undesired operation.
NVS
®is a registered trademark and Z-
Nav™ is a trademark of the Gentex
Corporation, Zeeland, Michigan.
HomeLink
®is a registered trademark
owned by Johnson Controls,
Incorporated, Milwaukee, Wisconsin.
WARNING
The transceiver has been tested
and complies with FCC and
Industry Canada rules. Changes or
modifications not expressly
approved by the party responsible
for compliance could void the
user's authority to operate the
device.
Page 118 of 394
447
Features of your vehicle
INSTRUMENT CLUSTER
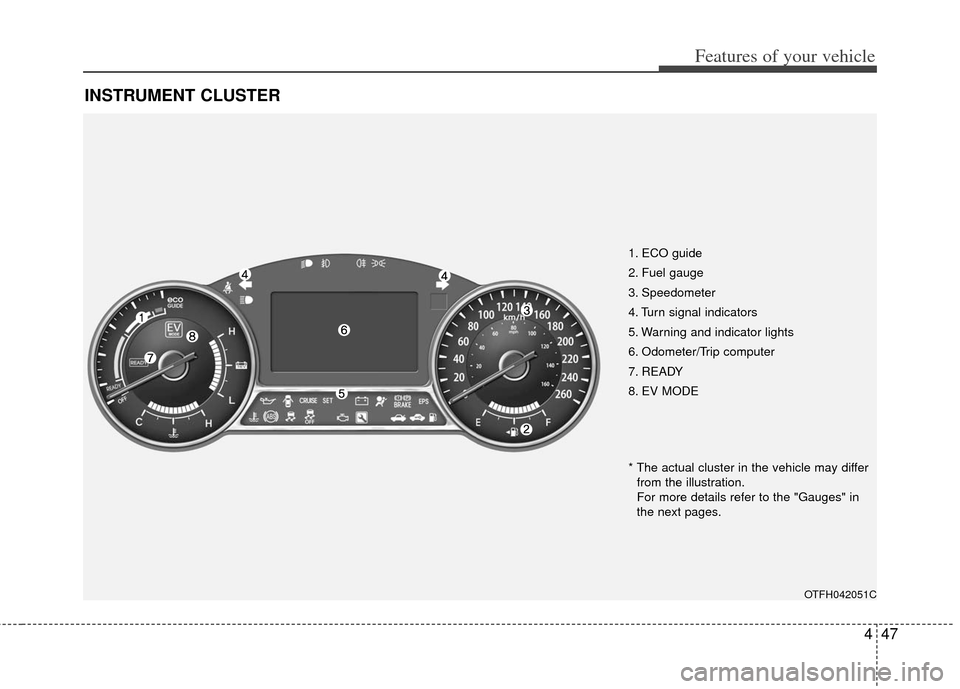
1. ECO guide
2. Fuel gauge
3. Speedometer
4. Turn signal indicators
5. Warning and indicator lights
6. Odometer/Trip computer
7. READY
8. EV MODE
OTFH042051C
* The actual cluster in the vehicle may differfrom the illustration.
For more details refer to the "Gauges" in
the next pages.
Page 120 of 394
449
Features of your vehicle
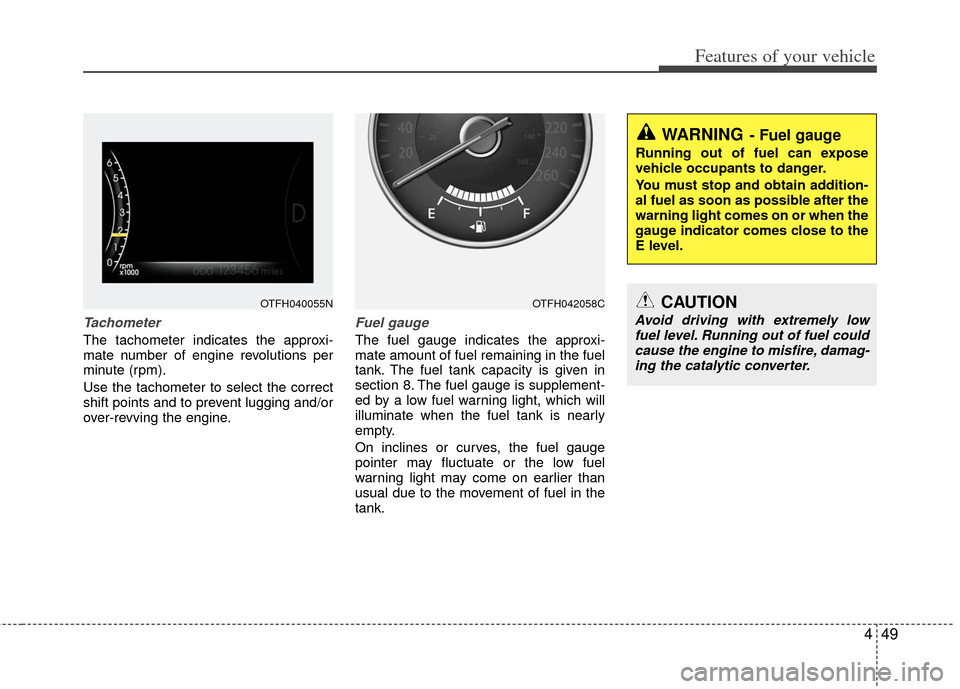
Tachometer
The tachometer indicates the approxi-
mate number of engine revolutions per
minute (rpm).
Use the tachometer to select the correct
shift points and to prevent lugging and/or
over-revving the engine.
Fuel gauge
The fuel gauge indicates the approxi-
mate amount of fuel remaining in the fuel
tank. The fuel tank capacity is given in
section 8. The fuel gauge is supplement-
ed by a low fuel warning light, which will
illuminate when the fuel tank is nearly
empty.
On inclines or curves, the fuel gauge
pointer may fluctuate or the low fuel
warning light may come on earlier than
usual due to the movement of fuel in the
tank.
WARNING- Fuel gauge
Running out of fuel can expose
vehicle occupants to danger.
You must stop and obtain addition-
al fuel as soon as possible after the
warning light comes on or when the
gauge indicator comes close to the
E level.
CAUTION
Avoid driving with extremely lowfuel level. Running out of fuel couldcause the engine to misfire, damag- ing the catalytic converter.
OTFH042058COTFH040055N
Page 131 of 394
Features of your vehicle
60
4
Vehicle option (if equipped)
1. When the vehicle is at a standstill,
pressing the TRIP button for more than
2 seconds with the ENGINE
START/STOP button in the ON posi-
tion or engine running, the LCD dis-
play on the cluster will change to the
"User Setting" mode.
You can move to items by pressing the TRIP button and select the item by
pressing the RESET button.
2. In the "User Setting" mode, select "Vehicle Option".
3. Move (TRIP button) to the desired item and select (RESET button).
Auto Door Lock
Off - The auto door lock operation will be canceled.
Speed - All doors will be automatically locked when the vehicle speed
exceeds 15 km/h (9.3 mph).
Shift Lever - All doors will be automati- cally locked if the shift lever
is shifted from the P(Park)
position to the R(Reverse),
N(Neutral) or D(Drive) posi-
tion.
Auto Door Unlock
Off - The auto door unlock operation willbe inactivated.
Key Out - All doors will be automatically unlocked when smart key is
removed from the smart key
holder.
Shift Lever - All doors will be automati- cally unlocked if the shift
lever is shifted to the P
(Park) position.
Twice Unlock
On - The driver’s door will unlock if thedoor is unlocked. When the door is
unlocked again within 4 seconds, all
doors will unlock.
Off - The two turn unlock function will be inactivated. Therefore, all doors will
unlock if the door is unlocked.
❈ Except the central door lock switch.
Horn feedback
On - The hazard warning light will blink
and the horn will sound when the
door is locked or unlocked with the
transmitter or smart key.
Off - The hazard warning light will blink but the horn will not sound when the
door is locked or unlocked with the
transmitter or smart key.
Seat Easy Access (only for DriverPosition Memory System equippedvehicle)
On - The driver's seat will automatically move forward or rearward for the
driver to enter or exit the vehicle
comfortably.
Off - The Seat Easy Access function will be inactivated.
Page 132 of 394
461
Features of your vehicle
Headlamp Escort
On - The Headlamp Escort and EscortWelcome function will be activated.
Off - The Headlamp Escort and Escort Welcome function will be inactivat-
ed.
Welcome Light (if equipped)
On - The Welcome Light function will beactivated.
Off - The Welcome Light function will be inactivated.
Steering Position
On - Steering Position display functionwill be activated.
Off - Steering Position display function will be inactivated.
Auto Triple Turn (One-touch tripleturn signal)
On - The lane change signals will blink 3 times when the turn signal lever is
moved slightly.
Off - The Auto Triple Turn function will be inactivated.
AVG fuel economy
Auto Reset - The average fuel economy will reset automatically
when you drive after refuel-
ing.
Manual Reset - The average fuel econo- my will not reset auto-
matically when you drive
after refueling.
Warnings and indicators
All warning lights are checked by turning
the ignition switch ON (do not start the
engine). Any light that does not illuminate
should be checked by an authorized Kia
dealer.
After starting the engine, check to make
sure that all warning lights are off. If any
are still on, this indicates a situation that
needs attention. When releasing the
parking brake, the brake system warning
light should go off. The fuel warning light
will stay on if the fuel level is low.