HEV KIA Optima Hybrid 2014 3.G User Guide
[x] Cancel search | Manufacturer: KIA, Model Year: 2014, Model line: Optima Hybrid, Model: KIA Optima Hybrid 2014 3.GPages: 474, PDF Size: 12.73 MB
Page 324 of 474
547
Driving your vehicle
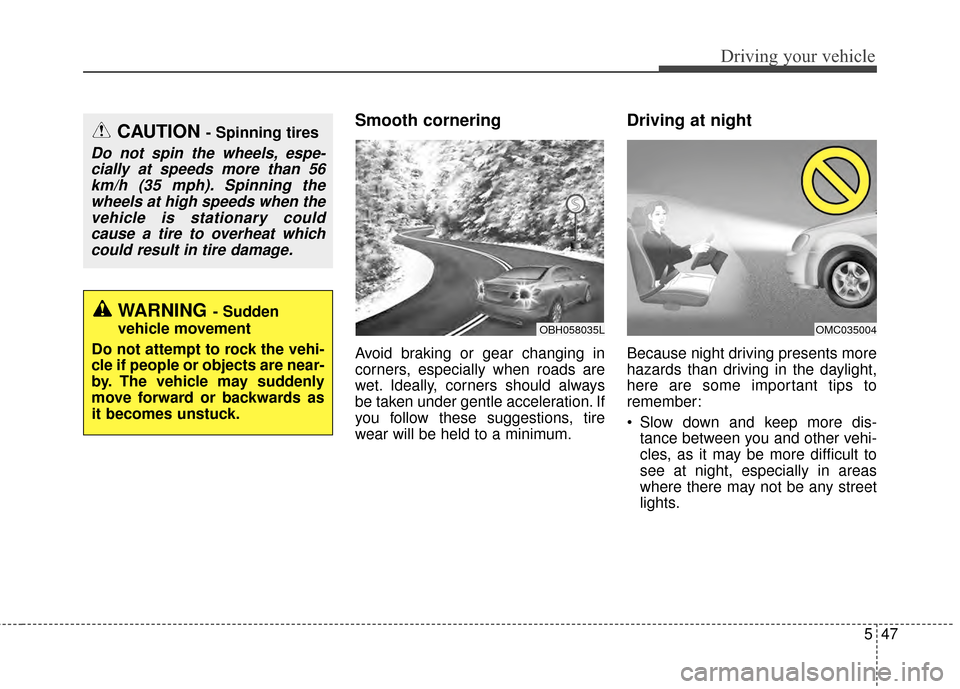
Smooth cornering
Avoid braking or gear changing in
corners, especially when roads are
wet. Ideally, corners should always
be taken under gentle acceleration. If
you follow these suggestions, tire
wear will be held to a minimum.
Driving at night
Because night driving presents more
hazards than driving in the daylight,
here are some important tips to
remember:
Slow down and keep more dis-tance between you and other vehi-
cles, as it may be more difficult to
see at night, especially in areas
where there may not be any street
lights.
OBH058035LOMC035004
WARNING- Sudden
vehicle movement
Do not attempt to rock the vehi-
cle if people or objects are near-
by. The vehicle may suddenly
move forward or backwards as
it becomes unstuck.
CAUTION - Spinning tires
Do not spin the wheels, espe- cially at speeds more than 56km/h (35 mph). Spinning thewheels at high speeds when thevehicle is stationary couldcause a tire to overheat whichcould result in tire damage.
Page 372 of 474
79
Maintenance
NORMAL MAINTENANCE SCHEDULE
The following maintenance services must be performed to ensure good emission control and performance. Keep
receipts for all vehicle emission services to protect your warranty. Where both mileage and time are shown, the fre-
quency of service is determined by whichever occurs first.
*1: If TOP TIER Detergent Gasoline is not available, one bottle of additive is recommended. Additives are available from yourauthorized Kia dealer along with information on how to use them. Do not mix other additives.
*
2: Fuel filter & Fuel tank air filter are considered to be maintenance free\
but periodic inspection is recommended for this mainte- nance schedule depends on fuel quality. If there are some important safety matters like fuel flow restriction, surging, loss of
power, hard starting problem etc, replace the fuel filter immediately regardless of maintenance schedule\
and consult an author-
ized Kia dealer for details.
*
3: The drive belt should be replaced when cracks occur or tension is reduced excessively.
*4: Inspect for excessive tappet noise and/or engine vibration and adjust if necessary.
Page 373 of 474
Maintenance
10
7
NORMAL MAINTENANCE SCHEDULE
The following maintenance services must be performed to ensure good emission control and performance. Keep receipts for all
vehicle emission services to protect your warranty. Where both mileage and time are shown, the frequency of service is deter-
mined by whichever occurs first.
24,000 km or 12 months
❑ Inspect air cleaner filter
❑Inspect HSG belt (24,000 km or 24 months)
❑ Inspect vacuum hose
❑Inspect air conditioning refrigerant
❑Inspect brake hoses and lines
❑Inspect drive shafts and boots
❑Inspect exhaust pipe and muffler
❑Inspect front brake disc/pads, calipers and rotors
❑Inspect rear brake disc/pads
❑Inspect parking brake
(Continued)
(Continued)
❑Inspect steering gear box, linkage & boots/lower arm ball
joint, upper arm ball joint
❑ Inspect suspension mounting bolts
❑Replace climate control air filter
(for evaporator and blower unit)
❑Replace engine oil and filter (24,000 km or 24 months)
❑ Add fuel additive *1 (Every 12,000 km or 12 months)
36,000 km or 18 months
❑ Inspect air cleaner filter
❑Inspect HSG belt (36,000 km or 36 months)
❑ Inspect vacuum hose
❑Replace engine oil and filter (36,000 km or 36 months)
❑Add fuel additive *1 (Every 12,000 km or 12 months)
12,000 km or 6 months
❑ Inspect air cleaner filter
❑Inspect HSG belt (12,000 km or 12 months)
❑ Inspect vacuum hose
❑Replace engine oil and filter (12,000 km or 12 months)
❑Add fuel additive *1 (Every 12,000 km or 12 months)
❈ Inspect : Inspect and if necessary, adjust, correct, clean or replace.
❈
Inspect : Inspect and if necessary, adjust, correct, clean or replace.
❈Inspect : Inspect and if necessary, adjust, correct, clean or replace.
Page 411 of 474
Maintenance
48
7
Wheel replacement
When replacing the metal wheels for
any reason, make sure the new
wheels are equivalent to the original
factory units in diameter, rim width
and offset.
A wheel that is not the correct size
may adversely affect wheel and
bearing life, braking and stopping
abilities, handling characteristics,
ground clearance, body-to-tire clear-
ance, snow chain clearance,
speedometer and odometer calibra-
tion, headlight aim and bumper
height.
Tire traction
Tire traction can be reduced if you
drive on worn tires, tires that are
improperly inflated or on slippery
road surfaces. Tires should be
replaced when tread wear indicators
appear. Slow down whenever there
is rain, snow or ice on the road, to
reduce the possibility of losing con-
trol of the vehicle.
Tire maintenance
In addition to proper inflation, correct
wheel alignment helps to decrease
tire wear. If you find a tire is worn
unevenly, have your dealer check the
wheel alignment.
When you have new tires installed,
make sure they are balanced. This
will increase vehicle ride comfort and
tire life. Additionally, a tire should
always be rebalanced if it is removed
from the wheel.
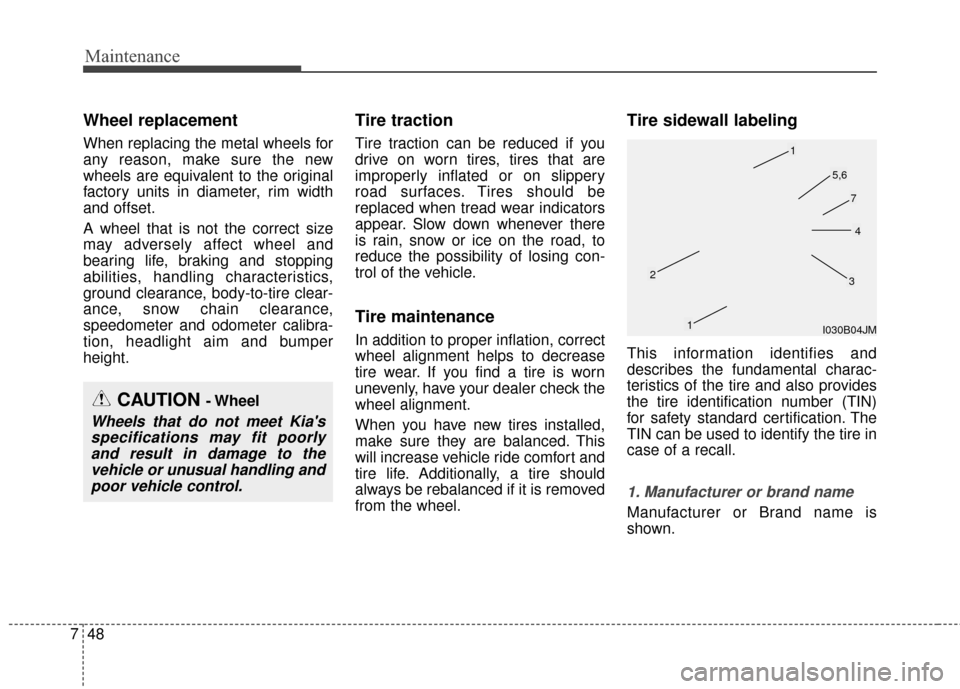
Tire sidewall labeling
This information identifies and
describes the fundamental charac-
teristics of the tire and also provides
the tire identification number (TIN)
for safety standard certification. The
TIN can be used to identify the tire in
case of a recall.
1. Manufacturer or brand name
Manufacturer or Brand name is
shown.
CAUTION - Wheel
Wheels that do not meet Kia's
specifications may fit poorlyand result in damage to thevehicle or unusual handling andpoor vehicle control.
I030B04JM
1
1
23
4
5,6
7
Page 417 of 474
Maintenance
54
7
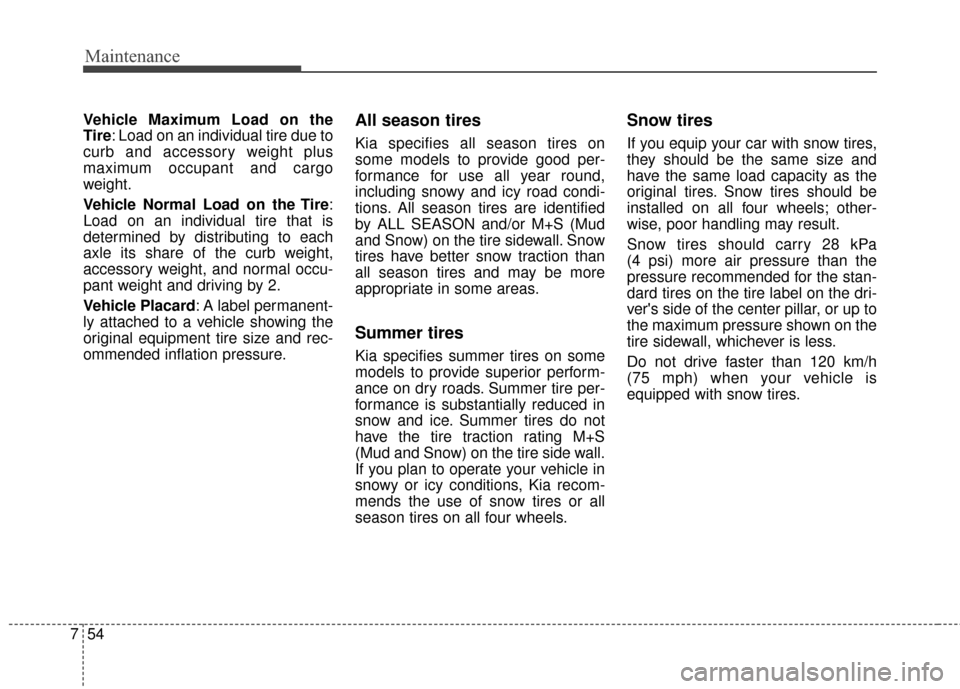
Vehicle Maximum Load on the
Tire: Load on an individual tire due to
curb and accessory weight plus
maximum occupant and cargo
weight.
Vehicle Normal Load on the Tire:
Load on an individual tire that is
determined by distributing to each
axle its share of the curb weight,
accessory weight, and normal occu-
pant weight and driving by 2.
Vehicle Placard: A label permanent-
ly attached to a vehicle showing the
original equipment tire size and rec-
ommended inflation pressure.All season tires
Kia specifies all season tires on
some models to provide good per-
formance for use all year round,
including snowy and icy road condi-
tions. All season tires are identified
by ALL SEASON and/or M+S (Mud
and Snow) on the tire sidewall. Snow
tires have better snow traction than
all season tires and may be more
appropriate in some areas.
Summer tires
Kia specifies summer tires on some
models to provide superior perform-
ance on dry roads. Summer tire per-
formance is substantially reduced in
snow and ice. Summer tires do not
have the tire traction rating M+S
(Mud and Snow) on the tire side wall.
If you plan to operate your vehicle in
snowy or icy conditions, Kia recom-
mends the use of snow tires or all
season tires on all four wheels.
Snow tires
If you equip your car with snow tires,
they should be the same size and
have the same load capacity as the
original tires. Snow tires should be
installed on all four wheels; other-
wise, poor handling may result.
Snow tires should carry 28 kPa
(4 psi) more air pressure than the
pressure recommended for the stan-
dard tires on the tire label on the dri-
ver's side of the center pillar, or up to
the maximum pressure shown on the
tire sidewall, whichever is less.
Do not drive faster than 120 km/h
(75 mph) when your vehicle is
equipped with snow tires.
Page 428 of 474
765
Maintenance
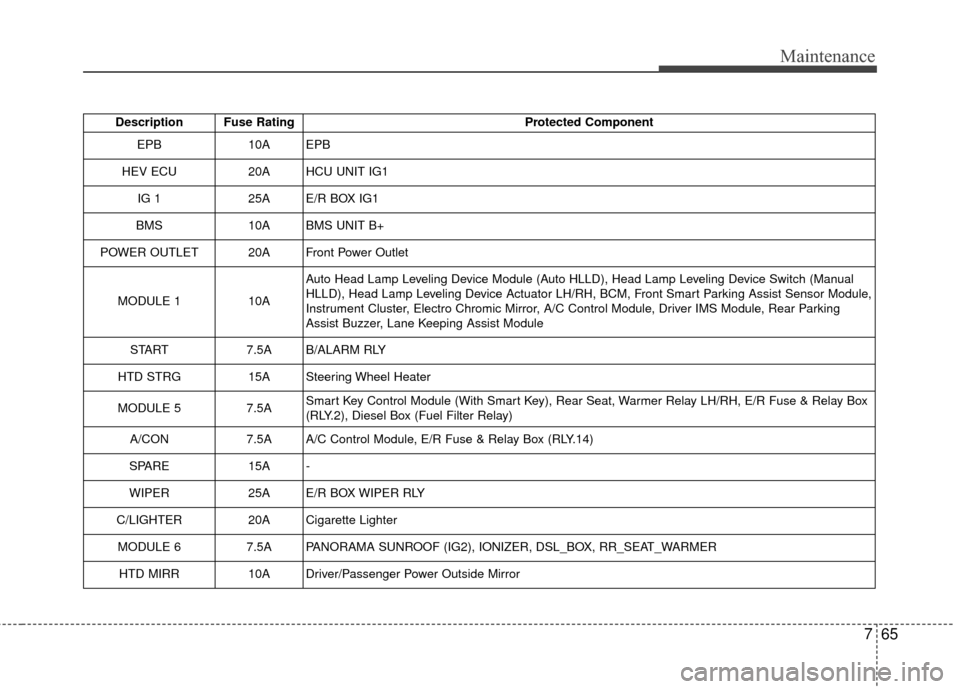
Description Fuse RatingProtected Component
EPB10AEPB
HEV ECU20AHCU UNIT IG1
IG 125AE/R BOX IG1
BMS 10A BMS UNIT B+
POWER OUTLET 20A Front Power Outlet
MODULE 1 10AAuto Head Lamp Leveling Device Module (Auto HLLD), Head Lamp Leveling Device Switch (Manual
HLLD), Head Lamp Leveling Device Actuator LH/RH, BCM, Front Smart Parking Assist Sensor Module,
Instrument Cluster, Electro Chromic Mirror, A/C Control Module, Driver IMS Module, Rear Parking
Assist Buzzer, Lane Keeping Assist Module
START 7.5A B/ALARM RLY
HTD STRG 15A Steering Wheel Heater
MODULE 5 7.5ASmart Key Control Module (With Smart Key), Rear Seat, Warmer Relay LH/RH, E/R Fuse & Relay Box
(RLY.2), Diesel Box (Fuel Filter Relay)
A/CON 7.5A A/C Control Module, E/R Fuse & Relay Box (RLY.14)
SPARE 15A -
WIPER 25A E/R BOX WIPER RLY
C/LIGHTER 20A Cigarette Lighter
MODULE 6 7.5A PANORAMA SUNROOF (IG2), IONIZER, DSL_BOX, RR_SEAT_WARMER
HTD MIRR 10A Driver/Passenger Power Outside Mirror
Page 431 of 474
Maintenance
68
7
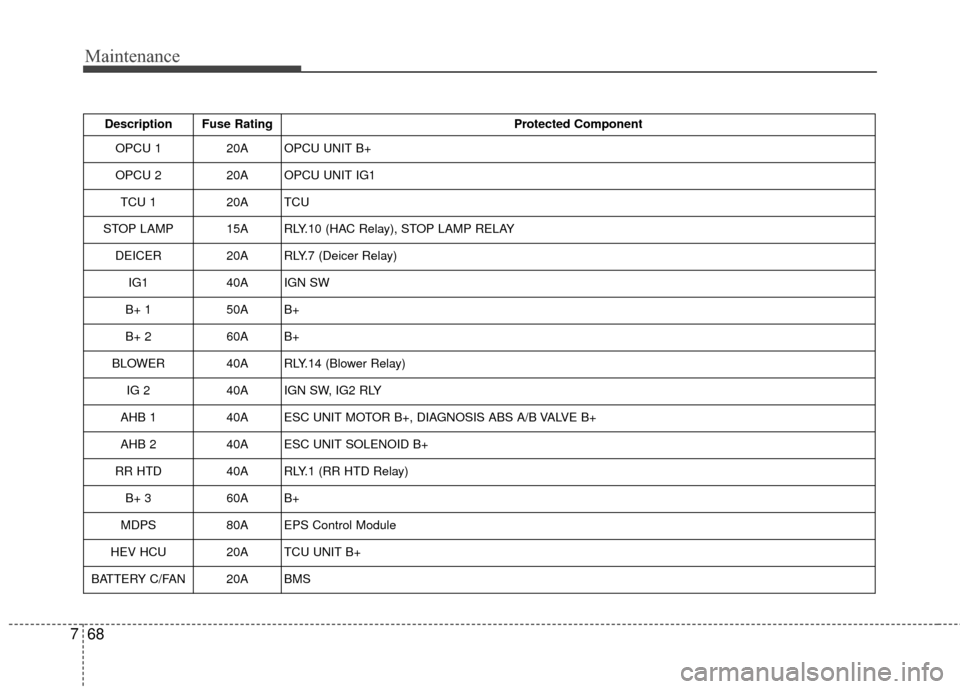
Description Fuse Rating Protected Component
OPCU 1 20A OPCU UNIT B+
OPCU 2 20A OPCU UNIT IG1
TCU 1 20A TCU
STOP LAMP 15A RLY.10 (HAC Relay), STOP LAMP RELAY DEICER 20A RLY.7 (Deicer Relay)
IG1 40A IGN SW
B+ 1 50A B+
B+ 2 60A B+
BLOWER 40A RLY.14 (Blower Relay) IG 2 40A IGN SW, IG2 RLY
AHB 1 40A ESC UNIT MOTOR B+, DIAGNOSIS ABS A/B VALVE B+
AHB 2 40A ESC UNIT SOLENOID B+
RR HTD 40A RLY.1 (RR HTD Relay)
B+ 3 60A B+
MDPS 80A EPS Control Module
HEV HCU 20A TCU UNIT B+
BATTERY C/FAN 20A BMS
Page 469 of 474
Index
4I
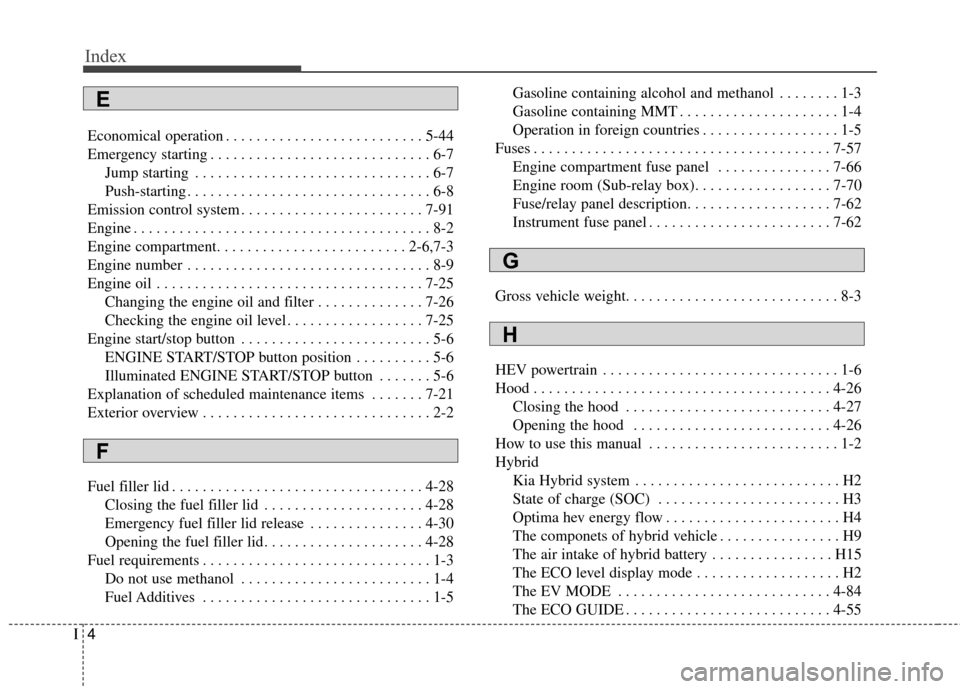
Economical operation . . . . . . . . . . . . . . . . . . . . . . . . . . 5-44
Emergency starting . . . . . . . . . . . . . . . . . . . . . . . . . . . . . 6-7Jump starting . . . . . . . . . . . . . . . . . . . . . . . . . . . . . . . 6-7
Push-starting . . . . . . . . . . . . . . . . . . . . . . . . . . . . . . . . 6-8
Emission control system . . . . . . . . . . . . . . . . . . . . . . . . 7-91
Engine . . . . . . . . . . . . . . . . . . . . . . . . . . . . . . . . . . . . \
. . . 8-2
Engine compartment. . . . . . . . . . . . . . . . . . . . . . . . . 2-6,7-3
Engine number . . . . . . . . . . . . . . . . . . . . . . . . . . . . . . . . 8-9
Engine oil . . . . . . . . . . . . . . . . . . . . . . . . . . . . . . . . . . . 7-\
25 Changing the engine oil and filter . . . . . . . . . . . . . . 7-26
Checking the engine oil level . . . . . . . . . . . . . . . . . . 7-25
Engine start/stop button . . . . . . . . . . . . . . . . . . . . . . . . . 5-6 ENGINE START/STOP button position . . . . . . . . . . 5-6
Illuminated ENGINE START/STOP button . . . . . . . 5-6
Explanation of scheduled maintenance items . . . . . . . 7-21
Exterior overview . . . . . . . . . . . . . . . . . . . . . . . . . . . . . . 2-2
Fuel filler lid . . . . . . . . . . . . . . . . . . . . . . . . . . . . . . . . . 4-28 Closing the fuel filler lid . . . . . . . . . . . . . . . . . . . . . 4-28
Emergency fuel filler lid release . . . . . . . . . . . . . . . 4-30
Opening the fuel filler lid. . . . . . . . . . . . . . . . . . . . . 4-28
Fuel requirements . . . . . . . . . . . . . . . . . . . . . . . . . . . . . . 1-3 Do not use methanol . . . . . . . . . . . . . . . . . . . . . . . . . 1-4
Fuel Additives . . . . . . . . . . . . . . . . . . . . . . . . . . . . . . 1-5 Gasoline containing alcohol and methanol . . . . . . . . 1-3
Gasoline containing MMT . . . . . . . . . . . . . . . . . . . . . 1-4
Operation in foreign countries . . . . . . . . . . . . . . . . . . 1-5
Fuses . . . . . . . . . . . . . . . . . . . . . . . . . . . . . . . . . . . . \
. . . 7-57 Engine compartment fuse panel . . . . . . . . . . . . . . . 7-66
Engine room (Sub-relay box). . . . . . . . . . . . . . . . . . 7-70
Fuse/relay panel description. . . . . . . . . . . . . . . . . . . 7-62
Instrument fuse panel . . . . . . . . . . . . . . . . . . . . . . . . 7-62
Gross vehicle weight. . . . . . . . . . . . . . . . . . . . . . . . . . . . 8-3
HEV powertrain . . . . . . . . . . . . . . . . . . . . . . . . . . . . . . . 1-6
Hood . . . . . . . . . . . . . . . . . . . . . . . . . . . . . . . . . . . . \
. . . 4-26 Closing the hood . . . . . . . . . . . . . . . . . . . . . . . . . . . 4-27
Opening the hood . . . . . . . . . . . . . . . . . . . . . . . . . . 4-26
How to use this manual . . . . . . . . . . . . . . . . . . . . . . . . . 1-2
Hybrid Kia Hybrid system . . . . . . . . . . . . . . . . . . . . . . . . . . . H2
State of charge (SOC) . . . . . . . . . . . . . . . . . . . . . . . . H3
Optima hev energy flow . . . . . . . . . . . . . . . . . . . . . . . H4
The componets of hybrid vehicle . . . . . . . . . . . . . . . . H9
The air intake of hybrid battery . . . . . . . . . . . . . . . . H15
The ECO level display mode . . . . . . . . . . . . . . . . . . . H2
The EV MODE . . . . . . . . . . . . . . . . . . . . . . . . . . . . 4-84
The ECO GUIDE . . . . . . . . . . . . . . . . . . . . . . . . . . . 4-55
E
F
G
H