engine KIA Optima Hybrid 2016 4.G Owner's Guide
[x] Cancel search | Manufacturer: KIA, Model Year: 2016, Model line: Optima Hybrid, Model: KIA Optima Hybrid 2016 4.GPages: 466, PDF Size: 14.92 MB
Page 101 of 466
Features of your vehicle
26
4
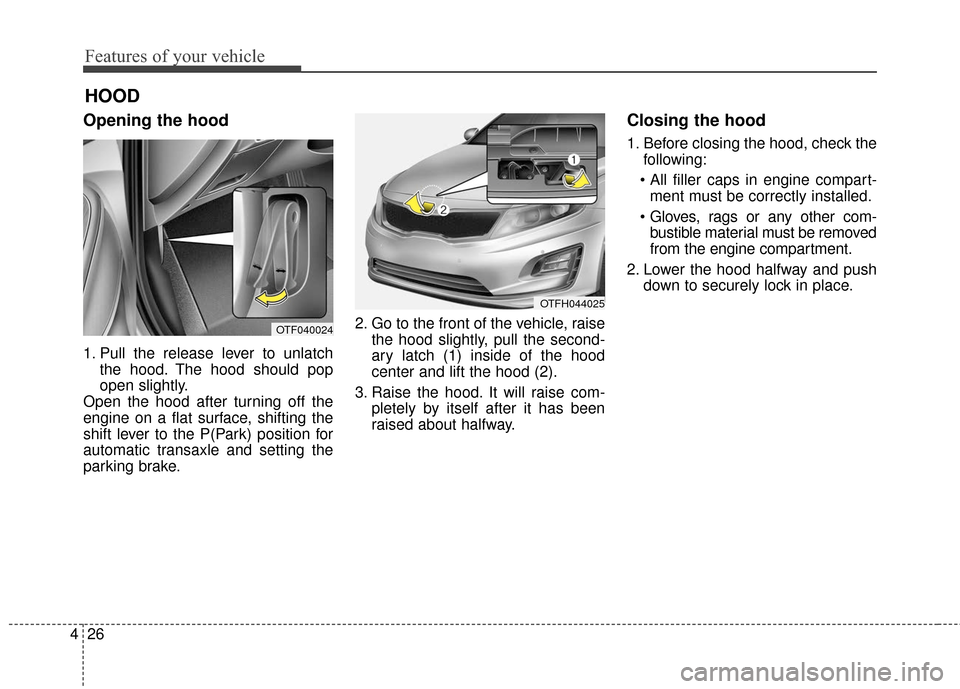
Opening the hood
1. Pull the release lever to unlatch
the hood. The hood should pop
open slightly.
Open the hood after turning off the
engine on a flat surface, shifting the
shift lever to the P(Park) position for
automatic transaxle and setting the
parking brake. 2. Go to the front of the vehicle, raise
the hood slightly, pull the second-
ary latch (1) inside of the hood
center and lift the hood (2).
3. Raise the hood. It will raise com- pletely by itself after it has been
raised about halfway.
Closing the hood
1. Before closing the hood, check thefollowing:
ment must be correctly installed.
bustible material must be removed
from the engine compartment.
2. Lower the hood halfway and push down to securely lock in place.
HOOD
OTF040024
OTFH044025
Page 102 of 466
427
Features of your vehicle
WARNING- Fire risk
Do not leave gloves, rags or any
other combustible material in the
engine compartment. Doing so
may cause a heat induced fire.
CAUTION
Before closing the hood, ensure that all obstructions areremoved from the engine com-partment and surrounding bodysheet metal. Closing the hoodwith an obstruction presentcould result in damage to theengine, sheet metal or theimpacted objects.
WARNING- Unsecured
engine hood
Always double check to be sure
that the hood is firmly latched
before driving away. If it is not
latched, the hood could fly open
while the vehicle is being driv-
en, causing a total loss of visi-
bility, which might result in an
accident.
Page 103 of 466
Features of your vehicle
28
4
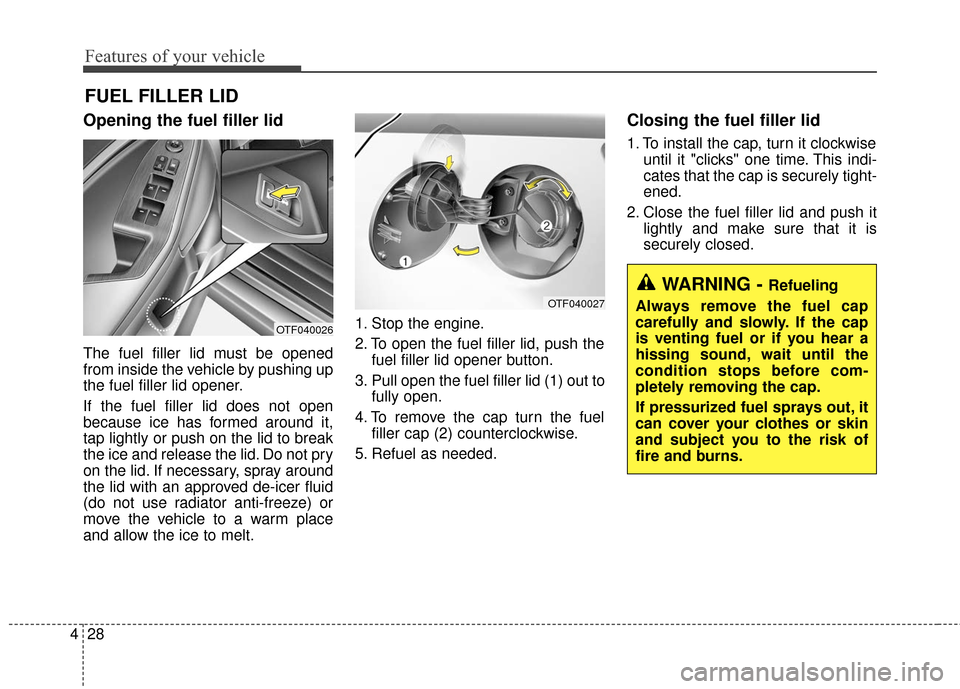
Opening the fuel filler lid
The fuel filler lid must be opened
from inside the vehicle by pushing up
the fuel filler lid opener.
If the fuel filler lid does not open
because ice has formed around it,
tap lightly or push on the lid to break
the ice and release the lid. Do not pry
on the lid. If necessary, spray around
the lid with an approved de-icer fluid
(do not use radiator anti-freeze) or
move the vehicle to a warm place
and allow the ice to melt. 1. Stop the engine.
2. To open the fuel filler lid, push the
fuel filler lid opener button.
3. Pull open the fuel filler lid (1) out to fully open.
4. To remove the cap turn the fuel filler cap (2) counterclockwise.
5. Refuel as needed.
Closing the fuel filler lid
1. To install the cap, turn it clockwise until it "clicks" one time. This indi-
cates that the cap is securely tight-
ened.
2. Close the fuel filler lid and push it lightly and make sure that it is
securely closed.
FUEL FILLER LID
OTF040026
OTF040027
WARNING - Refueling
Always remove the fuel cap
carefully and slowly. If the cap
is venting fuel or if you hear a
hissing sound, wait until the
condition stops before com-
pletely removing the cap.
If pressurized fuel sprays out, it
can cover your clothes or skin
and subject you to the risk of
fire and burns.
Page 105 of 466
Features of your vehicle
30
4
Make sure to refuel your vehicle
according to the "Fuel requirements"
suggested in chapter 1.
If the fuel filler cap requires replace-
ment, use only a genuine Kia cap or
the equivalent specified for your vehi-
cle. An incorrect fuel filler cap can
result in a serious malfunction of the
fuel system or emission control sys-
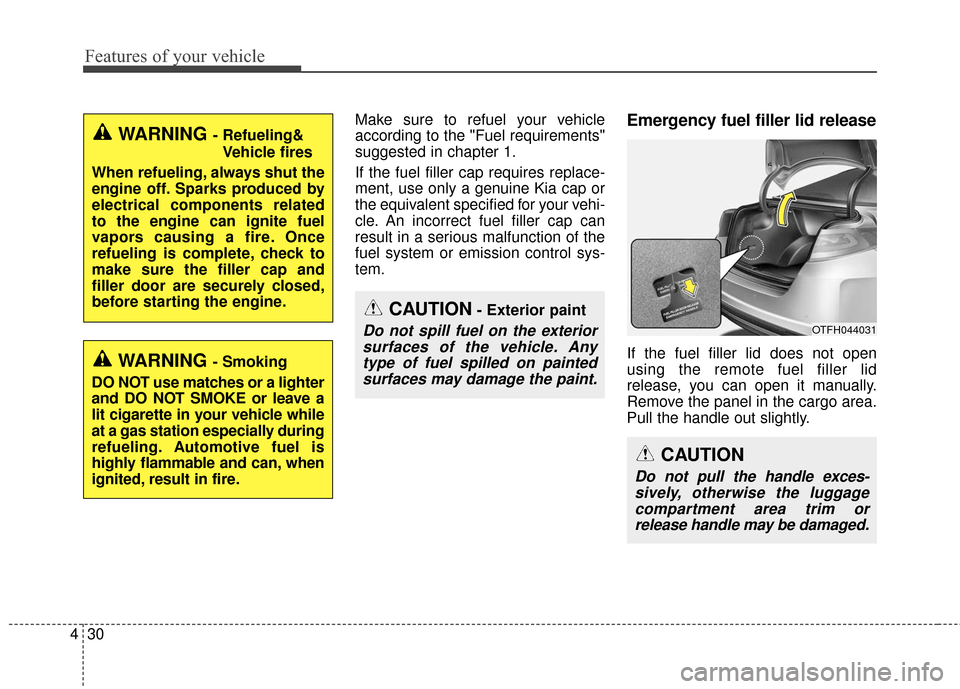
tem.Emergency fuel filler lid release
If the fuel filler lid does not open
using the remote fuel filler lid
release, you can open it manually.
Remove the panel in the cargo area.
Pull the handle out slightly.
CAUTION- Exterior paint
Do not spill fuel on the exterior
surfaces of the vehicle. Anytype of fuel spilled on paintedsurfaces may damage the paint.
WARNING - Refueling&
Vehicle fires
When refueling, always shut the
engine off. Sparks produced by
electrical components related
to the engine can ignite fuel
vapors causing a fire. Once
refueling is complete, check to
make sure the filler cap and
filler door are securely closed,
before starting the engine.
WARNING - Smoking
DO NOT use matches or a lighter
and DO NOT SMOKE or leave a
lit cigarette in your vehicle while
at a gas station especially during
refueling. Automotive fuel is
highly flammable and can, when
ignited, result in fire.
CAUTION
Do not pull the handle exces- sively, otherwise the luggagecompartment area trim orrelease handle may be damaged.
OTFH044031
Page 110 of 466
435
Features of your vehicle
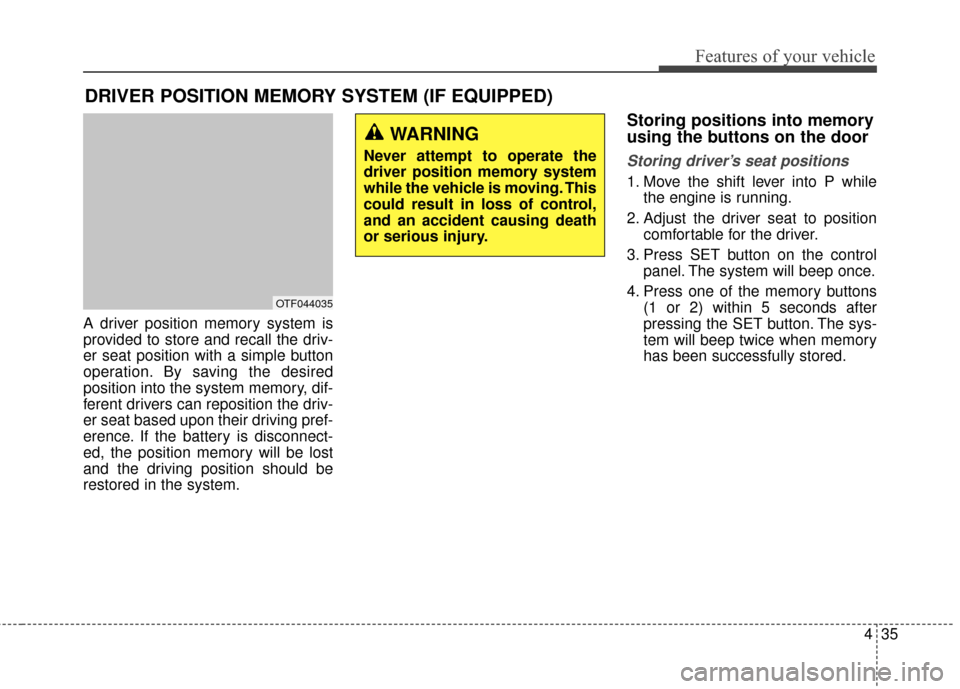
A driver position memory system is
provided to store and recall the driv-
er seat position with a simple button
operation. By saving the desired
position into the system memory, dif-
ferent drivers can reposition the driv-
er seat based upon their driving pref-
erence. If the battery is disconnect-
ed, the position memory will be lost
and the driving position should be
restored in the system.
Storing positions into memory
using the buttons on the door
Storing driver’s seat positions
1. Move the shift lever into P whilethe engine is running.
2. Adjust the driver seat to position comfortable for the driver.
3. Press SET button on the control panel. The system will beep once.
4. Press one of the memory buttons (1 or 2) within 5 seconds after
pressing the SET button. The sys-
tem will beep twice when memory
has been successfully stored.
DRIVER POSITION MEMORY SYSTEM (IF EQUIPPED)
OTF044035
WARNING
Never attempt to operate the
driver position memory system
while the vehicle is moving. This
could result in loss of control,
and an accident causing death
or serious injury.
Page 111 of 466
Features of your vehicle
36
4
Recalling positions from memory
1. The shift lever is in P or N with one
of the condition below:
- The ignition switch in the ON position or engine running.
- The ignition switch in the LOCK/OFF or ACC position
while the driver's door is opened.
- The ignition switch in the LOCK/OFF or ACC position and
within 30 seconds after the driver's
door was closed.
2. Press the desired memory button (1 or 2). The system will beep once,
then the driver’s seat will automati-
cally adjust to the stored position.
Adjusting the control switch for the
driver seat while the system is recall-
ing the stored position will cause the
movement to stop and move in the
direction that the control switch is
moved.
✽ ✽ NOTICE
When recalling an adjustment mem-
ory button while sitting in the vehi-
cle, you can be surprised by the set-
ting chosen if the memory has been
adjusted by someone else. If that
occurs, immediately push the seat
position control knob in the direc-
tion of the desired position to stop
further undesired movement.
Easy access function
(if equipped)
With the shift lever in the P position,
the system will move the driver's seat
automatically as follows:
- It will move the driver’s seat rear-
ward when the engine start/stop
button is turned to the OFF position
and front driver’s door is opened.
- It will move the driver’s seat for- ward when the engine start/stop
button is turned to the ACC or
START position.
You can activate or deactivate this
feature. Refer to "User settings" in
chapter 4.
Page 112 of 466
437
Features of your vehicle
Electric power steering
Power steering uses the motor to
assist you in steering the vehicle. If
the engine is off or if the power steer-
ing system becomes inoperative, the
vehicle may still be steered, but it will
require increased steering effort.
The motor driven power steering is
controlled by the power steering con-
trol unit which senses the steering
wheel torque and vehicle speed to
command the motor.
The steering wheel becomes heavier
as the vehicle’s speed increases and
becomes lighter as the vehicle’s
speed decreases for better control of
the steering wheel.
Should you notice any change in the
effort required to steer during normal
vehicle operation, have the power
steering checked by an authorized
Kia dealer.
✽ ✽NOTICE
The following symptoms may occur
during normal vehicle operation:
• The steering effort is increased
immediately after turning the igni-
tion switch on. This happens as the
system performs the EPS system
diagnostics. When the diagnostics
are completed, the steering wheel
will return to its normal condition
• A click noise may be heard from the EPS relay after the ignition
switch is turned to the ON or
LOCK position.
• Motor noise may be heard when the vehicle is at a stop or at a low
driving speed.
• The steering effort increases if the steering wheel is rotated continuous-
ly when the vehicle is not in motion.
However, after a few minutes, it will
return to its normal conditions.
• When you operate the steering wheel in low temperature, abnor-
mal noise could occur. If tempera-
ture rises, the noise will disappear.
This is a normal condition.
If the Electric Power Steering System
does not operate normally, the warn-
ing light will illuminate on the instru-
ment cluster. The steering wheel may
become difficult to control or operate
abnormally. Take your vehicle to an
authorized Kia dealer and have the
vehicle checked as soon as possible.
STEERING WHEEL
Page 114 of 466
439
Features of your vehicle
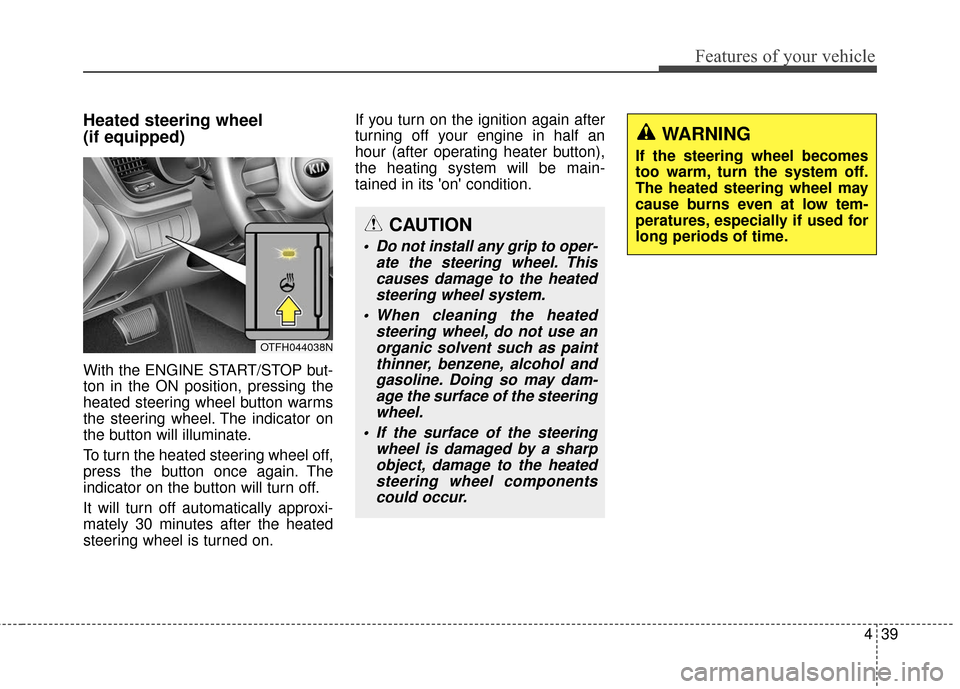
Heated steering wheel
(if equipped)
With the ENGINE START/STOP but-
ton in the ON position, pressing the
heated steering wheel button warms
the steering wheel. The indicator on
the button will illuminate.
To turn the heated steering wheel off,
press the button once again. The
indicator on the button will turn off.
It will turn off automatically approxi-
mately 30 minutes after the heated
steering wheel is turned on.If you turn on the ignition again after
turning off your engine in half an
hour (after operating heater button),
the heating system will be main-
tained in its 'on' condition.
CAUTION
Do not install any grip to oper-
ate the steering wheel. Thiscauses damage to the heatedsteering wheel system.
When cleaning the heated steering wheel, do not use anorganic solvent such as paintthinner, benzene, alcohol andgasoline. Doing so may dam-age the surface of the steeringwheel.
If the surface of the steering wheel is damaged by a sharpobject, damage to the heatedsteering wheel componentscould occur.
OTFH044038N
WARNING
If the steering wheel becomes
too warm, turn the system off.
The heated steering wheel may
cause burns even at low tem-
peratures, especially if used for
long periods of time.
Page 116 of 466
441
Features of your vehicle
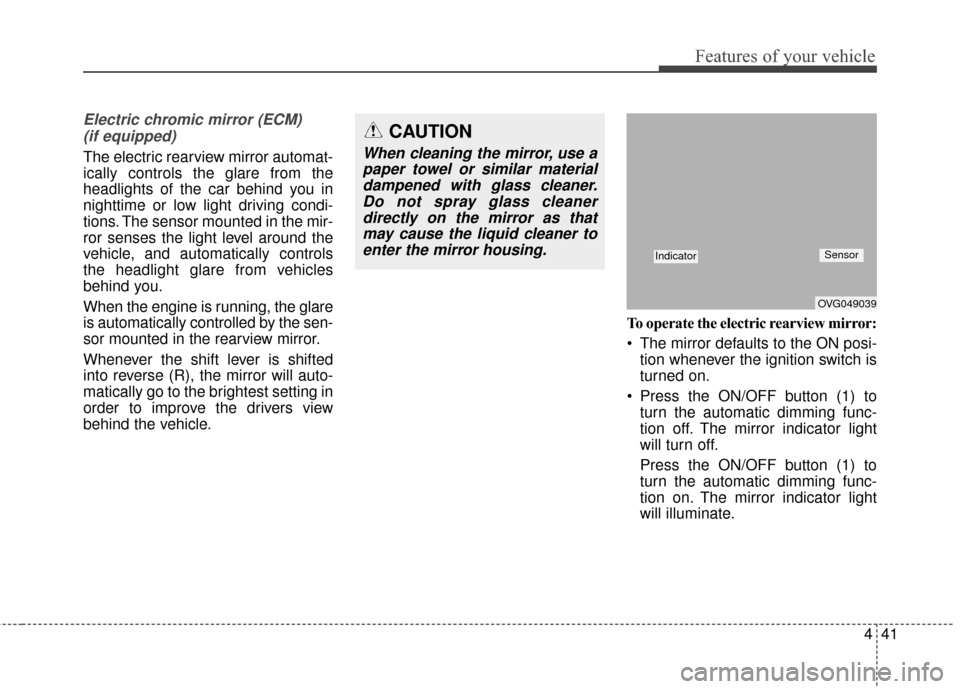
Electric chromic mirror (ECM) (if equipped)
The electric rearview mirror automat-
ically controls the glare from the
headlights of the car behind you in
nighttime or low light driving condi-
tions. The sensor mounted in the mir-
ror senses the light level around the
vehicle, and automatically controls
the headlight glare from vehicles
behind you.
When the engine is running, the glare
is automatically controlled by the sen-
sor mounted in the rearview mirror.
Whenever the shift lever is shifted
into reverse (R), the mirror will auto-
matically go to the brightest setting in
order to improve the drivers view
behind the vehicle. To operate the electric rearview mirror:
The mirror defaults to the ON posi-
tion whenever the ignition switch is
turned on.
Press the ON/OFF button (1) to turn the automatic dimming func-
tion off. The mirror indicator light
will turn off.
Press the ON/OFF button (1) to
turn the automatic dimming func-
tion on. The mirror indicator light
will illuminate.
CAUTION
When cleaning the mirror, use apaper towel or similar materialdampened with glass cleaner.Do not spray glass cleanerdirectly on the mirror as thatmay cause the liquid cleaner toenter the mirror housing.
OVG049039
IndicatorSensor
Page 118 of 466
443
Features of your vehicle
After the adjustment, put the lever
into neutral (center) position to pre-
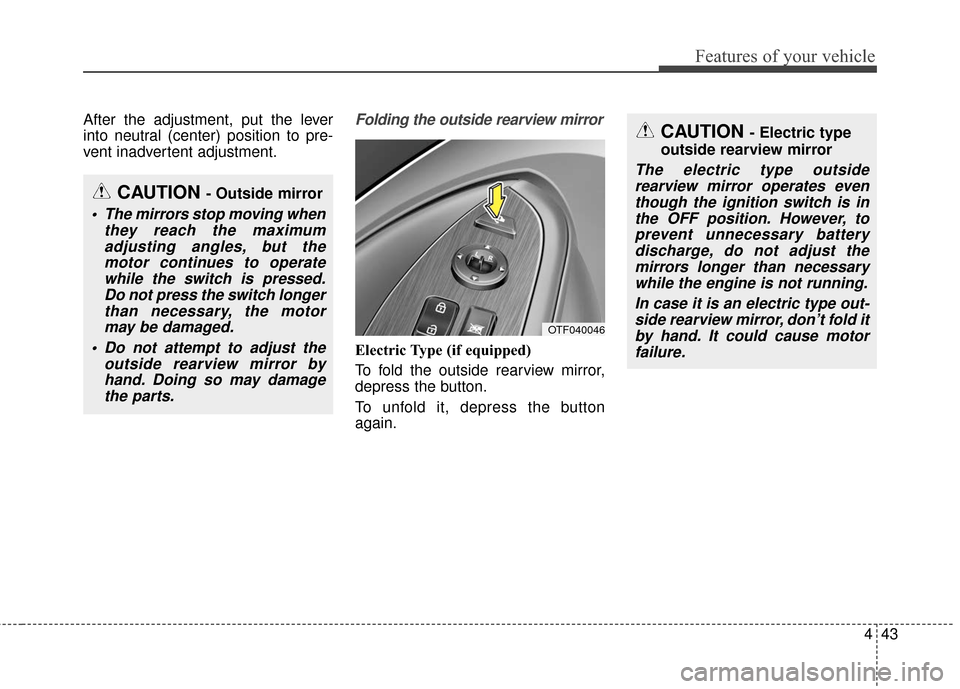
vent inadvertent adjustment.Folding the outside rearview mirror
Electric Type (if equipped)
To fold the outside rearview mirror,
depress the button.
To unfold it, depress the button
again.
CAUTION - Outside mirror
The mirrors stop moving whenthey reach the maximumadjusting angles, but themotor continues to operatewhile the switch is pressed.Do not press the switch longerthan necessary, the motormay be damaged.
Do not attempt to adjust the outside rearview mirror byhand. Doing so may damagethe parts.
CAUTION - Electric type
outside rearview mirror
The electric type outside rearview mirror operates eventhough the ignition switch is inthe OFF position. However, toprevent unnecessary batterydischarge, do not adjust themirrors longer than necessarywhile the engine is not running.
In case it is an electric type out-side rearview mirror, don’t fold itby hand. It could cause motorfailure.
OTF040046