key battery KIA OPTIMA HYBRID 2018 Owners Manual
[x] Cancel search | Manufacturer: KIA, Model Year: 2018, Model line: OPTIMA HYBRID, Model: KIA OPTIMA HYBRID 2018Pages: 547, PDF Size: 11.56 MB
Page 138 of 547
Features of your vehicle
84
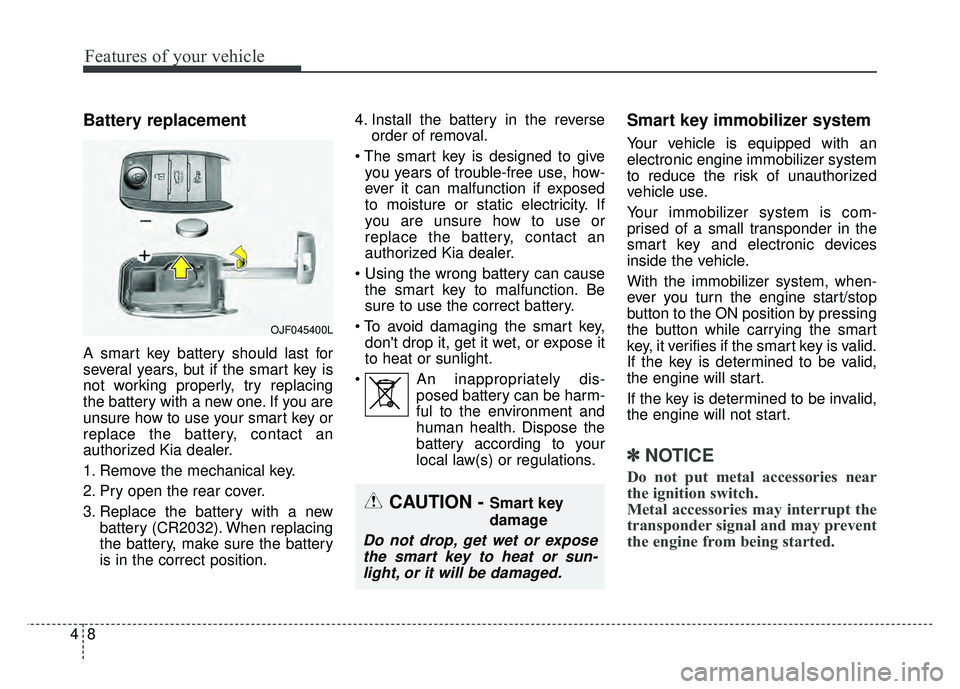
Battery replacement
A smart key battery should last for
several years, but if the smart key is
not working properly, try replacing
the battery with a new one. If you are
unsure how to use your smart key or
replace the battery, contact an
authorized Kia dealer.
1. Remove the mechanical key.
2. Pry open the rear cover.
3. Replace the battery with a newbattery (CR2032). When replacing
the battery, make sure the battery
is in the correct position. 4. Install the battery in the reverse
order of removal.
you years of trouble-free use, how-
ever it can malfunction if exposed
to moisture or static electricity. If
you are unsure how to use or
replace the battery, contact an
authorized Kia dealer.
the smart key to malfunction. Be
sure to use the correct battery.
don't drop it, get it wet, or expose it
to heat or sunlight.
An inappropriately dis- posed battery can be harm-
ful to the environment and
human health. Dispose the
battery according to your
local law(s) or regulations.
Smart key immobilizer system
Your vehicle is equipped with an
electronic engine immobilizer system
to reduce the risk of unauthorized
vehicle use.
Your immobilizer system is com-
prised of a small transponder in the
smart key and electronic devices
inside the vehicle.
With the immobilizer system, when-
ever you turn the engine start/stop
button to the ON position by pressing
the button while carrying the smart
key, it verifies if the smart key is valid.
If the key is determined to be valid,
the engine will start.
If the key is determined to be invalid,
the engine will not start.
✽ ✽NOTICE
Do not put metal accessories near
the ignition switch.
Metal accessories may interrupt the
transponder signal and may prevent
the engine from being started.
OJF045400L
CAUTION - Smart key
damage
Do not drop, get wet or expose
the smart key to heat or sun-light, or it will be damaged.
Page 180 of 547
Features of your vehicle
50
4
Folding the outside rearview mirror
(if equipped)
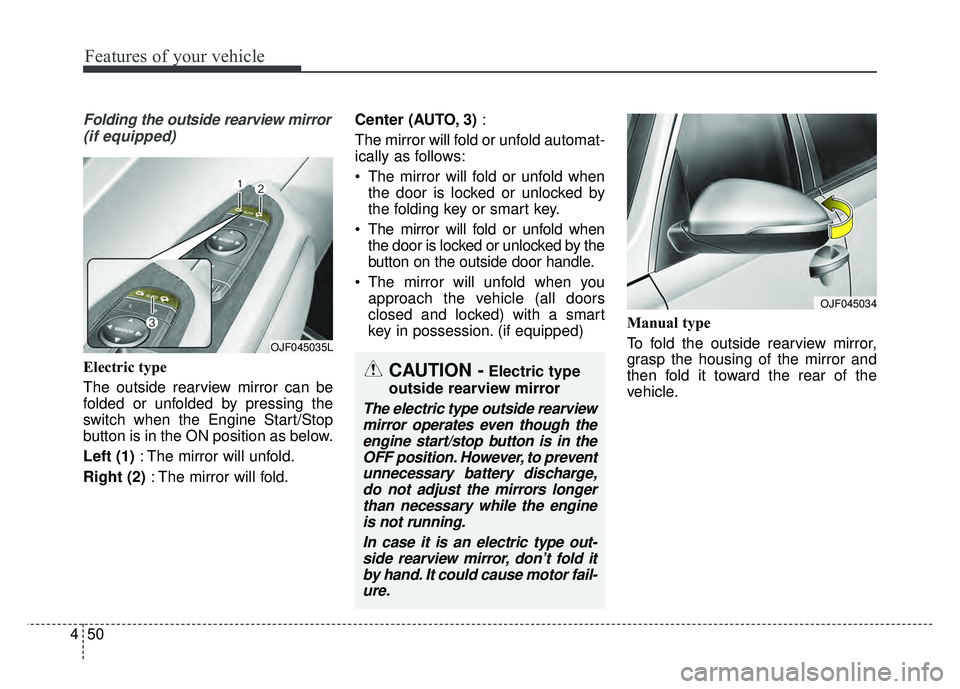
Electric type
The outside rearview mirror can be
folded or unfolded by pressing the
switch when the Engine Start/Stop
button is in the ON position as below.
Left (1) : The mirror will unfold.
Right (2) : The mirror will fold. Center (AUTO, 3)
:
The mirror will fold or unfold automat-
ically as follows:
The mirror will fold or unfold when the door is locked or unlocked by
the folding key or smart key.
The mirror will fold or unfold when the door is locked or unlocked by the
button on the outside door handle.
The mirror will unfold when you approach the vehicle (all doors
closed and locked) with a smart
key in possession. (if equipped) Manual type
To fold the outside rearview mirror,
grasp the housing of the mirror and
then fold it toward the rear of the
vehicle.
OJF045034
OJF045035L
CAUTION -Electric type
outside rearview mirror
The electric type outside rearview mirror operates even though theengine start/stop button is in theOFF position. However, to preventunnecessary battery discharge,do not adjust the mirrors longerthan necessary while the engineis not running.
In case it is an electric type out-side rearview mirror, don’t fold itby hand. It could cause motor fail-ure.
Page 202 of 547
Features of your vehicle
72
4
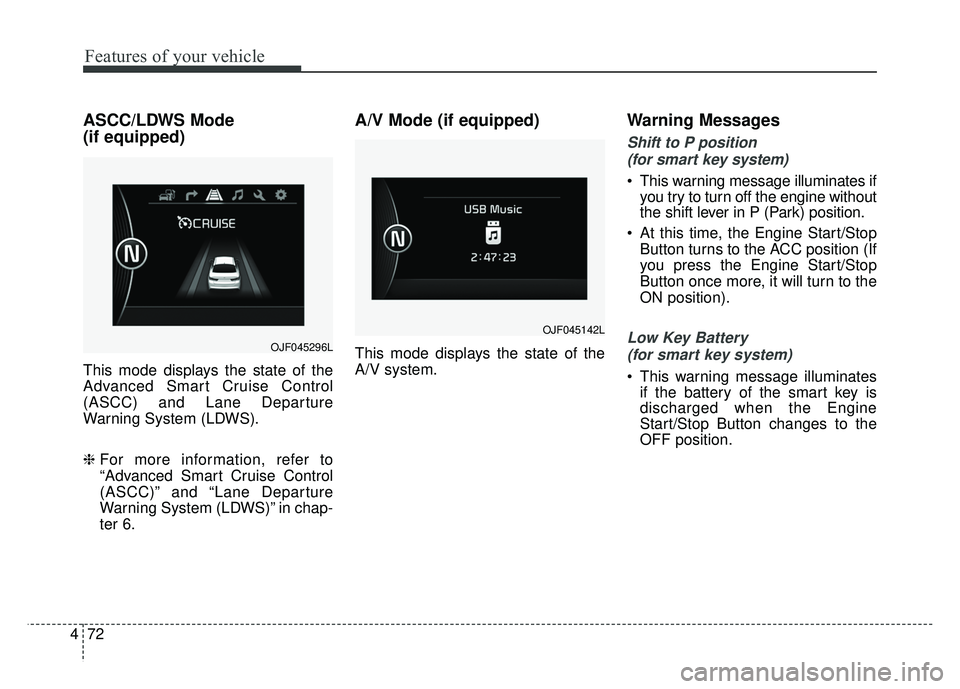
ASCC/LDWS Mode
(if equipped)
This mode displays the state of the
Advanced Smart Cruise Control
(ASCC) and Lane Departure
Warning System (LDWS).
❈ For more information, refer to
“Advanced Smart Cruise Control
(ASCC)” and “Lane Departure
Warning System (LDWS)” in chap-
ter 6.
A/V Mode (if equipped)
This mode displays the state of the
A/V system.
Warning Messages
Shift to P position
(for smart key system)
This warning message illuminates if you try to turn off the engine without
the shift lever in P (Park) position.
At this time, the Engine Start/Stop Button turns to the ACC position (If
you press the Engine Start/Stop
Button once more, it will turn to the
ON position).
Low Key Battery
(for smart key system)
This warning message illuminates if the battery of the smart key is
discharged when the Engine
Start/Stop Button changes to the
OFF position.
OJF045296L
OJF045142L
Page 222 of 547
Features of your vehicle
92
4
This indicator light illuminates for 2
seconds and goes off:
When the vehicle can not detect
the smart key which is in the vehi-
cle while the Engine Start/Stop
Button is ON.
In this case, have your vehicle
inspected by an authorized Kia
dealer.
This indicator light blinks:
When the battery of the smart key is weak.
- At this time, you can not start theengine. However, you can start the
engine if you press the Engine
Start/Stop Button with the smart
key. (For more details, refer to
“Starting the Engine” in chapter 6).
When there is a malfunction with the immobilizer system.
In this case, have your vehicle
inspected by an authorized Kia
dealer.Turn Signal Indicator
Light
This indicator light blinks:
When you turn the turn signal light on.
If any of the following occurs, there
may be a malfunction with the turn
signal system. In this case, have your
vehicle inspected by an authorized
Kia dealer. - The indicator light does not blinkbut illuminates.
- The indicator light blinks more rapidly.
- The indicator light does not illumi- nate at all.
High Beam Indicator
Light
This indicator light illuminates:
When the headlights are on and in the high beam position
When the turn signal lever is pulled into the Flash-to-Pass position.
High beam assist indica-
tor (if equipped)
This warning light illuminates :
When the high-Beam is on with the light switch in the AUTO light posi-
tion.
If your vehicle detects oncoming or preceding vehicles, the High beam
assist system will switch the high
beam to low beam automatically.
❈ For more details, refer to “High
beam assist” in this chapter.
Page 230 of 547
Features of your vehicle
100
4
Battery saver function
The purpose of this feature is to
prevent the battery from being dis-
charged if the lights are left in the
ON position. The system automati-
cally shuts off the parking lights 30
seconds after the ignition key is
removed and the driver’s door is
opened and closed.
With this feature, the parking lights will turn off automatically if the driver
parks on the side of the road at night
and opens the driver’s side door.
If necessary, to keep the parking
lights on when the ignition key is
removed, perform the following:
1) Open the driver-side door.
2) Turn the parking lights OFF and ON again using the light switch
on the steering column.
Daytime running light
(if equipped)
The Daytime Running Lights (DRL)
can make it easier for others to see the
front of your vehicle during the day.
DRL can be helpful in many different
driving conditions, and it is especially
helpful after dawn and before sunset.
The DRL system will turn the dedi-
cated lamp OFF when:
1. The headlight switch is ON.
2. The engine is OFF.
Lighting control
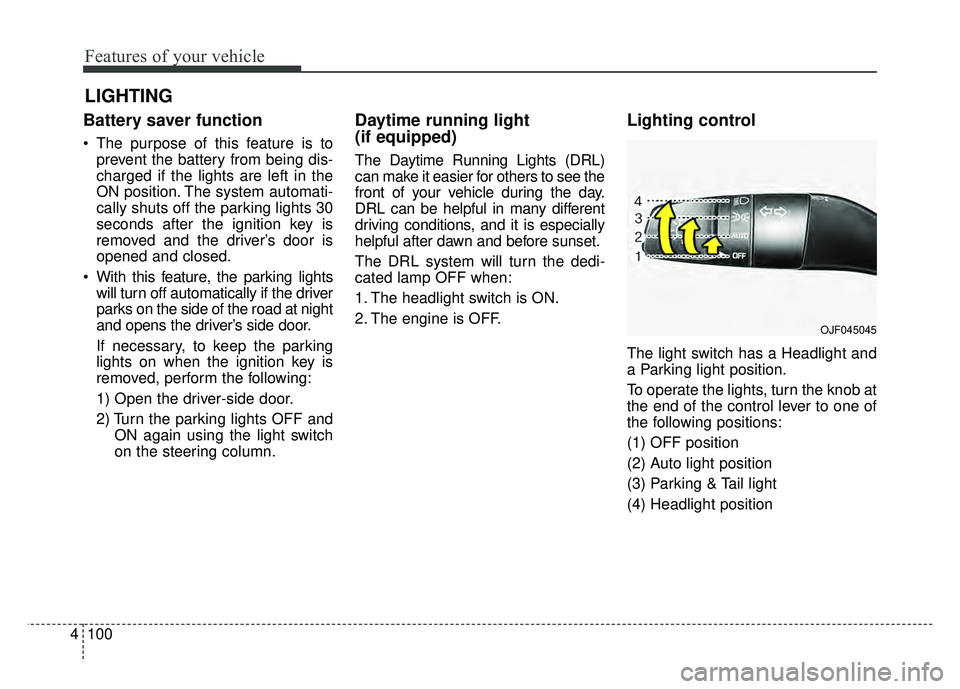
The light switch has a Headlight and
a Parking light position.
To operate the lights, turn the knob at
the end of the control lever to one of
the following positions:
(1) OFF position
(2) Auto light position
(3) Parking & Tail light
(4) Headlight position
LIGHTING
OJF045045
Page 288 of 547
Driving your vehicle
86
✽
✽
NOTICE
If you leave the ENGINE START/
STOP button in the ACC or ON
position for a long time, the battery
will discharge.
Starting the hybrid system✽ ✽ NOTICE
• The hybrid system will start by
pressing the Engine Start/Stop
button, only when the smart key is
in the vehicle.
• Even when the smart key is in the vehicle, and when it is far away
from the driver, the hybrid system
may not start.
• When the Engine Start/Stop but- ton is in the ACC or ON position,
any door is open, the system
checks for the smart key. When
the smart key is not in the vehicle,
the " " indicator will blink and
the warning "Key not in vehicle"
will come on. When all doors are
closed, the chime will also sound
for about 5 seconds. Keep the
smart key in the vehicle when in
the ACC position or if the hybrid
system is ON.
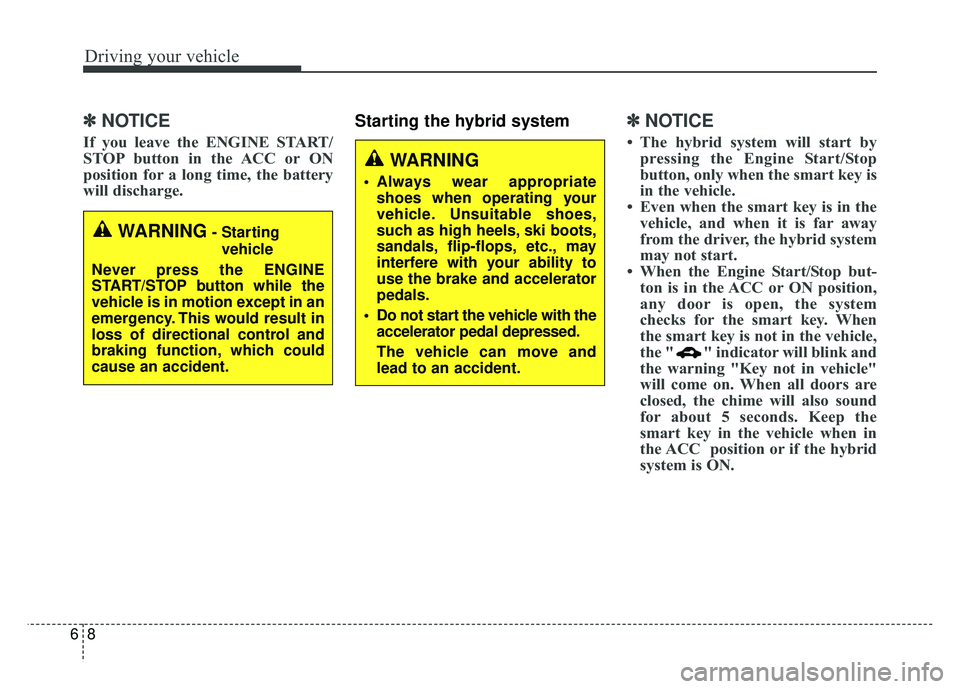
WARNING- Starting
vehicle
Never press the ENGINE
START/STOP button while the
vehicle is in motion except in an
emergency. This would result in
loss of directional control and
braking function, which could
cause an accident.
WARNING
• Always wear appropriate shoes when operating your
vehicle. Unsuitable shoes,
such as high heels, ski boots,
sandals, flip-flops, etc., may
interfere with your ability to
use the brake and accelerator
pedals.
Do not start the vehicle with the accelerator pedal depressed.
The vehicle can move and
lead to an accident.
Page 290 of 547
Driving your vehicle
10
6
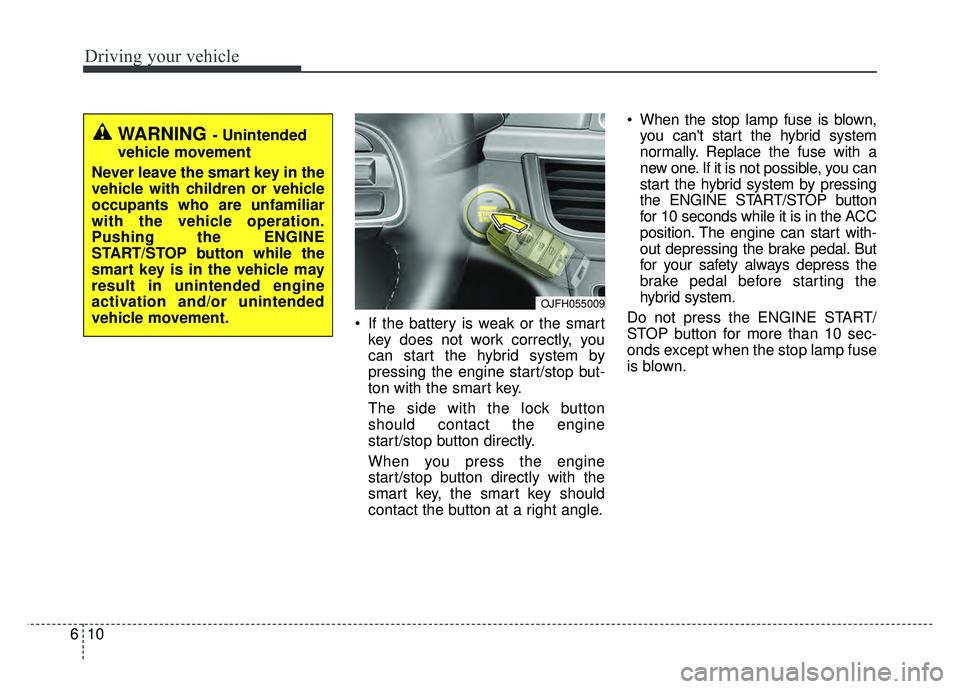
If the battery is weak or the smart
key does not work correctly, you
can start the hybrid system by
pressing the engine start/stop but-
ton with the smart key.
The side with the lock button
should contact the engine
start/stop button directly.
When you press the engine
start/stop button directly with the
smart key, the smart key should
contact the button at a right angle. When the stop lamp fuse is blown,
you can't start the hybrid system
normally. Replace the fuse with a
new one. If it is not possible, you can
start the hybrid system by pressing
the ENGINE START/STOP button
for 10 seconds while it is in the ACC
position. The engine can start with-
out depressing the brake pedal. But
for your safety always depress the
brake pedal before starting the
hybrid system.
Do not press the ENGINE START/
STOP button for more than 10 sec-
onds except when the stop lamp fuse
is blown.
WARNING - Unintended
vehicle movement
Never leave the smart key in the
vehicle with children or vehicle
occupants who are unfamiliar
with the vehicle operation.
Pushing the ENGINE
START/STOP button while the
smart key is in the vehicle may
result in unintended engine
activation and/or unintended
vehicle movement.
OJFH055009
Page 481 of 547
869
Maintenance
Fuse NameFuse ratingCircuit Protected
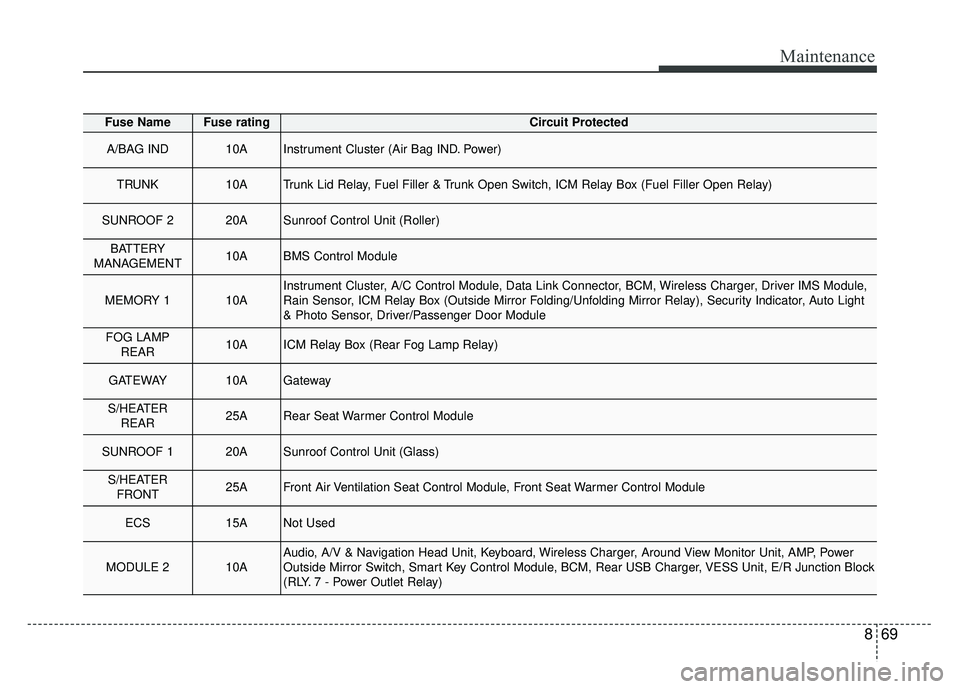
A/BAG IND10AInstrument Cluster (Air Bag IND. Power)
TRUNK10ATrunk Lid Relay, Fuel Filler & Trunk Open Switch, ICM Relay Box (Fuel Filler Open Relay)
SUNROOF 220ASunroof Control Unit (Roller)
BATTERY
MANAGEMENT10ABMS Control Module
MEMORY 110AInstrument Cluster, A/C Control Module, Data Link Connector, BCM, Wireless Charger, Driver IMS Module,
Rain Sensor, ICM Relay Box (Outside Mirror Folding/Unfolding Mirror Relay), Security Indicator, Auto Light
& Photo Sensor, Driver/Passenger Door Module
FOG LAMP REAR10AICM Relay Box (Rear Fog Lamp Relay)
GATEWAY10AGateway
S/HEATERREAR25ARear Seat Warmer Control Module
SUNROOF 120ASunroof Control Unit (Glass)
S/HEATERFRONT25AFront Air Ventilation Seat Control Module, Front Seat Warmer Control Module
ECS15ANot Used
MODULE 210AAudio, A/V & Navigation Head Unit, Keyboard, Wireless Charger, Around View Monitor Unit, AMP, Power
Outside Mirror Switch, Smart Key Control Module, BCM, Rear USB Charger, VESS Unit, E/R Junction Block
(RLY. 7 - Power Outlet Relay)
Page 487 of 547
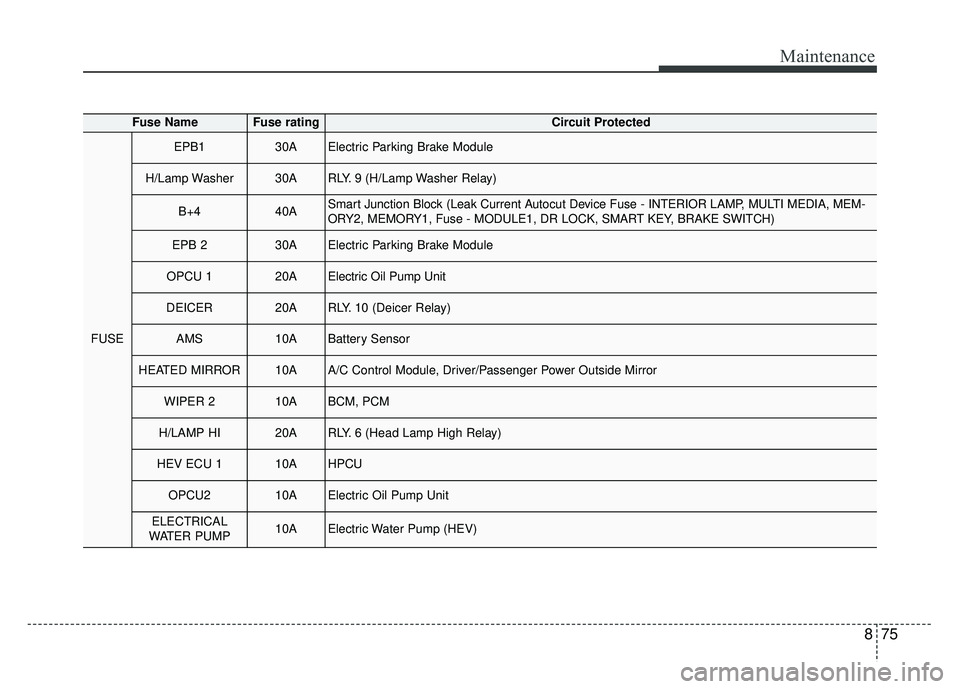
875
Maintenance
Fuse NameFuse ratingCircuit Protected
FUSE
EPB130AElectric Parking Brake Module
H/Lamp Washer30ARLY. 9 (H/Lamp Washer Relay)
B+440ASmart Junction Block (Leak Current Autocut Device Fuse - INTERIOR LAMP, MULTI MEDIA, MEM-
ORY2, MEMORY1, Fuse - MODULE1, DR LOCK, SMART KEY, BRAKE SWITCH)
EPB 230AElectric Parking Brake Module
OPCU 120AElectric Oil Pump Unit
DEICER20ARLY. 10 (Deicer Relay)
AMS10ABattery Sensor
HEATED MIRROR10AA/C Control Module, Driver/Passenger Power Outside Mirror
WIPER 210ABCM, PCM
H/LAMP HI20ARLY. 6 (Head Lamp High Relay)
HEV ECU 110AHPCU
OPCU210AElectric Oil Pump Unit
ELECTRICAL
WATER PUMP10AElectric Water Pump (HEV)
Page 543 of 547
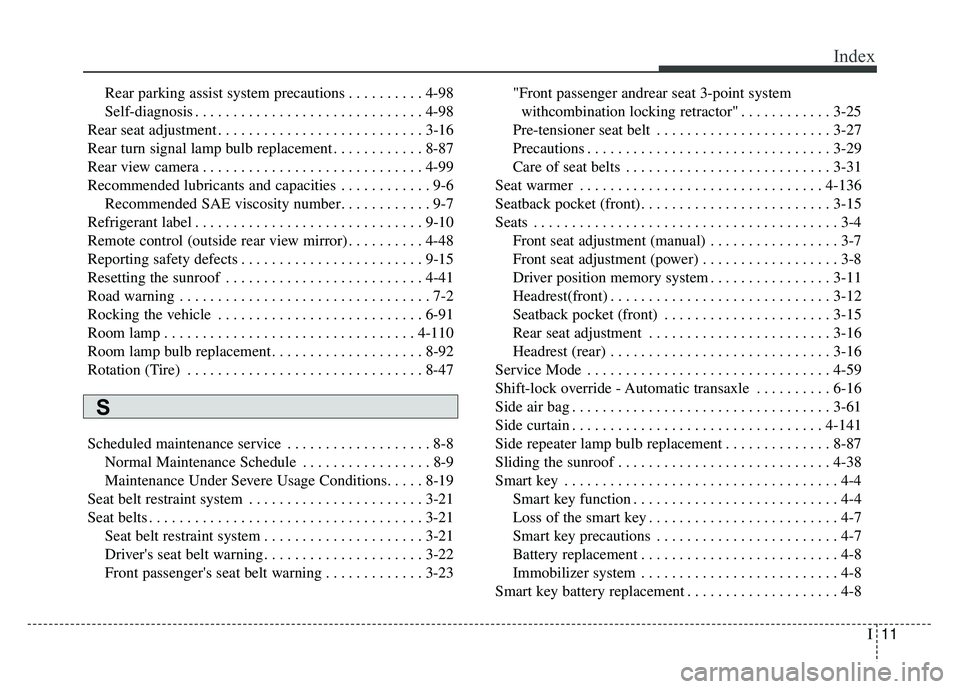
I11
Index
Rear parking assist system precautions . . . . . . . . . . 4-98
Self-diagnosis . . . . . . . . . . . . . . . . . . . . . . . . . . . . . . 4-98
Rear seat adjustment . . . . . . . . . . . . . . . . . . . . . . . . . . . 3-16
Rear turn signal lamp bulb replacement . . . . . . . . . . . . 8-87
Rear view camera . . . . . . . . . . . . . . . . . . . . . . . . . . . . . 4-99
Recommended lubricants and capacities . . . . . . . . . . . . 9-6 Recommended SAE viscosity number. . . . . . . . . . . . 9-7
Refrigerant label . . . . . . . . . . . . . . . . . . . . . . . . . . . . . . 9-10
Remote control (outside rear view mirror) . . . . . . . . . . 4-48
Reporting safety defects . . . . . . . . . . . . . . . . . . . . . . . . 9-15
Resetting the sunroof . . . . . . . . . . . . . . . . . . . . . . . . . . 4-41
Road warning . . . . . . . . . . . . . . . . . . . . . . . . . . . . . . . . . 7-2
Rocking the vehicle . . . . . . . . . . . . . . . . . . . . . . . . . . . 6-91
Room lamp . . . . . . . . . . . . . . . . . . . . . . . . . . . . . . . . . 4-110
Room lamp bulb replacement . . . . . . . . . . . . . . . . . . . . 8-92
Rotation (Tire) . . . . . . . . . . . . . . . . . . . . . . . . . . . . . . . 8-47
Scheduled maintenance service . . . . . . . . . . . . . . . . . . . 8-8 Normal Maintenance Schedule . . . . . . . . . . . . . . . . . 8-9
Maintenance Under Severe Usage Conditions. . . . . 8-19
Seat belt restraint system . . . . . . . . . . . . . . . . . . . . . . . 3-21
Seat belts . . . . . . . . . . . . . . . . . . . . . . . . . . . . . . . . . . . . \
3-21 Seat belt restraint system . . . . . . . . . . . . . . . . . . . . . 3-21
Driver's seat belt warning . . . . . . . . . . . . . . . . . . . . . 3-22
Front passenger's seat belt warning . . . . . . . . . . . . . 3-23 "Front passenger andrear seat 3-point system
withcombination locking retractor" . . . . . . . . . . . . 3-25
Pre-tensioner seat belt . . . . . . . . . . . . . . . . . . . . . . . 3-27
Precautions . . . . . . . . . . . . . . . . . . . . . . . . . . . . . . . . 3-29
Care of seat belts . . . . . . . . . . . . . . . . . . . . . . . . . . . 3-31
Seat warmer . . . . . . . . . . . . . . . . . . . . . . . . . . . . . . . . 4-136
Seatback pocket (front) . . . . . . . . . . . . . . . . . . . . . . . . . 3-15
Seats . . . . . . . . . . . . . . . . . . . . . . . . . . . . . . . . . . . . \
. . . . 3-4 Front seat adjustment (manual) . . . . . . . . . . . . . . . . . 3-7
Front seat adjustment (power) . . . . . . . . . . . . . . . . . . 3-8
Driver position memory system . . . . . . . . . . . . . . . . 3-11
Headrest(front) . . . . . . . . . . . . . . . . . . . . . . . . . . . . . 3-12
Seatback pocket (front) . . . . . . . . . . . . . . . . . . . . . . 3-15
Rear seat adjustment . . . . . . . . . . . . . . . . . . . . . . . . 3-16
Headrest (rear) . . . . . . . . . . . . . . . . . . . . . . . . . . . . . 3-16
Service Mode . . . . . . . . . . . . . . . . . . . . . . . . . . . . . . . . 4-59
Shift-lock override - Automatic transaxle . . . . . . . . . . 6-16
Side air bag . . . . . . . . . . . . . . . . . . . . . . . . . . . . . . . . . . 3-61\
Side curtain . . . . . . . . . . . . . . . . . . . . . . . . . . . . . . . . . 4-141
Side repeater lamp bulb replacement . . . . . . . . . . . . . . 8-87
Sliding the sunroof . . . . . . . . . . . . . . . . . . . . . . . . . . . . 4-38
Smart key . . . . . . . . . . . . . . . . . . . . . . . . . . . . . . . . . . . . \
4-4 Smart key function . . . . . . . . . . . . . . . . . . . . . . . . . . . 4-4
Loss of the smart key . . . . . . . . . . . . . . . . . . . . . . . . . 4-7
Smart key precautions . . . . . . . . . . . . . . . . . . . . . . . . 4-7
Battery replacement . . . . . . . . . . . . . . . . . . . . . . . . . . 4-8
Immobilizer system . . . . . . . . . . . . . . . . . . . . . . . . . . 4-8
Smart key battery replacement . . . . . . . . . . . . . . . . . . . . 4-8
S