trunk KIA OPTIMA HYBRID 2018 Owners Manual
[x] Cancel search | Manufacturer: KIA, Model Year: 2018, Model line: OPTIMA HYBRID, Model: KIA OPTIMA HYBRID 2018Pages: 547, PDF Size: 11.56 MB
Page 23 of 547
H17
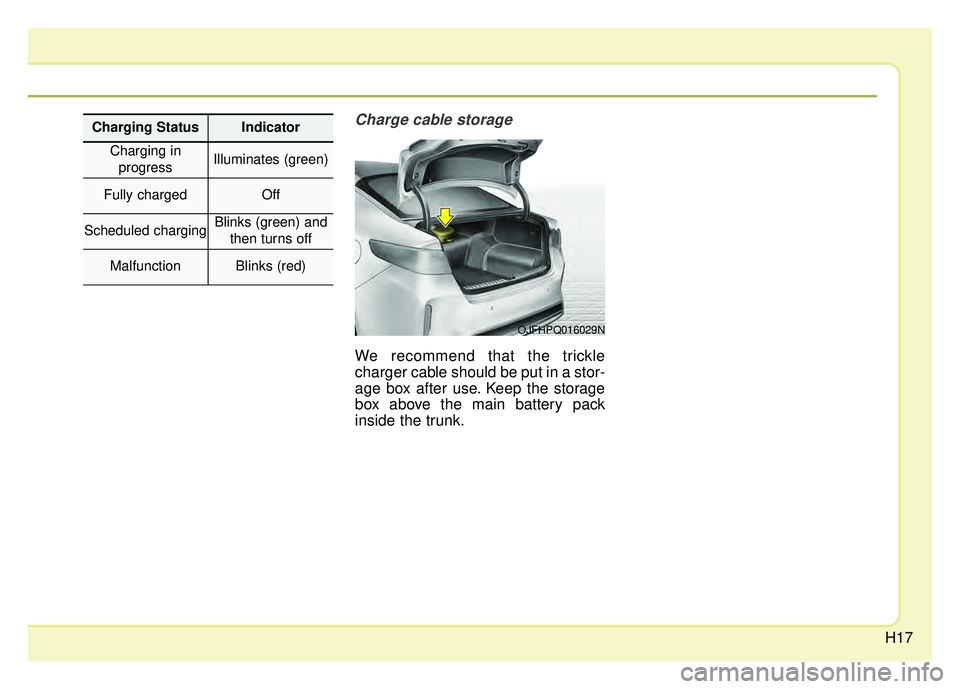
Charge cable storage
We recommend that the trickle
charger cable should be put in a stor-
age box after use. Keep the storage
box above the main battery pack
inside the trunk.
OJFHPQ016029N
Charging StatusIndicator
Charging inprogressIlluminates (green)
Fully chargedOff
Scheduled chargingBlinks (green) and then turns off
MalfunctionBlinks (red)
Page 42 of 547
H36
✽
✽NOTICE - Prolonged parking
Prolonged parking might cause bat-
tery discharge and operation failure
due to natural discharge. Driving
the vehicle approximately once
every 2 months, more than 9 mile
(15 km) is recommended. The bat-
tery will be charged automatically
when driving the vehicle.
CAUTION- High Voltage
Battery Damage
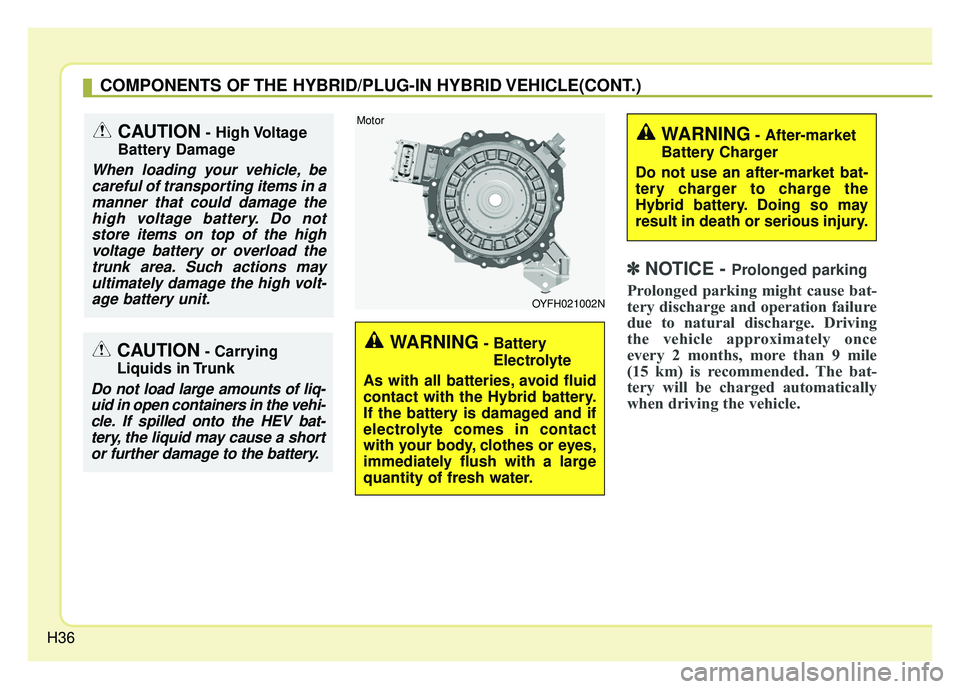
When loading your vehicle, be careful of transporting items in amanner that could damage thehigh voltage battery. Do notstore items on top of the highvoltage battery or overload thetrunk area. Such actions mayultimately damage the high volt-age battery unit.
CAUTION- Carrying
Liquids in Trunk
Do not load large amounts of liq- uid in open containers in the vehi-cle. If spilled onto the HEV bat-tery, the liquid may cause a shortor further damage to the battery.
COMPONENTS OF THE HYBRID/PLUG-IN HYBRID VEHICLE(CONT.)
WARNING- Battery
Electrolyte
As with all batteries, avoid fluid
contact with the Hybrid battery.
If the battery is damaged and if
electrolyte comes in contact
with your body, clothes or eyes,
immediately flush with a large
quantity of fresh water.
OYFH021002N
Motor
WARNING- After-market
Battery Charger
Do not use an after-market bat-
tery charger to charge the
Hybrid battery. Doing so may
result in death or serious injury.
Page 57 of 547
23
Your vehicle at a glance
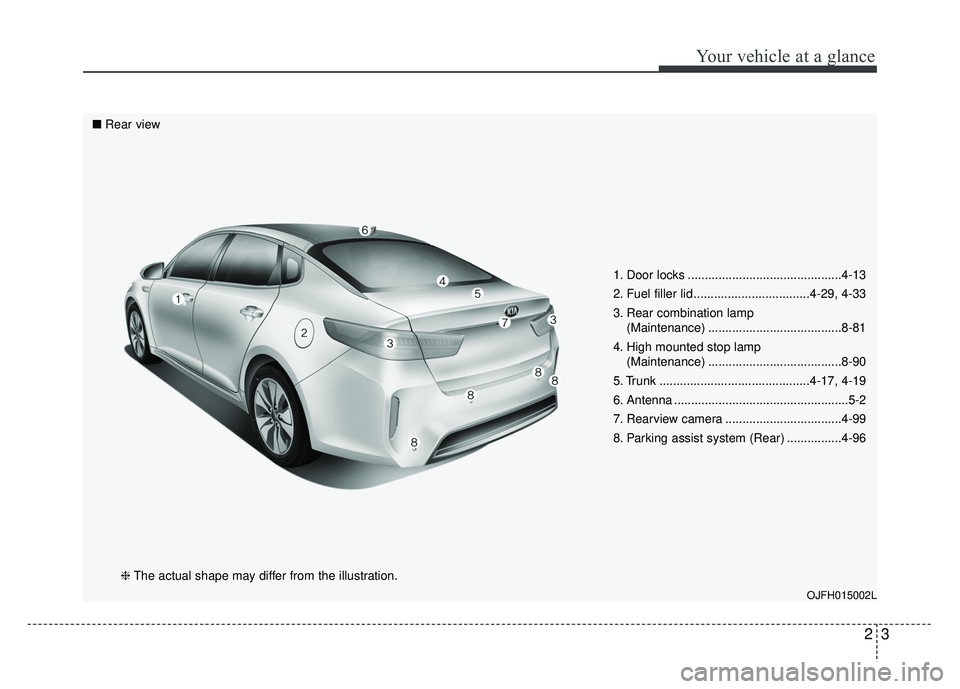
1. Door locks .............................................4-13
2. Fuel filler lid ..................................4-29, 4-33
3. Rear combination lamp(Maintenance) .......................................8-81
4. High mounted stop lamp (Maintenance) .......................................8-90
5. Trunk ............................................4-17, 4-19
6. Antenna ...................................................5-2
7. Rearview camera ..................................4-99
8. Parking assist system (Rear) ................4-96
OJFH015002L
■ Rear view
❈The actual shape may differ from the illustration.
Page 58 of 547
Your vehicle at a glance
42
INTERIOR OVERVIEW
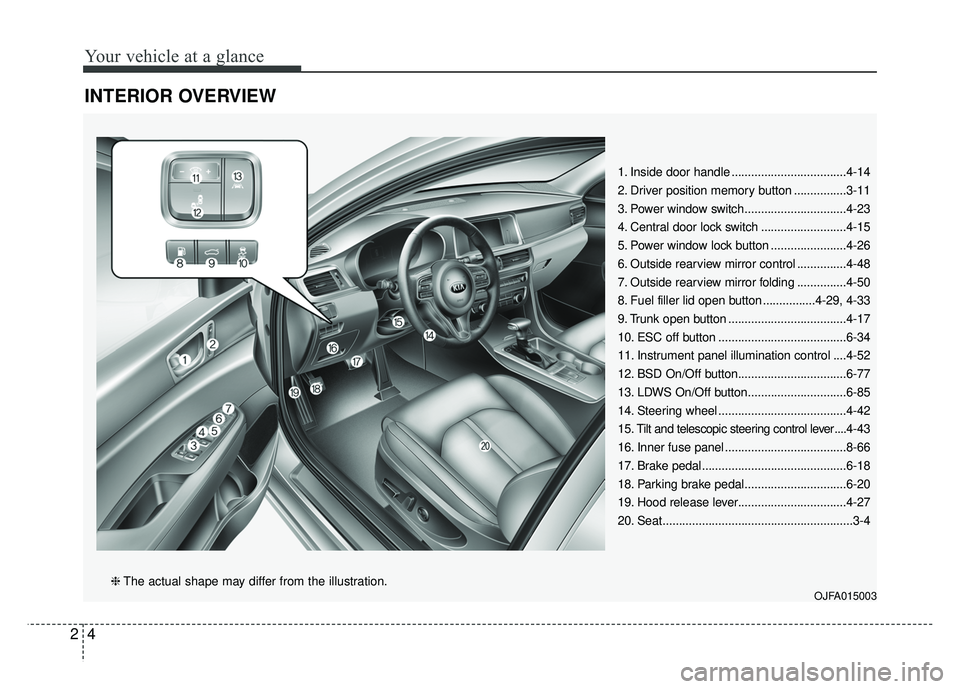
1. Inside door handle ...................................4-14
2. Driver position memory button ................3-11
3. Power window switch...............................4-23
4. Central door lock switch ..........................4-15
5. Power window lock button .......................4-26
6. Outside rearview mirror control ...............4-48
7. Outside rearview mirror folding ...............4-50
8. Fuel filler lid open button ................4-29, 4-33
9. Trunk open button ....................................4-17
10. ESC off button .......................................6-34
11. Instrument panel illumination control ....4-52
12. BSD On/Off button.................................6-77
13. LDWS On/Off button..............................6-85
14. Steering wheel .......................................4-42
15. Tilt and telescopic steering control lever ....4-43
16. Inner fuse panel .....................................8-66
17. Brake pedal............................................6-18
18. Parking brake pedal...............................6-20
19. Hood release lever.................................4-27
20. Seat..........................................................3-4
OJFA015003❈ The actual shape may differ from the illustration.
Page 77 of 547
317
Safety features of your vehicle
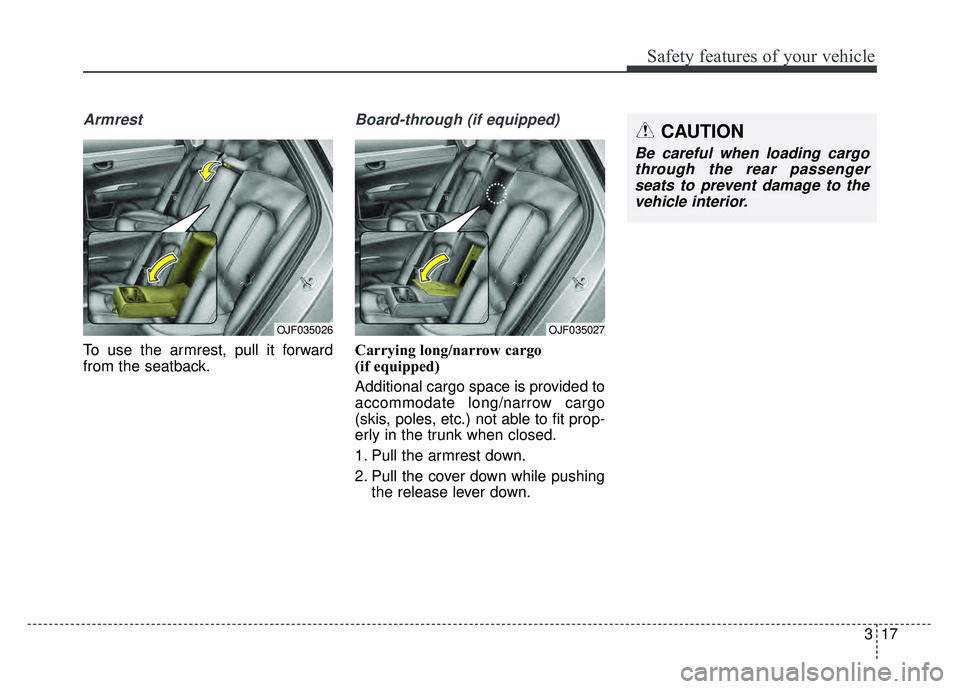
Armrest
To use the armrest, pull it forward
from the seatback.
Board-through (if equipped)
Carrying long/narrow cargo
(if equipped)
Additional cargo space is provided to
accommodate long/narrow cargo
(skis, poles, etc.) not able to fit prop-
erly in the trunk when closed.
1. Pull the armrest down.
2. Pull the cover down while pushingthe release lever down.
OJF035026OJF035027
CAUTION
Be careful when loading cargothrough the rear passengerseats to prevent damage to thevehicle interior.
Page 79 of 547
319
Safety features of your vehicle
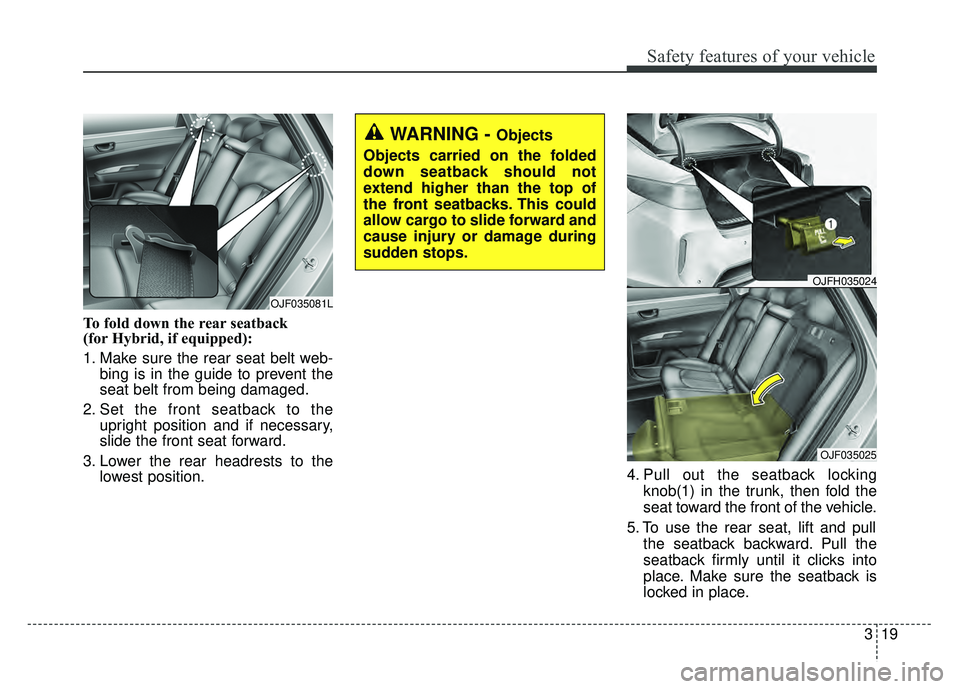
To fold down the rear seatback
(for Hybrid, if equipped):
1. Make sure the rear seat belt web-bing is in the guide to prevent the
seat belt from being damaged.
2. Set the front seatback to the upright position and if necessary,
slide the front seat forward.
3. Lower the rear headrests to the lowest position. 4. Pull out the seatback locking
knob(1) in the trunk, then fold the
seat toward the front of the vehicle.
5. To use the rear seat, lift and pull the seatback backward. Pull the
seatback firmly until it clicks into
place. Make sure the seatback is
locked in place.
OJF035025
WARNING - Objects
Objects carried on the folded
down seatback should not
extend higher than the top of
the front seatbacks. This could
allow cargo to slide forward and
cause injury or damage during
sudden stops.
OJFH035024
OJF035081L
Page 131 of 547
Features of your vehicle
Smart key . . . . . . . . . . . . . . . . . . . . . . . . . . . . . . . . . 4-4
• Record your key number . . . . . . . . . . . . . . . . . . . . . . . 4-4
. . . . . . . . . . . . . . . . . . . . . . . . . . . . 4-4
. . . . . . . . . . . . . . . . . . . . . . . . . . 4-7
. . . . . . . . . . . . . . . . . . . . . . . . . 4-7
. . . . . . . . . . . . . . . . . . . . . . . . . . . 4-8
. . . . . . . . . . . . . . . . . . . 4-8
Theft-alarm system . . . . . . . . . . . . . . . . . . . . . . . . 4-10
. . . . . . . . . . . . . . . . . . . . . . . . . . . . . . . . . 4-10
. . . . . . . . . . . . . . . . . . . . . . . . . . . . 4-11
Door locks . . . . . . . . . . . . . . . . . . . . . . . . . . . . . . . . 4-13
. . . . 4-13
. . . . . . 4-14
. . . . . . . . . . . . . . 4-16
. . . . . . . . . . . . . . . . . 4-16
Trunk . . . . . . . . . . . . . . . . . . . . . . . . . . . . . . . . . . . . \
4-17
. . . . . . . . . . . . . . . . . . . . . . . . . . . . 4-17
. . . . . . . . . . . . . . . . . . . . . . . . . . . . . 4-18
. . . . . . . . . . . . . . . . . 4-18
Smart trunk . . . . . . . . . . . . . . . . . . . . . . . . . . . . . . 4-19
. . . . . . . . . . . . . . . . . . . 4-19
using the smart key . . . . . . . . . . . . . . . . . . . . . . . . . . 4-21
. . . . . . . . . . . . . . . . . . . . . . . . . . . . . . . 4-22
Windows . . . . . . . . . . . . . . . . . . . . . . . . . . . . . . . . . 4-23
. . . . . . . . . . . . . . . . . . . . . . . . . . . . . . 4-24
Hood. . . . . . . . . . . . . . . . . . . . . . . . . . . . . . . . . . . . \
. 4-27
. . . . . . . . . . . . . . . . . . . . . . . . . . . . 4-27
. . . . . . . . . . . . . . . . . . . . . . . . . . . 4-28
. . . . . . . . . . . . . . . . . . . . . . . . . . . . . 4-28
Fuel filler lid (Hybrid) . . . . . . . . . . . . . . . . . . . . . . 4-29
. . . . . . . . . . . . . . . . . . . . . . 4-29
. . . . . . . . . . . . . . . . . . . . . . . 4-29
Fuel filler lid (Plug-in hybrid) . . . . . . . . . . . . . . . . 4-33
. . . . . . . . . . . . . . . . . . . . . . 4-33
. . . . . . . . . . . . . . . . . . . . . . . 4-35
Panoramic sunroof . . . . . . . . . . . . . . . . . . . . . . . . . 4-36
. . . . . . . . . . . . . . . . . . . . . . . . . . . 4-38
. . . . . . . . . . . . . . . . . . . . . . . . . . . . 4-40
. . . . . . . . . . . . . . . . . . . . . . . . . . . 4-40
. . . . . . . . . . . . . . . . . . . . . . . . . 4-41
Steering wheel . . . . . . . . . . . . . . . . . . . . . . . . . . . . . 4-42
. . . . . . . . . . . . . . . . . . 4-42
. . . . . . . . . . . . . . . . . . . . . 4-43
4
Page 134 of 547
Features of your vehicle
44
Record your key number
The key code number
is stamped on the bar
code tag attached to
the key set. Should
you lose your keys,
this number will enable an author-
ized Kia dealer to duplicate the keys
easily. Remove the bar code tag and
store it in a safe place. Also, record
the code number and keep it in a
safe and handy place, but not in the
vehicle.
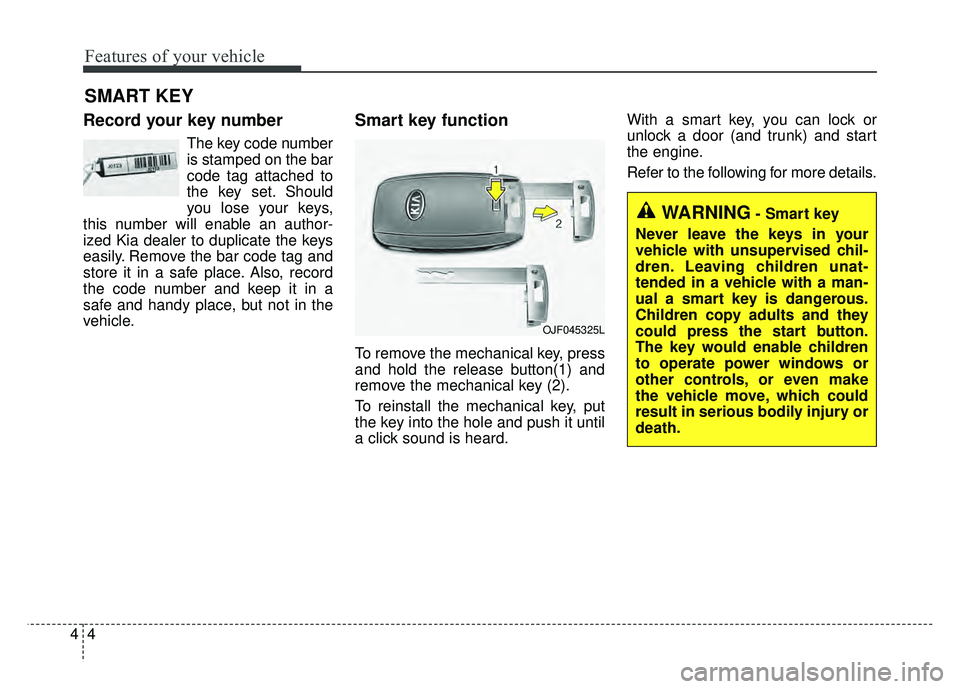
Smart key function
To remove the mechanical key, press
and hold the release button(1) and
remove the mechanical key (2).
To reinstall the mechanical key, put
the key into the hole and push it until
a click sound is heard. With a smart key, you can lock or
unlock a door (and trunk) and start
the engine.
Refer to the following for more details.
SMART KEY
OJF045325L
WARNING- Smart key
Never leave the keys in your
vehicle with unsupervised chil-
dren. Leaving children unat-
tended in a vehicle with a man-
ual a smart key is dangerous.
Children copy adults and they
could press the start button.
The key would enable children
to operate power windows or
other controls, or even make
the vehicle move, which could
result in serious bodily injury or
death.
Page 135 of 547
45
Features of your vehicle
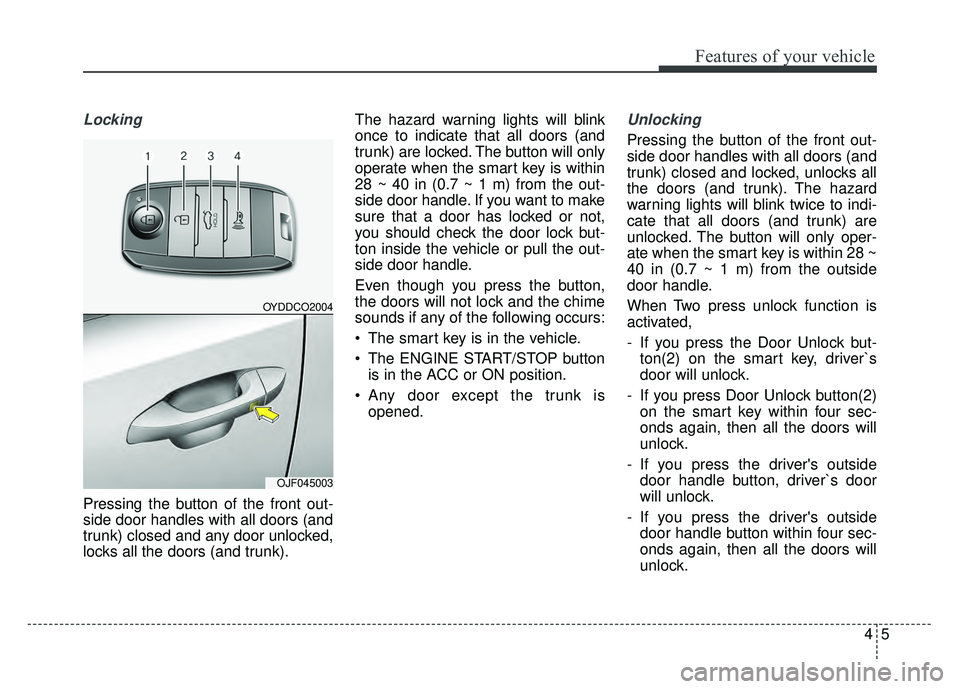
Locking
Pressing the button of the front out-
side door handles with all doors (and
trunk) closed and any door unlocked,
locks all the doors (and trunk).The hazard warning lights will blink
once to indicate that all doors (and
trunk) are locked. The button will only
operate when the smart key is within
28 ~ 40 in (0.7 ~ 1 m) from the out-
side door handle. If you want to make
sure that a door has locked or not,
you should check the door lock but-
ton inside the vehicle or pull the out-
side door handle.
Even though you press the button,
the doors will not lock and the chime
sounds if any of the following occurs:
• The smart key is in the vehicle.
The ENGINE START/STOP button
is in the ACC or ON position.
Any door except the trunk is opened.
Unlocking
Pressing the button of the front out-
side door handles with all doors (and
trunk) closed and locked, unlocks all
the doors (and trunk). The hazard
warning lights will blink twice to indi-
cate that all doors (and trunk) are
unlocked. The button will only oper-
ate when the smart key is within 28 ~
40 in (0.7 ~ 1 m) from the outside
door handle.
When Two press unlock function is
activated,
- If you press the Door Unlock but-ton(2) on the smart key, driver`s
door will unlock.
- If you press Door Unlock button(2) on the smart key within four sec-
onds again, then all the doors will
unlock.
- If you press the driver's outside door handle button, driver`s door
will unlock.
- If you press the driver's outside door handle button within four sec-
onds again, then all the doors will
unlock.
OYDDCO2004
OJF045003
Page 136 of 547
Features of your vehicle
64
✽
✽NOTICE
You can activate or deactivate the
Two Press Unlock function. Refer to
“User settings” in this chapter.
Trunk unlocking
If you are within 28 ~ 40 in (0.7 ~ 1 m)
from the outside trunk handle, with
your smart key in possession, the
trunk will unlock and open when you
press the trunk handle switch.
The hazard warning lights will blink
twice to indicate that the trunk is
unlocked.
Also, once the trunk is opened and
then closed, the trunk will lock auto-
matically.
Panic
1. Press the panic button (4) for more
than 1 second.
2. The horn sounds and hazard warning light flash for about 27
seconds.
✽ ✽NOTICE
To stop the horn and lights, press
any button on the smart key.
Start-up
You can start the engine without
inserting the key. For detailed infor-
mation refer to the “Engine start/stop
button” in chapter 6.