park KIA OPTIMA HYBRID 2019 Owners Manual
[x] Cancel search | Manufacturer: KIA, Model Year: 2019, Model line: OPTIMA HYBRID, Model: KIA OPTIMA HYBRID 2019Pages: 553, PDF Size: 11.97 MB
Page 442 of 553
815
Maintenance
Air cleaner filter
A Genuine Kia air cleaner filter is
recommended when the filter is
replaced.
Spark plugs
Make sure to install new spark plugs
of the correct heat range.
Cooling system
Check the cooling system compo-
nents, such as the radiator, coolant
reservoir, hoses and connections for
leakage and damage. Replace any
damaged parts.
Coolant (Engine / Inverter)
The coolant should be changed at
the intervals specified in the mainte-
nance schedule.
Automatic transaxle fluid
Automatic transaxle fluid should not
be checked under normal usage
conditions.
But in severe conditions, the fluid
should be changed at an authorized
Kia dealer in accordance to the
scheduled maintenance at the begin-
ning of this chapter.
✽ ✽NOTICE
Automatic transaxle fluid color is
reddish.
As the vehicle is driven, the auto-
matic transaxle fluid will begin to
look darker.
It is normal condition and you should
not judge the need to replace the fluid
based upon the changed color.
Brake hoses and lines
Visually check for proper installation,
chafing, cracks, deterioration and
any leakage. Replace any deteriorat-
ed or damaged parts immediately.
CAUTION
Use only specified automatic
transaxle fluid. The use of a non-specified fluid could result in atransaxle malfunction and fail-ure. (Refer to "Recommendedlubricants and capacities" inchapter 9.)
Page 443 of 553
Maintenance
16
8
✽ ✽
NOTICE - NHTSA Safety
Corrosion Alert
NHTSA has warned all vehicle own-
ers of all brands that they must main-
tain their vehicles in a manner which
will prevent brake hose and brake line
failures due to corrosion when such
vehicles are exposed to winter road
salt and related chemicals. While seri-
ous corrosion conditions typically only
manifest themselves as safety issues
after 7 years of vehicle use, the corro-
sion process starts immediately and
thus underbody cleaning maintenance
must commence from your vehicle's
first exposure to road salts and chem-
icals. NHTSA urges vehicle owners to
take the following steps to prevent
corrosion:
(Continued)(Continued)
1. Wash the undercarriage of your
vehicle regularly throughout the
winter and do a thorough washing
in the spring to remove road salt
and other de-icing chemicals.
2. Monitor the brake system for signs of corrosion by having regu-
lar professional inspections and
watching for signs of problems,
including loss of brake fluid,
unusual leaks and soft or spongy
feel in the brake pedal.
3. Replace the entire brake pipe assembly if you find severe corro-
sion that causes scaling or flaking
of brake components.
Brake fluid
Check the brake fluid level in the
brake fluid reservoir. The level should
be between “MIN” and “MAX” marks
on the side of the reservoir. Use only
hydraulic brake fluid conforming to
DOT 3 or DOT 4 specification.
Parking brake
Inspect the parking brake system
including the parking brake pedal
and cables.
Brake discs, pads, calipers
and rotors
Check the pads for excessive wear,
discs for run out and wear, and
calipers for fluid leakage.
Page 453 of 553
Maintenance
26
8
WASHER FLUID
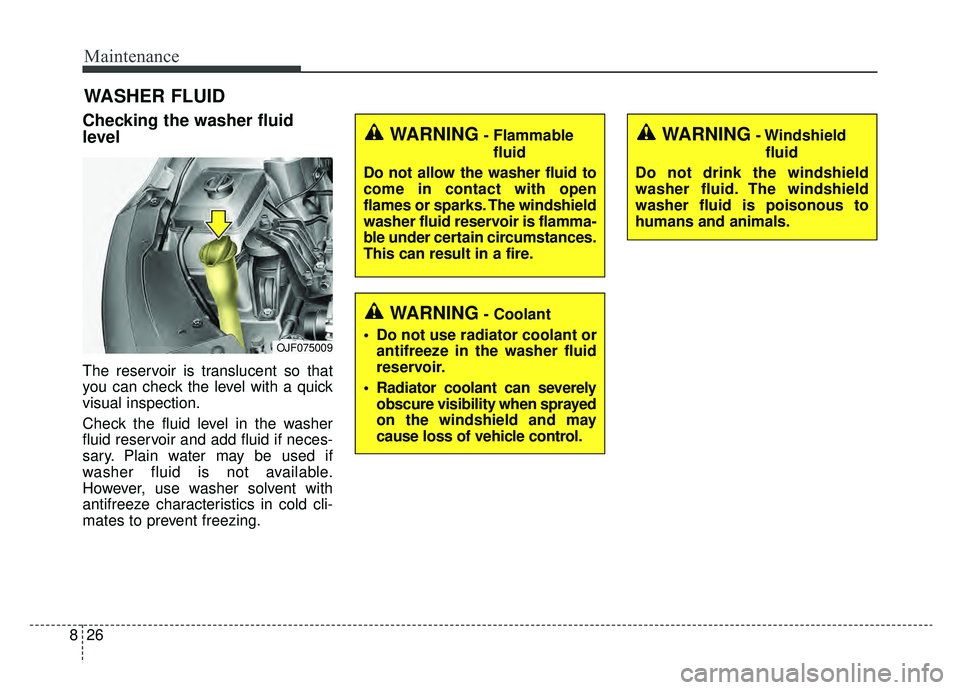
Checking the washer fluid
level
The reservoir is translucent so that
you can check the level with a quick
visual inspection.
Check the fluid level in the washer
fluid reservoir and add fluid if neces-
sary. Plain water may be used if
washer fluid is not available.
However, use washer solvent with
antifreeze characteristics in cold cli-
mates to prevent freezing.
WARNING- Flammable
fluid
Do not allow the washer fluid to
come in contact with open
flames or sparks. The windshield
washer fluid reservoir is flamma-
ble under certain circumstances.
This can result in a fire.WARNING- Windshield fluid
Do not drink the windshield
washer fluid. The windshield
washer fluid is poisonous to
humans and animals.
WARNING- Coolant
Do not use radiator coolant or antifreeze in the washer fluid
reservoir.
Radiator coolant can severely obscure visibility when sprayed
on the windshield and may
cause loss of vehicle control.
OJF075009
Page 454 of 553
827
Maintenance
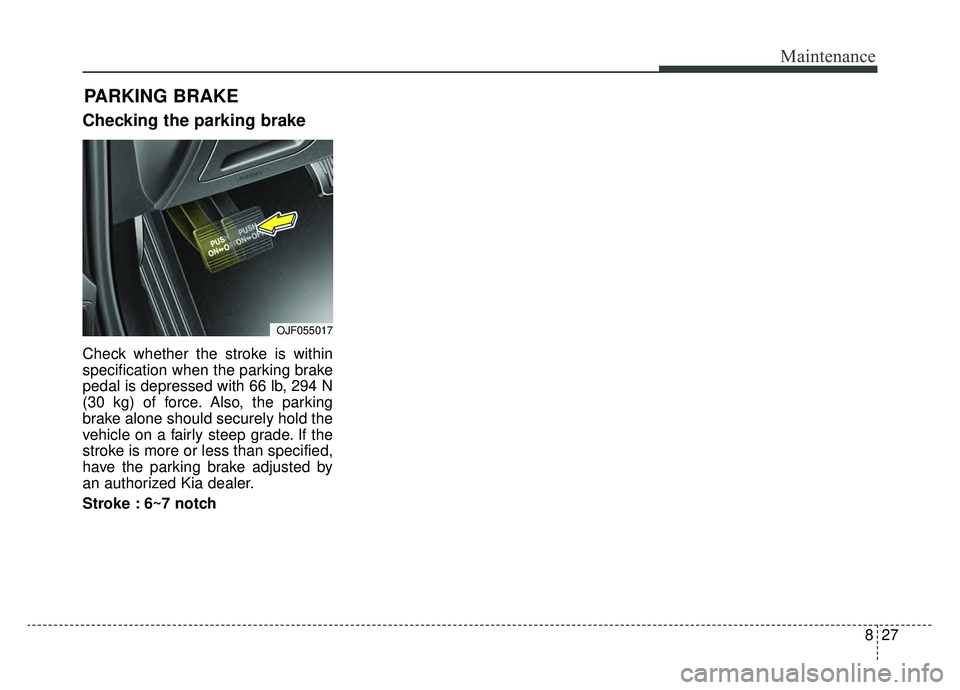
Checking the parking brake
Check whether the stroke is within
specification when the parking brake
pedal is depressed with 66 lb, 294 N
(30 kg) of force. Also, the parking
brake alone should securely hold the
vehicle on a fairly steep grade. If the
stroke is more or less than specified,
have the parking brake adjusted by
an authorized Kia dealer.
Stroke : 6~7 notch
PARKING BRAKE
OJF055017
Page 463 of 553
Maintenance
36
8
BATTERY
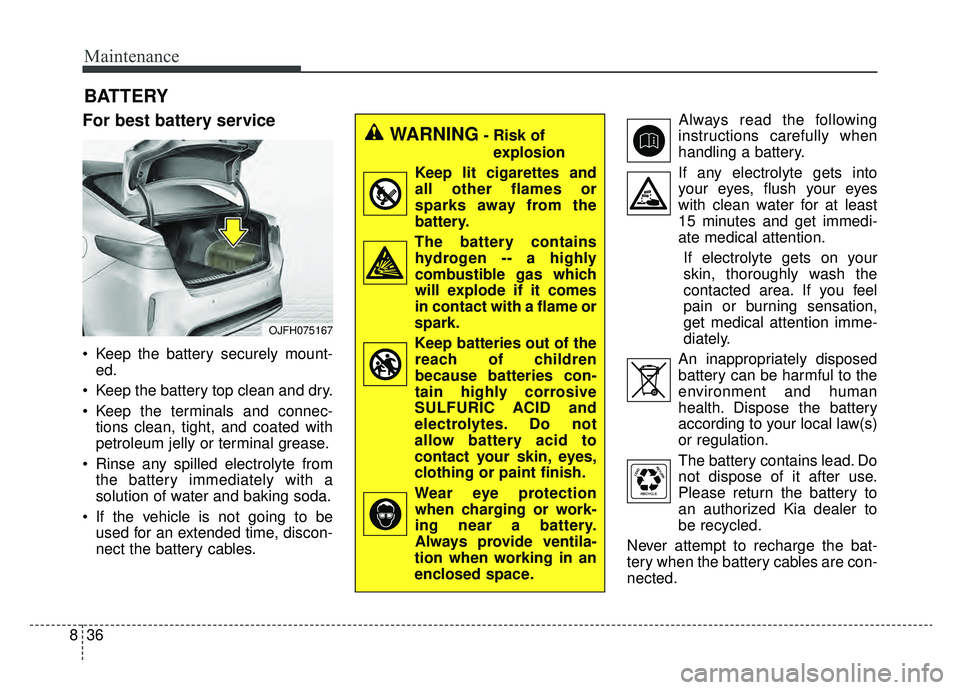
For best battery service
Keep the battery securely mount-
ed.
Keep the battery top clean and dry.
Keep the terminals and connec- tions clean, tight, and coated with
petroleum jelly or terminal grease.
Rinse any spilled electrolyte from the battery immediately with a
solution of water and baking soda.
If the vehicle is not going to be used for an extended time, discon-
nect the battery cables. Always read the following
instructions carefully when
handling a battery.
If any electrolyte gets into your eyes, flush your eyes
with clean water for at least
15 minutes and get immedi-
ate medical attention.
If electrolyte gets on your
skin, thoroughly wash the
contacted area. If you feel
pain or burning sensation,
get medical attention imme-
diately.
An inappropriately disposed battery can be harmful to the
environment and human
health. Dispose the battery
according to your local law(s)
or regulation.
The battery contains lead. Do
not dispose of it after use.
Please return the battery to
an authorized Kia dealer to
be recycled.
Never attempt to recharge the bat-
tery when the battery cables are con-
nected.
WARNING- Risk of explosion
Keep lit cigarettes and
all other flames or
sparks away from the
battery.
The battery contains hydrogen -- a highly
combustible gas which
will explode if it comes
in contact with a flame or
spark.
Keep batteries out of the reach of children
because batteries con-
tain highly corrosive
SULFURIC ACID and
electrolytes. Do not
allow battery acid to
contact your skin, eyes,
clothing or paint finish.
Wear eye protection when charging or work-
ing near a battery.
Always provide ventila-
tion when working in an
enclosed space.
OJFH075167
Page 465 of 553
Maintenance
38
8
When recharging the battery,
observe the following precautions:
The battery must be removed from
the vehicle and placed in an area
with good ventilation.
Do not allow cigarettes, sparks, or flame near the battery.
Watch the battery during charging, and stop or reduce the charging
rate if the battery cells begin
gassing (boiling) violently or if the
temperature of the electrolyte of
any cell exceeds 120°F (49°C).
Wear eye protection when check- ing the battery during charging.
Disconnect the battery charger in the following order.
1. Turn off the battery charger main switch.
2. Unhook the negative clamp from the negative battery terminal.
3. Unhook the positive clamp from the positive battery terminal. Before performing maintenance or
recharging the battery, turn off all
accessories and stop the engine.
The negative battery cable must be removed first and installed last
when the battery is disconnected.Reset items
Items should be reset after the bat-
tery has been discharged or the bat-
tery has been disconnected.
Auto up/down window (See chapter 4)
Sunroof (See chapter 4)
Trip computer (See chapter 4)
Climate control system (See chapter 4)
Driver position memory system (See chapter 3)
Audio (See chapter 5)
Page 467 of 553
Maintenance
40
8
Underinflation also results in
excessive wear, poor handling and
reduced fuel economy. Wheel
deformation also is possible. Keep
your tire pressures at the proper
levels. If a tire frequently needs
refilling, have it checked by an
authorized Kia dealer.
Overinflation produces a harsh ride, excessive wear at the center
of the tire tread, and a greater pos-
sibility of damage from road haz-
ards.
Warm tires normally exceed rec- ommended cold tire pressures by 4
to 6 psi (28 to 41 kPa). Do not
release air from warm tires to
adjust the pressure or the tires will
be underinflated.
Be sure to reinstall the tire inflation valve caps. Without the valve cap,
dirt or moisture could get into the
valve core and cause air leakage. If
a valve cap is missing, install a
new one as soon as possible.Tire pressure
Always observe the following:
Check tire pressure when the tiresare cold. (After vehicle has been
parked for at least three hours or
hasn't been driven more than one
mile (1.6 km) since startup.)
Check the pressure of your spare tire each time you check the pres-
sure of other tires.
Never overload your vehicle. Be careful not to overload a vehicle
luggage rack if your vehicle is
equipped with one.
Checking tire inflation pres-
sure
Check your tires once a month or
more.
Also, check the tire pressure of the
spare tire.
How to check
Use a good quality gauge to check
tire pressure. You cannot tell if your
tires are properly inflated simply by
looking at them. Radial tires may
look properly inflated even when
they're underinflated.
Check the tire's inflation pressure
when the tires are cold. - "Cold"
means your vehicle has been sitting
for at least three hours or driven no
more than 1 mile (1.6 km).
WARNING - Tire Inflation
Overinflation or underinflation
can reduce tire life, adversely
affect vehicle handling, and
lead to sudden tire failure. This
could result in loss of vehicle
control and potential injury.
Page 484 of 553
857
Maintenance
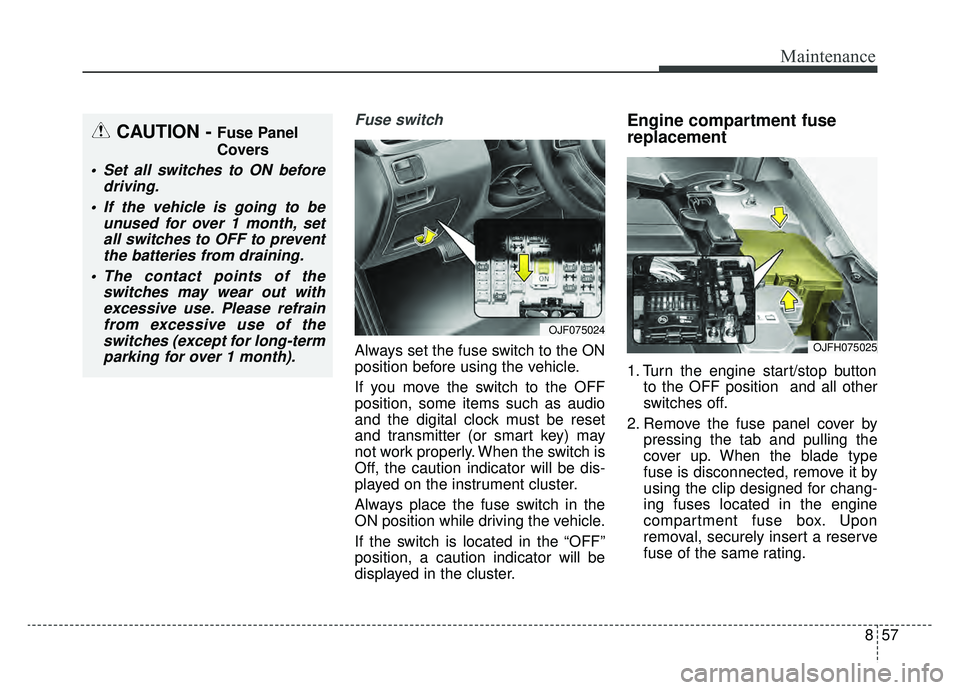
Fuse switch
Always set the fuse switch to the ON
position before using the vehicle.
If you move the switch to the OFF
position, some items such as audio
and the digital clock must be reset
and transmitter (or smart key) may
not work properly. When the switch is
Off, the caution indicator will be dis-
played on the instrument cluster.
Always place the fuse switch in the
ON position while driving the vehicle.
If the switch is located in the “OFF”
position, a caution indicator will be
displayed in the cluster.
Engine compartment fuse
replacement
1. Turn the engine start/stop buttonto the OFF position and all other
switches off.
2. Remove the fuse panel cover by pressing the tab and pulling the
cover up. When the blade type
fuse is disconnected, remove it by
using the clip designed for chang-
ing fuses located in the engine
compartment fuse box. Upon
removal, securely insert a reserve
fuse of the same rating.
OJF075024
OJFH075025
CAUTION - Fuse Panel
Covers
Set all switches to ON beforedriving.
If the vehicle is going to be unused for over 1 month, setall switches to OFF to preventthe batteries from draining.
The contact points of the switches may wear out withexcessive use. Please refrainfrom excessive use of theswitches (except for long-termparking for over 1 month).
Page 488 of 553
861
Maintenance
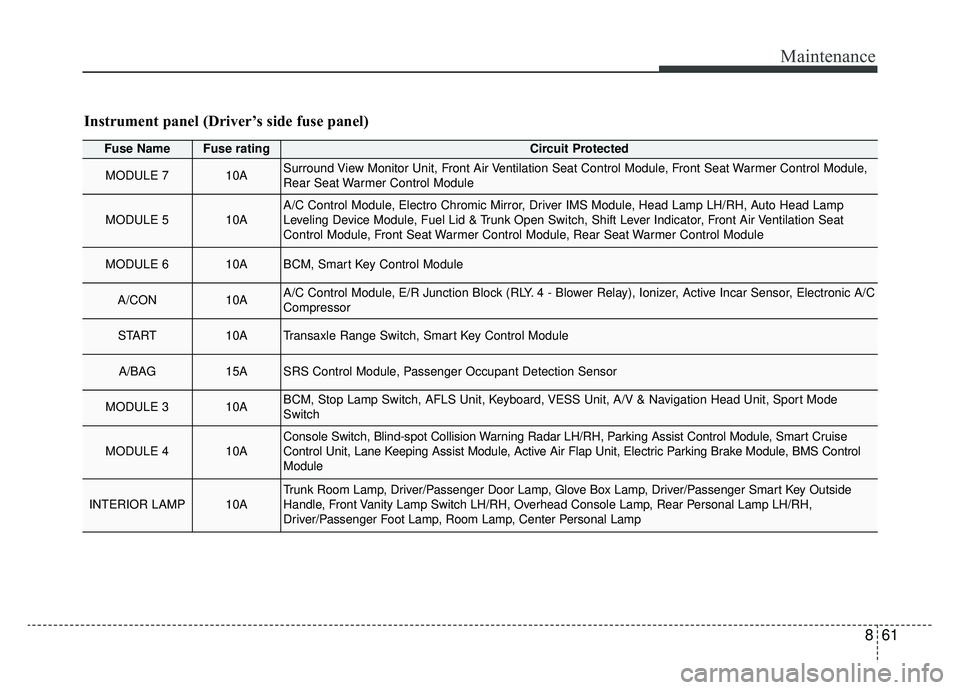
Instrument panel (Driver’s side fuse panel)
Fuse NameFuse ratingCircuit Protected
MODULE 710ASurround View Monitor Unit, Front Air Ventilation Seat Control Module, Front Seat Warmer Control Module,
Rear Seat Warmer Control Module
MODULE 510AA/C Control Module, Electro Chromic Mirror, Driver IMS Module, Head Lamp LH/RH, Auto Head Lamp
Leveling Device Module, Fuel Lid & Trunk Open Switch, Shift Lever Indicator, Front Air Ventilation Seat
Control Module, Front Seat Warmer Control Module, Rear Seat Warmer Control Module
MODULE 610ABCM, Smart Key Control Module
A/CON10AA/C Control Module, E/R Junction Block (RLY. 4 - Blower Relay), Ionizer, Active Incar Sensor, Electronic A/C
Compressor
START10ATransaxle Range Switch, Smart Key Control Module
A/BAG15ASRS Control Module, Passenger Occupant Detection Sensor
MODULE 310ABCM, Stop Lamp Switch, AFLS Unit, Keyboard, VESS Unit, A/V & Navigation Head Unit, Sport Mode
Switch
MODULE 410AConsole Switch, Blind-spot Collision Warning Radar LH/RH, Parking Assist Control Module, Smart Cruise
Control Unit, Lane Keeping Assist Module, Active Air Flap Unit, Electric Parking Brake Module, BMS Control
Module
INTERIOR LAMP10ATrunk Room Lamp, Driver/Passenger Door Lamp, Glove Box Lamp, Driver/Passenger Smart Key Outside
Handle, Front Vanity Lamp Switch LH/RH, Overhead Console Lamp, Rear Personal Lamp LH/RH,
Driver/Passenger Foot Lamp, Room Lamp, Center Personal Lamp
Page 496 of 553
869
Maintenance
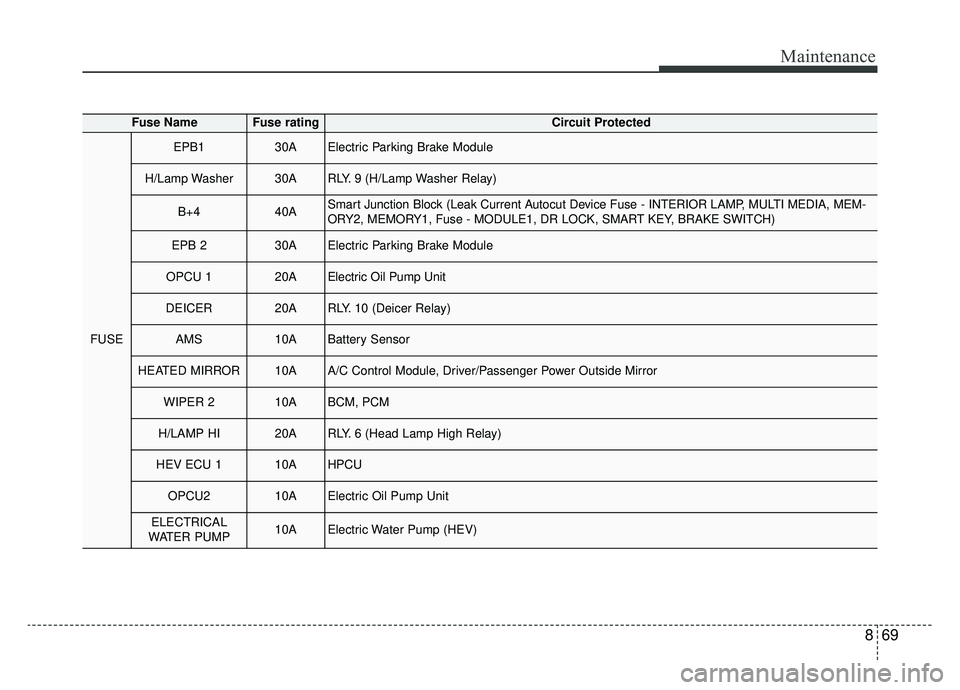
Fuse NameFuse ratingCircuit Protected
FUSE
EPB130AElectric Parking Brake Module
H/Lamp Washer30ARLY. 9 (H/Lamp Washer Relay)
B+440ASmart Junction Block (Leak Current Autocut Device Fuse - INTERIOR LAMP, MULTI MEDIA, MEM-
ORY2, MEMORY1, Fuse - MODULE1, DR LOCK, SMART KEY, BRAKE SWITCH)
EPB 230AElectric Parking Brake Module
OPCU 120AElectric Oil Pump Unit
DEICER20ARLY. 10 (Deicer Relay)
AMS10ABattery Sensor
HEATED MIRROR10AA/C Control Module, Driver/Passenger Power Outside Mirror
WIPER 210ABCM, PCM
H/LAMP HI20ARLY. 6 (Head Lamp High Relay)
HEV ECU 110AHPCU
OPCU210AElectric Oil Pump Unit
ELECTRICAL
WATER PUMP10AElectric Water Pump (HEV)