engine KIA OPTIMA PHEV 2017 Owners Manual
[x] Cancel search | Manufacturer: KIA, Model Year: 2017, Model line: OPTIMA PHEV, Model: KIA OPTIMA PHEV 2017Pages: 604, PDF Size: 13.16 MB
Page 531 of 604
Maintenance
62
8
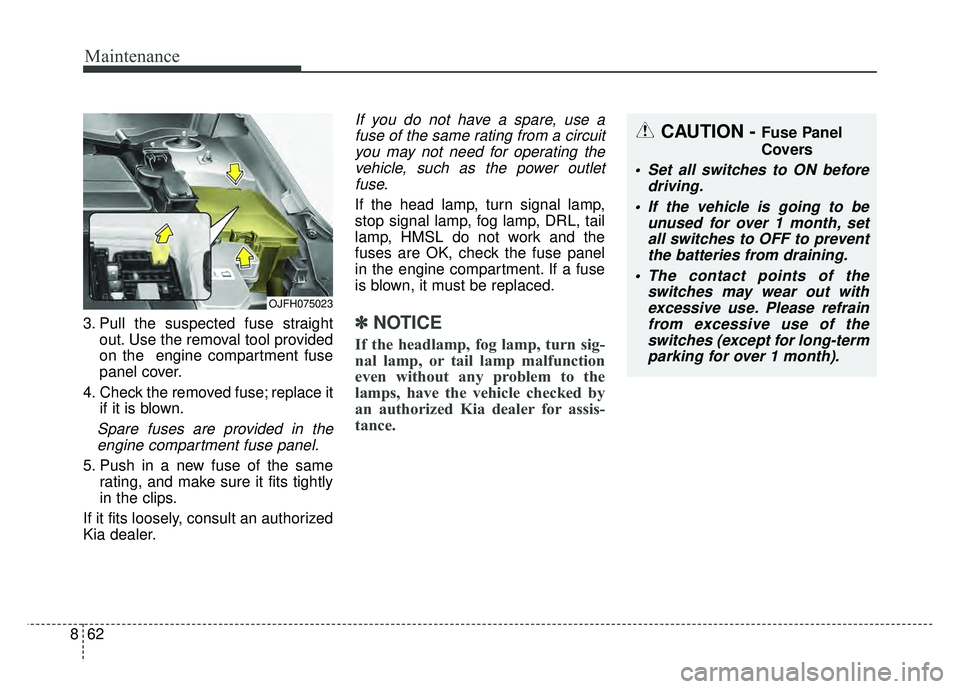
3. Pull the suspected fuse straight
out. Use the removal tool provided
on the engine compartment fuse
panel cover.
4. Check the removed fuse; replace it if it is blown.
Spare fuses are provided in theengine compartment fuse panel.
5. Push in a new fuse of the same rating, and make sure it fits tightly
in the clips.
If it fits loosely, consult an authorized
Kia dealer.
If you do not have a spare, use a fuse of the same rating from a circuityou may not need for operating thevehicle, such as the power outletfuse.
If the head lamp, turn signal lamp,
stop signal lamp, fog lamp, DRL, tail
lamp, HMSL do not work and the
fuses are OK, check the fuse panel
in the engine compartment. If a fuse
is blown, it must be replaced.
✽ ✽ NOTICE
If the headlamp, fog lamp, turn sig-
nal lamp, or tail lamp malfunction
even without any problem to the
lamps, have the vehicle checked by
an authorized Kia dealer for assis-
tance.
OJFH075023
CAUTION - Fuse Panel
Covers
Set all switches to ON before
driving.
If the vehicle is going to be unused for over 1 month, setall switches to OFF to preventthe batteries from draining.
The contact points of the switches may wear out withexcessive use. Please refrainfrom excessive use of theswitches (except for long-termparking for over 1 month).
Page 532 of 604

863
Maintenance
Fuse switch
Always set the fuse switch to the ON
position before using the vehicle.
If you move the switch to the OFF
position, some items such as audio
and digital clock must be reset and
transmitter (or smart key) may not
work properly. When the switch is
Off, the caution indicator will be dis-
played on the instrument cluster.
Always place the fuse switch in the
ON position while driving the vehicle.
If the switch is located in the “OFF”
position, a caution indicator will be
displayed in the cluster.
Engine compartment fuse
replacement
1. Turn the engine start/stop buttonto the OFF position and all other
switches off.
2. Remove the fuse panel cover by pressing the tab and pulling the
cover up. When the blade type
fuse is disconnected, remove it by
using the clip designed for chang-
ing fuses located in the engine
compartment fuse box. Upon
removal, securely insert reserve
fuse of the same rating. 3. Check the removed fuse; replace it
if it is blown. To remove or insert
the fuse, use the fuse puller in the
engine compartment fuse panel.
4. Push in a new fuse of the same rating, and make sure it fits tightly
in the clips. If it fits loosely, consult
an authorized Kia dealer.
OJF075024
CAUTION
After checking the fuse panel inthe engine compartment,securely install the fuse panelcover through the audible click-ing sound.
If not, electrical failures mayoccur from water contact.
OJFH075025
Page 533 of 604
Maintenance
64
8
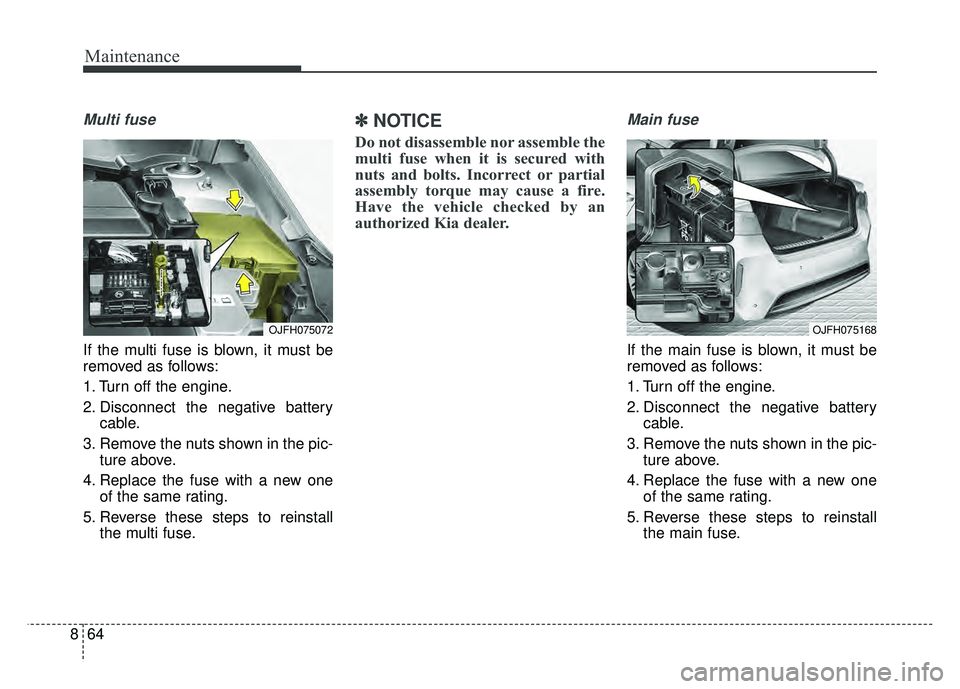
Multi fuse
If the multi fuse is blown, it must be
removed as follows:
1. Turn off the engine.
2. Disconnect the negative battery
cable.
3. Remove the nuts shown in the pic- ture above.
4. Replace the fuse with a new one of the same rating.
5. Reverse these steps to reinstall the multi fuse.
✽ ✽NOTICE
Do not disassemble nor assemble the
multi fuse when it is secured with
nuts and bolts. Incorrect or partial
assembly torque may cause a fire.
Have the vehicle checked by an
authorized Kia dealer.
Main fuse
If the main fuse is blown, it must be
removed as follows:
1. Turn off the engine.
2. Disconnect the negative battery
cable.
3. Remove the nuts shown in the pic- ture above.
4. Replace the fuse with a new one of the same rating.
5. Reverse these steps to reinstall the main fuse.
OJFH075072OJFH075168
Page 534 of 604
865
Maintenance
✽
✽NOTICE
The electronic system may not func-
tion correctly even when the engine
compartment and internal fuse
box’s individual fuses are not dis-
connected. In such case the cause of
the problem may be disconnection
of the main fuse (BFT type), which is
located inside the positive battery
terminal (+) cap.
Since the main fuse is designed more
intricately than other parts, have the
vehicle checked by an authorized
Kia dealer.
✽ ✽NOTICE- Random wiring pro-
hibited when retrofitting equip-
ment
Use of random wiring in the vehicle
might cause danger due to failure
and damage of the vehicle’s per-
formance.
Using random wires especially when
retrofitting AVN or theft alarm sys-
tem, remote engine control, car
phone or radio might damage the
vehicle or cause fire.
✽ ✽ NOTICE- Remodeling
Prohibited
Do not try remodeling the vehicle in
any way. It is illegal, and may affect
the vehicle’s performance, durabili-
ty, and safety. Warranty is also not
provided for problems caused by
remodeling.
Be aware of safety problems caused
by remodeling the vehicle with
unauthorized electrical
devices(lamp, black box, electrical
equipment, diagnostic device, com-
munication device, etc.). It might
cause malfunction of the vehicle,
wiring damage, battery discharge,
connector damage, or fire. the vehi-
cle or cause fire.
CAUTION
Visually inspect the battery capto ensure it is securely closed.If the battery cap is not securelyclosed, moisture may enter thesystem and damage the electri-cal components.
Page 540 of 604
871
Maintenance
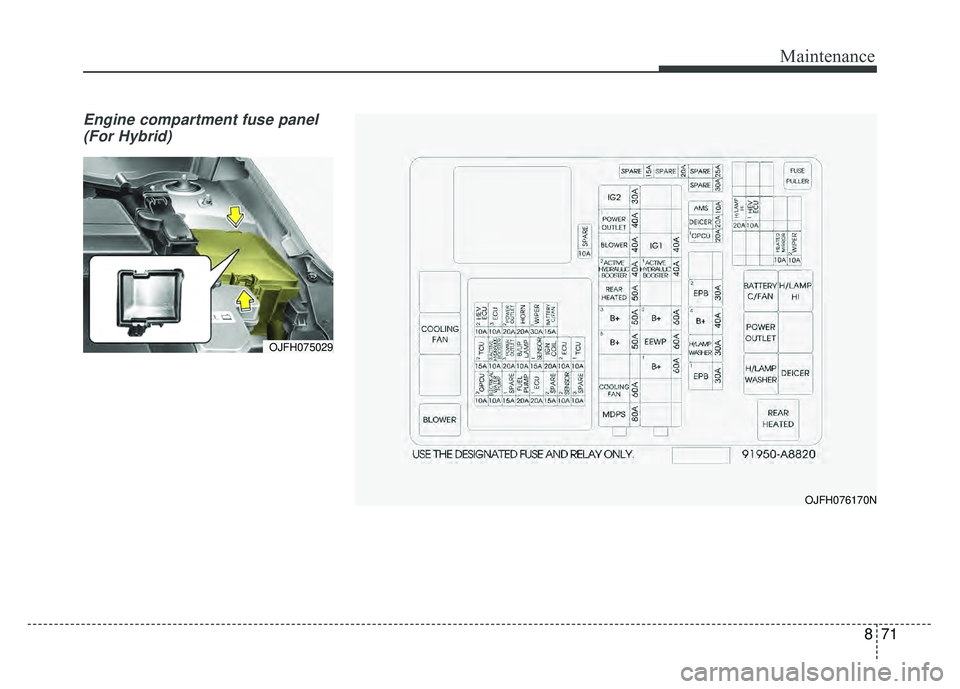
Engine compartment fuse panel(For Hybrid)
OJFH076170N
OJFH075029
Page 541 of 604
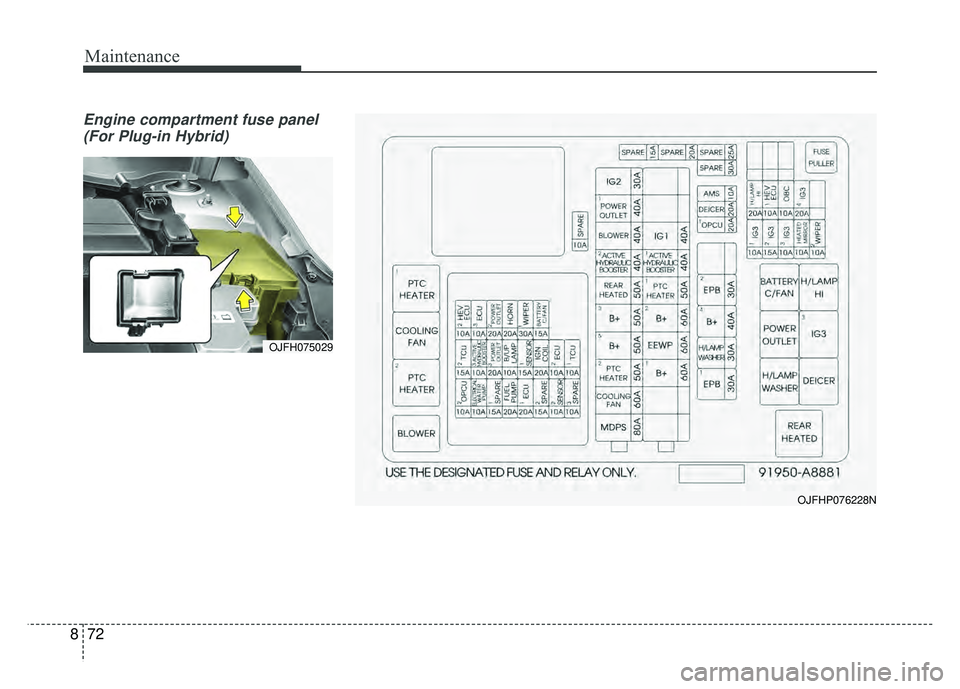
Maintenance
72
8
Engine compartment fuse panel
(For Plug-in Hybrid)
OJFHP076228N
OJFH075029
Page 542 of 604
873
Maintenance
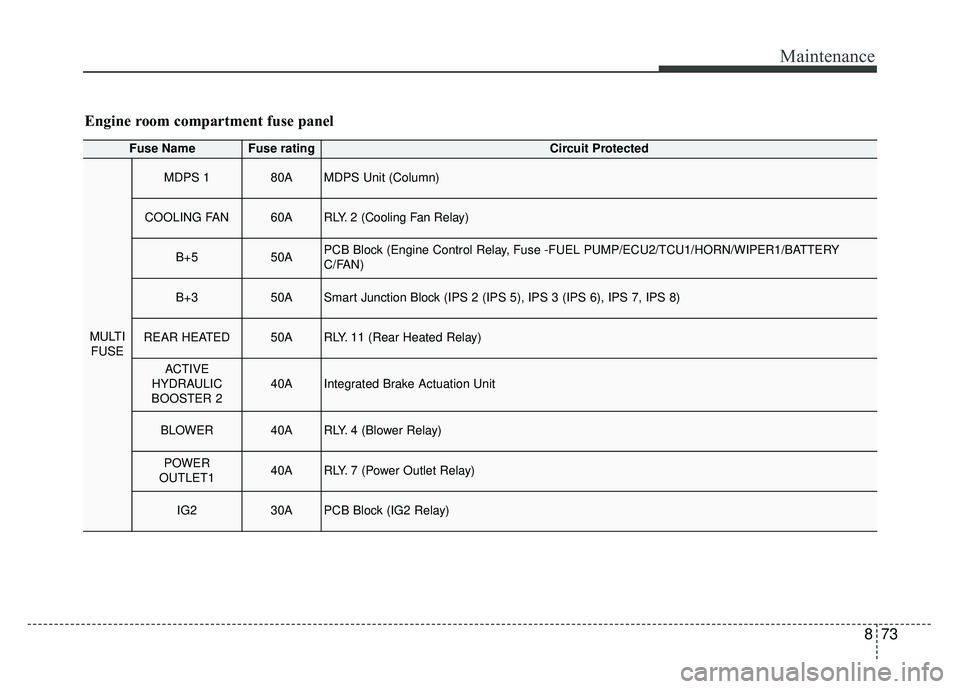
Fuse NameFuse ratingCircuit Protected
MULTIFUSE
MDPS 180AMDPS Unit (Column)
COOLING FAN60ARLY. 2 (Cooling Fan Relay)
B+550APCB Block (Engine Control Relay, Fuse -FUEL PUMP/ECU2/TCU1/HORN/WIPER1/BATTERY
C/FAN)
B+350ASmart Junction Block (IPS 2 (IPS 5), IPS 3 (IPS 6), IPS 7, IPS 8)
REAR HEATED50ARLY. 11 (Rear Heated Relay)
ACTIVE
HYDRAULIC
BOOSTER 240AIntegrated Brake Actuation Unit
BLOWER40ARLY. 4 (Blower Relay)
POWER
OUTLET140ARLY. 7 (Power Outlet Relay)
IG230APCB Block (IG2 Relay)
Engine room compartment fuse panel
Page 543 of 604
Maintenance
74
8
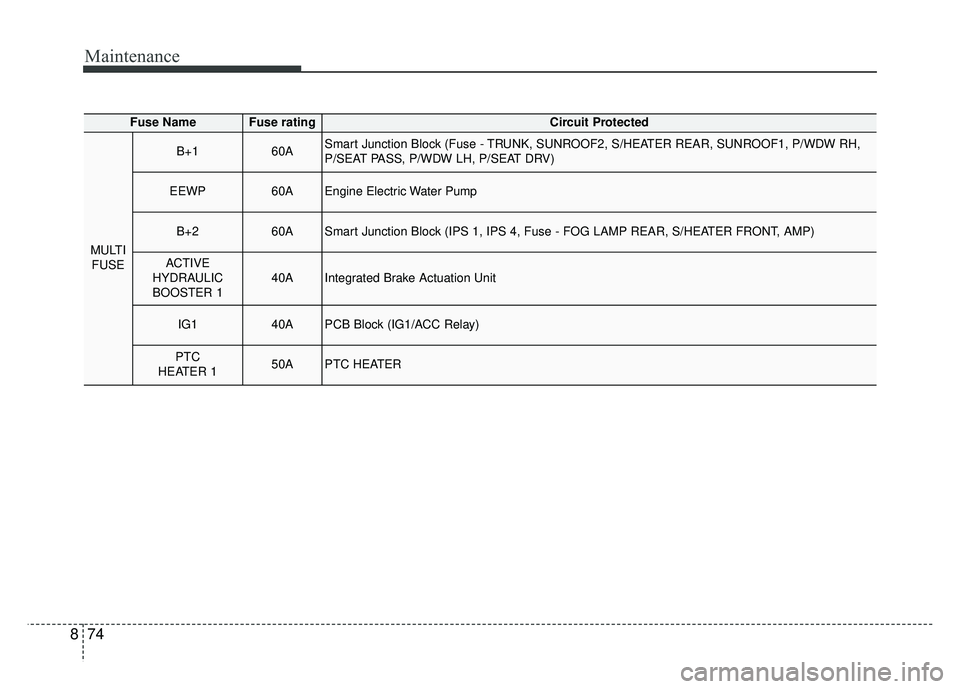
Fuse NameFuse ratingCircuit Protected
MULTI
FUSE
B+160ASmart Junction Block (Fuse - TRUNK, SUNROOF2, S/HEATER REAR, SUNROOF1, P/WDW RH,
P/SEAT PASS, P/WDW LH, P/SEAT DRV)
EEWP60AEngine Electric Water Pump
B+260ASmart Junction Block (IPS 1, IPS 4, Fuse - FOG LAMP REAR, S/HEATER FRONT, AMP)
ACTIVE
HYDRAULIC
BOOSTER 140AIntegrated Brake Actuation Unit
IG140APCB Block (IG1/ACC Relay)
PTC
HEATER 150APTC HEATER
Page 549 of 604
Maintenance
80
8
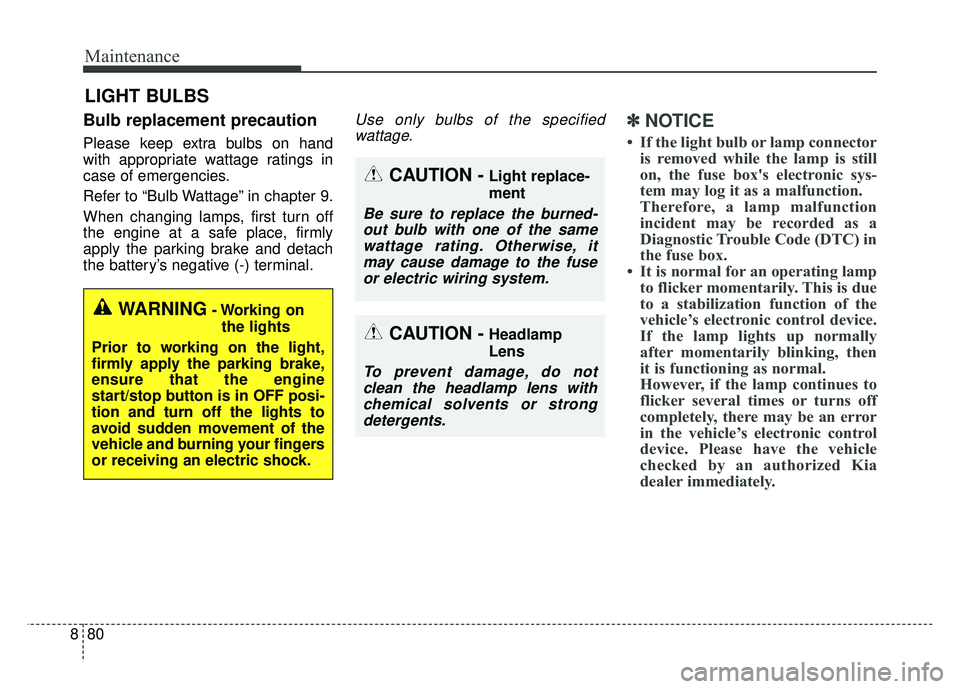
LIGHT BULBS
Bulb replacement precaution
Please keep extra bulbs on hand
with appropriate wattage ratings in
case of emergencies.
Refer to “Bulb Wattage” in chapter 9.
When changing lamps, first turn off
the engine at a safe place, firmly
apply the parking brake and detach
the battery’s negative (-) terminal.
Use only bulbs of the specified
wattage.✽ ✽ NOTICE
• If the light bulb or lamp connector
is removed while the lamp is still
on, the fuse box's electronic sys-
tem may log it as a malfunction.
Therefore, a lamp malfunction
incident may be recorded as a
Diagnostic Trouble Code (DTC) in
the fuse box.
• It is normal for an operating lamp to flicker momentarily. This is due
to a stabilization function of the
vehicle’s electronic control device.
If the lamp lights up normally
after momentarily blinking, then
it is functioning as normal.
However, if the lamp continues to
flicker several times or turns off
completely, there may be an error
in the vehicle’s electronic control
device. Please have the vehicle
checked by an authorized Kia
dealer immediately.
WARNING- Working on
the lights
Prior to working on the light,
firmly apply the parking brake,
ensure that the engine
start/stop button is in OFF posi-
tion and turn off the lights to
avoid sudden movement of the
vehicle and burning your fingers
or receiving an electric shock.
CAUTION -Light replace-
ment
Be sure to replace the burned- out bulb with one of the samewattage rating. Otherwise, itmay cause damage to the fuseor electric wiring system.
CAUTION -Headlamp
Lens
To prevent damage, do notclean the headlamp lens withchemical solvents or strongdetergents.
Page 564 of 604
895
Maintenance
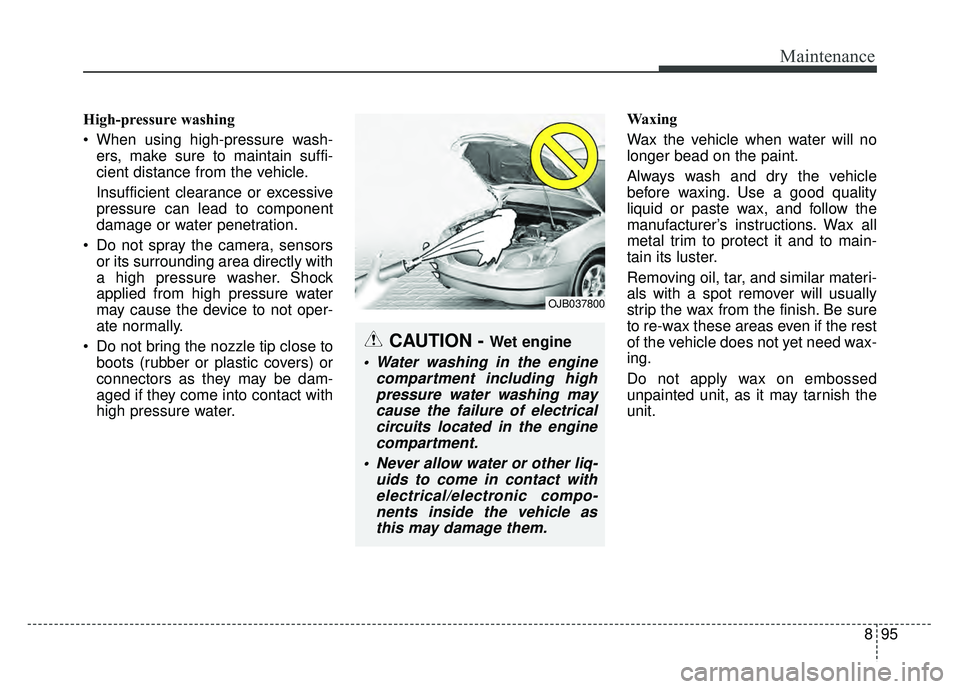
High-pressure washing
When using high-pressure wash-ers, make sure to maintain suffi-
cient distance from the vehicle.
Insufficient clearance or excessive
pressure can lead to component
damage or water penetration.
Do not spray the camera, sensors or its surrounding area directly with
a high pressure washer. Shock
applied from high pressure water
may cause the device to not oper-
ate normally.
Do not bring the nozzle tip close to boots (rubber or plastic covers) or
connectors as they may be dam-
aged if they come into contact with
high pressure water. Waxing
Wax the vehicle when water will no
longer bead on the paint.
Always wash and dry the vehicle
before waxing. Use a good quality
liquid or paste wax, and follow the
manufacturer’s instructions. Wax all
metal trim to protect it and to main-
tain its luster.
Removing oil, tar, and similar materi-
als with a spot remover will usually
strip the wax from the finish. Be sure
to re-wax these areas even if the rest
of the vehicle does not yet need wax-
ing.
Do not apply wax on embossed
unpainted unit, as it may tarnish the
unit.
OJB037800
CAUTION - Wet engine
Water washing in the engine
compartment including highpressure water washing maycause the failure of electricalcircuits located in the enginecompartment.
Never allow water or other liq- uids to come in contact withelectrical/electronic compo-nents inside the vehicle asthis may damage them.