ECU KIA OPTIMA PHEV 2017 Owner's Manual
[x] Cancel search | Manufacturer: KIA, Model Year: 2017, Model line: OPTIMA PHEV, Model: KIA OPTIMA PHEV 2017Pages: 604, PDF Size: 13.16 MB
Page 161 of 604

431
Features of your vehicle
Make sure to refuel your vehicle
according to the “Fuel requirements”
suggested in chapter 1.
If the fuel filler cap requires replace-
ment, use only a genuine Kia cap or
the equivalent specified for your vehi-
cle. An incorrect fuel filler cap can
result in a serious malfunction of the
fuel system or emission control sys-
tem.
WARNING- Cell phonefires
Do not use cellular phones
while refueling. Electric current
and/or electronic interference
from cellular phones can poten-
tially ignite fuel vapors causing
a fire.
WARNING- Smoking
DO NOT use matches or a
lighter and DO NOT SMOKE or
leave a lit cigarette in your vehi-
cle while at a gas station espe-
cially during refueling.
Automotive fuel is highly flam-
mable and can, when ignited,
result in fire.
WARNING- Refueling & Vehicle fires
When refueling, always shut the
engine off. Sparks produced by
electrical components related
to the engine can ignite fuel
vapors causing a fire. Once
refueling is complete, check to
make sure the filler cap and
filler door are securely closed,
before starting the engine.
CAUTION- Exterior paint
Do not spill fuel on the exterior surfaces of the vehicle. Anytype of fuel spilled on paintedsurfaces may damage the paint.
WARNING- Portable fuel
container
When using an approved
portable fuel container, be sure
to place the container on the
ground prior to refueling. Static
electricity discharge from the
container can ignite fuel vapors
causing a fire. Once refueling
has begun, contact with the
vehicle should be maintained
until the filling is complete. Use
only approved portable plastic
fuel containers designed to
carry and store gasoline.
Page 165 of 604
435
Features of your vehicle
Closing the fuel filler lid
1. To install the cap, turn it clockwiseuntil it “clicks” once. This indicates
that the cap is securely tightened.
2. Close the fuel filler lid and push it in lightly making sure that it is
securely closed.
✽ ✽NOTICE - Refueling
Do not "top off" after the nozzle
automatically shuts off when refuel-
ing. If pressurized fuel sprays out, it
can cover your clothes or skin and
subject you to the risk of fire and
burns. Always remove the fuel cap
carefully and slowly. If the cap is
venting fuel or if you hear a hissing
sound, wait until the condition stops
before completely removing the cap.
✽ ✽NOTICE
Always check that the fuel cap is
installed securely to prevent fuel
spillage in the event of an accident.
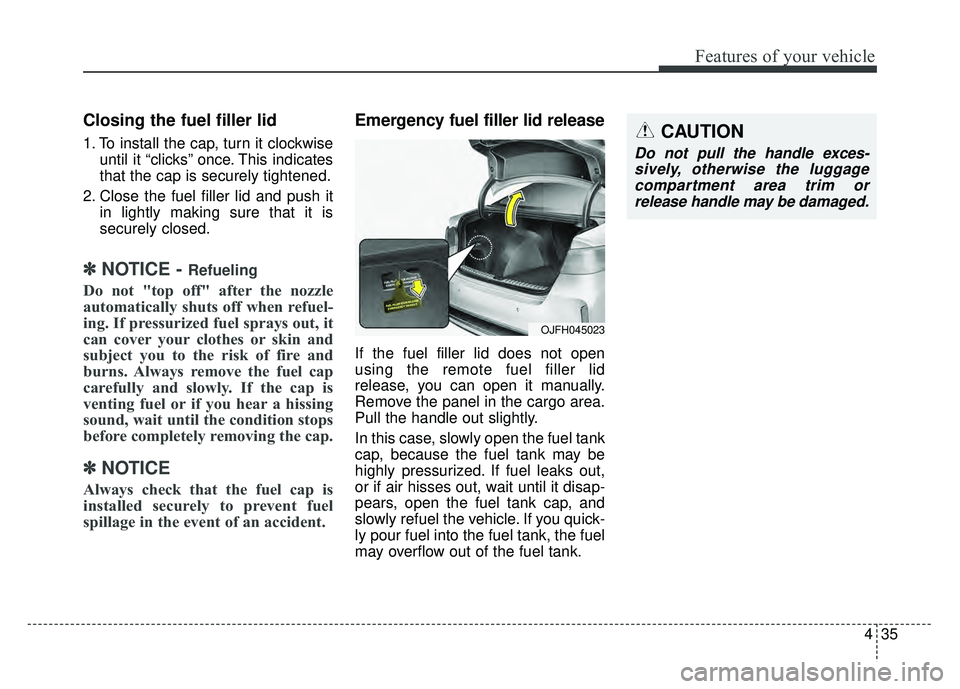
Emergency fuel filler lid release
If the fuel filler lid does not open
using the remote fuel filler lid
release, you can open it manually.
Remove the panel in the cargo area.
Pull the handle out slightly.
In this case, slowly open the fuel tank
cap, because the fuel tank may be
highly pressurized. If fuel leaks out,
or if air hisses out, wait until it disap-
pears, open the fuel tank cap, and
slowly refuel the vehicle. If you quick-
ly pour fuel into the fuel tank, the fuel
may overflow out of the fuel tank.
CAUTION
Do not pull the handle exces-
sively, otherwise the luggagecompartment area trim orrelease handle may be damaged.
OJFH045023
Page 167 of 604
437
Features of your vehicle
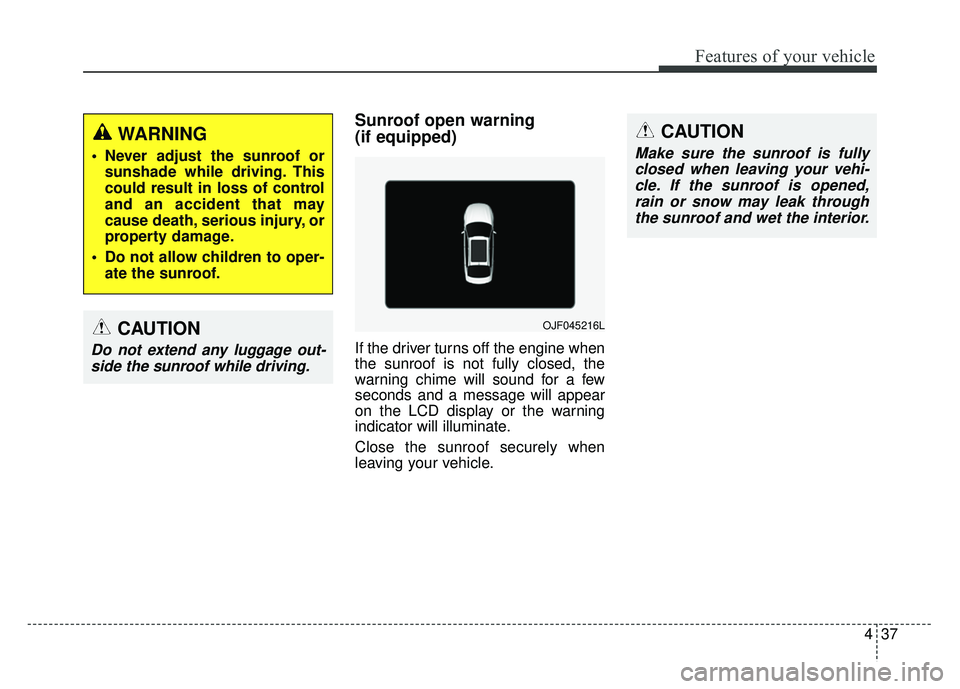
Sunroof open warning
(if equipped)
If the driver turns off the engine when
the sunroof is not fully closed, the
warning chime will sound for a few
seconds and a message will appear
on the LCD display or the warning
indicator will illuminate.
Close the sunroof securely when
leaving your vehicle.
WARNING
Never adjust the sunroof orsunshade while driving. This
could result in loss of control
and an accident that may
cause death, serious injury, or
property damage.
Do not allow children to oper- ate the sunroof.
CAUTION
Do not extend any luggage out-side the sunroof while driving.
OJF045216L
CAUTION
Make sure the sunroof is fullyclosed when leaving your vehi-cle. If the sunroof is opened,rain or snow may leak throughthe sunroof and wet the interior.
Page 188 of 604
Features of your vehicle
58
4
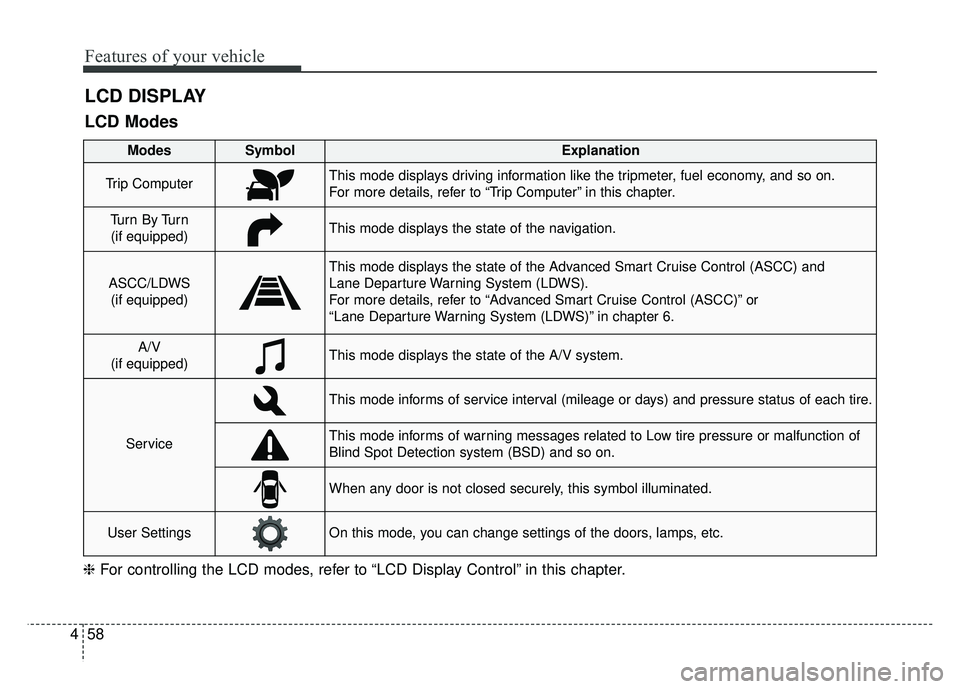
LCD DISPLAY
❈ For controlling the LCD modes, refer to “LCD Display Control” in this chapter.
LCD Modes
Modes SymbolExplanation
Trip ComputerThis mode displays driving information like the tripmeter, fuel economy, and so on.
For more details, refer to “Trip Computer” in this chapter.
Tu r n B y Tu r n
(if equipped)This mode displays the state of the navigation.
ASCC/LDWS (if equipped)
This mode displays the state of the Advanced Smart Cruise Control (ASCC) and
Lane Departure Warning System (LDWS).
For more details, refer to “Advanced Smart Cruise Control (ASCC)” or
“Lane Departure Warning System (LDWS)” in chapter 6.
A/V
(if equipped)This mode displays the state of the A/V system.
Service
This mode informs of service interval (mileage or days) and pressure status of each tire.
This mode informs of warning messages related to Low tire pressure or malfunction of
Blind Spot Detection system (BSD) and so on.
When any door is not closed securely, this symbol illuminated.
User SettingsOn this mode, you can change settings of the doors, lamps, etc.
Page 242 of 604
Features of your vehicle
112
4
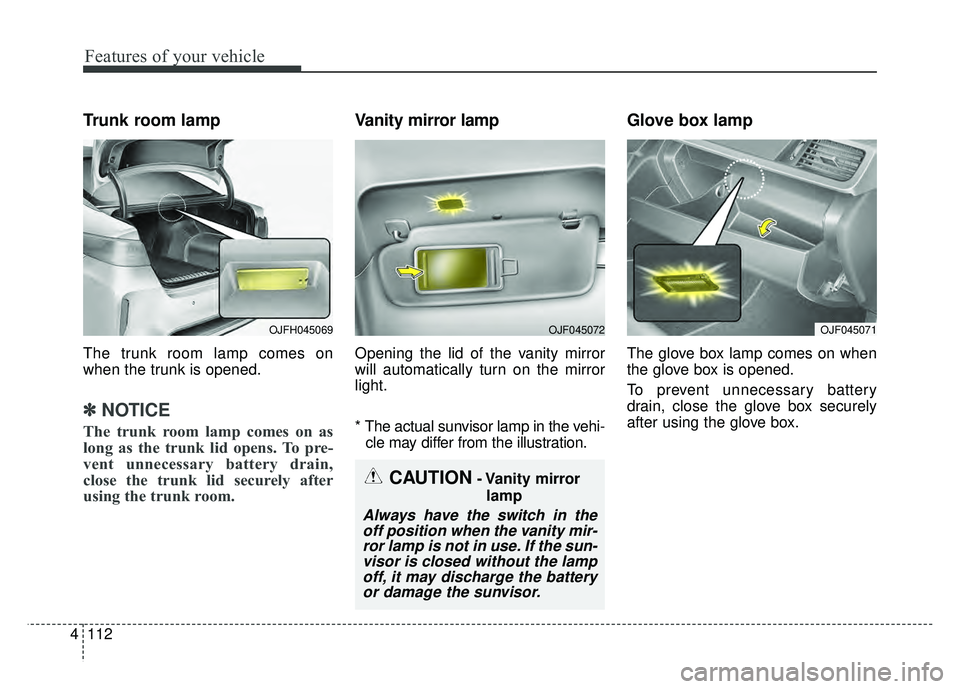
Trunk room lamp
The trunk room lamp comes on
when the trunk is opened.
✽ ✽
NOTICE
The trunk room lamp comes on as
long as the trunk lid opens. To pre-
vent unnecessary battery drain,
close the trunk lid securely after
using the trunk room.
Vanity mirror lamp
Opening the lid of the vanity mirror
will automatically turn on the mirror
light.
* The actual sunvisor lamp in the vehi-
cle may differ from the illustration.
Glove box lamp
The glove box lamp comes on when
the glove box is opened.
To prevent unnecessary battery
drain, close the glove box securely
after using the glove box.
CAUTION- Vanity mirror
lamp
Always have the switch in theoff position when the vanity mir-ror lamp is not in use. If the sun-visor is closed without the lampoff, it may discharge the batteryor damage the sunvisor.
OJFH045069OJF045072OJF045071
Page 263 of 604
4133
Features of your vehicle
STORAGE COMPARTMENTS
These compartments can be used to
store small items required by the
driver or passengers.
To avoid possible theft, do notleave valuables in the storage
compartment.
Always keep the storage compart- ment covers closed while driving.
Do not attempt to place so many
items in the storage compartment
that the storage compartment
cover can not close securely.Center console storage
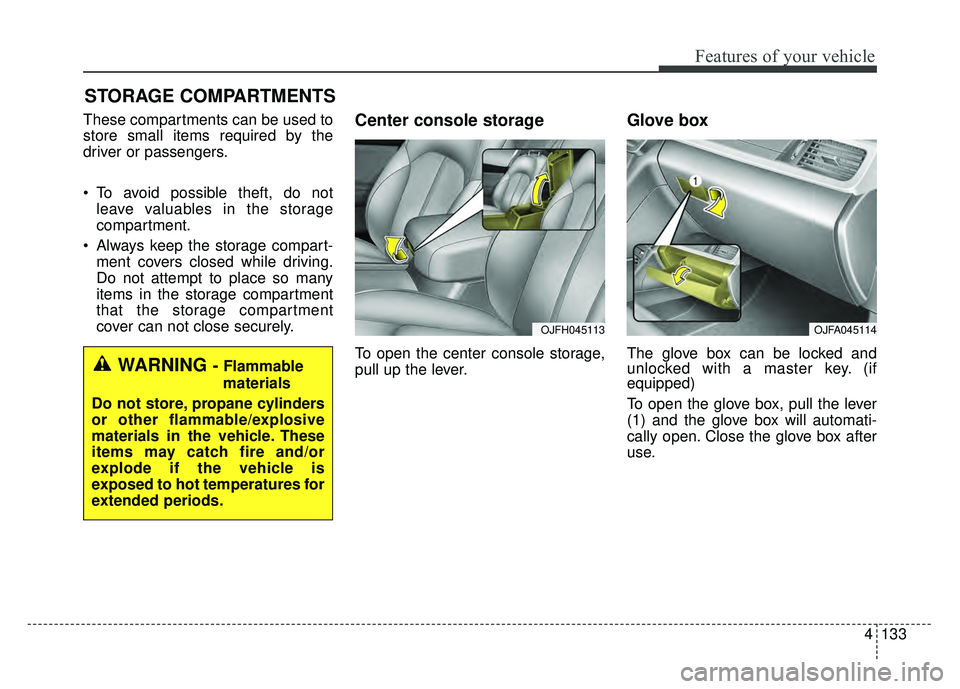
To open the center console storage,
pull up the lever.
Glove box
The glove box can be locked and
unlocked with a master key. (if
equipped)
To open the glove box, pull the lever
(1) and the glove box will automati-
cally open. Close the glove box after
use.WARNING - Flammable
materials
Do not store, propane cylinders
or other flammable/explosive
materials in the vehicle. These
items may catch fire and/or
explode if the vehicle is
exposed to hot temperatures for
extended periods.
OJFA045114OJFH045113
Page 270 of 604
Features of your vehicle
140
4
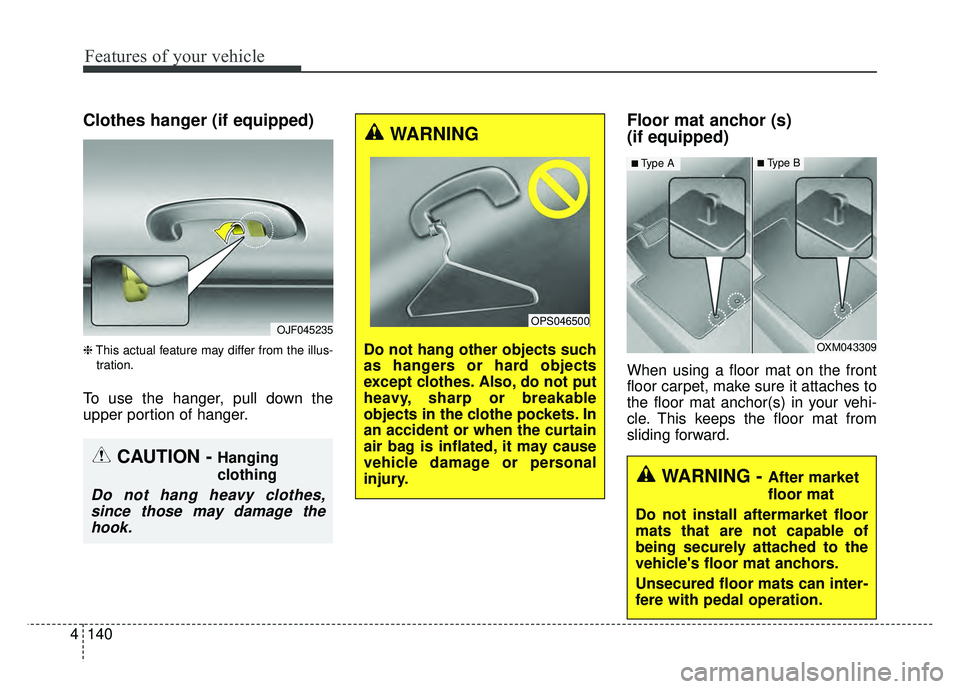
Clothes hanger (if equipped)
❈ This actual feature may differ from the illus-
tration.
To use the hanger, pull down the
upper portion of hanger.
Floor mat anchor (s)
(if equipped)
When using a floor mat on the front
floor carpet, make sure it attaches to
the floor mat anchor(s) in your vehi-
cle. This keeps the floor mat from
sliding forward.
OJF045235
CAUTION - Hanging
clothing
Do not hang heavy clothes, since those may damage thehook.
OXM043309
■Type A■Type B
WARNING - After market
floor mat
Do not install aftermarket floor
mats that are not capable of
being securely attached to the
vehicle's floor mat anchors.
Unsecured floor mats can inter-
fere with pedal operation.
WARNING
Do not hang other objects such
as hangers or hard objects
except clothes. Also, do not put
heavy, sharp or breakable
objects in the clothe pockets. In
an accident or when the curtain
air bag is inflated, it may cause
vehicle damage or personal
injury.
OPS046500
Page 271 of 604

4141
Features of your vehicle
The following must be observed
when installing ANY floor mat to the
vehicle.
Ensure that the floor mats aresecurely attached to the vehicle's
floor mat anchor(s) before driving
the vehicle.
Do not use ANY floor mat that can- not be firmly attached to the vehi-
cle's floor mat anchors.
Do not stack floor mats on top of one another (e.g. all-weather rub-
ber mat on top of a carpeted floor
mat). Only a single floor mat should
be installed in each position.
✽ ✽ NOTICE
Your vehicle was manufactured with
driver's side floor mat anchors that
are designed to securely hold the
floor mat in place. To avoid any
interference with pedal operation,
Kia recommends that only the Kia
floor mat designed for use in your
vehicle be installed.
Side curtain (if equipped)
To use the side curtain:
1. Lift the curtain by the handle (1).
2. Hang the curtain on the hooks on
both sides of the handle.
To avoid injury or damage to the side
curtain and door moldings, lower
side curtain by the handle all the way
back to the stowed position. Do not
release handle after disengaging
from the hooks on the door.
OJF045304
Page 312 of 604
![KIA OPTIMA PHEV 2017 Owners Manual Audio system
541
Bluetooth®Wireless Technology
When No Devices have beenPaired
➀ Press the [PHONE] button or the
[CALL] button on the steering
wheel controls. The following
screen is displayed.
� KIA OPTIMA PHEV 2017 Owners Manual Audio system
541
Bluetooth®Wireless Technology
When No Devices have beenPaired
➀ Press the [PHONE] button or the
[CALL] button on the steering
wheel controls. The following
screen is displayed.
�](/img/2/54972/w960_54972-311.png)
Audio system
541
Bluetooth®Wireless Technology
When No Devices have beenPaired
➀ Press the [PHONE] button or the
[CALL] button on the steering
wheel controls. The following
screen is displayed.
➁ Press the [OK] button to enter the
Pair Phone screen. Vehicle Name : Name of device as
shown when searching from your
Bluetooth®Wireless Technology
device
Passkey : Passkey used to pair the device
\b From your
Bluetooth®Wireless
Technology device (i.e. Mobile
Phone), search and select your
car audio system.
❈ SSP: Secure Simple Pairing
Non SSP supported device :
➃ After a few moments, a screen is
displayed where the passkey is
entered.
Enter the passkey “0000” to pair your
Bluetooth®Wireless Technology
device with the car audio system. SSP supported device :
➃
After a few moments, a screen is
displayed 6 digits passkey.
Check the passkey on your
Bluetooth®Wireless Technology
device and confirm.
➄ Once pairing is complete, the fol-
lowing screen is displayed.
Page 321 of 604
Audio system
50
5
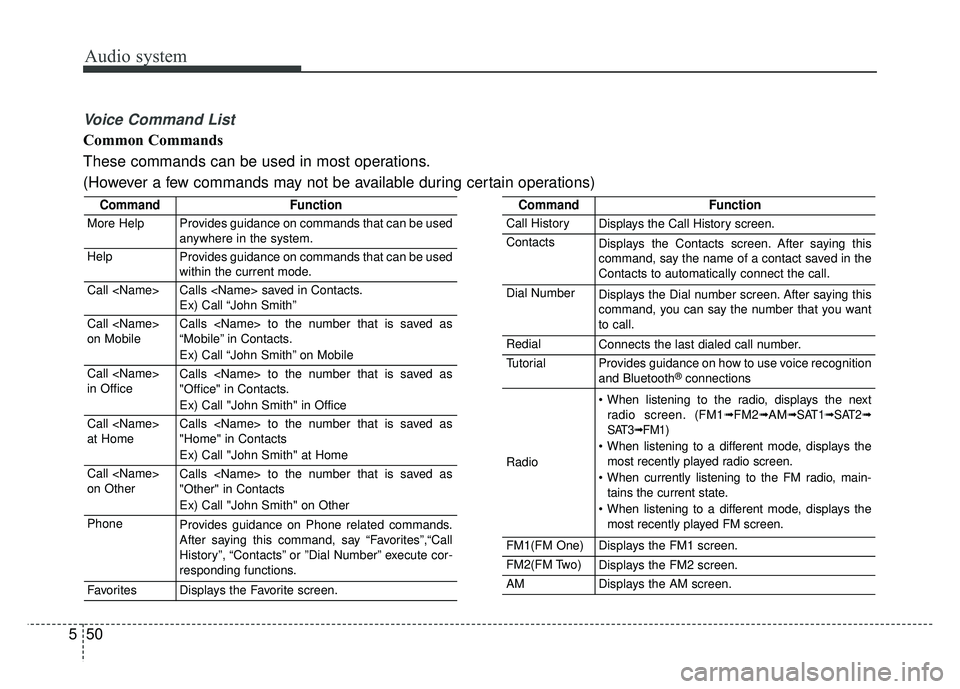
Voice Command List
Common Commands
These commands can be used in most operations.
(However a few commands may not be available during certain operations)
CommandFunction
More HelpProvides guidance on commands that can be used
anywhere in the system.
HelpProvides guidance on commands that can be used
within the current mode.
Call
Ex) Call “John Smith”
Call
on MobileCalls
“Mobile” in Contacts.
Ex) Call “John Smith” on Mobile
Call
in OfficeCalls
"Office" in Contacts.
Ex) Call "John Smith" in Office
Call
at HomeCalls
"Home" in Contacts
Ex) Call "John Smith" at Home
Call
on OtherCalls
"Other" in Contacts
Ex) Call "John Smith" on Other
PhoneProvides guidance on Phone related commands.
After saying this command, say “Favorites”,“Call
History”, “Contacts” or ”Dial Number” execute cor-
responding functions.
FavoritesDisplays the Favorite screen.
CommandFunction
Call HistoryDisplays the Call History screen.
ContactsDisplays the Contacts screen. After saying this
command, say the name of a contact saved in the
Contacts to automatically connect the call.
Dial NumberDisplays the Dial number screen. After saying this
command, you can say the number that you want
to call.
RedialConnects the last dialed call number.
TutorialProvides guidance on how to use voice recognition
and Bluetooth®connections
Radio
When listening to the radio, displays the next
radio screen. (FM1➟FM2➟AM➟ SAT1➟ SAT2➟
SAT3➟ FM1)
When listening to a different mode, displays the most recently played radio screen.
When currently listening to the FM radio, main- tains the current state.
When listening to a different mode, displays the most recently played FM screen.
FM1(FM One)Displays the FM1 screen.
FM2(FM Two)Displays the FM2 screen.
AMDisplays the AM screen.