display KIA OPTIMA PHEV 2020 Owners Manual
[x] Cancel search | Manufacturer: KIA, Model Year: 2020, Model line: OPTIMA PHEV, Model: KIA OPTIMA PHEV 2020Pages: 597, PDF Size: 14.2 MB
Page 21 of 597
H14When you cannot drive to a public
charging station due to low battery,
you can charge the car by using the
220V portable charger (ICCB: In
Cable Control Box) which you can
buy as an option.
✽ ✽
NOTICE
This cable is designed to prevent
problems caused by unexpected bat-
tery discharge and when you use
general outlets, it may lead to exces-
sive electricity charges as the elec-
tricity charges for electric vehicles
will not be applied. So refrain from
using it to fully charge your car.
How to Set Charging Current of
Portable Charging Cable
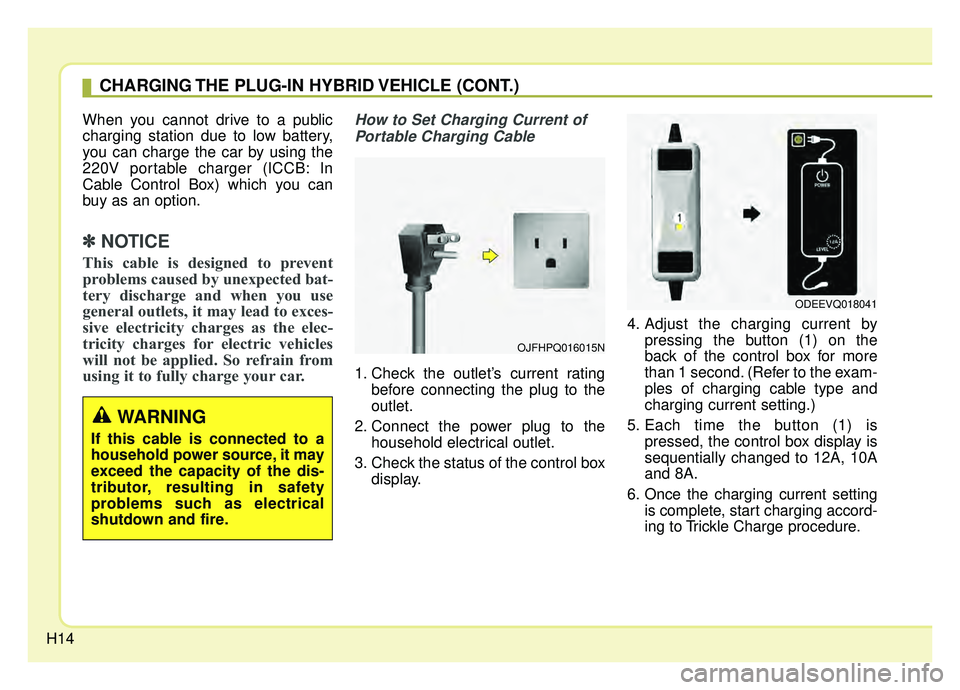
1. Check the outlet’s current rating before connecting the plug to the
outlet.
2. Connect the power plug to the household electrical outlet.
3. Check the status of the control box display. 4. Adjust the charging current by
pressing the button (1) on the
back of the control box for more
than 1 second. (Refer to the exam-
ples of charging cable type and
charging current setting.)
5. Each time the button (1) is pressed, the control box display is
sequentially changed to 12A, 10A
and 8A.
6. Once the charging current setting is complete, start charging accord-
ing to Trickle Charge procedure.
CHARGING THE PLUG-IN HYBRID VEHICLE (CONT.)
OJFHPQ016015N
ODEEVQ018041
WARNING
If this cable is connected to a
household power source, it may
exceed the capacity of the dis-
tributor, resulting in safety
problems such as electrical
shutdown and fire.
Page 22 of 597

H15
How to Connect PortableCharging Cable (ICCB: In-Cable Control Box)
1. Turn OFF all switches, move the shift lever to P (Park), and turn
OFF the vehicle.
2. Connect the plug to a household electric outlet.
Outlet currentICCB charge levelControl box display
14-16A12A
13-12A10A
11-10A8A
9-8A6A
❈Examples of ICCB Charging Current Setting
(However, examples are only for reference and situations may vary depend-
ing on the surrounding environment.)
OJFHPQ016015N
CAUTION
If the outlet is aged, damaged or cracked, do not use it.
Page 32 of 597
H25
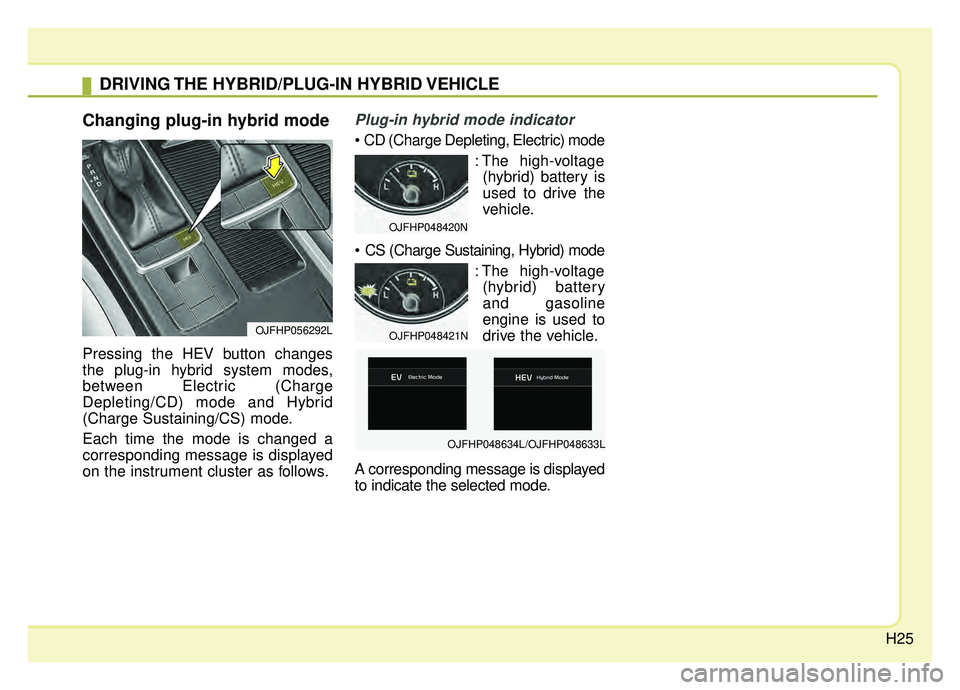
Changing plug-in hybrid mode
Pressing the HEV button changes
the plug-in hybrid system modes,
between Electric (Charge
Depleting/CD) mode and Hybrid
(Charge Sustaining/CS) mode.
Each time the mode is changed a
corresponding message is displayed
on the instrument cluster as follows.
Plug-in hybrid mode indicator
: The high-voltage(hybrid) battery is
used to drive the
vehicle.
: The high-voltage(hybrid) battery
and gasoline
engine is used to
drive the vehicle.
A corresponding message is displayed
to indicate the selected mode.
DRIVING THE HYBRID/PLUG-IN HYBRID VEHICLE
OJFHP056292L
OJFHP048420N
OJFHP048421N
OJFHP048634L/OJFHP048633L
Page 35 of 597
H28
✽ ✽NOTICE
Coasting guide is only a supplemen-
tal system to assist with fuel-efficient
driving in certain situations. Thus,
the operating conditions may be dif-
ferent in accordance with
traffic/road conditions (i.e. driving
in a traffic jam, driving on a slope,
driving on a curve). Thus, take the
actual driving conditions into con-
sideration, such as distances from
the vehicles ahead/ behind, while
referring to the coasting guide sys-
tem as guidance.
Unplug vehicle to start
(Plug-in hybrid)
This message is displayed when you
start the engine without unplugging
the charging cable. Unplug the
charging cable, and then start the
vehicle.
Remaining time (Plug-in hybrid)
This message is displayed to notify
the remaining time to fully charge the
battery.
Shift to P to charge(Plug-in hybrid)
This message is displayed when the
charging connector is plugged with
the shift lever in R (Reverse), N
(Neutral) or D (Drive). Move the shift
lever to P (Park) and re-start the
charging process.
Electric/Hybrid modes (Plug-in hybrid)
A corresponding message is dis-
played when a mode is selected by
pressing the HEV button.
Low battery. Maintaining Hybridmode (Plug-in hybrid)
This message is displayed when the
vehicle is unable to convert to EV
mode even when pressing the HEV
button during HEV mode driving due
to insufficient high-voltage (hybrid)
battery level.
Low battery temp. Maintainingcurrent (Plug-in hybrid)
This message is displayed when the
vehicle is unable to convert to EV
mode even when pressing the HEV
button during HEV mode driving due
to low battery temperature.
DRIVING THE HYBRID/PLUG-IN HYBRID VEHICLE (CONT.)
Page 36 of 597
H29
Charger Error! (Plug-in hybrid)
This message is displayed when the
charging failed due to an external
charger error.
The purpose of this message is to let
you know the error has occurred in
the charger itself, not in the vehicle.
Low/High System temperatureMaintaining Hybrid mode (Plug-in hybrid)
This message is displayed when the
vehicle is unable to convert to EV
mode even when pressing the HEV
button during HEV mode driving due
to low/high system temperature.
Switching to Hybrid mode toallow heating or air conditioning(Plug-in hybrid)
When the coolant temperature is lower than 57 °F (-14 °C), and you
turn the climate control On for
heating, this message will be dis-
played in the cluster. Then, the
vehicle will automatically switch to
HEV mode.
When the coolant temperature is higher than 57 °F (-14 °C), or you
turn the climate control Off, the
vehicle will automatically return to
EV mode.
Wait until fuel door opens
(Plug-in hybrid)
This message is displayed when you
attempt to open the fuel filler lid with
the fuel tank pressurized. Wait until
the fuel tank is depressurized.
✽ ✽ NOTICE
• It may take up to 20 seconds to
open fuel filler lid.
• When the fuel filler lid is frozen and does not open after 20 seconds
at freezing temperature, slightly
tap the fuel filler lid and then
attempt to open it.
Page 37 of 597
H30
Fuel door open (Plug-in hybrid)
This message is displayed when the
fuel filler lid is opened.
Also means "Ready to refuel".
Check fuel door (Plug-in hybrid)
This message is displayed when the
fuel filler lid is open or an abnormal-
ity has occurred.
Refuel after stopping (Plug-in hybrid)
This message is displayed when the
fuel filler lid open button is pressed
when a vehicle equipped with a plug-
in hybrid seal-type fuel tank is in
motion (vehicle speed is greater than
mi/h (0 km/h)).
Disconnect charging cable beforeopening fuel door (Plug-in hybrid)
This message is displayed when you
press the fuel filler lid open button
while charging.
The fuel lid will not open when the
charging cable is connected to the
vehicle.
Charging Door Open (Plug-in hybrid)
This message indicates that the
charging door is open while in driv-
ing-ready state to encourage you to
inspect and close the door.
(Driving with the charging door open
may result in moisture inflow or dam-
age. This message is used to prevent
such occurrences.)
DRIVING THE HYBRID/PLUG-IN HYBRID VEHICLE (CONT.)
Page 43 of 597
H36
AUX. BATTERY SAVER+ (For
Plug-in Hybrid, if equipped)
The Aux. Battery Saver+ is a function
that monitors the charging status of
the 12V auxiliary battery.
If the auxiliary battery level is low, the
main high voltage battery charges
the auxiliary battery.
✽ ✽NOTICE
The Aux. Battery Saver+ function will
be ON when the vehicle is delivered. If
the function is not needed, you may
turn it off in the Users Settings mode
on the LCD display. For more infor-
mation, refer to the "System setting"
on the following page.
Mode
When the vehicle is OFF with all
doors, hood and liftgate closed, the
Aux. Battery Saver+ periodically acti-
vates according to the auxiliary bat-
tery status.
When the engine start/stop button is
in the ON position with the charging
connector plugged in, this function
activates according to the auxiliary
battery status to prevent over-dis-
charge of the auxiliary battery.
✽ ✽NOTICE
The Aux. Battery Saver+ activates
for a maximum of 20 minutes. If the
Aux. Battery Saver+ function acti-
vates more than 10 times consecu-
tively, in the Automatic Mode, this
function will stop activating, judg-
ing that there is a problem with the
auxiliary battery. In this case, drive
the vehicle for some period of time.
The function will start activating if
the auxiliary battery returns to nor-
mal.
✽ ✽NOTICE
If the Aux. Battery Saver+ function
was activated, a message will be dis-
played on the instrument cluster
and the high voltage battery level
may have decreased.
ENERGY FLOW HYBRID/PLUG-IN HYBRID VEHICLE (CONT.)
CAUTION
The Aux. Battery Saver+ func-
tion cannot prevent battery dis-charge if the auxiliary battery isdamaged, worn out, used as apower supply or unauthorizedelectronic devices are used.
Page 44 of 597
H37
System setting
The driver can activate the Aux.
Battery Saver+ function by placing
the engine start/stop button to the
ON position and by selecting:
"User Settings \bOther \b Aux.
Battery Saver+"
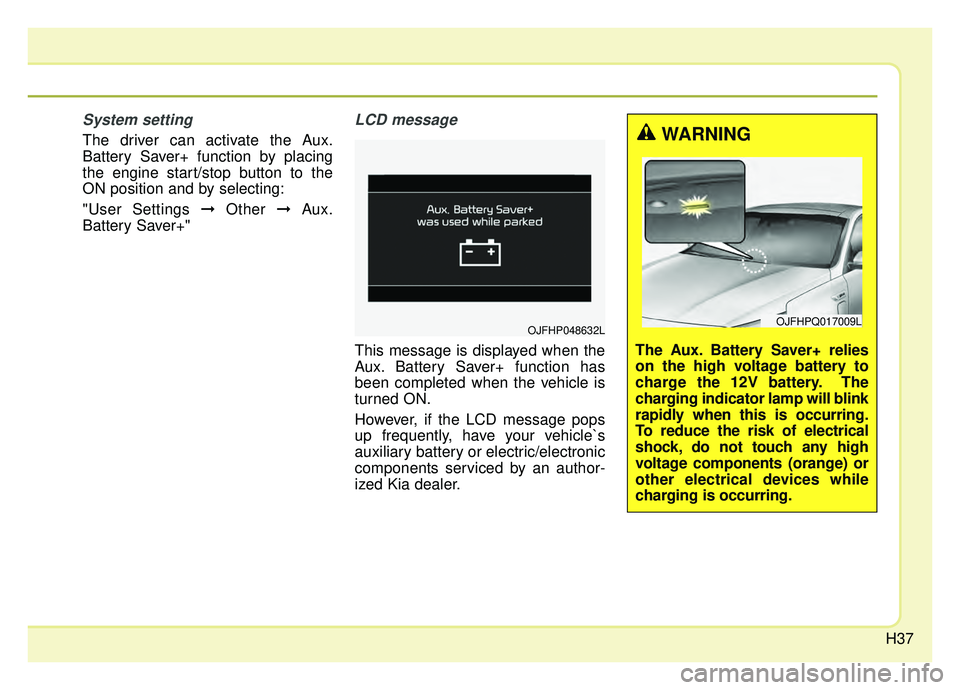
LCD message
This message is displayed when the
Aux. Battery Saver+ function has
been completed when the vehicle is
turned ON.
However, if the LCD message pops
up frequently, have your vehicle`s
auxiliary battery or electric/electronic
components serviced by an author-
ized Kia dealer.
OJFHP048632L
WARNING
The Aux. Battery Saver+ relies
on the high voltage battery to
charge the 12V battery. The
charging indicator lamp will blink
rapidly when this is occurring.
To reduce the risk of electrical
shock, do not touch any high
voltage components (orange) or
other electrical devices while
charging is occurring.
OJFHPQ017009L
Page 140 of 597

Mirrors . . . . . . . . . . . . . . . . . . . . . . . . . . . . . . . . . . 4-48\
. . . . . . . . . . . . . . . . . . . . . . . . 4-48
. . . . . . . . . . . . . . . . . . . . . . . 4-50
Instrument cluster . . . . . . . . . . . . . . . . . . . . . . . . . 4-53
. . . . . . . . . . . . . . . . . . . . . 4-54
. . . . . . . . . . . . . . . . . . . . . . . . . . 4-54
. . . . . . . . . . . . . . . . . . . . . . . . . . . . . . . . . . . . \
. 4-55
. . . . . . . . . . . . . . . . . . . . . . . 4-60
LCD display . . . . . . . . . . . . . . . . . . . . . . . . . . . . . . 4-61
. . . . . . . . . . . . . . . . . . . . 4-69
. . . . . . . . . . . . . . . . . . . . . . . . . . . . . . . . . . 4-69\
. . . . . . . . . . . . . . . . . . . . . . . . . . . . 4-73
Warning and indicator lights . . . . . . . . . . . . . . . . 4-84
. . . . . . . . . . . . . . . . . . . . . . . . . . . . . . . 4-84
Parking distance warning-reverse . . . . . . . . . . . . 4-99
. 4-99
warning-reverse system . . . . . . . . . . . . . . . . . . . . . 4-100
precautions . . . . . . . . . . . . . . . . . . . . . . . . . . . . . . . . 4-101
. . . . . . . . . . . . . . . . . . . . . . . . . . . . . . . 4-101
Rearview monitor . . . . . . . . . . . . . . . . . . . . . . . . . 4-102
Lighting . . . . . . . . . . . . . . . . . . . . . . . . . . . . . . . . . 4-103
. . . . . . . . . . . . . . . . . . . . . . . . 4-103
. . . . . . . . . . . . . . . . . . . . . . . . . . . . . 4-103
. . . . . . . . . . . . . . . . . . . . . . . . . . . . 4-106
. . . . . . . . . . . 4-109
. . . . . . . . . . . . . . . . . . . . . . . . . . . . 4-110
. . . . . . . . . . . . . . . . . . . . . . . . . . . . . . 4-110
. . . . . . . . . . . . . . . . . . . . . 4-111
. . . . . . . . . . . . . . . . . . . . . . 4-111
Wipers and washers . . . . . . . . . . . . . . . . . . . . . . . 4-112
. . . . . . . . . . . . . . . . . . . . . . . . . . . 4-112
. . . . . . . . . . . . . . . . . . . . . 4-113
Interior lights . . . . . . . . . . . . . . . . . . . . . . . . . . . . 4-114
. . . . . . . . . . . . . . . . . . . 4-114
. . . . . . . . . . . . . . . . . . . . . . . . . . . . . . . . . 4-114
. . . . . . . . . . . . . . . . . . . . . . . . . . . . . . . . . . 4-11\
5
. . . . . . . . . . . . . . . . . . . . . . . . . . . 4-116
. . . . . . . . . . . . . . . . . . . . . . . . . . 4-116
. . . . . . . . . . . . . . . . . . . . . . . . . . . . . 4-116
4
Page 157 of 597

419
Features of your vehicle
1. Setting
To activate the Smart Trunk, go to
User Settings Mode and select
Smart Trunk on the LCD display.
❈ For more details, refer to “LCD
Display” in this chapter.
2. Detect and Alert
If you are positioned in the detecting
area (20 ~ 40 inches (50 ~100 cm)
behind the vehicle) carrying a smart
key, the hazard warning lights will
blink and the chime will sound for
about 3 seconds to alert you the
smart key has been detected and the
trunk will open.✽ ✽NOTICE
Do not approach the detecting area
if you do not want the trunk to open.
If you have unintentionally entered
the detecting area and the hazard
warning lights and chime starts to
operate, leave the detecting area
with the smart key. The trunk will
stay closed.
OJFH046011N