stop light KIA PICANTO 2006 User Guide
[x] Cancel search | Manufacturer: KIA, Model Year: 2006, Model line: PICANTO, Model: KIA PICANTO 2006Pages: 281, PDF Size: 9.89 MB
Page 163 of 281
Driving tips
8
5
Driving at night
Because night driving presents more
hazards than driving in the daylight,
here are some important tips to
remember:
Slow down and keep more dis-
tance between you and other vehi-
cles, as it may be more difficult tosee at night, especially in areas
where there may not be any street
lights.
Adjust your mirrors to reduce the glare from other driver's head-
lights.
Keep your headlights clean and properly aimed on vehicles notequipped with the automatic head-
light aiming feature. Dirty or
improperly aimed headlights will
make it much more difficult to seeat night.
Avoid staring directly at the head- lights of oncoming vehicles. You
could be temporarily blinded, and it
will take several seconds for your
eyes to readjust to the darkness. Driving in the rain
Rain and wet roads can make driving
dangerous, especially if you’re not
prepared for the slick pavement.
Here are a few things to consider
when driving in the rain:
A heavy rainfall will make it harder
to see and will increase the dis-
tance needed to stop your vehicle,
so slow down.
Keep your windshield wiping equipment in good shape. Replace
your windshield wiper blades when
they show signs of streaking ormissing areas on the windshield.
If your tires are not in good condi- tion, making a quick stop on wet
pavement can cause a skid and
possibly lead to an accident. Be
sure your tires are in good shape.
Turn on your headlights to make it easier for others to see you.
1 23456789
WARNING - Spinning tires
Do not spin the wheels, espe-
cially at speeds more than 56
km/h (35 mph). Spinning thewheels at high speeds when the
vehicle is stationary could
cause a tire to overheat, explode
and injure bystanders.
Page 173 of 281
Driving tips
18
5
1 23456789
Following distance
Stay at least twice as far behind the
vehicle ahead as you would when
driving your vehicle without a trailer.
This can help you avoid situations
that require heavy braking and sud-
den turns.
Passing
You’ll need more passing distance
up ahead when you’re towing a trail-
er. And, because you’re a good deal
longer, you’ll need to go much farther
beyond the passed vehicle before
you can return to your lane.
Backing up
Hold the bottom of the steering
wheel with one hand. Then, to move
the trailer to the left, just move your
hand to the left. To move the trailer to
the right, move your hand to the
right. Always back up slowly and, if
possible, have someone guide you.
Making turns
When you’re turning with a trailer,
make wider turns than normal. Do
this so your trailer won’t strike soft
shoulders, curbs, road signs, trees,
or other objects. Avoid jerky or sud-
den maneuvers. Signal well in
advance.
Turn signals when towing a trailer
When you tow a trailer, your vehicle
has to have a different turn signal
flasher and extra wiring. The green
arrows on your instrument panel will
flash whenever you signal a turn or
lane change. Properly connected,
the trailer lights will also flash to alert
other drivers you’re about to turn,
change lanes, or stop.
When towing a trailer, the green
arrows on your instrument panel will
flash for turns even if the bulbs on
the trailer are burned out. Thus, you
may think drivers behind you are
seeing your signals when, in fact,
they are not. It’s important to check
occasionally to be sure the trailer
bulbs are still working. You must also
check the lights every time you dis-connect and then reconnect the
wires.
Page 180 of 281
In case of an emergency
2
6
ROAD WARNING
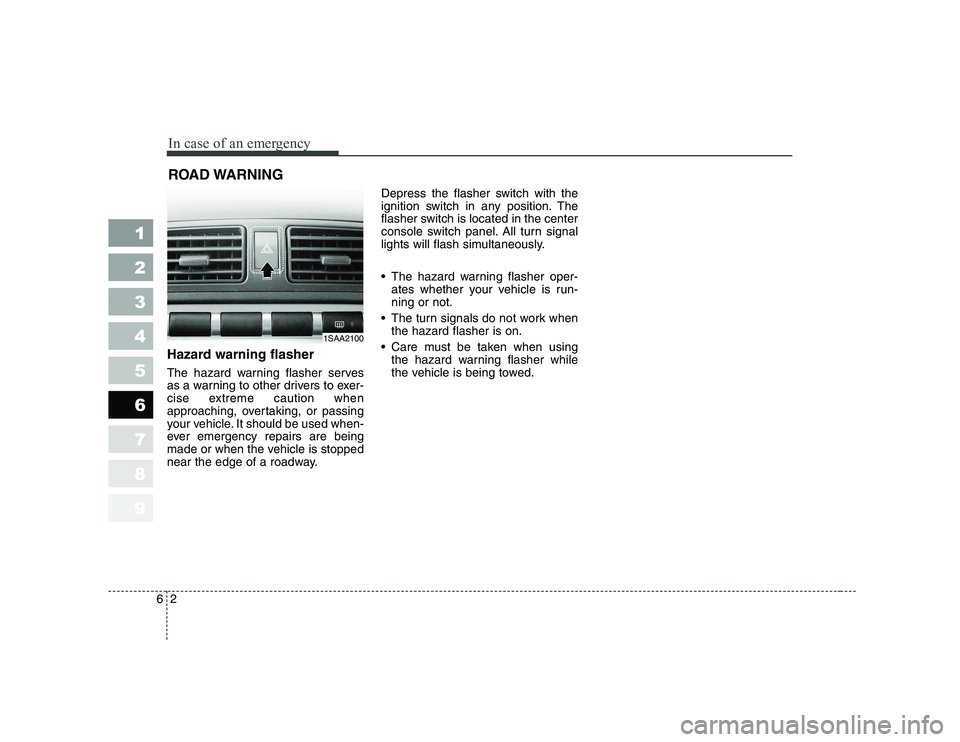
Hazard warning flasher
The hazard warning flasher serves
as a warning to other drivers to exer-
cise extreme caution when
approaching, overtaking, or passing
your vehicle. It should be used when-
ever emergency repairs are being
made or when the vehicle is stopped
near the edge of a roadway. Depress the flasher switch with the
ignition switch in any position. The
flasher switch is located in the center
console switch panel. All turn signal
lights will flash simultaneously.
• The hazard warning flasher oper-
ates whether your vehicle is run- ning or not.
The turn signals do not work when the hazard flasher is on.
Care must be taken when using the hazard warning flasher while
the vehicle is being towed.
1 23456789
1SAA2100
Page 189 of 281

611
In case of an emergency
1 23456789
Description Fuse rating Protected component
ECU1 20A (30A) Engine control unit
STOP 10A Stop light
FR/FOG 10A Front fog light
A/CON 10A Air conditioner
HORN 10A Horn
ECU2 10A Engine control unit
SPARE 10A spare fuse
SPARE 15A spare fuse
SPARE 10A spare fuse
ABS2 30A Anti-lock brake system
ABS1 30A Anti-lock brake system
B+ 30A In panel B+
BLOWER 30A Blower
IGN1 30A Ignition
IGN2 30A Ignition
TAIL LH 10A Tail light (left)
TAIL RH 10A Tail light (right)
DRL 10A Daytime running light
HAZARD 15A Hazard warning flasher
R/LP 10A Room lamp
AUDIO 15A Audio
P/WDW 30A Power windowDescription Fuse rating Protected component
RAD 30A Radiator fan
BATT 100A (120A) Alternator, Battery
F/FOG - Front fog light relay
A/CON - Air conditioner relay
HORN - Horn relay
START - Start motor relay
RAD1 - Radiator fan relay
RAD2 - Radiator fan relay
RR FOG - Rear fog light relay
TAIL - Tail light relay
Engine compartment
Engine compartment (Diesel only)
Description Fuse rating Protected component
FFHTS 30A
Fuel filter heater temporary sensor
GLOW PLUG 80A Glow plug
MDPS 80A Motor driven power steering
PTC HTR1 40A PTC heater1
PTC HTR2 40A PTC heater2
PTC HTR3 40A PTC heater3
Page 207 of 281
629
In case of an emergency
1 23456789
12. If a tire inflation pressure of 1.8bar (26 psi) is reached, turn the
on / off switch to the "0" position,
quickly unscrew the hose from
the tire. Unplug the cable from
the cigarette lighter. Do not
unscrew the bottle. Stow theTireMobilityKit, the bottle cap and
the bottle holder cap safely in the
vehicle in an easily accessible
place, as it will be needed again
to check tire pressure.
13. Drive immediately and cautiously for about 3 km / 2 miles so thatthe sealing compound can seal
the puncture. Do not exceed 80
km/h / 50 mph. If while driving,
you experience any unusual
vibration, ride disturbance or
noise, reduce your speed and
drive with caution until you can
safely pull off of the side of the
road. Call for road side service or
towing. 2nd Stage: Check tire pressure
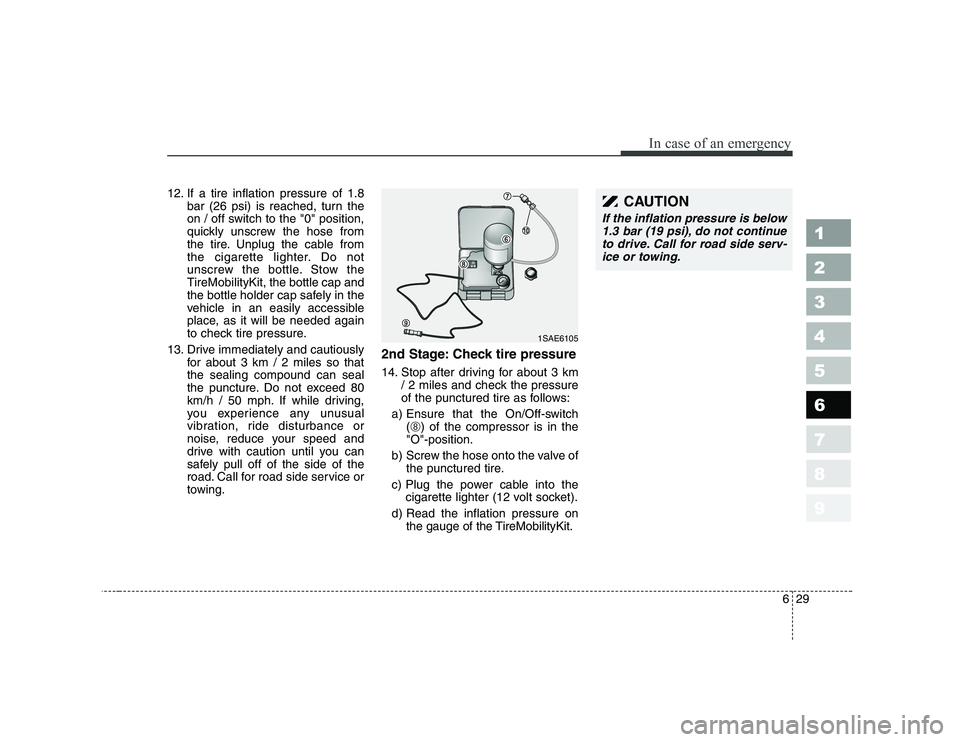
14. Stop after driving for about 3 km
/ 2 miles and check the pressure
of the punctured tire as follows:
a) Ensure that the On/Off-switch (➇ ) of the compressor is in the
"O"-position.
b) Screw the hose onto the valve of the punctured tire.
c) Plug the power cable into the cigarette lighter (12 volt socket).
d) Read the inflation pressure on the gauge of the TireMobilityKit.CAUTION
If the inflation pressure is below
1.3 bar (19 psi), do not continueto drive. Call for road side serv- ice or towing.
1SAE6105
Page 223 of 281
Maintenance
10
7
1 23456789
OWNER MAINTENANCE
Owner maintenance schedule
The following lists are vehicle checks and inspections that should be per-
formed by the owner or an AuthorizedKia Dealer at the frequencies indicat-
ed to help ensure safe, dependable
operation of your vehicle.
Any adverse conditions should be
brought to the attention of your deal-
er as soon as possible.
These Owner Maintenance Checks
are generally not covered by war-
ranties and you may be charged for
labor, parts and lubricants used.
When you stop for fuel:
Check the engine oil level.
Check coolant level in coolant reservoir.
Check the windshield washer fluid level. Look for low or under-inflated tires.
While operating your vehicle:
Note any changes in the sound of
the exhaust or any smell of
exhaust fumes in the vehicle.
Check for vibrations in the steering wheel. Notice any increased steer-
ing effort or looseness in the steer-
ing wheel, or change in its straight-ahead position.
Notice if your vehicle constantly turns slightly or “pulls” to one side
when traveling on smooth, levelroad.
When stopping, listen and check for strange sounds, pulling to one
side, increased brake pedal travel
or “hard-to-push” brake pedal.
If any slipping or changes in the operation of your transaxle occurs,
check the transaxle fluid level.
Check automatic transaxle P (Park) function.
Check parking brake.
Check for fluid leaks under your vehicle (water dripping from the air conditioning system after use is
normal).
At least monthly:
Check coolant level in the coolantrecovery reservoir.
Check the operation of all exterior lights, including the stoplights, turn
signals and hazard warning flash-
ers.
Check the inflation pressures of all tires including the spare.
At least twice a year
(i.e., every Spring and Fall) :
Check radiator, heater and air con- ditioning hoses for leaks or da-
mage.
Check windshield washer spray and wiper operation. Clean wiper
blades with clean cloth dampened
with washer fluid.
Check headlight alignment.
Check muffler, exhaust pipes, shields and clamps.
Check the lap/shoulder belts for wear and function.
Check for worn tires and loose wheel lug nuts.
WARNING
Be careful when checking your
engine coolant level when the
engine is hot. Scalding hot
coolant and steam may blow out
under pressure. This could
cause serious injury.
Page 256 of 281

743
Maintenance
1 23456789
Wheel replacement
When replacing the metal wheels for
any reason, make sure the new
wheels are equivalent to the original
factory units in diameter, rim widthand offset.WARNING
When replacing tires, never mix radial, bias-belted, and
bias-type tires. All four tires
should be of the same size,
design and construction. Use
only the tire sizes listed on the
Tire Label found below the
door striker on the driver’s
side. Make sure that all tires
and wheels are the same size
and have the same load-carry-
ing capacity. Use only tire andwheel combinations recom-
mended on the Tire Label or
by an Authorized Kia Dealer.
Failure to follow these precau-
tions can adversely affect the
safety and handling of your
vehicle.
(Continued)(Continued)
The use of any other tire sizeor type may seriously affect
ride, handling, ground clear-
ance, tire clearance, andspeedometer calibration.
Driving on worn-out tires is very hazardous and will
reduce braking effectiveness,
steering accuracy, and trac-tion.
It is best to replace all four tires at the same time. If that is
not possible, or necessary,
then replace the two front or
two rear tires as a pair.Replacing just one tire can
seriously affect your vehicle’shandling.
WARNING
A wheel that is not the correct
size may adversely affect wheel
and bearing life, braking and
stopping abilities, handling
characteristics, ground clear-
ance, body-to-tire clearance,
snow chain clearance,
speedometer calibration, head-
light aim and bumper height.
Page 265 of 281
Maintenance
52
7
1 23456789
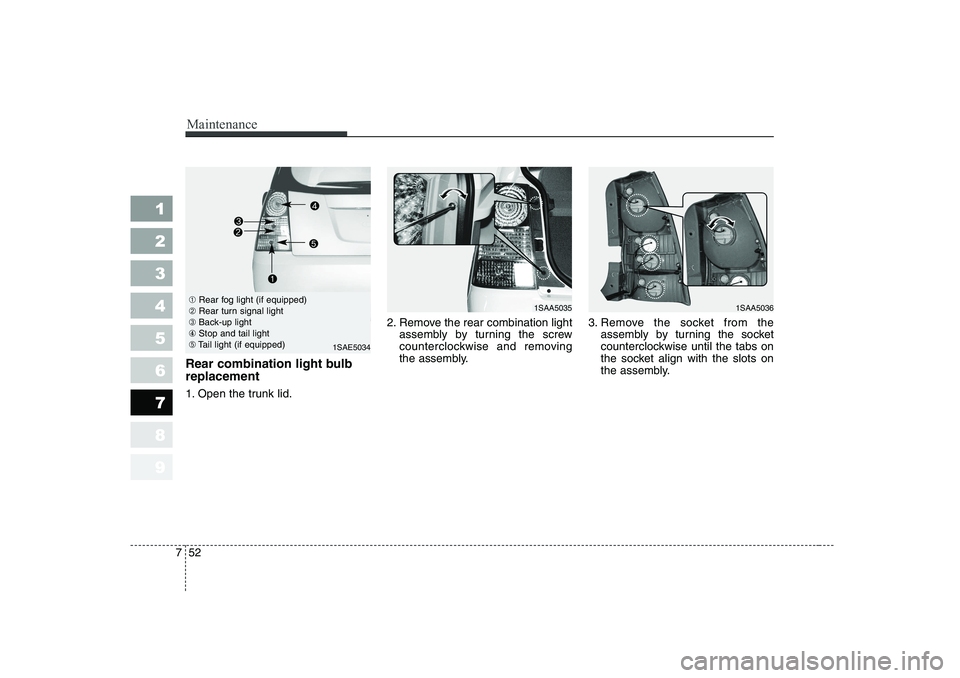
Rear combination light bulb replacement
1. Open the trunk lid. 2. Remove the rear combination light
assembly by turning the screw
counterclockwise and removing
the assembly. 3. Remove the socket from the
assembly by turning the socket
counterclockwise until the tabs on
the socket align with the slots on
the assembly.
➀Rear fog light (if equipped)
➁ Rear turn signal light
➂ Back-up light
④ Stop and tail light
➄ Tail light (if equipped)
1SAE5034
1SAA50361SAA5035
Page 277 of 281
Specifications
4
8
1 23456789
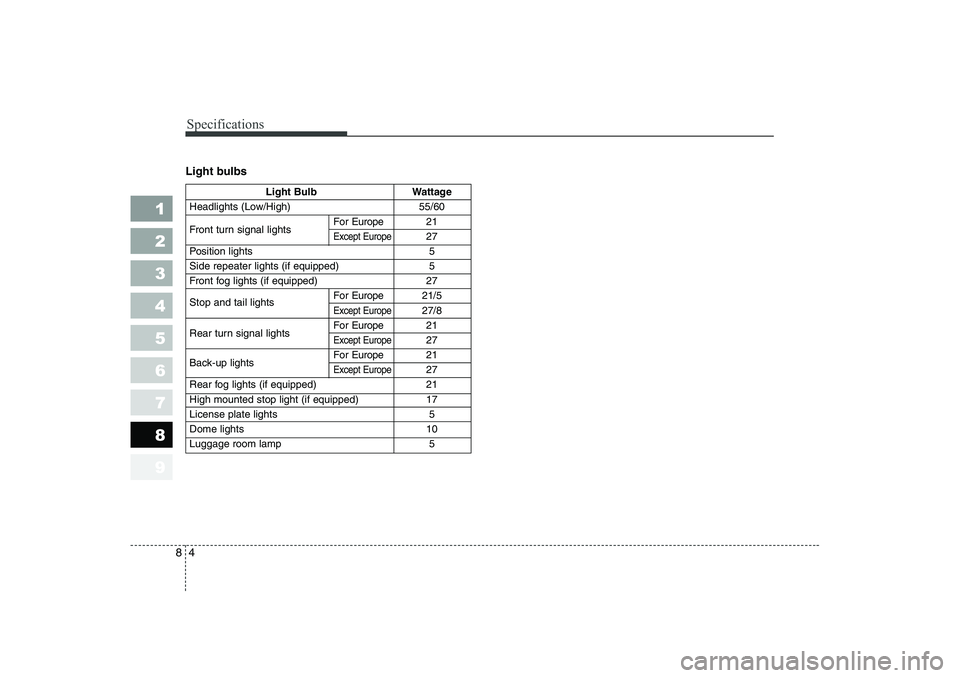
Light bulbs
Light Bulb Wattage
Headlights (Low/High) 55/60
Front turn signal lights For Europe 21
Except Europe27
Position lights 5
Side repeater lights (if equipped) 5
Front fog lights (if equipped) 27 Stop and tail lights For Europe
21/5
Except Europe27/8
Rear turn signal lights For Europe 21
Except Europe27
Back-up lights For Europe 21
Except Europe27
Rear fog lights (if equipped) 21
High mounted stop light (if equipped) 17
License plate lights 5Dome lights 10
Luggage room lamp 5