stop light KIA PICANTO 2006 Owners Manual
[x] Cancel search | Manufacturer: KIA, Model Year: 2006, Model line: PICANTO, Model: KIA PICANTO 2006Pages: 281, PDF Size: 9.89 MB
Page 86 of 281

Knowing your vehicle
76
3
1 23456789
CAUTION
To avoid injury from sharp
objects, it is recommended thatprotective gloves be worn whenopening the fuel filler door man- ually.
Closing the hood
1. Before closing the hood, check the following:
All filler caps in engine compart- ment must be correctly installed.
Gloves, rags or any other com- bustible material must be
removed from the engine com-
partment.
2. Secure the support rod in its clip.
3. Lower the hood to about 30 cm (12 inches) height and then let it
drop to properly lock in place.
Make sure the hood is properly
locked before driving. 1. Stop the engine.
2. To open the fuel filler lid, pull the
release lever. 3. Pull the fuel filler lid out to open.
4. To remove the cap, turn the fuel
tank cap counter-clockwise.
5. Refuel as needed.
6. To install the cap, turn it clockwise until it “clicks”. This indicates that the cap is securely tightened.
7. Close the fuel filler lid and push it lightly and make sure that it issecurely closed.
CAUTION
Before closing the hood, make
sure that all engine parts andtools have been removed fromthe engine area and that noone’s hands are near the hoodopening.
Do not leave gloves, rags or any other combustible materi-al in the engine compartment.Doing so may cause a heat- induced fire.
FUEL FILLER LID
1SAA20181SAA2019
Page 106 of 281

45
1 23456789
Driving your vehicle
4. If the glow indicator light goes out,turn the ignition switch to START and hold it there until the engine
starts (a maximum of 10 sec-onds), then release the key.
✽✽
NOTICE
If the engine were not started within
2 seconds after the preheating iscompleted, turn the ignition key
once more to the LOCK positionduring 10 seconds, and then to the
ON position, in order to preheatagain.
Starting and stopping the
engine for turbo charger
intercooler (if equipped)
1. Do not race or accelerate the engine immediately after starting.
If the engine is cold, allow the
engine to idle for several seconds
before it is driven to ensure suffi-
cient lubrication of the turbocharger unit.
2. After high speed or extended driv- ing, requiring a heavy engine load,
the engine should be allowed to
idle, as shown in the chart below,
before turning it off.
This idle time will allow the turbocharger to cool prior to shutting
the engine off.
WARNING
Do not turn the engine off imme-
diately after it has been subject-
ed to a heavy load. Doing so
may cause severe damage to
the engine or turbo charger unit.
Driving Condition Required Idle Time
Normal driving Not necessary
High speed Up to 80 km/h About 20 seconds
driving Up to 100 km/h About 1 minuteSteep mountain slopes or
continued driving in excess About 2 minutesof 100 km/h
W-60
Glow indicator light
Page 107 of 281

Driving your vehicle
6
4
1 23456789
Manual transaxle operation
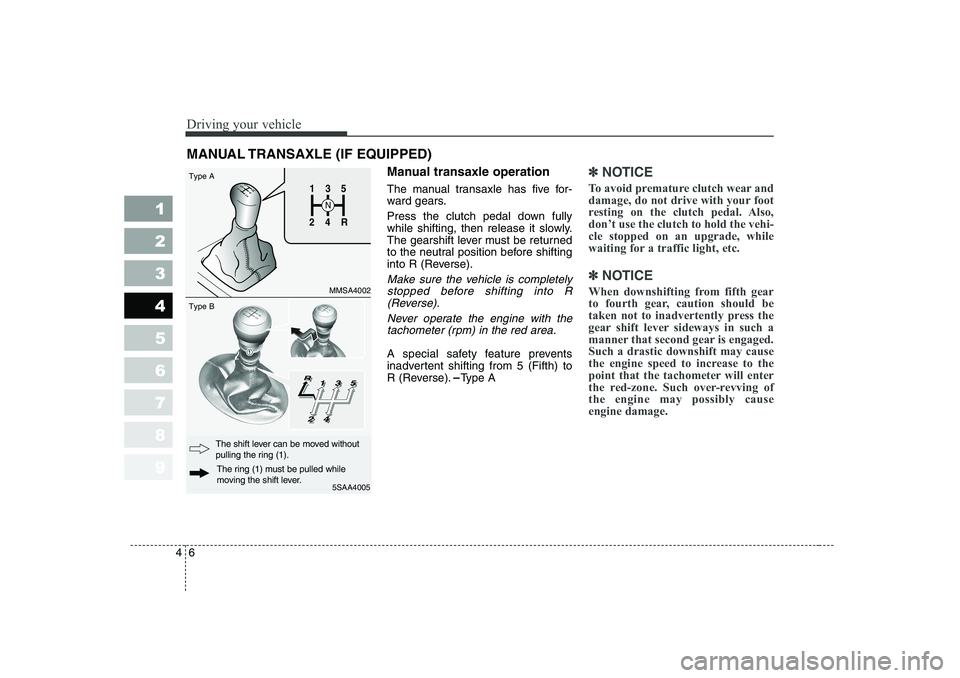
The manual transaxle has five for-
ward gears.
Press the clutch pedal down fully
while shifting, then release it slowly.
The gearshift lever must be returned
to the neutral position before shifting
into R (Reverse).
Make sure the vehicle is completely
stopped before shifting into R(Reverse).
Never operate the engine with thetachometer (rpm) in the red area.
A special safety feature prevents
inadvertent shifting from 5 (Fifth) to
R (Reverse). Type A
✽✽ NOTICE
To avoid premature clutch wear and
damage, do not drive with your foot
resting on the clutch pedal. Also,don’t use the clutch to hold the vehi-cle stopped on an upgrade, while
waiting for a traffic light, etc.
✽
✽ NOTICE
When downshifting from fifth gear
to fourth gear, caution should be
taken not to inadvertently press the
gear shift lever sideways in such a
manner that second gear is engaged.Such a drastic downshift may cause
the engine speed to increase to the
point that the tachometer will enter
the red-zone. Such over-revving ofthe engine may possibly causeengine damage.
MANUAL TRANSAXLE (IF EQUIPPED)
1
2 4
R
3
S
N
135
R
4
2
5SAA4005
Type A Type B
MMSA4002
The ring (1) must be pulled while
moving the shift lever.
The shift lever can be moved without
pulling the ring (1).
Page 110 of 281

49
1 23456789
Driving your vehicle
✽✽
NOTICE
The transaxle may be damaged if
you shift into P (Park) while thevehicle is in motion.
R (reverse)
Use this position to drive the vehicle
backward.
✽✽
NOTICE
Always come to a complete stop
before shifting into or out of R(Reverse); you may damage thetransaxle if you shift into R whilethe vehicle is in motion, except as
explained in “Rocking the Vehicle”,in this manual.
N (neutral)
With the gearshift in the N position,
the wheels and transaxle are not
locked. The vehicle will roll freely
even on the slightest incline unless
the parking brake or service brakesare applied.(Continued) Before leaving the driver ’s
seat, always make sure the
shift lever is in the P (PARK)
position. Set the parking
brake fully, shut the engine off
and take the key with you.
Unexpected and sudden vehi-
cle movement can occur if you
do not follow these precau-
tions in the order specified.
Never leave a child unattend-
ed in a vehicle.
Page 116 of 281

415
1 23456789
Driving your vehicle
Parking brake
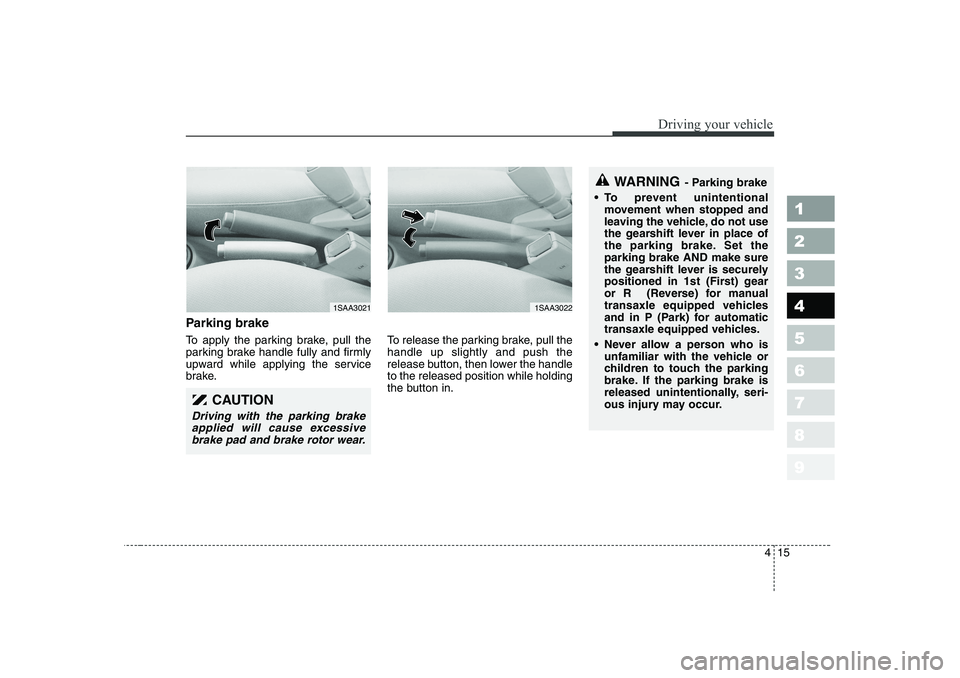
To apply the parking brake, pull the
parking brake handle fully and firmly
upward while applying the service
brake.To release the parking brake, pull thehandle up slightly and push the
release button, then lower the handleto the released position while holding
the button in.
CAUTION
Driving with the parking brake
applied will cause excessive brake pad and brake rotor wear.
1SAA30211SAA3022
WARNING - Parking brake
To prevent unintentional
movement when stopped and
leaving the vehicle, do not use
the gearshift lever in place of
the parking brake. Set theparking brake AND make sure
the gearshift lever is securely
positioned in 1st (First) gear
or R (Reverse) for manual
transaxle equipped vehicles
and in P (Park) for automatic
transaxle equipped vehicles.
Never allow a person who is
unfamiliar with the vehicle or
children to touch the parking
brake. If the parking brake is
released unintentionally, seri-
ous injury may occur.
Page 129 of 281

Driving your vehicle
28
4
1 23456789
Engine oil pressure warning
This warning light indicates the
engine oil pressure is low.
If the warning light illuminates while
driving:
1. Drive safely to the side of the road
and stop.
2. With the engine off, check the engine oil level. If the level is low, add oil as required.
If the warning light remains on after
adding oil or if oil is not available, call
an Authorized Kia Dealer.
✽✽
NOTICE
If the engine is not stopped immedi-
ately, severe damage could result.
Charging system warning
This warning light indicates a mal-
function of either the generator or
electrical charging system.
If the warning light comes on while
the vehicle is in motion:
1. Drive to the nearest safe location.
2. With the engine off, check the gen- erator drive belt for looseness or
breakage.
3. If the belt is adjusted properly, a problem exists somewhere in the
electrical charging system. Have
an Authorized Kia Dealer correct
the problem as soon as possible. Safety belt warning
Type A
As a reminder to the driver and pas-
senger, safety belt warning light will
blink for approximately 6 seconds
each time you turn the ignition switchON.
If the driver
’s lap/shoulder belt is not
fastened when the key is turned ON,
the safety belt warning light blinks for
approximately 6 seconds. (ifequipped)
If the system does not operate as
described, see an Authorized Kia
Dealer for assistance.
Type B (for Europe)
As a reminder to the driver and pas-
senger, safety belt warning light will
blink or illuminate for approximately 6
seconds each time you turn the igni-
tion switch ON.
Page 130 of 281

429
1 23456789
Driving your vehicle
If the driver's lap/shoulder belt is not
fastened when the key is turned ON
or if it is disconnected after the key is
turn ON, the safety belt warning light
will blink or illuminate until the belt is
fastened.
But, if the driver's lap/shoulder belt is connected and disconnected twice
within 9 seconds after the belt is fas-
tened, the safety belt warning light
will not operate.
If the system does not operate as
described, see an authorized Kia
dealer for assistance.
Type C
If the driver's lap/shoulder belt is not
fastened when the key is turned ON
or if it is disconnected after the key is
turn ON, the safety belt warning light
illuminates until the belt is fastened.
If the system does not operate as
described, see an Authorized Kia
Dealer for assistance.Parking brake & brake fluid warning
Parking brake warning
This light is illuminated when the
parking brake is applied with the igni-
tion switch in the START or ON posi-
tion. The warning light should go off
when the parking brake is released.
Low brake fluid level warning
If the warning light remains on, it may
indicate that the brake fluid level in
the reservoir is low.
If the warning light remains on:
1. Drive carefully to the nearest safe
location and stop your vehicle.
2. With the engine stopped, check the brake fluid level immediately
and add fluid as required. Then
check all brake components for
fluid leaks. 3. Do not drive the vehicle if leaks
are found, the warning light
remains on or the brakes do not
operate properly. Have it towed to
any Authorized Kia Dealer for a
brake system inspection and nec-
essary repairs.
To check bulb operation, check
whether the parking brake and brake
fluid warning light illuminates when
the ignition switch is in the ON posi-tion.
WARNING
Driving the vehicle with a warn-
ing light on is dangerous. If thebrake warning light remains on,
have the brakes checked and
repaired immediately by an
Authorized Kia Dealer.
Page 132 of 281

431
1 23456789
Driving your vehicle
Malfunction indicator (if equipped)
This indicator light is part of the Engine Control System which moni-
tors various emission control system
components. If this light illuminates
while driving, it indicates that a
potential problem has been detected
somewhere in the emission controlsystem.
Generally, your vehicle will continue
to be drivable and will not need tow-
ing, but have the system checked by
an authorized Kia Dealer as soon as
possible.Electric power steer- ing system(EPS) warn-ing Light (if equipped,
diesel engine only) This indicator light comes on about 3
seconds after the ignition key is
turned to the
“ON ”position or after
the engine is started, it will go out.This light also comes on when the
EPS has some troubles. If this light
illuminates while driving, take your
car to the authorized Kia Dealer and
have the system checked.CAUTION
Prolonged driving with the
Emission Control SystemMalfunction Indicator Light ( ) illuminated may causedamage to the emission con- trol systems which couldeffect drivability and/or fueleconomy.
If the EmissionControl System
Malfunction Indicator Light ( ) begins to flash ON and OFF, potential catalytic con-verter damage is possible which could result in loss ofengine power. Have the Engine Control System inspected assoon as possible by an author- ized Kia Dealer.
EPS
CAUTION
When you move the electric
power steering back-end andforth-end continuously in stop position, steering wheel playsheavily to operate anti-overloadsystem. It is normal condition. It returns to be normal gettingtime.
Page 137 of 281

Driving your vehicle
36
4
1 23456789
Front fog light (if equipped)
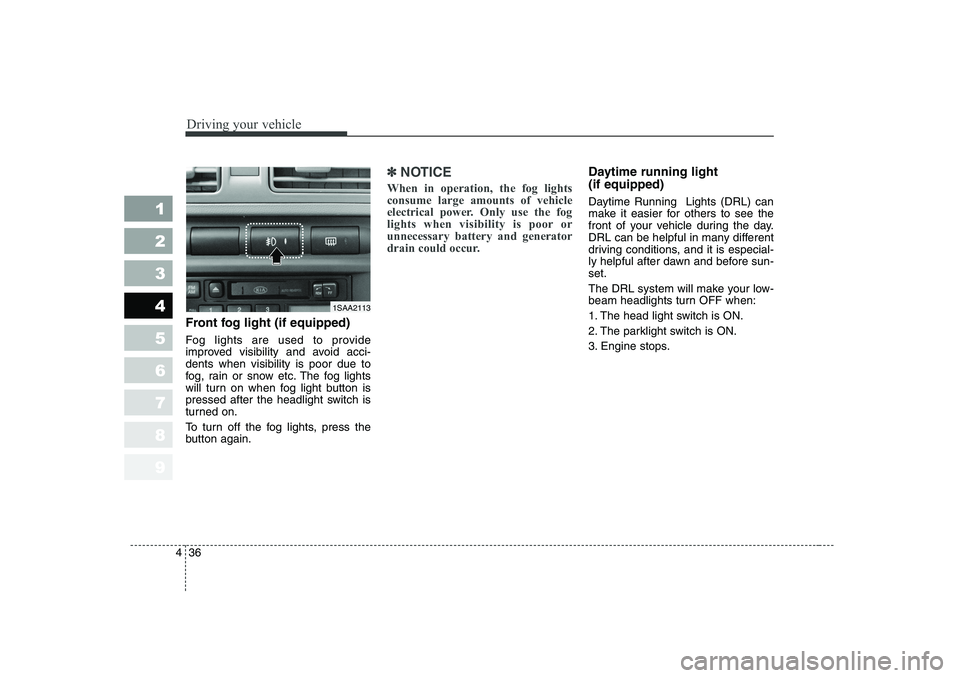
Fog lights are used to provide
improved visibility and avoid acci-dents when visibility is poor due to
fog, rain or snow etc. The fog lights
will turn on when fog light button is
pressed after the headlight switch is
turned on.
To turn off the fog lights, press the
button again.
✽✽
NOTICE
When in operation, the fog lights consume large amounts of vehicle
electrical power. Only use the fog
lights when visibility is poor orunnecessary battery and generator
drain could occur.Daytime running light (if equipped)
Daytime Running Lights (DRL) can
make it easier for others to see the
front of your vehicle during the day.
DRL can be helpful in many different
driving conditions, and it is especial-
ly helpful after dawn and before sun-set.
The DRL system will make your low-
beam headlights turn OFF when:
1. The head light switch is ON.
2. The parklight switch is ON.
3. Engine stops.
1SAA2113
Page 162 of 281

57
Driving tips
SPECIAL DRIVING CONDITIONS
Hazardous driving conditions
When hazardous driving conditions
are encountered such as water,
snow, ice, mud, sand, or similar haz-
ards, follow these suggestions:
Drive cautiously and allow extra distance for braking.
Avoid sudden movements in brak- ing or steering.
When braking, pump the brake pedal with a light up-and-down
motion until the vehicle is stopped.
✽✽ NOTICE
Do not pump the brake pedal on a
vehicle equipped with ABS.
If stalled in snow, mud, or sand, use second gear. Accelerate slow-
ly to avoid spinning the drive
wheels.
Use sand, rock salt, tire chains, or other non-slip material under the
drive wheels to provide traction
when stalled in ice, snow, or mud. Rocking the vehicle
If it is necessary to rock the vehicle
to free it from snow, sand, or mud,
first turn the steering wheel right and
left to clear the area around your
front wheels. Then, shift back and
forth between 1 (First) and R
(Reverse) in vehicles equipped with
a manual transaxle or R (Reverse)
and any forward gear in vehiclesequipped with an automatic
transaxle. Do not race the engine,and spin the wheels as little as pos-
sible. If you are still stuck after a few
tries, have the vehicle pulled out by a
tow vehicle to avoid engine overheat-
ing and possible damage to the
transaxle.
✽✽
NOTICE
Prolonged rocking may cause engine
over-heating, transaxle damage or
failure, and tire damage.
1 23456789
WARNING - Downshifting
Downshifting with an automatic
transaxle, while driving on slip-
pery surfaces can cause an
accident. The sudden change intire speed could cause the tires
to skid. Be careful when down-
shifting on slippery surfaces.