tow KIA PICANTO 2006 Owner's Guide
[x] Cancel search | Manufacturer: KIA, Model Year: 2006, Model line: PICANTO, Model: KIA PICANTO 2006Pages: 281, PDF Size: 9.89 MB
Page 193 of 281
615
In case of an emergency
1 23456789
When towing your vehicle in an emergency without wheel dollies :
1. Set the ignition switch in the ACCposition.
2. Place the transaxle shift lever in N (Neutral).
3. Release the parking brake.
✽✽ NOTICE
Failure to place the transaxle shift
lever in N (Neutral) may cause inter-nal damage to the transaxle.
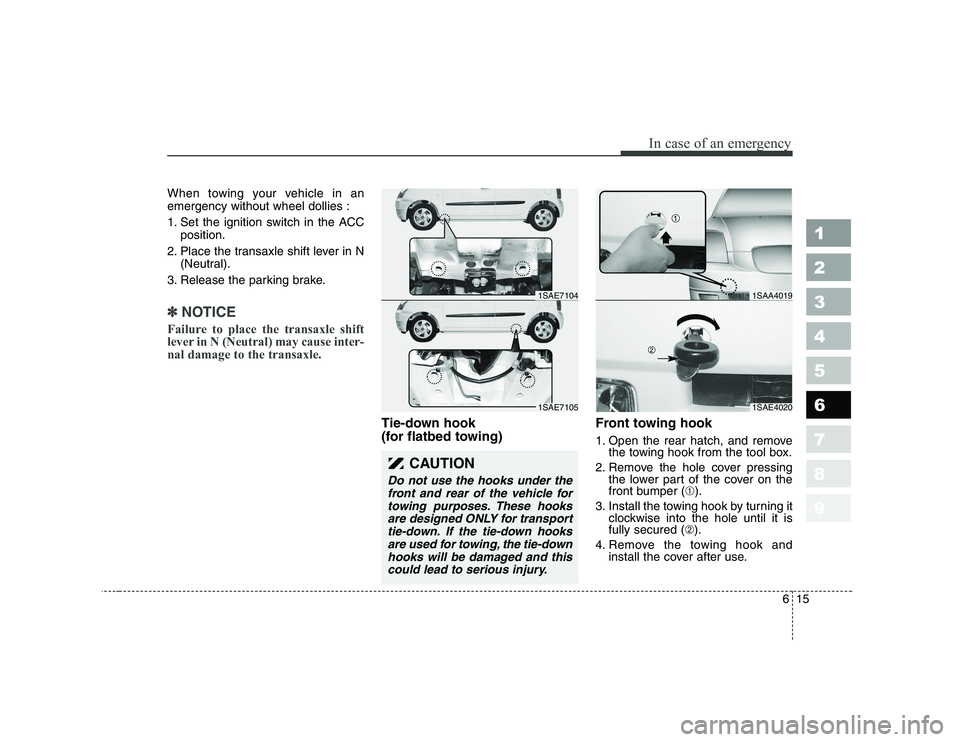
Tie-down hook
(for flatbed towing) Front towing hook
1. Open the rear hatch, and remove
the towing hook from the tool box.
2. Remove the hole cover pressing the lower part of the cover on the
front bumper ( ➀).
3. Install the towing hook by turning it clockwise into the hole until it isfully secured ( ➁).
4. Remove the towing hook and install the cover after use.
CAUTION
Do not use the hooks under the
front and rear of the vehicle fortowing purposes. These hooksare designed ONLY for transport tie-down. If the tie-down hooksare used for towing, the tie-downhooks will be damaged and this could lead to serious injury.
1SAE40201SAE7105
1SAA40191SAE7104
Page 194 of 281
In case of an emergency
16
6
1 23456789
Towing with a vehicle other
than a tow truck
If towing is necessary, we recom-
mend you to have it done by an
Authorized Kia dealer or a commer-
cial tow truck service.
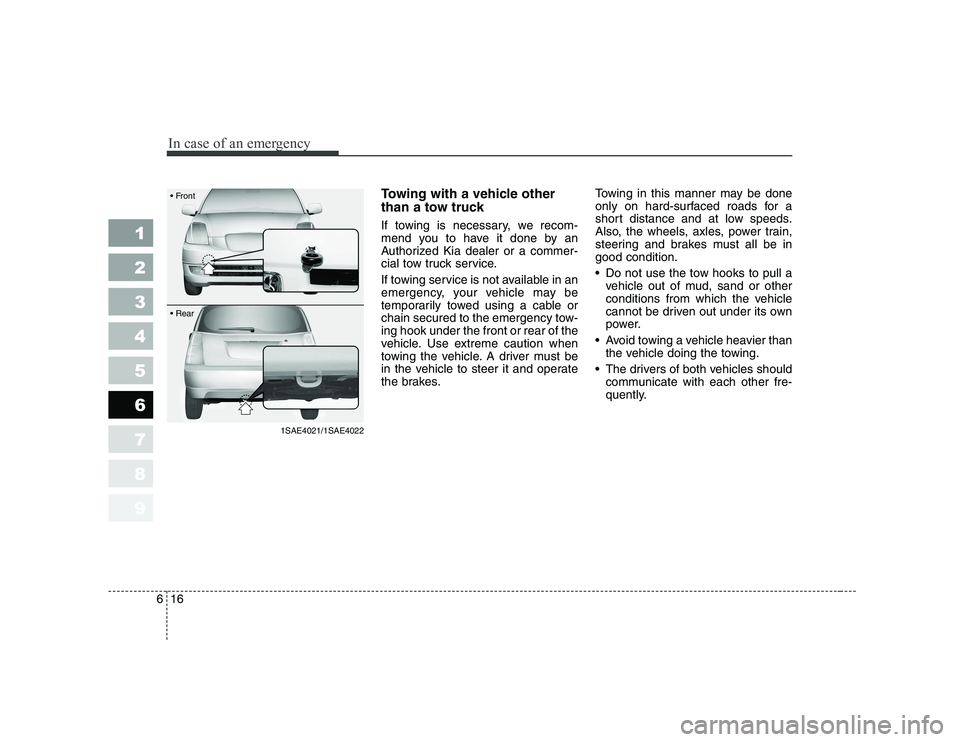
If towing service is not available in an
emergency, your vehicle may be
temporarily towed using a cable or
chain secured to the emergency tow-ing hook under the front or rear of the
vehicle. Use extreme caution when
towing the vehicle. A driver must be
in the vehicle to steer it and operate
the brakes. Towing in this manner may be done
only on hard-surfaced roads for a
short distance and at low speeds.
Also, the wheels, axles, power train,
steering and brakes must all be ingood condition.
Do not use the tow hooks to pull a
vehicle out of mud, sand or other
conditions from which the vehicle
cannot be driven out under its own
power.
Avoid towing a vehicle heavier than the vehicle doing the towing.
The drivers of both vehicles should communicate with each other fre-
quently.
1SAE4021/1SAE4022
Front Rear
Page 196 of 281
In case of an emergency
18
6
1 23456789
When your vehicle is being
towed by another vehicle
other than a tow truck (in case
of an emergency)
Turn the ignition switch to ACC so
the steering wheel isn’t locked.
Place the transaxle shift lever in N (Neutral).
Release the parking bake.
Vehicles equipped with automatic transaxles should not exceed 45 km/h (28 mph) and should not be
towed more than 80 km (50 miles).
Vehicles equipped with manual transaxles should not be towed in
excess of 88 km/h (55 mph) and
should not be towed more than645 km (400 miles). Press the brake pedal with more
force than normal since you will
have reduced brake performance.
More steering effort will be required because the power steer-
ing system will be disabled.
If you are driving down a long hill, the brakes may overheat and brake
performance will be reduced. Stop
often and let the brakes cool off.
✽✽ NOTICE
To prevent internal damage to the
transaxle, never tow your vehicle
from the rear (backwards) with all
four tires in contact with the sur-face.
Tips for towing a stuck vehicle
The following methods are effective
when your vehicle is stuck in mud,sand or similar substances that pre-
vent the vehicle from being driven
out under its own power.
Remove the soil and sand, etc. from the front and the back of the
tires.
Place a stone or wood under the tires.
Page 197 of 281
619
In case of an emergency
1 23456789
IF YOU HAVE A FLAT TIRE (IF THE VEHICLE IS EQUIPPED WITH SPARE TIRE)
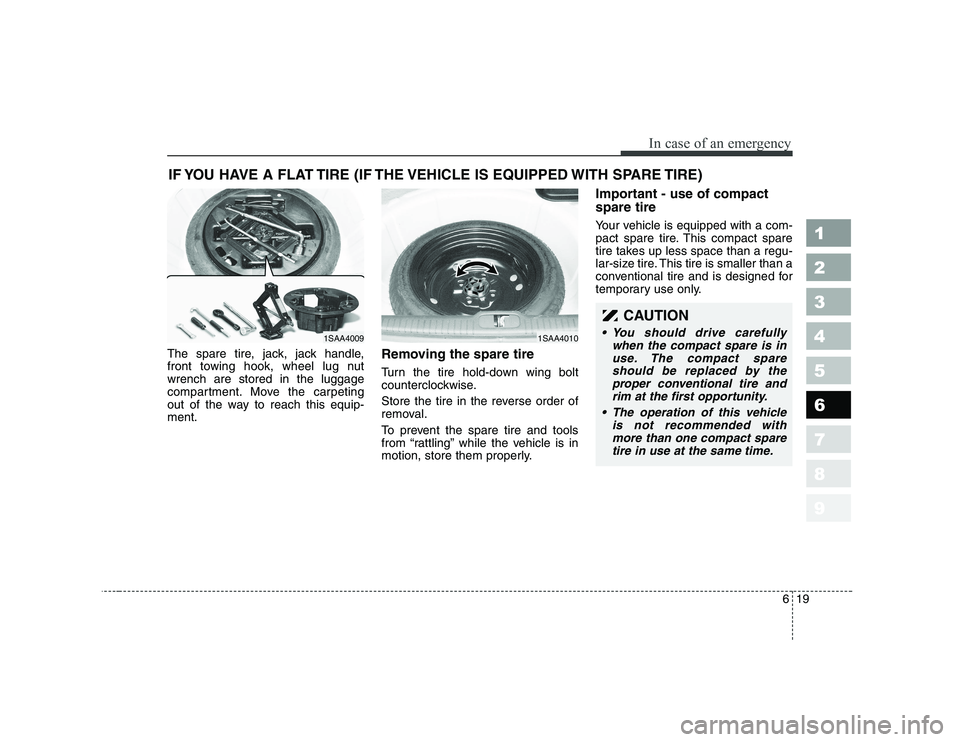
The spare tire, jack, jack handle,
front towing hook, wheel lug nutwrench are stored in the luggage
compartment. Move the carpeting
out of the way to reach this equip-ment. Removing the spare tire
Turn the tire hold-down wing bolt
counterclockwise.
Store the tire in the reverse order of
removal.
To prevent the spare tire and tools
from “rattling” while the vehicle is in
motion, store them properly.Important - use of compact spare tire
Your vehicle is equipped with a com-
pact spare tire. This compact spare
tire takes up less space than a regu-
lar-size tire. This tire is smaller than a
conventional tire and is designed for
temporary use only.
1SAA40091SAA4010
CAUTION
You should drive carefully
when the compact spare is inuse. The compact spareshould be replaced by theproper conventional tire and rim at the first opportunity.
The operation of this vehicle is not recommended withmore than one compact sparetire in use at the same time.
Page 199 of 281
621
In case of an emergency
1 23456789
Changing tires
Jacking instructions
The jack is provided for emergency
tire changing only.
Follow jacking instructions to reduce
the possibility of personal injury.
WARNING- Changing
tires
Never attempt vehicle repairs in the traffic lanes of a public
road or highway.
Always move the vehicle com- pletely off the road and onto
the shoulder before trying to
change a tire. The jack should
be used on level firm ground
whenever possible. If you can-
not find a firm, level place off
the road, call a towing service
company for assistance.
Be sure to use the correct front and rear jacking posi-
tions on the vehicle; never use
the bumpers or any other part
of the vehicle for jack support.
(Continued)(Continued)
The vehicle can easily roll offthe jack causing serious
injury or death. No person
should place any portion of
their body under a vehicle that
is supported only by a jack ;
use vehicle support stands.
Do not start or run the engine while the vehicle is on the
jack.
Do not allow anyone to remain in the vehicle while it is on the
jack.
Make sure any children pres- ent are in a secure place away
from the road and from the
vehicle to be raised with the
jack.
Page 206 of 281
In case of an emergency
28
6
1 23456789
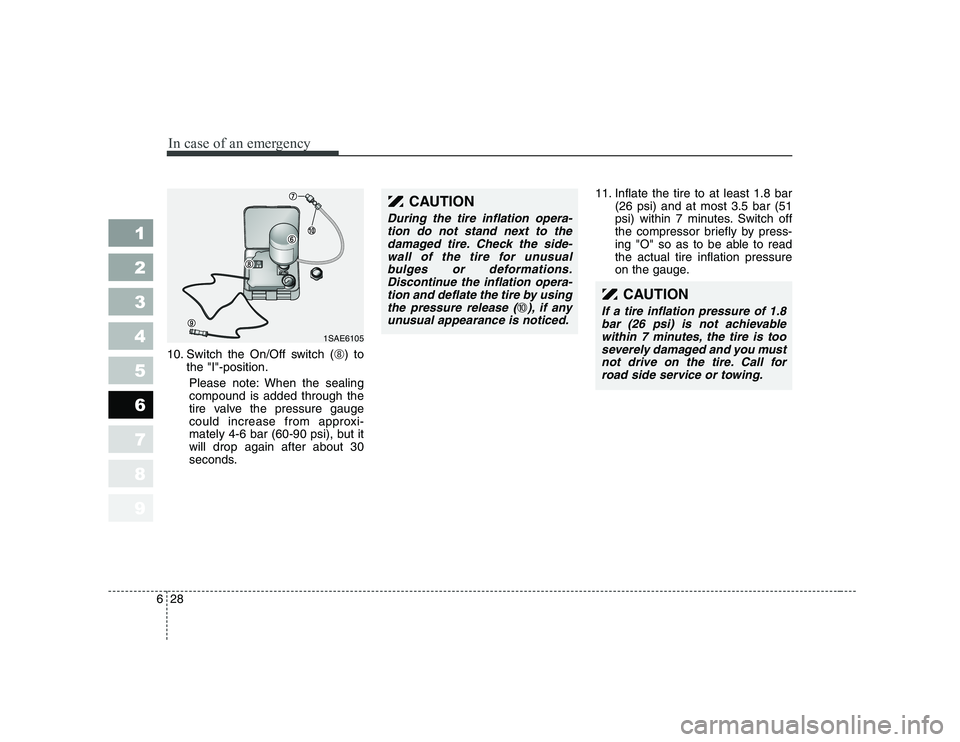
10. Switch the On/Off switch (
➇) to
the "I"-position.
Please note: When the sealing compound is added through the
tire valve the pressure gauge
could increase from approxi-
mately 4-6 bar (60-90 psi), but itwill drop again after about 30
seconds. 11. Inflate the tire to at least 1.8 bar
(26 psi) and at most 3.5 bar (51
psi) within 7 minutes. Switch off
the compressor briefly by press-
ing "O" so as to be able to readthe actual tire inflation pressure
on the gauge.
CAUTION
During the tire inflation opera-
tion do not stand next to thedamaged tire. Check the side-wall of the tire for unusual bulges or deformations.Discontinue the inflation opera-tion and deflate the tire by using the pressure release (
➉), if any
unusual appearance is noticed.
CAUTION
If a tire inflation pressure of 1.8 bar (26 psi) is not achievablewithin 7 minutes, the tire is tooseverely damaged and you must not drive on the tire. Call forroad side service or towing.
1SAE6105
Page 207 of 281
629
In case of an emergency
1 23456789
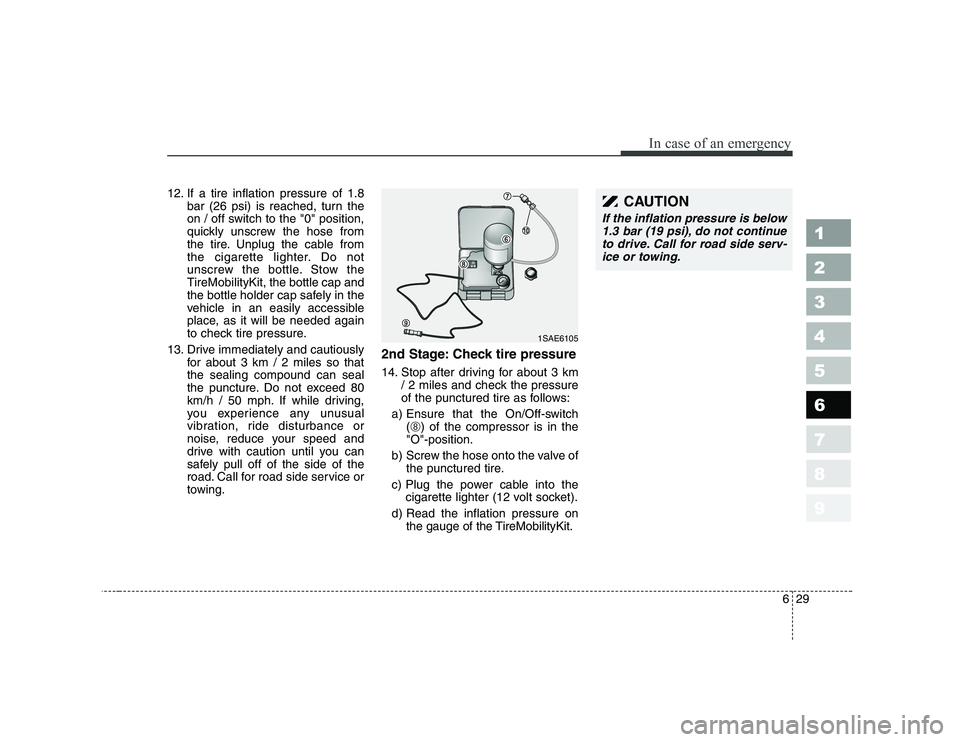
12. If a tire inflation pressure of 1.8bar (26 psi) is reached, turn the
on / off switch to the "0" position,
quickly unscrew the hose from
the tire. Unplug the cable from
the cigarette lighter. Do not
unscrew the bottle. Stow theTireMobilityKit, the bottle cap and
the bottle holder cap safely in the
vehicle in an easily accessible
place, as it will be needed again
to check tire pressure.
13. Drive immediately and cautiously for about 3 km / 2 miles so thatthe sealing compound can seal
the puncture. Do not exceed 80
km/h / 50 mph. If while driving,
you experience any unusual
vibration, ride disturbance or
noise, reduce your speed and
drive with caution until you can
safely pull off of the side of the
road. Call for road side service or
towing. 2nd Stage: Check tire pressure
14. Stop after driving for about 3 km
/ 2 miles and check the pressure
of the punctured tire as follows:
a) Ensure that the On/Off-switch (➇ ) of the compressor is in the
"O"-position.
b) Screw the hose onto the valve of the punctured tire.
c) Plug the power cable into the cigarette lighter (12 volt socket).
d) Read the inflation pressure on the gauge of the TireMobilityKit.CAUTION
If the inflation pressure is below
1.3 bar (19 psi), do not continueto drive. Call for road side serv- ice or towing.
1SAE6105
Page 208 of 281
In case of an emergency
30
6
1 23456789
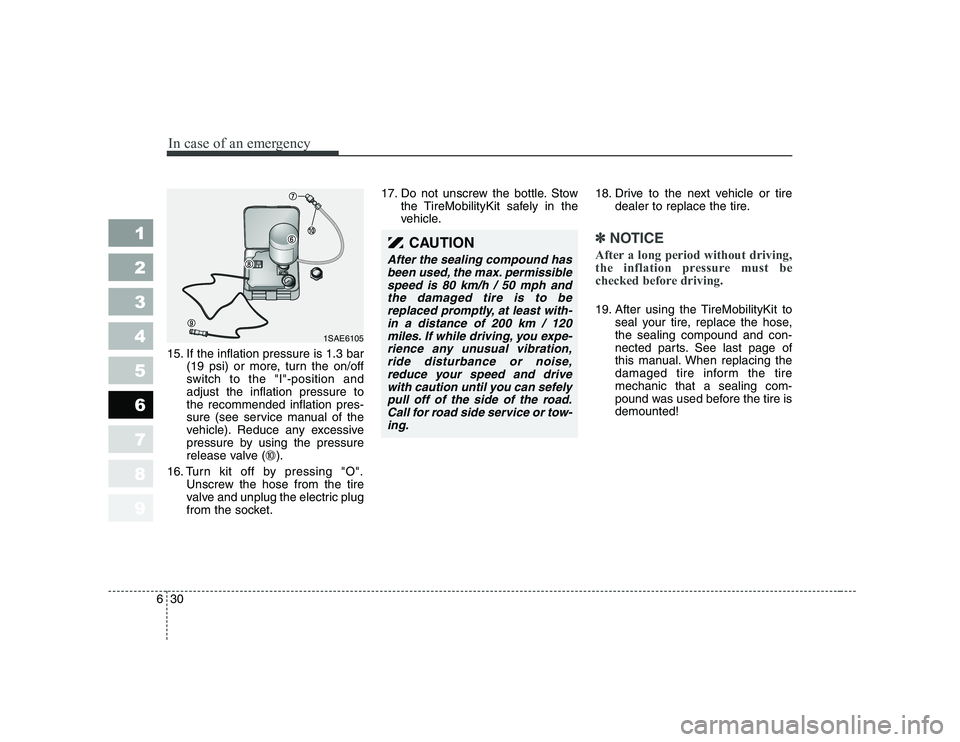
15. If the inflation pressure is 1.3 bar
(19 psi) or more, turn the on/off
switch to the "I"-position andadjust the inflation pressure tothe recommended inflation pres-
sure (see service manual of the
vehicle). Reduce any excessive
pressure by using the pressure
release valve ( ➉).
16. Turn kit off by pressing "O". Unscrew the hose from the tire
valve and unplug the electric plug
from the socket. 17. Do not unscrew the bottle. Stow
the TireMobilityKit safely in the
vehicle. 18. Drive to the next vehicle or tire
dealer to replace the tire.
✽✽NOTICE
After a long period without driving,
the inflation pressure must be
checked before driving.
19. After using the TireMobilityKit to seal your tire, replace the hose, the sealing compound and con-
nected parts. See last page of
this manual. When replacing the
damaged tire inform the tiremechanic that a sealing com-
pound was used before the tire isdemounted!
CAUTION
After the sealing compound has
been used, the max. permissiblespeed is 80 km/h / 50 mph andthe damaged tire is to be replaced promptly, at least with-in a distance of 200 km / 120miles. If while driving, you expe- rience any unusual vibration,ride disturbance or noise,reduce your speed and drive with caution until you can sefelypull off of the side of the road.Call for road side service or tow- ing.
1SAE6105
Page 209 of 281
631
In case of an emergency
1 23456789
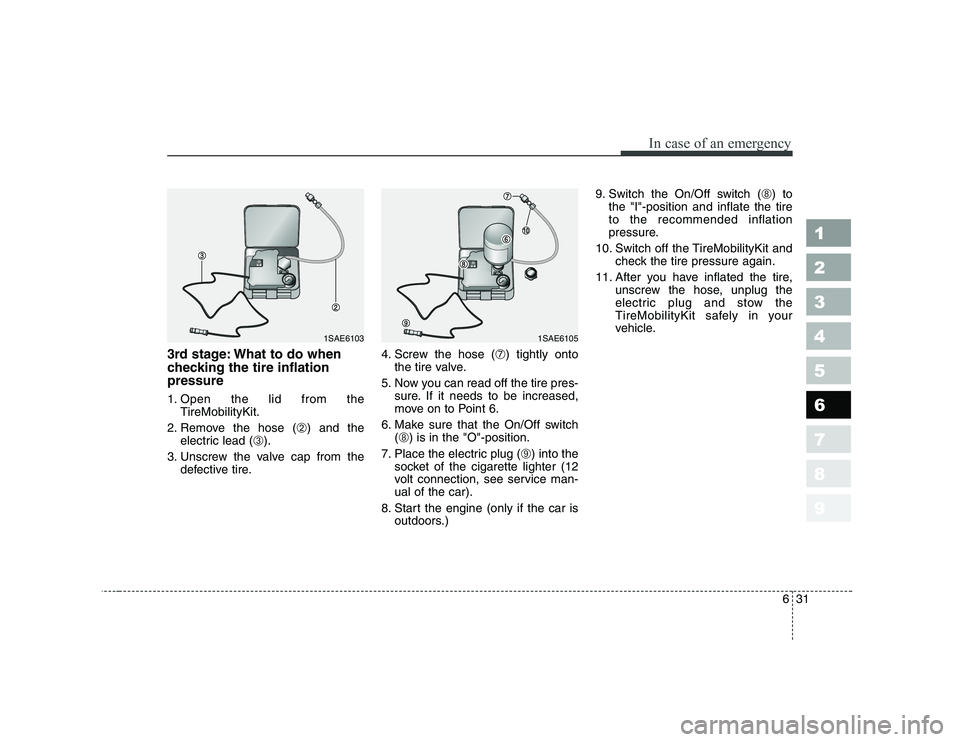
3rd stage: What to do when
checking the tire inflationpressure
1. Open the lid from theTireMobilityKit.
2. Remove the hose ( ➁) and the
electric lead ( ➂).
3. Unscrew the valve cap from the defective tire. 4. Screw the hose (
➆) tightly onto
the tire valve.
5. Now you can read off the tire pres- sure. If it needs to be increased,
move on to Point 6.
6. Make sure that the On/Off switch (➇ ) is in the "O"-position.
7. Place the electric plug ( ➈) into the
socket of the cigarette lighter (12
volt connection, see service man-ual of the car).
8. Start the engine (only if the car is outdoors.) 9. Switch the On/Off switch (
➇) to
the "I"-position and inflate the tireto the recommended inflation
pressure.
10. Switch off the TireMobilityKit and check the tire pressure again.
11. After you have inflated the tire, unscrew the hose, unplug the
electric plug and stow the
TireMobilityKit safely in your
vehicle.
1SAE61051SAE6103
Page 212 of 281
In case of an emergency
34
6
1 23456789
EMERGENCY COMMODITY (IF EQUIPPED)
There are some emergency com-
modities in the vehicle to help yourespond to the emergency situation. Fire extinguisher
The fire extinguisher is located in the
trunk.
If there is small fire and you know
how to use the fire extinguisher, take
the following steps carefully.
1.Pull the pin at the top of the extin-
guisher that keeps the handle from being accidentally pressed.
2.Aim the nozzle toward the base of the fire.
3.Stand approximately 2.5 m (8 ft) away from the fire and squeeze the
handle to discharge the extinguish-
er. If you release the handle, the
discharge will stop.
4.Sweep the nozzle back and forth at the base of the fire. After the fire
appears to be out, watch it careful-
ly since it may re-ignite. First aid kit There are some items such as scis-
sors, bandage and adhesive tape
and etc. in the kit to give first aid toan injured person.
Triangle reflector
Place the triangle reflector on the
road to warn oncoming vehicles dur-
ing emergencies, such as when the
vehicle is parked by the roadside due
to any problems.