lock KIA PICANTO 2006 Service Manual
[x] Cancel search | Manufacturer: KIA, Model Year: 2006, Model line: PICANTO, Model: KIA PICANTO 2006Pages: 281, PDF Size: 9.89 MB
Page 155 of 281
Driving your vehicle
54
4
1 23456789
Alarm stage
The alarm will be activated when:
1. Any door is opened without using
the transmitter.
2. The rear hatch lid is opened with anything except the transmitter (opening the rear hatch with the
key will cause the alarm to sound).
The alarm sound and flash will be
ON for 30 seconds. During this time,
the engine will not start. (For Europe)
The alarm will sound ON for 30 sec-
onds, then OFF for 10 seconds. ThisON/OFF cycle will be repeated three
times. During this time, the engine
will not start. (Except Europe) Disarmed stage
If the following conditions are met,
the alarm system will be deactivatedand hazard flasher light will flash
twice.
When the unlock button on the
transmitter is pressed. If a door orthe rear hatch is not opened within
approximately 30 seconds after
unlocking with the transmitter, all
doors will be locked again and theft
alarm system armed.
When the ignition key is in the ON
position for 30 seconds or more.
Page 160 of 281
55
Driving tips
BEFORE DRIVING
Before entering vehicle:
Be sure that all windows, outside mirror(s), and outside lights are clean.
Check the condition of the tires.
Check under the vehicle for any sign of leaks.
Be sure there are no obstacles behind you if you intend to back up.
Necessary inspections
Fluid levels, such as engine oil,
engine coolant, brake fluid, and
washer fluid should be checked on a
regular basis, with the exact interval
depending on the fluid. Further
details are provided in Section 7,
Maintenance. Before starting
Close and lock all doors.
Position the seat so that all con-
trols are easily reached.
Adjust the inside and outside rearview mirrors.
Be sure that all lights work.
Check all gauges.
Check the operation of warning lights when the ignition switch is
turned to the ON position.
Release the parking brake and make sure the brake warning lightgoes out.
For safe operation, be sure you are
familiar with your vehicle and itsequipment.
1 23456789
WARNING - Driving under
the influence of alcohol or drugs
Drinking and driving is danger-
ous. Drunk driving is the num-
ber one contributor to the high-
way death toll each year. Even asmall amount of alcohol will
affect your reflexes, perceptions
and judgement.
You are much more likely to
have a serious accident if you
drink and drive.
If you are drinking or taking
drugs, don’t drive. Do not ridewith a driver who has beendrinking or taking drugs.Choose a designated driver orcall a cab. Driving while under the influ-
ence of drugs is as dangerous
or more dangerous than drivingdrunk.
Page 164 of 281
59
Driving tips
Driving too fast through large pud-dles can affect your brakes. If you
must go through puddles, try to
drive through them slowly.
If you believe you may have gotten your brakes wet, apply them lightly
while driving until normal braking
operation returns. Winter driving
We recommend that you carry
emergency equipment, including
tire chains, a window scraper,
windshield de-icer, a bag of sand
or salt, flares, a small shovel and
jumper cables.
Make sure you have sufficient eth- ylene-glycol coolant in the radiator.
Check the battery condition and cables. Cold temperatures reduce
the capacity of any battery, so it
must be in excellent condition to
provide enough winter starting
power.
Make sure the engine oil viscosity is suitable for cold weather.
Check the ignition system for loose connections and damage. Use antifreeze-formulated wind-
shield washer fluid. (Do not use
engine coolant antifreeze.)
Do not use the parking brake if it might freeze. When parking, shift
to 1 (First) or R (Reverse) with a
manual transaxle or P (Park) with
an automatic transaxle and block
the rear wheels.
1 23456789
Page 186 of 281
In case of an emergency
8
6
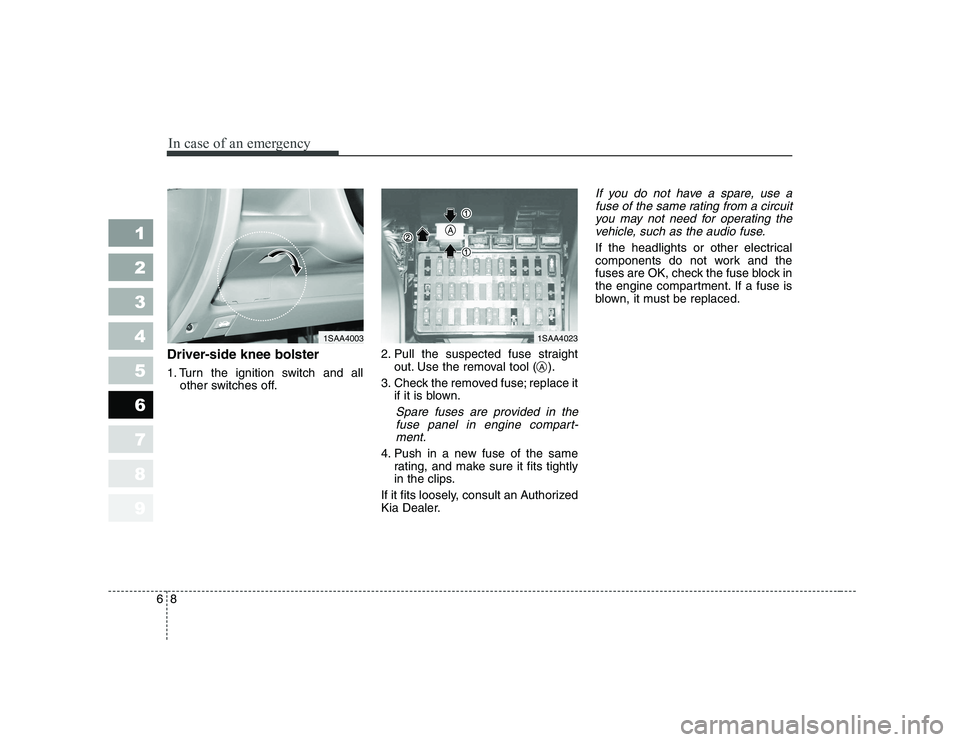
Driver-side knee bolster
1. Turn the ignition switch and all
other switches off. 2. Pull the suspected fuse straight
out. Use the removal tool ( ).
3. Check the removed fuse; replace it if it is blown.
Spare fuses are provided in the
fuse panel in engine compart-ment.
4. Push in a new fuse of the same rating, and make sure it fits tightly
in the clips.
If it fits loosely, consult an Authorized
Kia Dealer.
If you do not have a spare, use a fuse of the same rating from a circuityou may not need for operating thevehicle, such as the audio fuse.
If the headlights or other electrical
components do not work and the
fuses are OK, check the fuse block in
the engine compartment. If a fuse is
blown, it must be replaced.
1 23456789
1SAA40031SAA4023
A
A
Page 189 of 281

611
In case of an emergency
1 23456789
Description Fuse rating Protected component
ECU1 20A (30A) Engine control unit
STOP 10A Stop light
FR/FOG 10A Front fog light
A/CON 10A Air conditioner
HORN 10A Horn
ECU2 10A Engine control unit
SPARE 10A spare fuse
SPARE 15A spare fuse
SPARE 10A spare fuse
ABS2 30A Anti-lock brake system
ABS1 30A Anti-lock brake system
B+ 30A In panel B+
BLOWER 30A Blower
IGN1 30A Ignition
IGN2 30A Ignition
TAIL LH 10A Tail light (left)
TAIL RH 10A Tail light (right)
DRL 10A Daytime running light
HAZARD 15A Hazard warning flasher
R/LP 10A Room lamp
AUDIO 15A Audio
P/WDW 30A Power windowDescription Fuse rating Protected component
RAD 30A Radiator fan
BATT 100A (120A) Alternator, Battery
F/FOG - Front fog light relay
A/CON - Air conditioner relay
HORN - Horn relay
START - Start motor relay
RAD1 - Radiator fan relay
RAD2 - Radiator fan relay
RR FOG - Rear fog light relay
TAIL - Tail light relay
Engine compartment
Engine compartment (Diesel only)
Description Fuse rating Protected component
FFHTS 30A
Fuel filter heater temporary sensor
GLOW PLUG 80A Glow plug
MDPS 80A Motor driven power steering
PTC HTR1 40A PTC heater1
PTC HTR2 40A PTC heater2
PTC HTR3 40A PTC heater3
Page 190 of 281
In case of an emergency
12
6
1 23456789
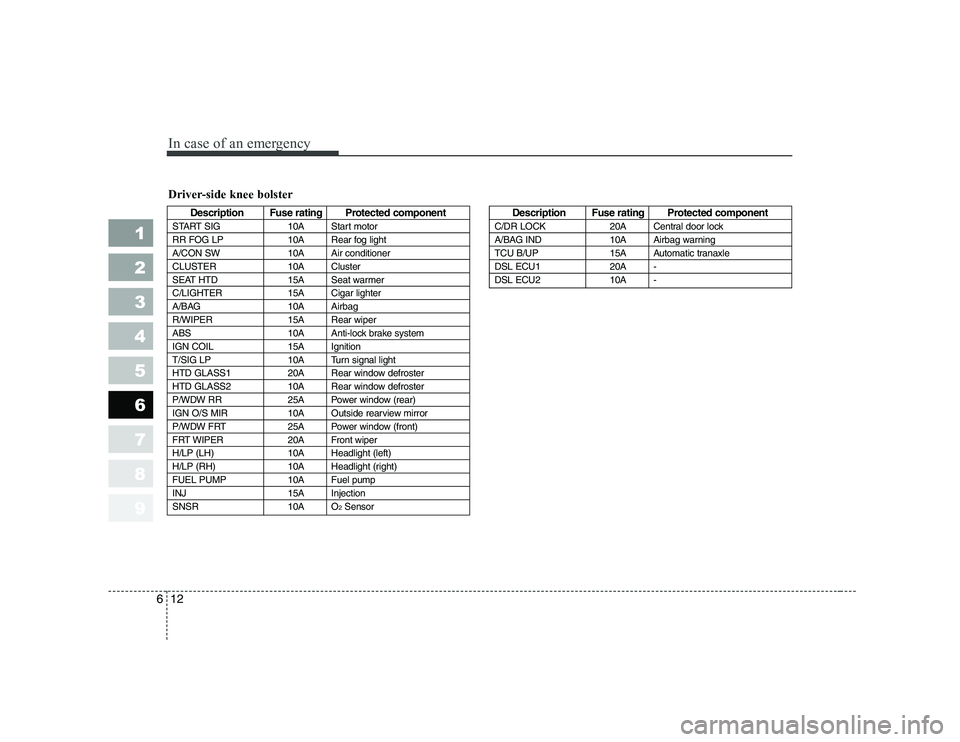
Driver-side knee bolster
Description Fuse rating Protected component
START SIG 10A Start motor
RR FOG LP 10A Rear fog light
A/CON SW 10A Air conditioner
CLUSTER 10A Cluster
SEAT HTD 15A Seat warmer
C/LIGHTER 15A Cigar lighter
A/BAG 10A Airbag
R/WIPER 15A Rear wiper
ABS 10A Anti-lock brake system
IGN COIL 15A Ignition
T/SIG LP 10A Turn signal light
HTD GLASS1 20A Rear window defroster
HTD GLASS2 10A Rear window defroster
P/WDW RR 25A Power window (rear)
IGN O/S MIR 10A Outside rearview mirror
P/WDW FRT 25A Power window (front)
FRT WIPER 20A Front wiper
H/LP (LH) 10A Headlight (left)
H/LP (RH) 10A Headlight (right)
FUEL PUMP 10A Fuel pump
INJ 15A Injection
SNSR 10A O 2SensorDescription Fuse rating Protected component
C/DR LOCK 20A Central door lock
A/BAG IND 10A Airbag warning
TCU B/UP 15A Automatic tranaxle
DSL ECU1 20A -
DSL ECU2 10A -
Page 193 of 281
615
In case of an emergency
1 23456789
When towing your vehicle in an emergency without wheel dollies :
1. Set the ignition switch in the ACCposition.
2. Place the transaxle shift lever in N (Neutral).
3. Release the parking brake.
✽✽ NOTICE
Failure to place the transaxle shift
lever in N (Neutral) may cause inter-nal damage to the transaxle.
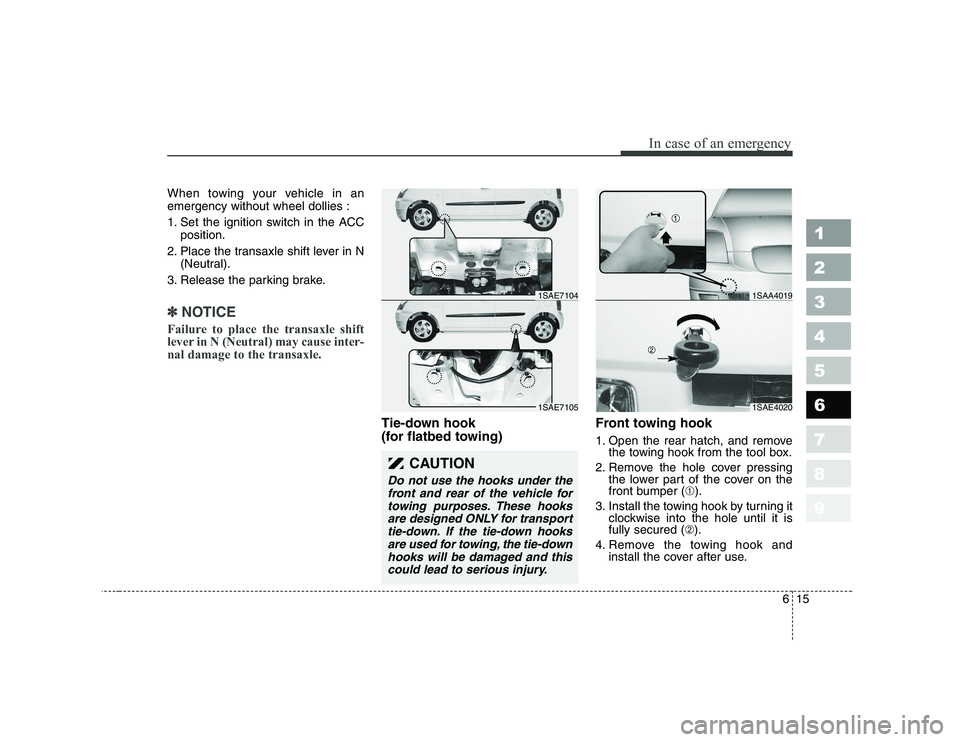
Tie-down hook
(for flatbed towing) Front towing hook
1. Open the rear hatch, and remove
the towing hook from the tool box.
2. Remove the hole cover pressing the lower part of the cover on the
front bumper ( ➀).
3. Install the towing hook by turning it clockwise into the hole until it isfully secured ( ➁).
4. Remove the towing hook and install the cover after use.
CAUTION
Do not use the hooks under the
front and rear of the vehicle fortowing purposes. These hooksare designed ONLY for transport tie-down. If the tie-down hooksare used for towing, the tie-downhooks will be damaged and this could lead to serious injury.
1SAE40201SAE7105
1SAA40191SAE7104
Page 196 of 281
In case of an emergency
18
6
1 23456789
When your vehicle is being
towed by another vehicle
other than a tow truck (in case
of an emergency)
Turn the ignition switch to ACC so
the steering wheel isn’t locked.
Place the transaxle shift lever in N (Neutral).
Release the parking bake.
Vehicles equipped with automatic transaxles should not exceed 45 km/h (28 mph) and should not be
towed more than 80 km (50 miles).
Vehicles equipped with manual transaxles should not be towed in
excess of 88 km/h (55 mph) and
should not be towed more than645 km (400 miles). Press the brake pedal with more
force than normal since you will
have reduced brake performance.
More steering effort will be required because the power steer-
ing system will be disabled.
If you are driving down a long hill, the brakes may overheat and brake
performance will be reduced. Stop
often and let the brakes cool off.
✽✽ NOTICE
To prevent internal damage to the
transaxle, never tow your vehicle
from the rear (backwards) with all
four tires in contact with the sur-face.
Tips for towing a stuck vehicle
The following methods are effective
when your vehicle is stuck in mud,sand or similar substances that pre-
vent the vehicle from being driven
out under its own power.
Remove the soil and sand, etc. from the front and the back of the
tires.
Place a stone or wood under the tires.
Page 197 of 281
619
In case of an emergency
1 23456789
IF YOU HAVE A FLAT TIRE (IF THE VEHICLE IS EQUIPPED WITH SPARE TIRE)
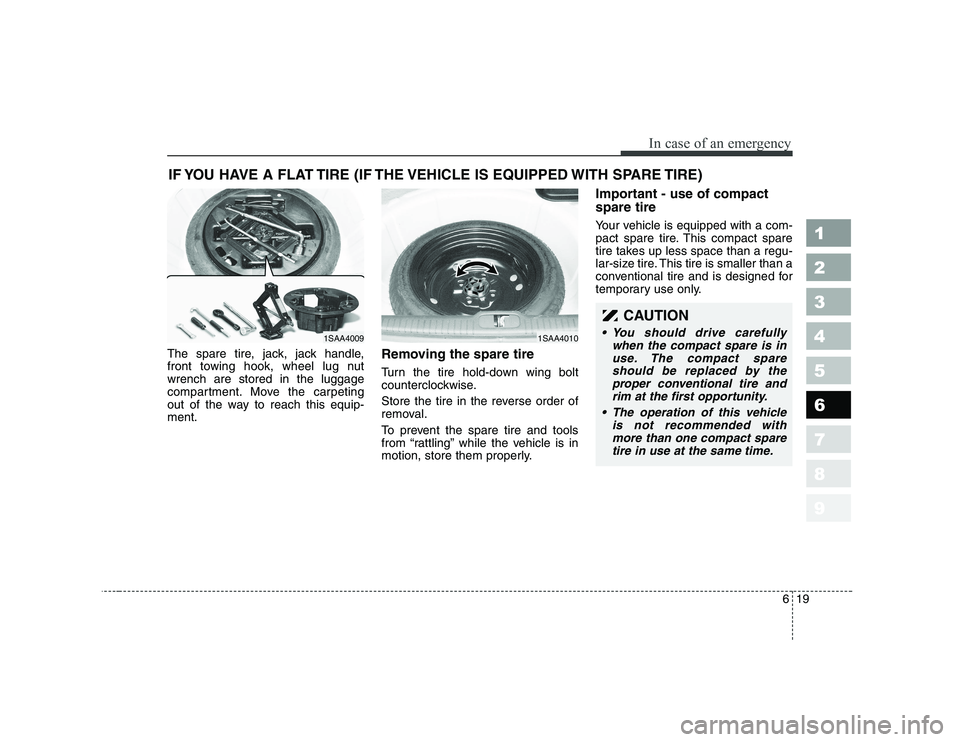
The spare tire, jack, jack handle,
front towing hook, wheel lug nutwrench are stored in the luggage
compartment. Move the carpeting
out of the way to reach this equip-ment. Removing the spare tire
Turn the tire hold-down wing bolt
counterclockwise.
Store the tire in the reverse order of
removal.
To prevent the spare tire and tools
from “rattling” while the vehicle is in
motion, store them properly.Important - use of compact spare tire
Your vehicle is equipped with a com-
pact spare tire. This compact spare
tire takes up less space than a regu-
lar-size tire. This tire is smaller than a
conventional tire and is designed for
temporary use only.
1SAA40091SAA4010
CAUTION
You should drive carefully
when the compact spare is inuse. The compact spareshould be replaced by theproper conventional tire and rim at the first opportunity.
The operation of this vehicle is not recommended withmore than one compact sparetire in use at the same time.
Page 200 of 281
In case of an emergency
22
6
1 23456789
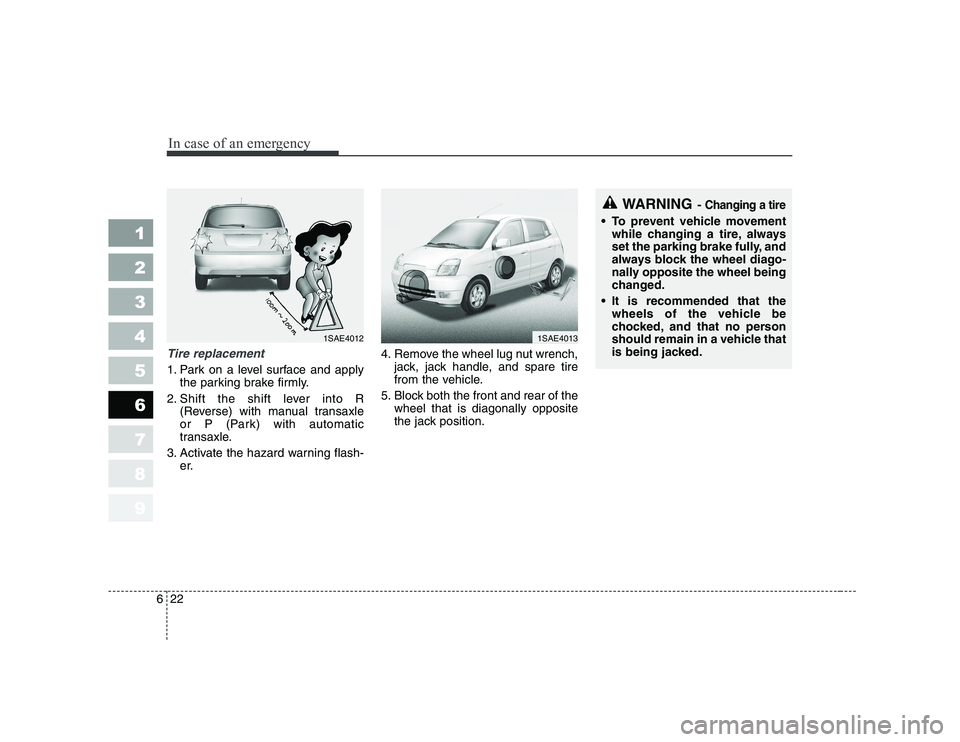
Tire replacement
1. Park on a level surface and apply
the parking brake firmly.
2. Shift the shift lever into R (Reverse) with manual transaxle
or P (Park) with automatic
transaxle.
3. Activate the hazard warning flash- er. 4. Remove the wheel lug nut wrench,
jack, jack handle, and spare tire
from the vehicle.
5. Block both the front and rear of the wheel that is diagonally opposite
the jack position.
WARNING - Changing a tire
To prevent vehicle movement
while changing a tire, always
set the parking brake fully, and
always block the wheel diago-
nally opposite the wheel being
changed.
It is recommended that the wheels of the vehicle be
chocked, and that no person
should remain in a vehicle that
is being jacked.
1SAE40131SAE4012