clock KIA PICANTO 2010 Owners Manual
[x] Cancel search | Manufacturer: KIA, Model Year: 2010, Model line: PICANTO, Model: KIA PICANTO 2010Pages: 336, PDF Size: 33.02 MB
Page 86 of 336
415
Features of your vehicle
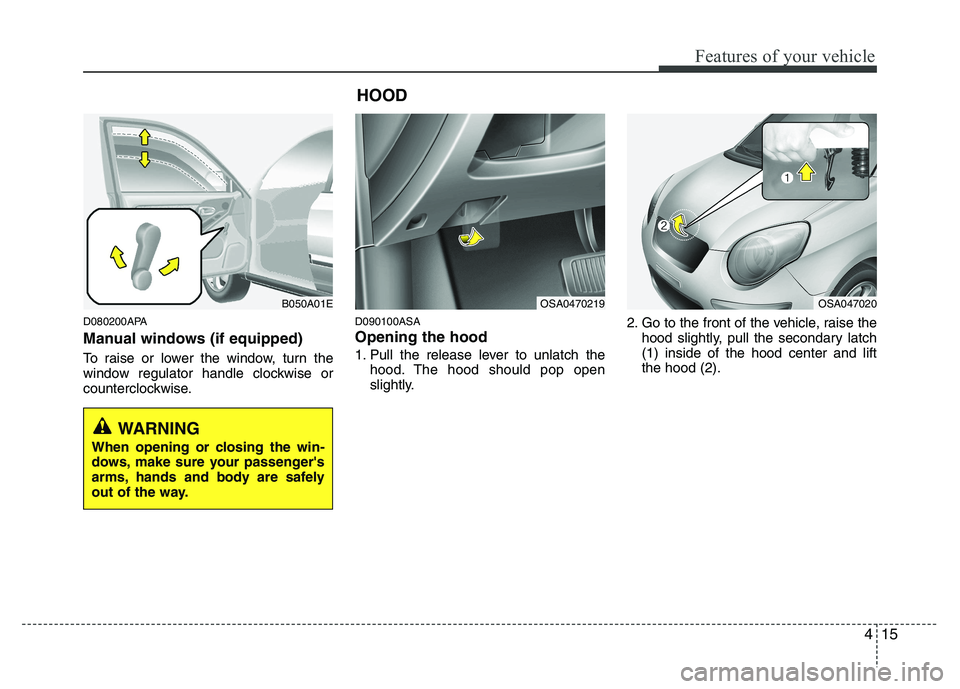
D080200APA
Manual windows (if equipped)
To raise or lower the window, turn the
window regulator handle clockwise or
counterclockwise.D090100ASA Opening the hood
1. Pull the release lever to unlatch the
hood. The hood should pop open
slightly. 2. Go to the front of the vehicle, raise the
hood slightly, pull the secondary latch(1) inside of the hood center and liftthe hood (2).
B050A01E
WARNING
When opening or closing the win-
dows, make sure your passenger's
arms, hands and body are safely
out of the way.
OSA0470219OSA047020
HOOD
Page 88 of 336
417
Features of your vehicle
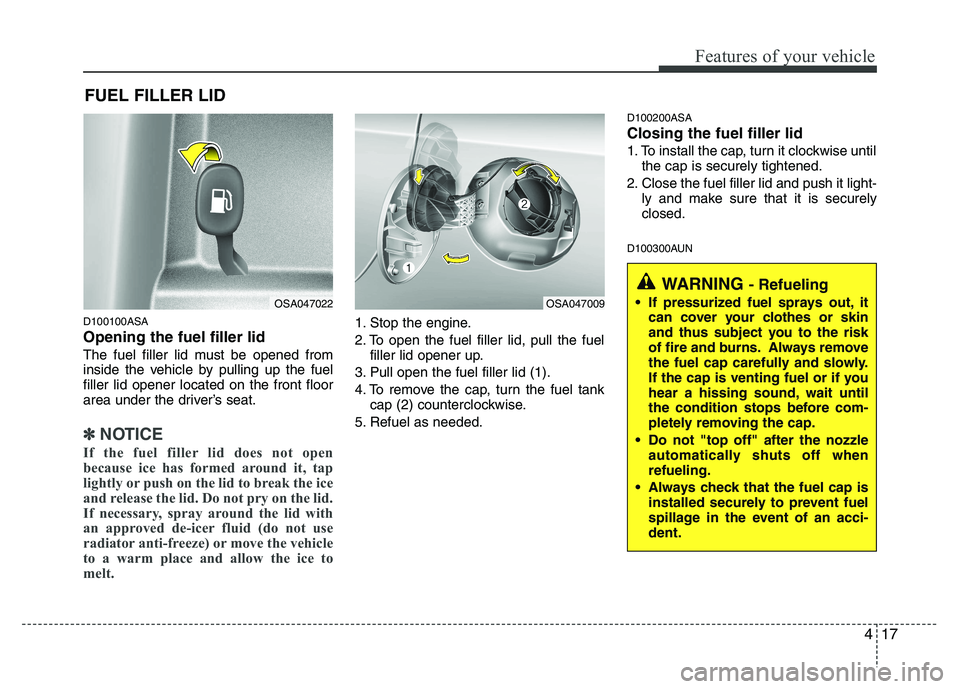
D100100ASA Opening the fuel filler lid
The fuel filler lid must be opened from
inside the vehicle by pulling up the fuelfiller lid opener located on the front floor
area under the driver’s seat.
✽✽NOTICE
If the fuel filler lid does not open
because ice has formed around it, tap
lightly or push on the lid to break the ice
and release the lid. Do not pry on the lid.
If necessary, spray around the lid with
an approved de-icer fluid (do not use
radiator anti-freeze) or move the vehicle
to a warm place and allow the ice to
melt.
1. Stop the engine.
2. To open the fuel filler lid, pull the fuel filler lid opener up.
3. Pull open the fuel filler lid (1).
4. To remove the cap, turn the fuel tank cap (2) counterclockwise.
5. Refuel as needed. D100200ASA Closing the fuel filler lid
1. To install the cap, turn it clockwise until
the cap is securely tightened.
2. Close the fuel filler lid and push it light- ly and make sure that it is securely closed.
D100300AUN
FUEL FILLER LID
OSA047022OSA047009
WARNING
- Refueling
If pressurized fuel sprays out, it can cover your clothes or skin
and thus subject you to the risk
of fire and burns. Always remove
the fuel cap carefully and slowly.
If the cap is venting fuel or if you
hear a hissing sound, wait until
the condition stops before com-
pletely removing the cap.
Do not "top off" after the nozzle automatically shuts off whenrefueling.
Always check that the fuel cap is installed securely to prevent fuel
spillage in the event of an acci-dent.
Page 145 of 336
Features of your vehicle
74
4
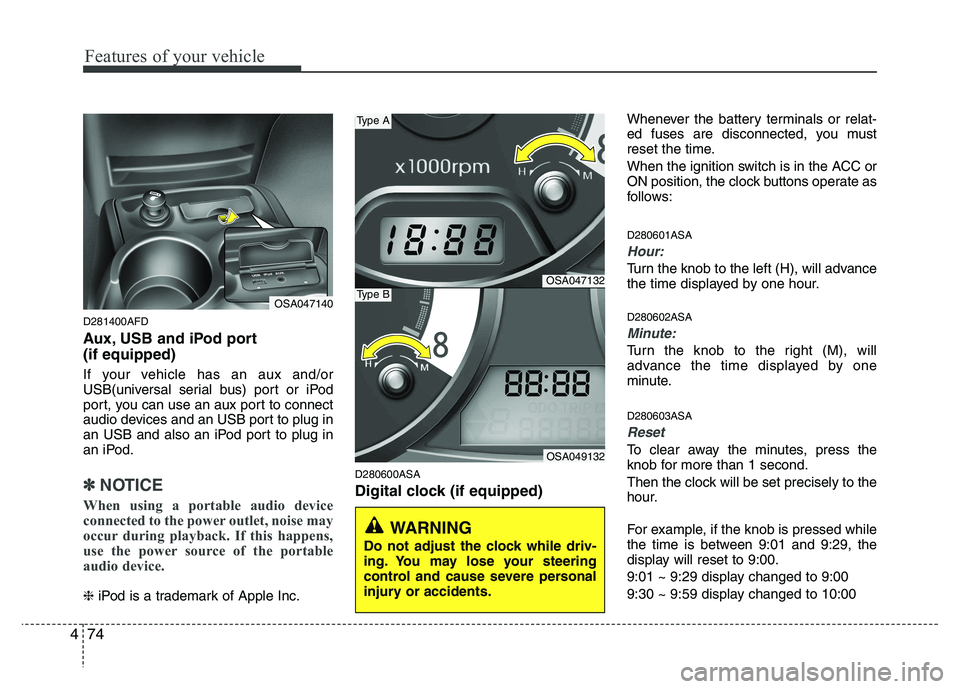
D281400AFD
Aux, USB and iPod port (if equipped)
If your vehicle has an aux and/or
USB(universal serial bus) port or iPod
port, you can use an aux port to connect
audio devices and an USB port to plug in
an USB and also an iPod port to plug in
an iPod.
✽✽
NOTICE
When using a portable audio device
connected to the power outlet, noise may
occur during playback. If this happens,
use the power source of the portable
audio device.
❈ iPod is a trademark of Apple Inc. D280600ASA
Digital clock (if equipped) Whenever the battery terminals or relat-
ed fuses are disconnected, you must
reset the time.
When the ignition switch is in the ACC or
ON position, the clock buttons operate as
follows: D280601ASA
Hour:
Turn the knob to the left (H), will advance
the time displayed by one hour. D280602ASA
Minute:
Turn the knob to the right (M), will
advance the time displayed by one
minute. D280603ASA
Reset
To clear away the minutes, press the
knob for more than 1 second.
Then the clock will be set precisely to the
hour.
For example, if the knob is pressed while
the time is between 9:01 and 9:29, the
display will reset to 9:00.
9:01 ~ 9:29 display changed to 9:00
9:30 ~ 9:59 display changed to 10:00
OSA047140
WARNING
Do not adjust the clock while driv-
ing. You may lose your steering
control and cause severe personal
injury or accidents.
OSA047132
OSA049132
Type A
Type B
Page 148 of 336
477
Features of your vehicle
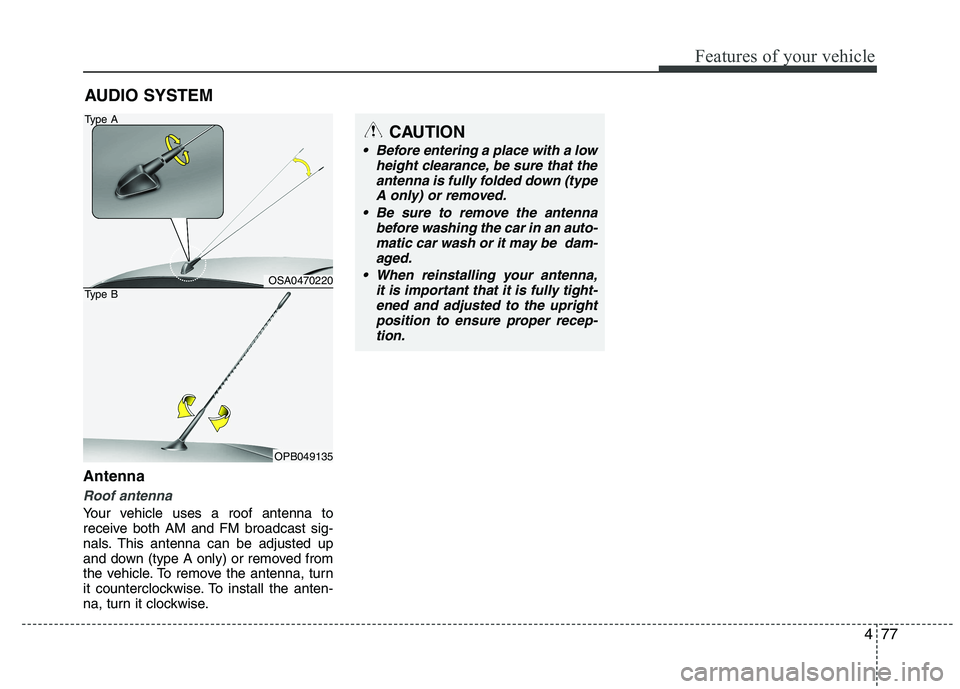
Antenna
Roof antenna
Your vehicle uses a roof antenna to
receive both AM and FM broadcast sig-
nals. This antenna can be adjusted up
and down (type A only) or removed from
the vehicle. To remove the antenna, turn
it counterclockwise. To install the anten-
na, turn it clockwise.AUDIO SYSTEM
CAUTION
• Before entering a place with a low
height clearance, be sure that the
antenna is fully folded down (typeA only) or removed.
Be sure to remove the antenna before washing the car in an auto-
matic car wash or it may be dam- aged.
it is important that it is fully tight-ened and adjusted to the upright
position to ensure proper recep- tion.
OSA0470220
OPB049135
Type A
Type B
Page 152 of 336
481
Features of your vehicle
1. FM/AM Selection Button
Turns to FM/AM mode and toggles FM1 and FM2➟AM ➟FM1··· when the button is
pressed each time.
2. Automatic Channel Selection
Button
When the [SEEK ] button is pressed, it
reduces the band frequency by 100KHzto automatically select a channel.
Stops at the previous frequency if no
channel is found.
When the [SEEK ] button is pressed, it
increases the band frequency by 100KHzto automatically select a channel.
Stops at the previous frequency if no
channel is found.
3. Power ON/OFF & Volume ControlButton
Turns ON/OFF when the IGNITION
SWITCH is on ACC or ON.
If the button is turned to the right, it
increases the volume and the button is
turned to the left, decreases the volume.
4. Preset Button
Push [1]~[6]button less than 0.8 second
to play the channel saved in each button.
Push preset button for 0.8 second or
longer to save the current channel to the
respective button with a beep.
5. TUNE/AUDIO Control Button
Turn this button clockwise by one notch
to increase frequency by 100KHz from
current frequency.
Turn this button counterclockwise by one
notch to decrease frequency by 100KHz
from current frequency.
Turns to AUDIO CONTROL mode, and toggles in the order of BASS ➟
MIDDLE
➟ TREBLE ➟FADER ➟BALANCE ➟···BAS
S··· when the button is pressed each
time.
6. SCAN Button
Plays the first 10 seconds of each chan-
nel, when the button is pressed.
To cancel the mode, press the button once again.
7. AUTO STORE Button
When the button is pressed, it automati-
cally selects and saves channels with
high reception rate to PRESET but-
tons(1~6) and plays the channel saved inPRESET1.
If no channel is saved after AST, it will
play the previous channel.
CAUTION
Do not place beverages close to
the audio system. The audio sys-tem mechanism may be damaged
if you spill them.
Do not strike or allow anything to impact the audio system, damageto the system mechanisms couldoccur.
Page 158 of 336
487
Features of your vehicle
10. TUNE/ENTER Button
Turn this button clockwise by one notch
to increase frequency by 100Khz from
current frequency.
Turn this button counterclockwise by one
notch to decrease frequency by 100Khz
from current frequency.
Press this button while holding SET UP
button to activate / inactivate the item.
Select SET UP item using left and right
function of the Tune button.
11. Preset Button
Push [1]~[6] buttons less than 0.8 second
to play the channel saved in each button.
Push the preset button for 0.8 second or
longer to save the current channel to the
respective button with a beep.
CAUTION
Do not place beverages close tothe audio system. It may damagethe audio system mechanism if
you spill them.
Do not strike or allow anything to impact the audio system, damageto the system mechanisms couldoccur.
Page 160 of 336
489
Features of your vehicle
1. CD Loading Slot
Insert the CD with the label facing
upward.
When the ignition switch is on ACC or
ON and the power is off, the power is
automatically turned on if the CD isloaded.
This CDP supports 12 cm CDs. But if
VCD, Data CD, MP3 CD are loaded, "Er-6" message will appear and the CD willbe ejected.
2. CD Eject Button
Push button to eject the CD during
CD playback. This button is enabled
when ignition switch is off.
3. CD Selection Button
If there is a CD in the CDP deck, it turns
to the CD mode when the button is
pressed each time.
4. Automatic Track Selection Button
Push [SEEK ] button for less than0.8 second to play from the beginning of the current song.
Push [SEEK ] button for less than 0.8 second and press again within 1
seconds to play the previous song. Push [SEEK ] button for 0.8 second
or longer to rewind the current song.
Push [SEEK ] button for less than 0.8 second to play the next song.
Push [SEEK ] button for less than 0.8 second or longer to fast-foward thecurrent song.
5. INFO Button
Displays the information of the current
CD TRACK in the order of DISCTITLE ➟DISC ARTIST ➟TRACK TITLE ➟
TRACK ARTIST ➟TOTAL TRACK ➟Play
Screen ➟DISC TITLE ➟···.(It is not dis-
played if the information is not available
on the disc.) (If MP3 is displayed FILENAME ➟TITLE ➟ARTIST ➟ALBUM ➟
FOLDER ➟TOTAL FILE ➟FILE NAME ➟···)
6. ENTER/TUNE Button
Turn this button clockwise to display songs after the current song.
Also, turn this button counterclockwise to
display songs before the current song.
To listen to the displayed song, press the
button to skip to the song and play.
7. REPEAT Button
Repeats current song when the button is
pressed for less than 0.8 second.
Repeats the entire disc when the button
is pressed for 0.8 second or longer.
8. RANDOM (RDM) Button
You can listen to the tracks in random,
rather than sequential order.
To use random, do the following:
Press the RDM button to listen to record-
ed tracks in random sequence. PressRDM again to cancel.
9. AST(CD SCAN) Button
Plays the first 10 seconds of each song in the disc.
To cancel the mode, press the key once again.
10. FOLDER Moving Button
Moves [FLDR ] button child folder of
the current folder and displays the first
song in the folder. Press ENT/TUNE
button to move to the folder displayed.
It will play the first song in the folder.
Moves [FLDR ] button parent folder and displays the first song in the folder.
Press ENT/TUNE button to move to
the folder displayed. It will play the first
song in the folder.
Page 163 of 336
Features of your vehicle
92
4
In case USB is connected to the multi-
media jack inside the consol on the right
hand side of the driver’s seat. When USB
is connected, the ‘USB’ icon will be dis-
played on the top right corner of the dis-
play screen.
1. AUX(USB) Selection Button
If the USB is connected, it switches to the
USB mode from the CD mode to play the
song files stored in the USB.
If there are no CD and USB(AUX), it dis-
plays ‘NO MEDIA’.
2. Track Moving Button
Press the [SEEK ] button for less
than 0.8 second to play from the begin-
ning of the song currently played.
Press the button for less than 0.8 sec- ond and press it again within 1 second
to play the previous track.
Press the button for 0.8 second or
longer to play the song in reverse
direction in fast speed.
Press the [SEEK ] button for less
than 0.8 second to move to the next
track. Press the button for 0.8 second
or longer to play the song in forward
direction in fast speed.
3. INFO Button
Displays the information of the file cur-
rently played in the order of FILE NAME➟ TITLE ➟ARTIST ➟ALBUM ➟FOLDER ➟
TOTAL FILE ➟FILE NAME ➟… (Displays
no information if the file has no song
information.)
4. Folder moving Button
If [FLDR ] button is pressed, it
moves to the child folder of the current
folder and displays the first song in the
folder. Press ENTER/TUNE button to
move to the folder displayed. It will play
the first song in the folder.
If [FLDR ] is button pressed, it moves to the parent folder and displays
the first song in the folder. Press
ENTER/TUNE button to move to the
folder displayed. It will play the first
song in the folder.
5. ENTER/TUNE Button
Turn this button clockwise to display the
songs next to the currently played song.
Turn the button counterclockwise to dis-
play the songs before the currently
played song.
Press the button to skip to the selected song.
6. RANDOM Button
Press the button for less than 0.8 second
to start or stop the random playback of
the songs in the current folder.
Press the button for more than 0.8 sec-
ond to randomly play the entire songs in
the USB device.
Press the button again to cancel the mode.
7. REPEAT Button
Press the button for less than 0.8 second
to repeat the song currently played.
Press the button for more than 0.8 sec- ond to repeat the entire songs in the USB
device.
8. SCAN Button
Plays 10 seconds of each song in the
USB device.
Press the button once again to cancel scanning.
Page 167 of 336
Features of your vehicle
96
4
In case the iPod exclusive cable is con-
nected to the multimedia jack inside the
consol on the right hand side of the dri-
ver’s seat. When the iPod is connected,
the ‘iPod’ icon will be displayed on the top
right corner of the display screen.
1. AUX(iPod) Selection Button
If iPod is connected, it switches to the
iPod mode from the CD mode to play the
song files stored in the iPod.
If there are no CD and AUX(iPod), it dis-
plays ‘NO MEDIA’
2. Track Moving Button
Press the [SEEK ] button for less
than 0.8 second to play from the begin-
ning of the song currently played.
Press the button for less than 0.8 sec- ond and press it again within 1 second
to play the previous track.
Press the button for 0.8 second or
longer to play the song in reverse
direction in fast speed. Press the [SEEK ] button for
less
than 0.8 second to move to the next
track. Press the button for 0.8 second
or longer to play the song in forward
direction in fast speed.
3. INFO Button
Displays the information of the file cur-
rently played in the order of FILE NAME ➟ TITLE ➟ARTIST ➟ALBUM ➟FOLDER ➟
TOTAL FILE ➟FILE NAME ➟… (Displays
no information if the file has no song
information.)
4. Category Selection Button
Moves to the upper category from cur-
rently played category of the iPod.
You will be able to search through the
lower category of the selected category.
The order of iPod’s category is SONG,
ALBUMES, ARTISTS, GENRES, and
iPod. (Refer to the iPod user’s manual for
more information)
5. ENTER/TUNE Button
Turn this button clockwise to display the
songs next to the currently played song.
Turn the button counterclockwise to dis-
play the songs before the currently
played song.
Press the button to skip to the selected song.
6. RANDOM Button
Press the button for less than 0.8 second
to start or stop the random playback of
the songs in the current folder.
Press the button for longer than 0.8 sec-
ond to randomly play all songs in the
entire album of the iPod.
Press the button again to cancel the mode.
7. REPEAT Button
Repeats the song currently played.
Page 171 of 336
Features of your vehicle
100
4
10. ENTER/TUNE Button
Turn this button clockwise by one notch
to increase frequency by 0.05Mhz from
current frequency.
Turn this button counterclockwise by one
notch to decrease frequency by 0.05Mhz
from current frequency.
Press this button while holding the SET
UP button to activate/inactivate the item. Select a SET UP item using the left and
right function of the Tune button.
11. Preset Button
Push [1]~[6] buttons less than 0.8 second
to play the channel saved in each button.
Push the Preset button for 0.8 second or
longer to save the current channel to the
respective button with a beep.
CAUTION
Do not place beverages close to
the audio system. It may damagethe playback mechanism if you
spill them.
Do not strike or allow anything to impact the audio system, damageto the system mechanisms couldoccur.