engine KIA PICANTO 2012 Owners Manual
[x] Cancel search | Manufacturer: KIA, Model Year: 2012, Model line: PICANTO, Model: KIA PICANTO 2012Pages: 840, PDF Size: 41.16 MB
Page 347 of 840
715
Maintenance
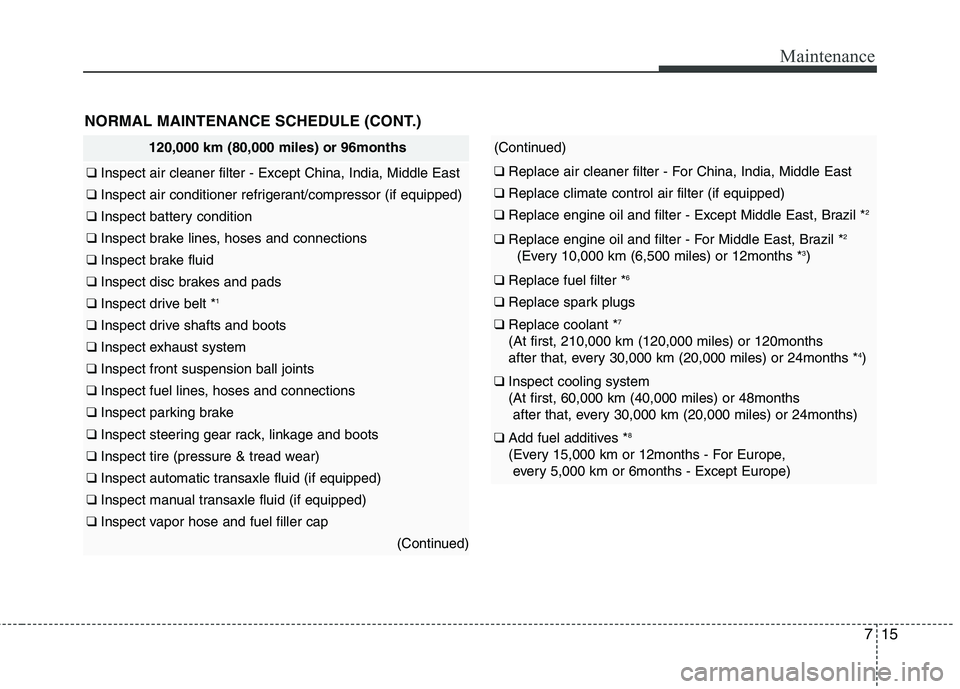
NORMAL MAINTENANCE SCHEDULE (CONT.)
120,000 km (80,000 miles) or 96months
❑ Inspect air cleaner filter - Except China, India, Middle East
❑ Inspect air conditioner refrigerant/compressor (if equipped)
❑ Inspect battery condition
❑ Inspect brake lines, hoses and connections
❑ Inspect brake fluid
❑ Inspect disc brakes and pads
❑ Inspect drive belt * 1
❑
Inspect drive shafts and boots
❑ Inspect exhaust system
❑ Inspect front suspension ball joints
❑ Inspect fuel lines, hoses and connections
❑ Inspect parking brake
❑ Inspect steering gear rack, linkage and boots
❑ Inspect tire (pressure & tread wear)
❑ Inspect automatic transaxle fluid (if equipped)
❑ Inspect manual transaxle fluid (if equipped)
❑ Inspect vapor hose and fuel filler cap
(Continued)
(Continued)
❑ Replace air cleaner filter - For China, India, Middle East
❑ Replace climate control air filter (if equipped)
❑ Replace engine oil and filter - Except Middle East, Brazil * 2
❑
Replace engine oil and filter - For Middle East, Brazil * 2
(Every 10,000 km (6,500 miles) or 12months * 3
)
❑ Replace fuel filter * 6
❑
Replace spark plugs
❑ Replace coolant * 7
(At first, 210,000 km (120,000 miles) or 120months
after that, every 30,000 km (20,000 miles) or 24months * 4
)
❑ Inspect cooling system
(At first, 60,000 km (40,000 miles) or 48months
after that, every 30,000 km (20,000 miles) or 24months)
❑ Add fuel additives * 8
(Every 15,000 km or 12months - For Europe, every 5,000 km or 6months - Except Europe)
Page 348 of 840
Maintenance
16
7
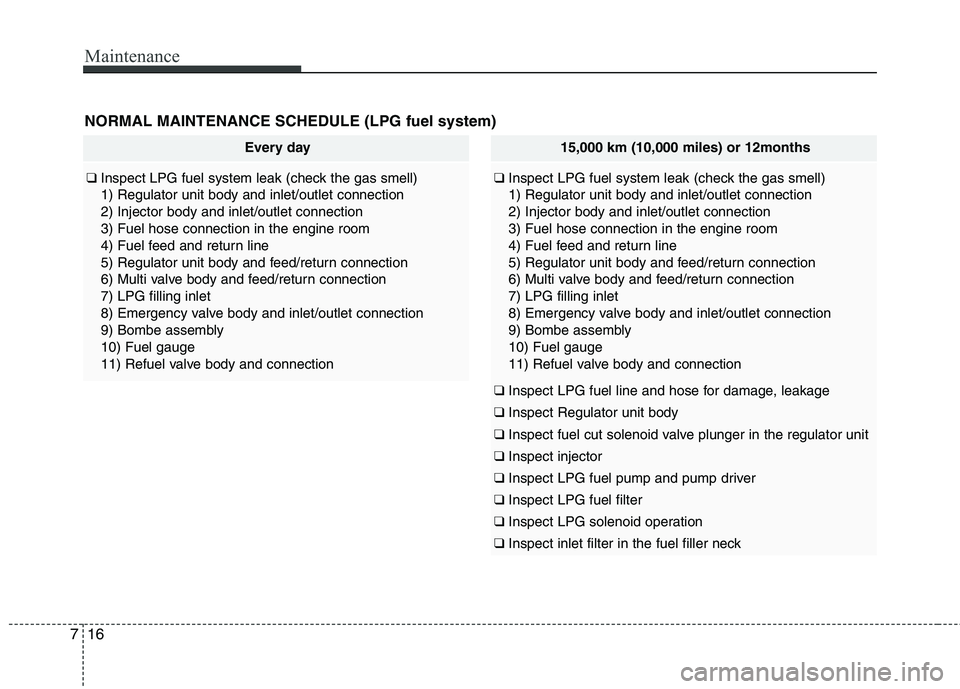
Every day
❑ Inspect LPG fuel system leak (check the gas smell) 1) Regulator unit body and inlet/outlet connection2) Injector body and inlet/outlet connection3) Fuel hose connection in the engine room
4) Fuel feed and return line
5) Regulator unit body and feed/return connection
6) Multi valve body and feed/return connection7) LPG filling inlet
8) Emergency valve body and inlet/outlet connection
9) Bombe assembly10) Fuel gauge
11) Refuel valve body and connection
NORMAL MAINTENANCE SCHEDULE (LPG fuel system)
15,000 km (10,000 miles) or 12months
❑ Inspect LPG fuel system leak (check the gas smell) 1) Regulator unit body and inlet/outlet connection2) Injector body and inlet/outlet connection3) Fuel hose connection in the engine room
4) Fuel feed and return line
5) Regulator unit body and feed/return connection
6) Multi valve body and feed/return connection7) LPG filling inlet
8) Emergency valve body and inlet/outlet connection
9) Bombe assembly10) Fuel gauge
11) Refuel valve body and connection
❑ Inspect LPG fuel line and hose for damage, leakage
❑ Inspect Regulator unit body
❑ Inspect fuel cut solenoid valve plunger in the regulator unit
❑ Inspect injector
❑ Inspect LPG fuel pump and pump driver
❑ Inspect LPG fuel filter
❑ Inspect LPG solenoid operation
❑ Inspect inlet filter in the fuel filler neck
Page 349 of 840
717
Maintenance
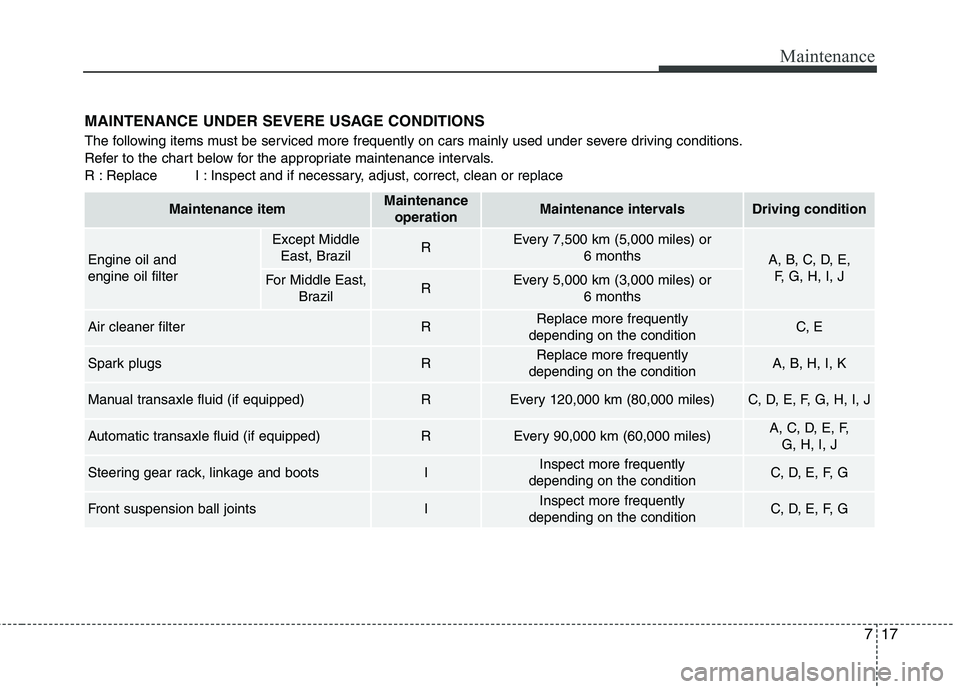
MAINTENANCE UNDER SEVERE USAGE CONDITIONS
The following items must be serviced more frequently on cars mainly used under severe driving conditions.
Refer to the chart below for the appropriate maintenance intervals.
R : Replace I : Inspect and if necessary, adjust, correct, clean or replace
Maintenance itemMaintenanceoperationMaintenance intervalsDriving condition
Engine oil and engine oil filter
Except MiddleEast, Brazil REvery 7,500 km (5,000 miles) or 6 months
A, B, C, D, E, F, G, H, I, J
For Middle East, Brazil REvery 5,000 km (3,000 miles) or 6 months
Air cleaner filterRReplace more frequently
depending on the conditionC, E
Spark plugs RReplace more frequently
depending on the conditionA, B, H, I, K
Manual transaxle fluid (if equipped)REvery 120,000 km (80,000 miles)C, D, E, F, G, H, I, J
Automatic transaxle fluid (if equipped)REvery 90,000 km (60,000 miles)A, C, D, E, F, G, H, I, J
Steering gear rack, linkage and bootsIInspect more frequently
depending on the conditionC, D, E, F, G
Front suspension ball jointsIInspect more frequently
depending on the conditionC, D, E, F, G
Page 351 of 840
719
Maintenance
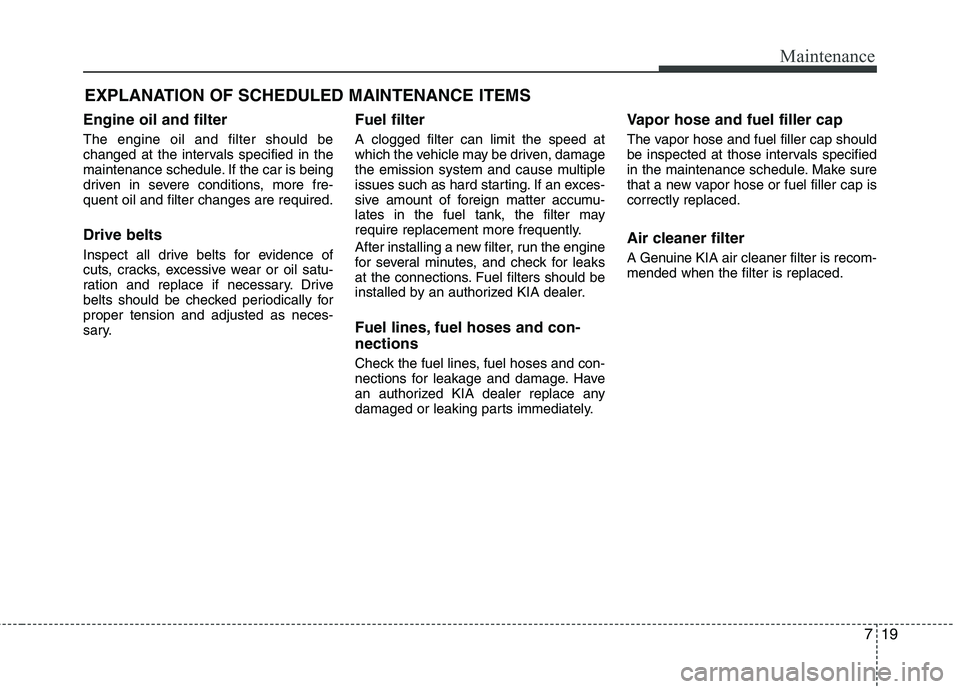
EXPLANATION OF SCHEDULED MAINTENANCE ITEMS
Engine oil and filter The engine oil and filter should be
changed at the intervals specified in the
maintenance schedule. If the car is being
driven in severe conditions, more fre-quent oil and filter changes are required. Drive belts
Inspect all drive belts for evidence of
cuts, cracks, excessive wear or oil satu-
ration and replace if necessary. Drive
belts should be checked periodically forproper tension and adjusted as neces-
sary. Fuel filter A clogged filter can limit the speed at
which the vehicle may be driven, damage
the emission system and cause multiple
issues such as hard starting. If an exces-
sive amount of foreign matter accumu-
lates in the fuel tank, the filter may
require replacement more frequently.
After installing a new filter, run the engine
for several minutes, and check for leaks
at the connections. Fuel filters should be
installed by an authorized KIA dealer.
Fuel lines, fuel hoses and con- nections
Check the fuel lines, fuel hoses and con-
nections for leakage and damage. Have
an authorized KIA dealer replace any
damaged or leaking parts immediately.Vapor hose and fuel filler cap
The vapor hose and fuel filler cap should
be inspected at those intervals specified
in the maintenance schedule. Make sure
that a new vapor hose or fuel filler cap iscorrectly replaced.
Air cleaner filter
A Genuine KIA air cleaner filter is recom- mended when the filter is replaced.
Page 352 of 840
Maintenance
20
7
Spark plugs
Make sure to install new spark plugs of
the correct heat range.
Valve clearance
Inspect excessive valve noise and/or
engine vibration and adjust if necessary.
An authorized KIA dealer should perform
the operation. Cooling system
Check cooling system components, such
as radiator, coolant reservoir, hoses and
connections for leakage and damage.
Replace any damaged parts. Coolant The coolant should be changed at the
intervals specified in the maintenance
schedule.
Manual transaxle fluid (if equipped)
Inspect the manual transaxle fluid
according to the maintenance schedule.
Automatic transaxle fluid (if equipped)
The fluid level should be in the "HOT"
range of the dipstick, after the engine
and transaxle are at normal operating
temperature. Check the automatic
transaxle fluid level with the engine run-
ning and the transaxle in neutral, with the
parking brake properly applied.
Page 353 of 840
721
Maintenance
Brake hoses and lines
Visually check for proper installation,
chafing, cracks, deterioration and any
leakage. Replace any deteriorated or
damaged parts immediately. Brake fluid
Check brake fluid level in the brake fluid
reservoir. The level should be between
“MIN” and “MAX” marks on the side of
the reservoir. Use only hydraulic brake
fluid conforming to DOT 3 or DOT 4specification.
Parking brake
Inspect the parking brake system includ-
ing the parking brake lever and cables. Rear brake drums and linings (if equipped)
Check the rear brake drums and linings
for scoring, burning, leaking fluid, broken
parts, and excessive wear.Brake discs, pads, calipers and
rotors
Check the pads for excessive wear, discs
for run out and wear, and calipers for fluid
leakage. Suspension mounting bolts
Check the suspension connections for
looseness or damage. Retighten to the
specified torque.
Steering gear box, linkage &
boots/lower arm ball joint
With the vehicle stopped and engine off,
check for excessive free-play in the
steering wheel.
Check the linkage for bends or damage.
Check the dust boots and ball joints for
deterioration, cracks, or damage.
Replace any damaged parts.
Drive shafts and boots
Check the drive shafts, boots and clamps
for cracks, deterioration, or damage.
Replace any damaged parts and, if nec-
essary, repack the grease.
Air conditioning refrigerant (if equipped)
Check the air conditioning lines and con-
nections for leakage and damage.
Page 354 of 840
Maintenance
22
7
ENGINE OIL
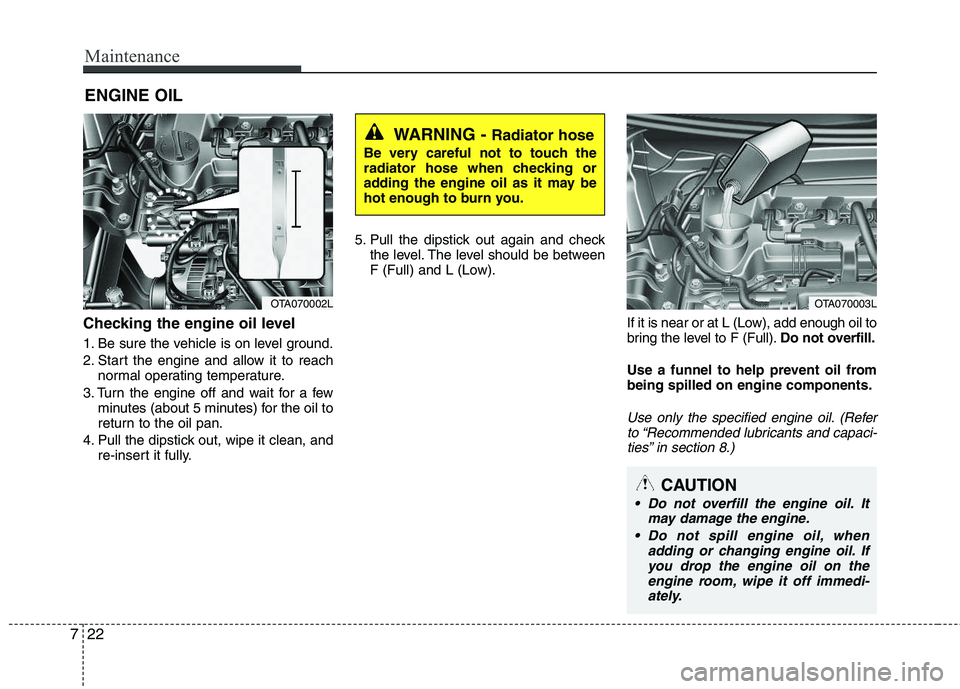
Checking the engine oil level
1. Be sure the vehicle is on level ground.
2. Start the engine and allow it to reach normal operating temperature.
3. Turn the engine off and wait for a few minutes (about 5 minutes) for the oil to
return to the oil pan.
4. Pull the dipstick out, wipe it clean, and re-insert it fully. 5. Pull the dipstick out again and check
the level. The level should be between
F (Full) and L (Low).
If it is near or at L (Low), add enough oil to
bring the level to F (Full).Do not overfill.
Use a funnel to help prevent oil frombeing spilled on engine components.
Use only the specified engine oil. (Refer to “Recommended lubricants and capaci- ties” in section 8.)
WARNING - Radiator hose
Be very careful not to touch the
radiator hose when checking or
adding the engine oil as it may be
hot enough to burn you.
OTA070002LOTA070003L
CAUTION
Do not overfill the engine oil. It may damage the engine.
Do not spill engine oil, when adding or changing engine oil. Ifyou drop the engine oil on the engine room, wipe it off immedi-
ately.
Page 355 of 840
723
Maintenance
Changing the engine oil and filter
Have engine oil and filter changed by an
authorized KIA dealer according to theMaintenance Schedule at the beginningof this section.
WARNING
Used engine oil may cause irrita- tion or cancer of the skin if left in
contact with the skin for prolonged
periods of time. Used engine oil
contains chemicals that have
caused cancer in laboratory ani-
mals. Always protect your skin by
washing your hands thoroughlywith soap and warm water as soon
as possible after handling used oil.
Page 356 of 840
Maintenance
24
7
ENGINE COOLANT
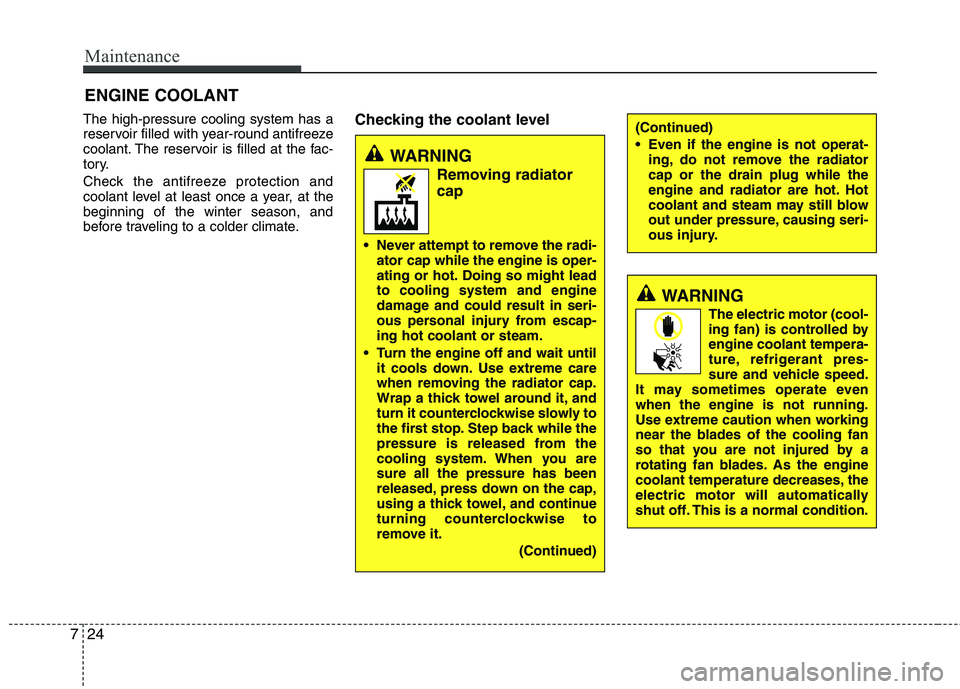
The high-pressure cooling system has a
reservoir filled with year-round antifreeze
coolant. The reservoir is filled at the fac-
tory.
Check the antifreeze protection and
coolant level at least once a year, at thebeginning of the winter season, and
before traveling to a colder climate. Checking the coolant level
WARNING
Removing radiatorcap
Never attempt to remove the radi- ator cap while the engine is oper-
ating or hot. Doing so might leadto cooling system and engine
damage and could result in seri-
ous personal injury from escap-ing hot coolant or steam.
Turn the engine off and wait until it cools down. Use extreme care
when removing the radiator cap.
Wrap a thick towel around it, and
turn it counterclockwise slowly to
the first stop. Step back while the
pressure is released from the
cooling system. When you aresure all the pressure has been
released, press down on the cap,
using a thick towel, and continue
turning counterclockwise to
remove it.
(Continued)
(Continued)
Even if the engine is not operat-ing, do not remove the radiator cap or the drain plug while the
engine and radiator are hot. Hot
coolant and steam may still blow
out under pressure, causing seri-
ous injury.
WARNING
The electric motor (cool-
ing fan) is controlled byengine coolant tempera-
ture, refrigerant pres-
sure and vehicle speed.
It may sometimes operate evenwhen the engine is not running.
Use extreme caution when working
near the blades of the cooling fan
so that you are not injured by a
rotating fan blades. As the engine
coolant temperature decreases, the
electric motor will automatically
shut off. This is a normal condition.
Page 357 of 840
725
Maintenance
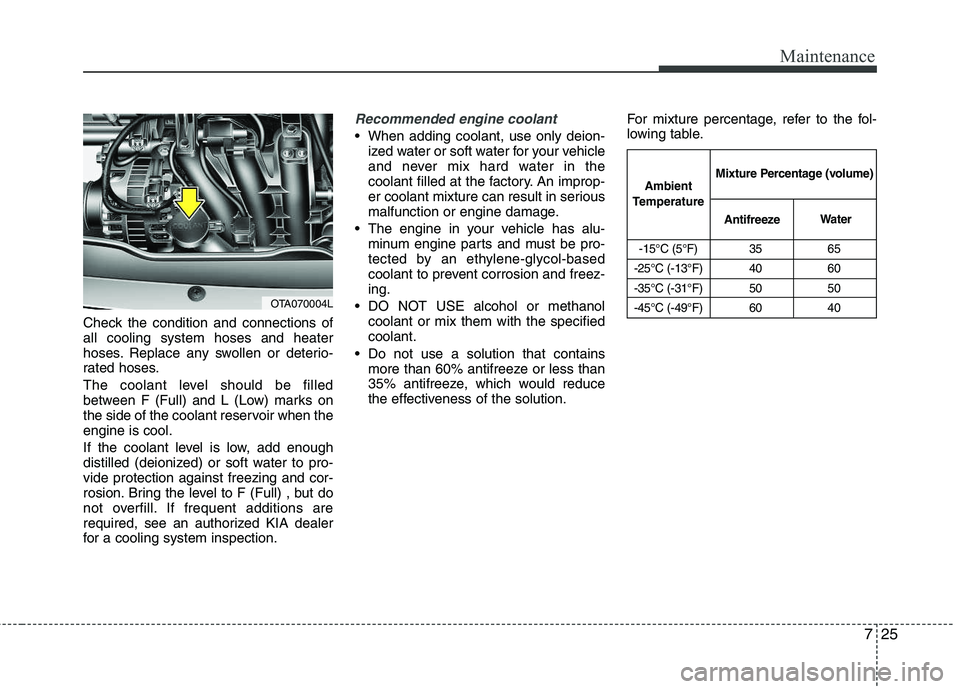
Check the condition and connections of all cooling system hoses and heater
hoses. Replace any swollen or deterio-
rated hoses.
The coolant level should be filled
between F (Full) and L (Low) marks on
the side of the coolant reservoir when theengine is cool.
If the coolant level is low, add enough
distilled (deionized) or soft water to pro-vide protection against freezing and cor-
rosion. Bring the level to F (Full) , but do
not overfill. If frequent additions are
required, see an authorized KIA dealer
for a cooling system inspection.
Recommended engine coolant
When adding coolant, use only deion-ized water or soft water for your vehicle
and never mix hard water in the
coolant filled at the factory. An improp-
er coolant mixture can result in serious
malfunction or engine damage.
The engine in your vehicle has alu- minum engine parts and must be pro-
tected by an ethylene-glycol-based
coolant to prevent corrosion and freez-ing.
DO NOT USE alcohol or methanol coolant or mix them with the specifiedcoolant.
Do not use a solution that contains more than 60% antifreeze or less than
35% antifreeze, which would reduce
the effectiveness of the solution. For mixture percentage, refer to the fol-
lowing table.
-15°C (5°F) 35 65
-25°C (-13°F) 40 60
-35°C (-31°F) 50 50
-45°C (-49°F) 60 40
Ambient
Temperature Mixture Percentage (volume)
Antifreeze Water
OTA070004L