call KIA PICANTO 2012 Owners Manual
[x] Cancel search | Manufacturer: KIA, Model Year: 2012, Model line: PICANTO, Model: KIA PICANTO 2012Pages: 840, PDF Size: 41.16 MB
Page 6 of 840
13
Introduction
Leaded (if equipped)
For some countries, your vehicle is
designed to use leaded gasoline. When
you are going to use leaded gasoline,
ask an authorized KIA dealer whether
leaded gasoline in your vehicle is avail-
able or not. Octane Rating of leaded gasoline is
same with unleaded one.
Gasoline containing alcohol andmethanol
Gasohol, a mixture of gasoline and
ethanol (also known as grain alcohol),and gasoline or gasohol containing
methanol (also known as wood alcohol)
are being marketed along with or instead
of leaded or unleaded gasoline. Do not use gasohol containing more than 10% ethanol, and do not use gasoline or
gasohol containing any methanol. Either
of these fuels may cause drivability prob-lems and damage to the fuel system.
Discontinue using gasohol of any kind if
drivability problems occur.
Vehicle damage or drivability problems
may not be covered by the manufactur-
er’s warranty if they result from the useof:
1. Gasohol containing more than 10% ethanol.
2. Gasoline or gasohol containing methanol.
3. Leaded fuel or leaded gasohol.
WARNING
• Do not "top off" after the nozzle automatically shuts off when refueling.
Always check that the fuel cap is installed securely to prevent fuel
spillage in the event of an acci-dent.
CAUTION
NEVER USE LEADED FUEL. The
use of leaded fuel is detrimental to
the catalytic converter and willdamage the engine control sys-tem’s oxygen sensor and affect emission control.
Never add any fuel system cleaningagents to the fuel tank other thanwhat has been specified. (Consult anauthorized KIA dealer for details.)
CAUTION
Never use gasohol which containsmethanol. Discontinue use of any
gasohol product which impairs dri-vability.
Page 19 of 840
37
Safety features of your vehicle
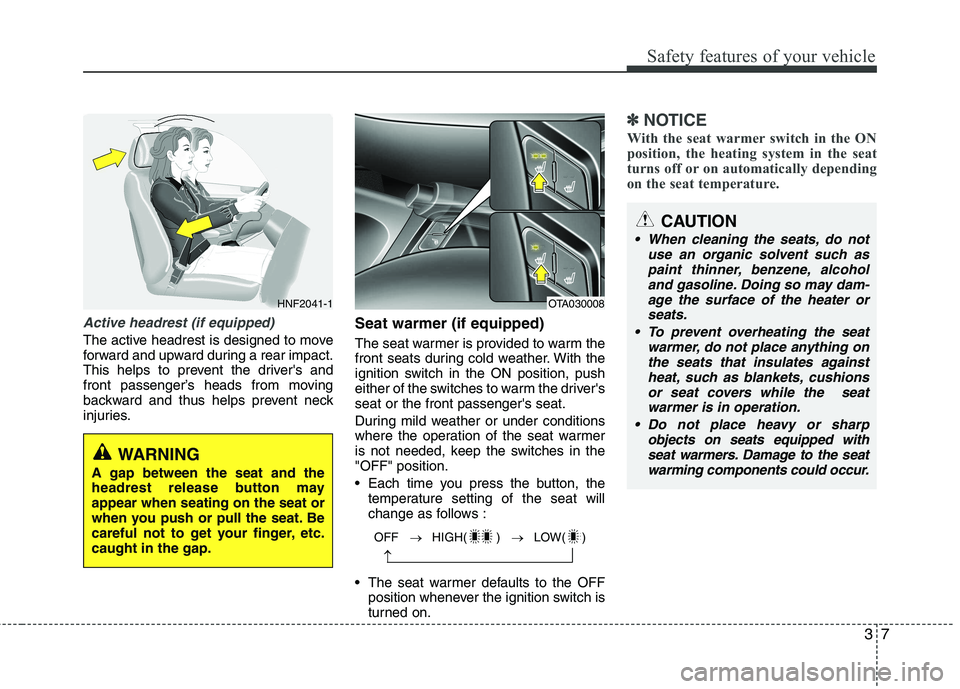
Active headrest (if equipped)
The active headrest is designed to move
forward and upward during a rear impact.
This helps to prevent the driver's and
front passenger’s heads from moving
backward and thus helps prevent neck
injuries.Seat warmer (if equipped)
The seat warmer is provided to warm the
front seats during cold weather. With the
ignition switch in the ON position, push
either of the switches to warm the driver'sseat or the front passenger's seat.
During mild weather or under conditions
where the operation of the seat warmer
is not needed, keep the switches in the"OFF" position.
Each time you press the button, the
temperature setting of the seat will
change as follows :
The seat warmer defaults to the OFF position whenever the ignition switch is
turned on.
✽✽ NOTICE
With the seat warmer switch in the ON
position, the heating system in the seat
turns off or on automatically depending
on the seat temperature.
OFF � HIGH( ) � LOW( )
�
HNF2041-1OTA030008
WARNING
A gap between the seat and the
headrest release button mayappear when seating on the seat or
when you push or pull the seat. Be
careful not to get your finger, etc.caught in the gap.
CAUTION
When cleaning the seats, do not use an organic solvent such aspaint thinner, benzene, alcohol and gasoline. Doing so may dam-
age the surface of the heater or seats.
To prevent overheating the seat warmer, do not place anything onthe seats that insulates against
heat, such as blankets, cushionsor seat covers while the seat warmer is in operation.
Do not place heavy or sharp objects on seats equipped with
seat warmers. Damage to the seatwarming components could occur.
Page 30 of 840
Safety features of your vehicle
18
3
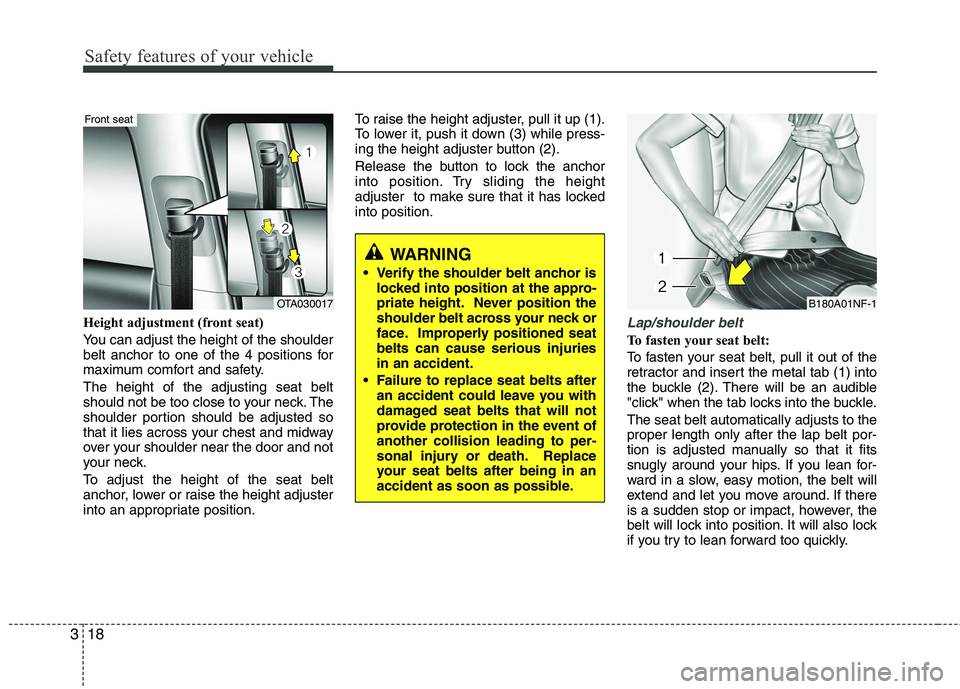
Height adjustment (front seat)
You can adjust the height of the shoulder
belt anchor to one of the 4 positions for
maximum comfort and safety. The height of the adjusting seat belt
should not be too close to your neck. The
shoulder portion should be adjusted so
that it lies across your chest and midway
over your shoulder near the door and not
your neck.
To adjust the height of the seat belt
anchor, lower or raise the height adjuster
into an appropriate position. To raise the height adjuster, pull it up (1).
To lower it, push it down (3) while press-
ing the height adjuster button (2).
Release the button to lock the anchor
into position. Try sliding the height
adjuster to make sure that it has lockedinto position.Lap/shoulder belt
To fasten your seat belt:
To fasten your seat belt, pull it out of the
retractor and insert the metal tab (1) into
the buckle (2). There will be an audible
"click" when the tab locks into the buckle. The seat belt automatically adjusts to the proper length only after the lap belt por-
tion is adjusted manually so that it fits
snugly around your hips. If you lean for-
ward in a slow, easy motion, the belt will
extend and let you move around. If there
is a sudden stop or impact, however, the
belt will lock into position. It will also lock
if you try to lean forward too quickly.
OTA030017
Front seat
WARNING
Verify the shoulder belt anchor is locked into position at the appro-
priate height. Never position the
shoulder belt across your neck or
face. Improperly positioned seatbelts can cause serious injuriesin an accident.
Failure to replace seat belts after an accident could leave you with
damaged seat belts that will not
provide protection in the event ofanother collision leading to per-
sonal injury or death. Replace
your seat belts after being in an
accident as soon as possible.
B180A01NF-1
Page 32 of 840
Safety features of your vehicle
20
3
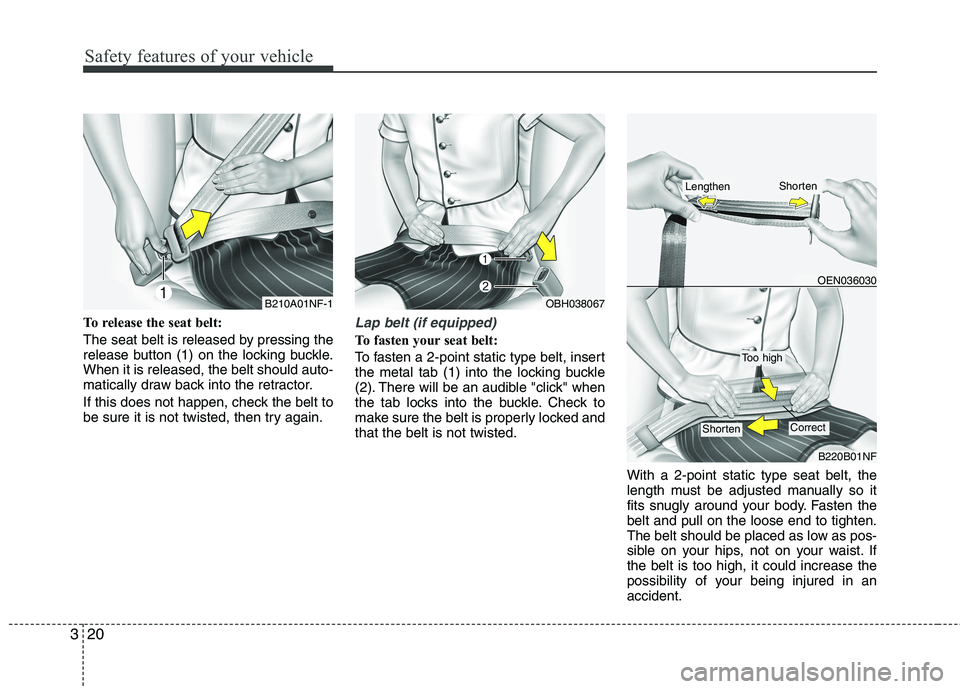
To release the seat belt:
The seat belt is released by pressing the
release button (1) on the locking buckle.When it is released, the belt should auto-
matically draw back into the retractor.
If this does not happen, check the belt to
be sure it is not twisted, then try again.Lap belt (if equipped)
To fasten your seat belt:
To fasten a 2-point static type belt, insert
the metal tab (1) into the locking buckle
(2). There will be an audible "click" when
the tab locks into the buckle. Check to
make sure the belt is properly locked andthat the belt is not twisted.
With a 2-point static type seat belt, the
length must be adjusted manually so it
fits snugly around your body. Fasten thebelt and pull on the loose end to tighten.
The belt should be placed as low as pos-
sible on your hips, not on your waist. Ifthe belt is too high, it could increase the
possibility of your being injured in anaccident.
B210A01NF-1
OEN036030
B220B01NF
Too high
ShortenCorrect
OBH038067
ShortenLengthen
Page 37 of 840

325
Safety features of your vehicle
Infant or small child
You should be aware of the specific
requirements in your country. Child
and/or infant seats must be properly
placed and installed in the rear seat. For
more information about the use of these
restraints, refer to “Child restraint sys-
tem” in this section.✽✽NOTICE
Small children are best protected from
injury in an accident when properly
restrained in the rear seat by a child
restraint system that meets the require-
ments of the Safety Standards of your
country. Before buying any child
restraint system, make sure that it has a
label certifying that it meets Safety
Standards of your country. The restraint
must be appropriate for your child's
height and weight. Check the label on
the child restraint for this information.
Refer to “Child restraint system” in this
section.Larger children
Children who are too large for child
restraint systems should always occupy
the rear seat and use the available
lap/shoulder belts. The lap portion should
be fastened and snugged on the hips
and as low as possible. Check if belt fits
periodically. A child's squirming could put
the belt out of position. Children are
given the most safety in the event of an
accident when they are restrained by a
proper restraint system in the rear seat. If
a larger child (over age 12) must be seat-ed in the front seat, the child should be
securely restrained by the availablelap/shoulder belt and the seat should be
placed in the rearmost position. Children
age 12 and under should be restrained
securely in the rear seat. NEVER place achild age 12 and under in the front seat.
NEVER place a rear facing child seat in
the front seat of a vehicle.
WARNING
Every person in your vehicle needs
to be properly restrained at all
times, including infants and chil-
dren. Never hold a child in yourarms or lap when riding in a vehi-
cle. The violent forces created dur-
ing a crash will tear the child from
your arms and throw the child
against the interior. Always use a
child restraint appropriate for your
child's height and weight.
Page 39 of 840
327
Safety features of your vehicle
Care of seat belts
Seat belt systems should never be disas-
sembled or modified. In addition, care
should be taken to assure that seat belts
and belt hardware are not damaged by
seat hinges, doors or other abuse.Periodic inspection
All seat belts should be inspected peri-
odically for wear or damage of any kind.
Any damaged parts should be replaced
as soon as possible.
Keep belts clean and dry
Seat belts should be kept clean and dry.
If belts become dirty, they can be
cleaned by using a mild soap solution
and warm water. Bleach, dye, strong
detergents or abrasives should not be
used because they may damage and
weaken the fabric.
When to replace seat belts
Entire in-use seat belt assembly or
assemblies should be replaced if the
vehicle has been involved in an accident.
This should be done even if no damage
is visible. Additional questions concern-
ing seat belt operation should be directed
to an authorized KIA dealer.
WARNING
Riding with a reclined seatback
increases your chance of serious
or fatal injuries in the event of a col-
lision or sudden stop. The protec-
tion of your restraint system (seat
belts and air bags) is greatly
reduced by reclining your seat.
Seat belts must be snug against
your hips and chest to work proper-
ly. The more the seatback is
reclined, the greater the chancethat an occupant's hips will slideunder the lap belt causing seriousinternal injuries or the occupant's
neck could strike the shoulder belt.
Drivers and passengers should
always sit well back in their seats,
properly belted, and with the seat-
backs upright.
WARNING
When you return the rear seatback to its upright position after the rear
seatback has been folded down, be
careful not to damage the seat belt
webbing or buckle. Be sure that the
webbing or buckle does not get
caught or pinched in the rear seat.
A seat belt with damaged webbing
or buckle could possibly fail during
a collision or sudden stop, result-
ing in serious injury. If the webbing
or buckles are damaged, get them
replaced immediately.
Page 43 of 840

331
Safety features of your vehicle
2. Fasten the lap/shoulder belt latch intothe buckle. Listen for the distinct “click” sound.
Position the release button so that it is
easy to access in case of an emergency.
3. Buckle the seat belt and allow the seat belt to take up any slack. After installa-
tion of the child restraint system, try to
move it in all directions to be sure the
child restraint system is securelyinstalled.
If you need to tighten the belt, pull more
webbing toward the retractor. When you
unbuckle the seat belt and allow it to
retract, the retractor will automatically
revert back to its normal seated passen-
ger emergency locking usage condition.Installing a child restraint system by lap belt (on the center rear seat) (if equipped) - Except Europe
To install a child restraint system on the
center rear seats, do the following:
1. Place the child restraint system on the center rear seat.
2. Extend the latch plate tongue of the lap belt.
3. Route the lap belt through the restraint according to the seat manufacturer’s
instructions.
4. Buckle the seat belt and adjust the lap belt for a snug hold on the child
restraint by pulling on the loose end of
the belt. After installation of the child
restraint system, try to move it in all
directions to be sure the child restraintsystem is securely installed.
E2BLD347E2BLD310
WARNING
A child can be seriously injured or
killed in a collision if the child
restraint is not properly anchored
to the car and the child is not prop-
erly restrained in the child restraint.
Always follow the child seat manu-
facturer’s instructions for installa-
tion and use.
MMSA3030
Page 56 of 840
Safety features of your vehicle
44
3
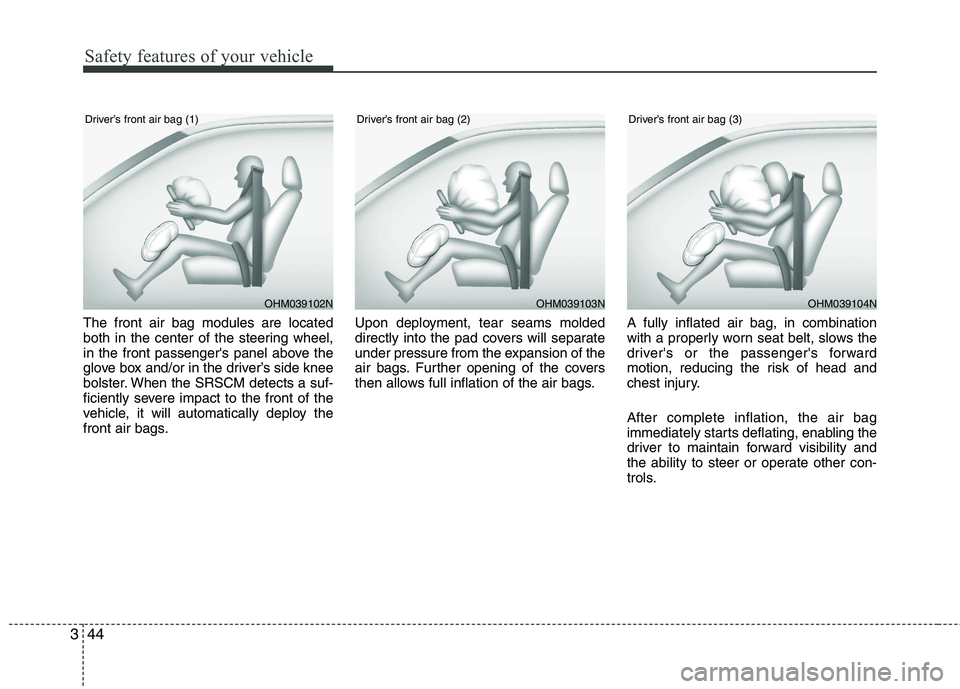
The front air bag modules are located
both in the center of the steering wheel,
in the front passenger's panel above the
glove box and/or in the driver’s side knee
bolster. When the SRSCM detects a suf-
ficiently severe impact to the front of the
vehicle, it will automatically deploy the
front air bags. Upon deployment, tear seams molded
directly into the pad covers will separate
under pressure from the expansion of the
air bags. Further opening of the covers
then allows full inflation of the air bags.
A fully inflated air bag, in combination
with a properly worn seat belt, slows the
driver's or the passenger's forward
motion, reducing the risk of head and
chest injury. After complete inflation, the air bag
immediately starts deflating, enabling the
driver to maintain forward visibility and
the ability to steer or operate other con-
trols.
OHM039102N
Driver’s front air bag (1)OHM039103NOHM039104N
Driver’s front air bag (2) Driver’s front air bag (3)
Page 76 of 840
43
Features of your vehicle
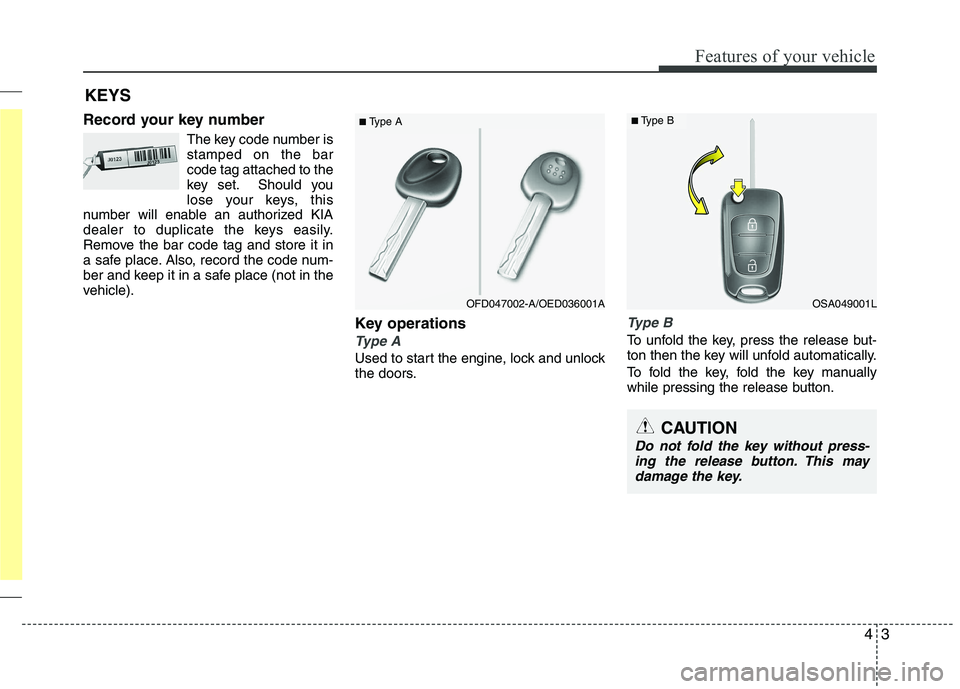
Record your key numberThe key code number is stamped on the barcode tag attached to the
key set. Should you
lose your keys, this
number will enable an authorized KIA
dealer to duplicate the keys easily.
Remove the bar code tag and store it in
a safe place. Also, record the code num-
ber and keep it in a safe place (not in the
vehicle).
Key operations
Type A
Used to start the engine, lock and unlock
the doors.
Type B
To unfold the key, press the release but-
ton then the key will unfold automatically.
To fold the key, fold the key manually
while pressing the release button.
KEYS
■
Type A
CAUTION
Do not fold the key without press-
ing the release button. This may
damage the key.
OSA049001L
■ Type B
OFD047002-A/OED036001A
Page 78 of 840
45
Features of your vehicle
To activate the immobilizer system:
Turn the ignition key to the OFF position.
The immobilizer system activates auto-
matically. Without a valid ignition key for
your vehicle, the engine will not start.
To deactivate the immobilizer sys-tem:
Insert the ignition key into the key cylin-
der and turn it to the ON position.
✽✽ NOTICE
When starting the engine, do not use the
key with other immobilizer keys around.
Otherwise the engine may not start or
may stop soon after it starts. Keep each
key separate in order to avoid a starting
malfunction. ✽
✽
NOTICE
If you need additional keys or lose your
keys, consult an authorized KIA dealer.
WARNING
In order to prevent theft of your vehi-
cle, do not leave spare keys any-
where in your vehicle. Your immobi-
lizer password is a customer unique
password and should be kept confi-
dential. Do not leave this number
anywhere in your vehicle.
CAUTION
The transponder in your ignition key is an important part of theimmobilizer system. It is designedto give years of trouble-free service,
however you should avoid expo-sure to moisture, static electricity and rough handling. Immobilizersystem malfunction could occur.
CAUTION
Do not put metal accessories near the ignition switch. Metal acces-
sories may interrupt the transpon-der signal and may prevent theengine from being started.
CAUTION
Do not change, alter or adjust the immobilizer system because it
could cause the immobilizer sys- tem to malfunction and should onlybe serviced by an authorized KIAdealer.
Malfunctions caused by improperalterations, adjustments or modifi-cations to the immobilizer system are not covered by your vehicle
manufacturer warranty.